
Running the production
Check in attendees and print name badges at your event registration desk
Conference and trade show teams greet hundreds of delegates in the first hour, each wanting their name badge now. Checking a ticket in and printing the badge in one go keeps the registration queue moving, and every badge printed is on record, so a lost badge is replaced without anyone printing a spare for a friend.
Run the registration desk at your conference, trade show or festival from any browser: scan a ticket or find the attendee by name, email or order number, check them in and print their name badge on an A6 or card printer. A second badge needs a reason, walk-ups buy a ticket from a QR code, and you can share a desk link so volunteers work the desk from their own laptop.
- For
- Checking attendees in and printing their name badges at registration
- Takes
- 7 minutes
Before you start
- You are an owner, admin or producer on the event. The event's Operations page opens for those roles only.
- A badge printer that your computer can print to, such as an A6 label printer or a plastic card printer. Nothing else needs installing.
- A USB or Bluetooth barcode scanner for the QR codes on tickets, or you can enter a name, email or order number instead.
-
Open Registration
Open the event, select Operations, select Desks, then select Registration.
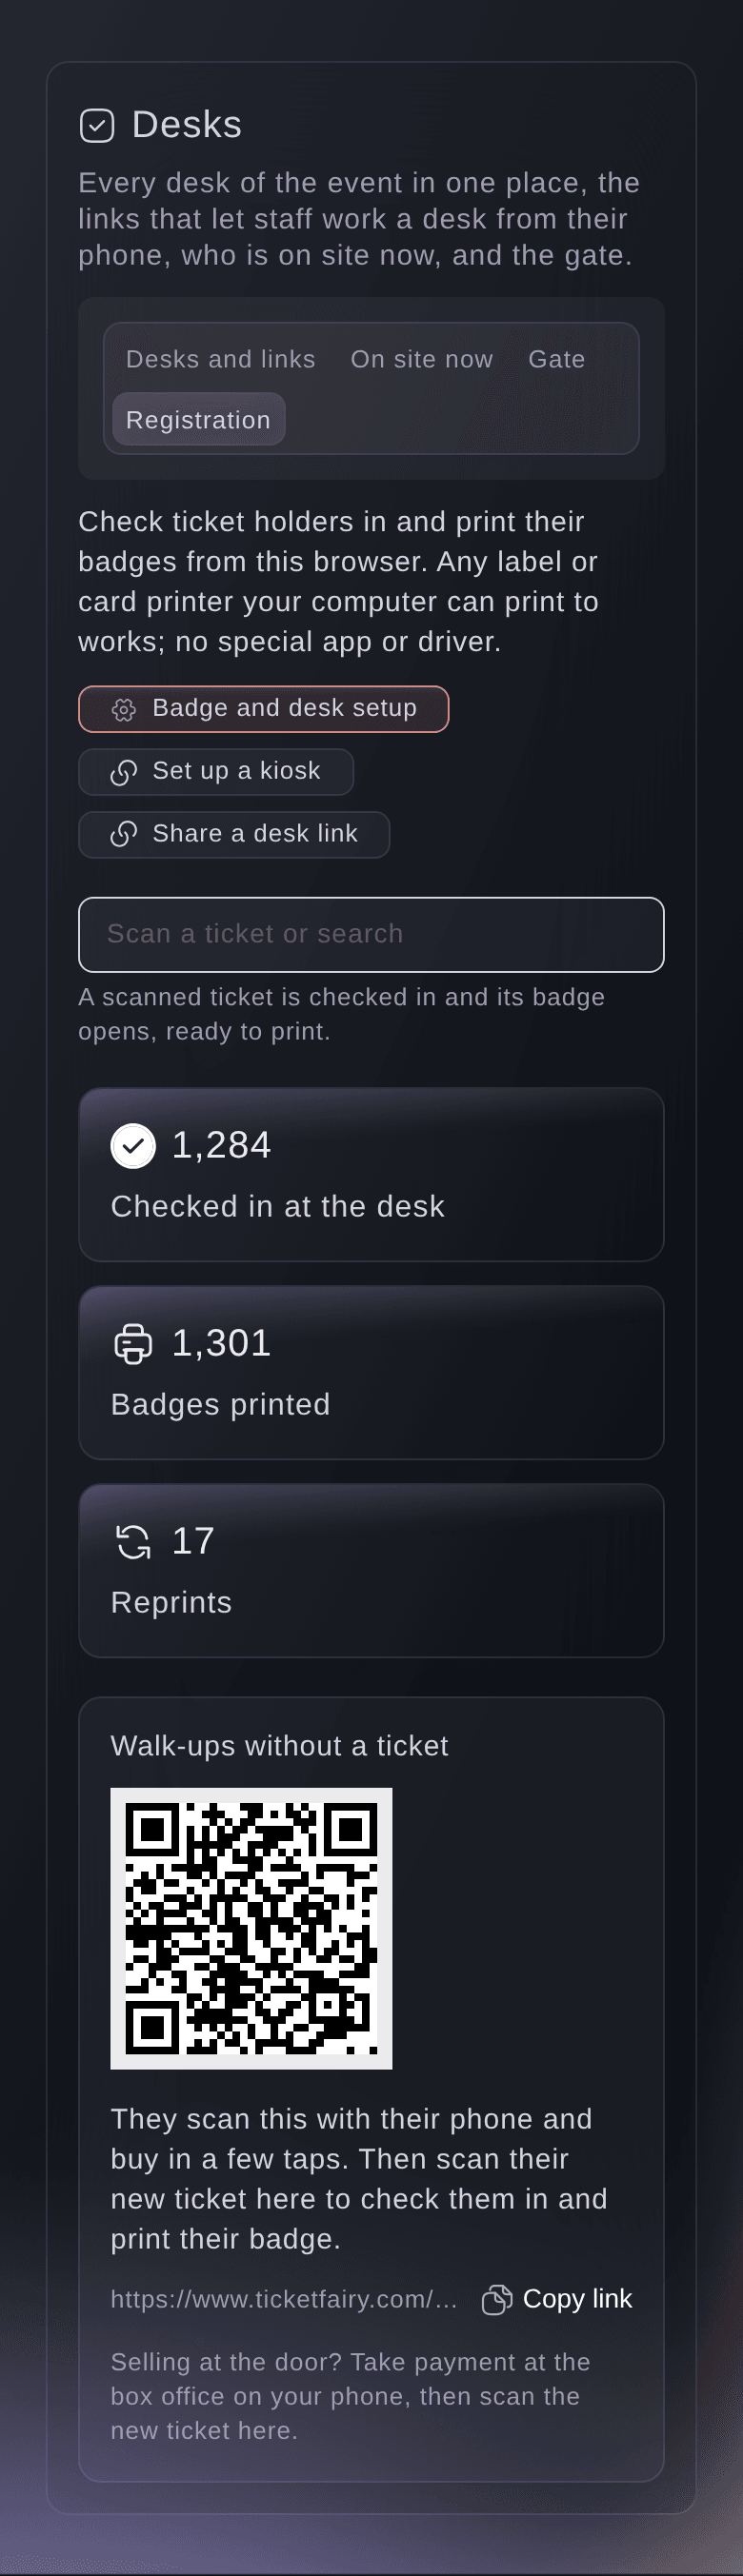
Note: On Check-In, Registration desk and badges opens the same view. It shows the scan field, today's counts and the page walk-ups buy from.

The registration desk. -
Set up your badge
Select Badge and desk setup.
Note: The logo and colour come from your event's email look and brand kit, so badges match your emails.

Badge and desk setup, with how the badge prints. -
Choose the badge size
Choose A6 badge or Card (CR80) in Badge size.
Note: A6 fits a lanyard pouch, and card size fits a plastic card printer.
-
Choose what prints under the name
Choose the checkout question for Company line and Job title line, or Leave this line off.
Note: A question named like Company or Job title is chosen for you. With no checkout questions, badges show the name and ticket type.
-
Save the setup
Turn Print the ticket type on or off, then select Save.
Note: The ticket type prints in your colour, such as Delegate or Speaker, so staff can tell at a glance. How the badge prints shows each change before you save.
-
Find the attendee
Scan the ticket's QR code, or enter a name, email or order number in the field and select the person.
Note: A scanned ticket is checked in straight away and its badge opens, ready to print. A search shows up to 20 matches, with each ticket's type, company and whether a badge was printed.

Ticket holders found by name. -
Check them in
Select Check in and print badge, or Check in only.
Note: The desk says the person is checked in, and the ticket counts as checked in everywhere, as at the door. Someone already checked in shows when and by whom.

An attendee checked in at the desk. -
Print the badge
Select Print, then choose your badge printer and paper size in the print dialog.
Note: The badge is recorded as printed. If it does not come out, select Print again in the same window.

An A6 badge, ready to print.


A ticket that cannot get in
The desk checks each ticket the same way the door does, and a ticket that does not let the person in shows Cannot get in with the reason, such as a refund, a resale or a replacement ticket. It gets no badge. Look up their order on the Orders page before you help them.
Try these steps on your own event
Create a free account, build your event and follow the steps above in your own dashboard. It takes a few minutes and you do not need to book a sales call.
No setup fees. No required monthly ticketing fee. No credit card required.
Or have it done for you
Fai finds a ticket holder, reads the desk's counts and a badge's print history, checks a ticket in and changes the badge setup, after you confirm. Printing a badge happens in the browser at the desk, so Fai tells you where to print it.
In your dashboard, with Fai
How many people have checked in at registration for <EVENT NAME> so far, and how many badges were printed again?
Let Fai do it for you
Fai works inside your Ticket Fairy dashboard. Create your account, open Fai and paste the prompt above.
No setup fees. No required monthly ticketing fee. No credit card required.
Print a second badge
-
Print again with a reason
Find the person, select Print again, enter Why does this person need another badge?, then select Print another badge.
Note: The dialog lists every badge already printed, when and by whom. The reason is kept with the new badge.

A second badge needs a reason.

Print a second badge at the registration desk, where you enter the reason. Fai can read you a person's badge history first.
Let volunteers work the desk from a link
-
Share a registration desk link
Select Share a desk link, enter the Name, then select Make link and open the link on the desk's laptop or tablet.
Note: Volunteers then find, check in and print badges without a login. Turn on Can print a second badge for someone, with a reason only for a supervisor's link.

The registration desk opened from its link.

Fai makes a registration desk link after you confirm. Open Desks and links and select Get a new link to see its address.
In your dashboard, with Fai
Make a registration desk link called Registration desk 2 for <EVENT NAME>
Help walk-ups without a ticket
-
Show them the walk-up QR code
Ask them to scan the QR code under Walk-ups without a ticket with their phone, buy a ticket, then scan their new ticket at the desk.
Note: The code opens your quick-buy page when one is on for the whole event, otherwise your event page. To take payment at the door instead, sell at the box office, then scan the new ticket here.
Show walk-ups the QR code in the Registration view of Desks, then check them in with their new ticket.
Questions you might have
- Does checking in at registration also check the ticket in at the door?
- Yes. The desk checks tickets in the same way the check-in app does, so the ticket shows as checked in on Check-In and a second scan at the door says it is already checked in.
- What if two desks check the same person in at once?
- The first one checks them in. The other desk says
Another desk is checking this person in. Try again in a moment.
, and when you try again it shows them as already checked in. - Which printers work?
- Any label or card printer your computer can print to. Choose it and the A6 or card paper size in your browser's print dialog.
- Where do the logo and colour on the badge come from?
- From your event's email look and your brand kit, with your organiser name, so badges match your emails. Change them there, and How the badge prints shows the result.
Still have a question?
Book a demo and we will answer it on a call, on your kind of event. Or create your account and see it for yourself.
No setup fees. No required monthly ticketing fee. No credit card required.
Related guides
Do this on your own event
Create your account, build your event and follow the steps in your own dashboard. You do not need to book a sales call.