
Vault and Capital
Pay your event suppliers from Vault
Festival and concert promoters pay venues, production companies and crew long before the show. Vault lets you pay them straight from the ticket money your events have taken, and keeps each payment's reference, reason and status on record for your team.
Send a bank transfer from your Vault balance to the venue, crew or supplier behind your event, with the reference they'll see on their statement, and follow it until it's paid.
- For
- Paying the venues, suppliers and crew behind your events
- Takes
- 8 minutes
- Open Transfers
- Select New transfer
- Choose the recipient
- Enter the amount
- Choose the transfer method
- Enter the reference your supplier will see
- Enter what the payment is for
- Choose who pays the transfer fee
- Pick a later payment date
- Add a note for your team
- Review the transfer
- Send the payment
- Check the payment in Transfer activity
- Open the payment's details
Before you start
- You're an owner or admin on the brand, and Vault is switched on for it. Ask Ticket Fairy support to switch it on if Vault isn't in your brand's menu.
- Your Vault account has finished onboarding. Transfers appears in the Vault menu once the account is active.
- You have enough available in Vault in the currency of your supplier's bank account. A transfer is paid from your balance in that currency.
- You have your second factor to hand. Vault may ask you to confirm it's you before a payment goes.
-
Open Transfers
Pick the brand, open Vault, then select Transfers.
Note: Transfer activity lists the payments the brand has sent, with the reference each supplier sees and its status.
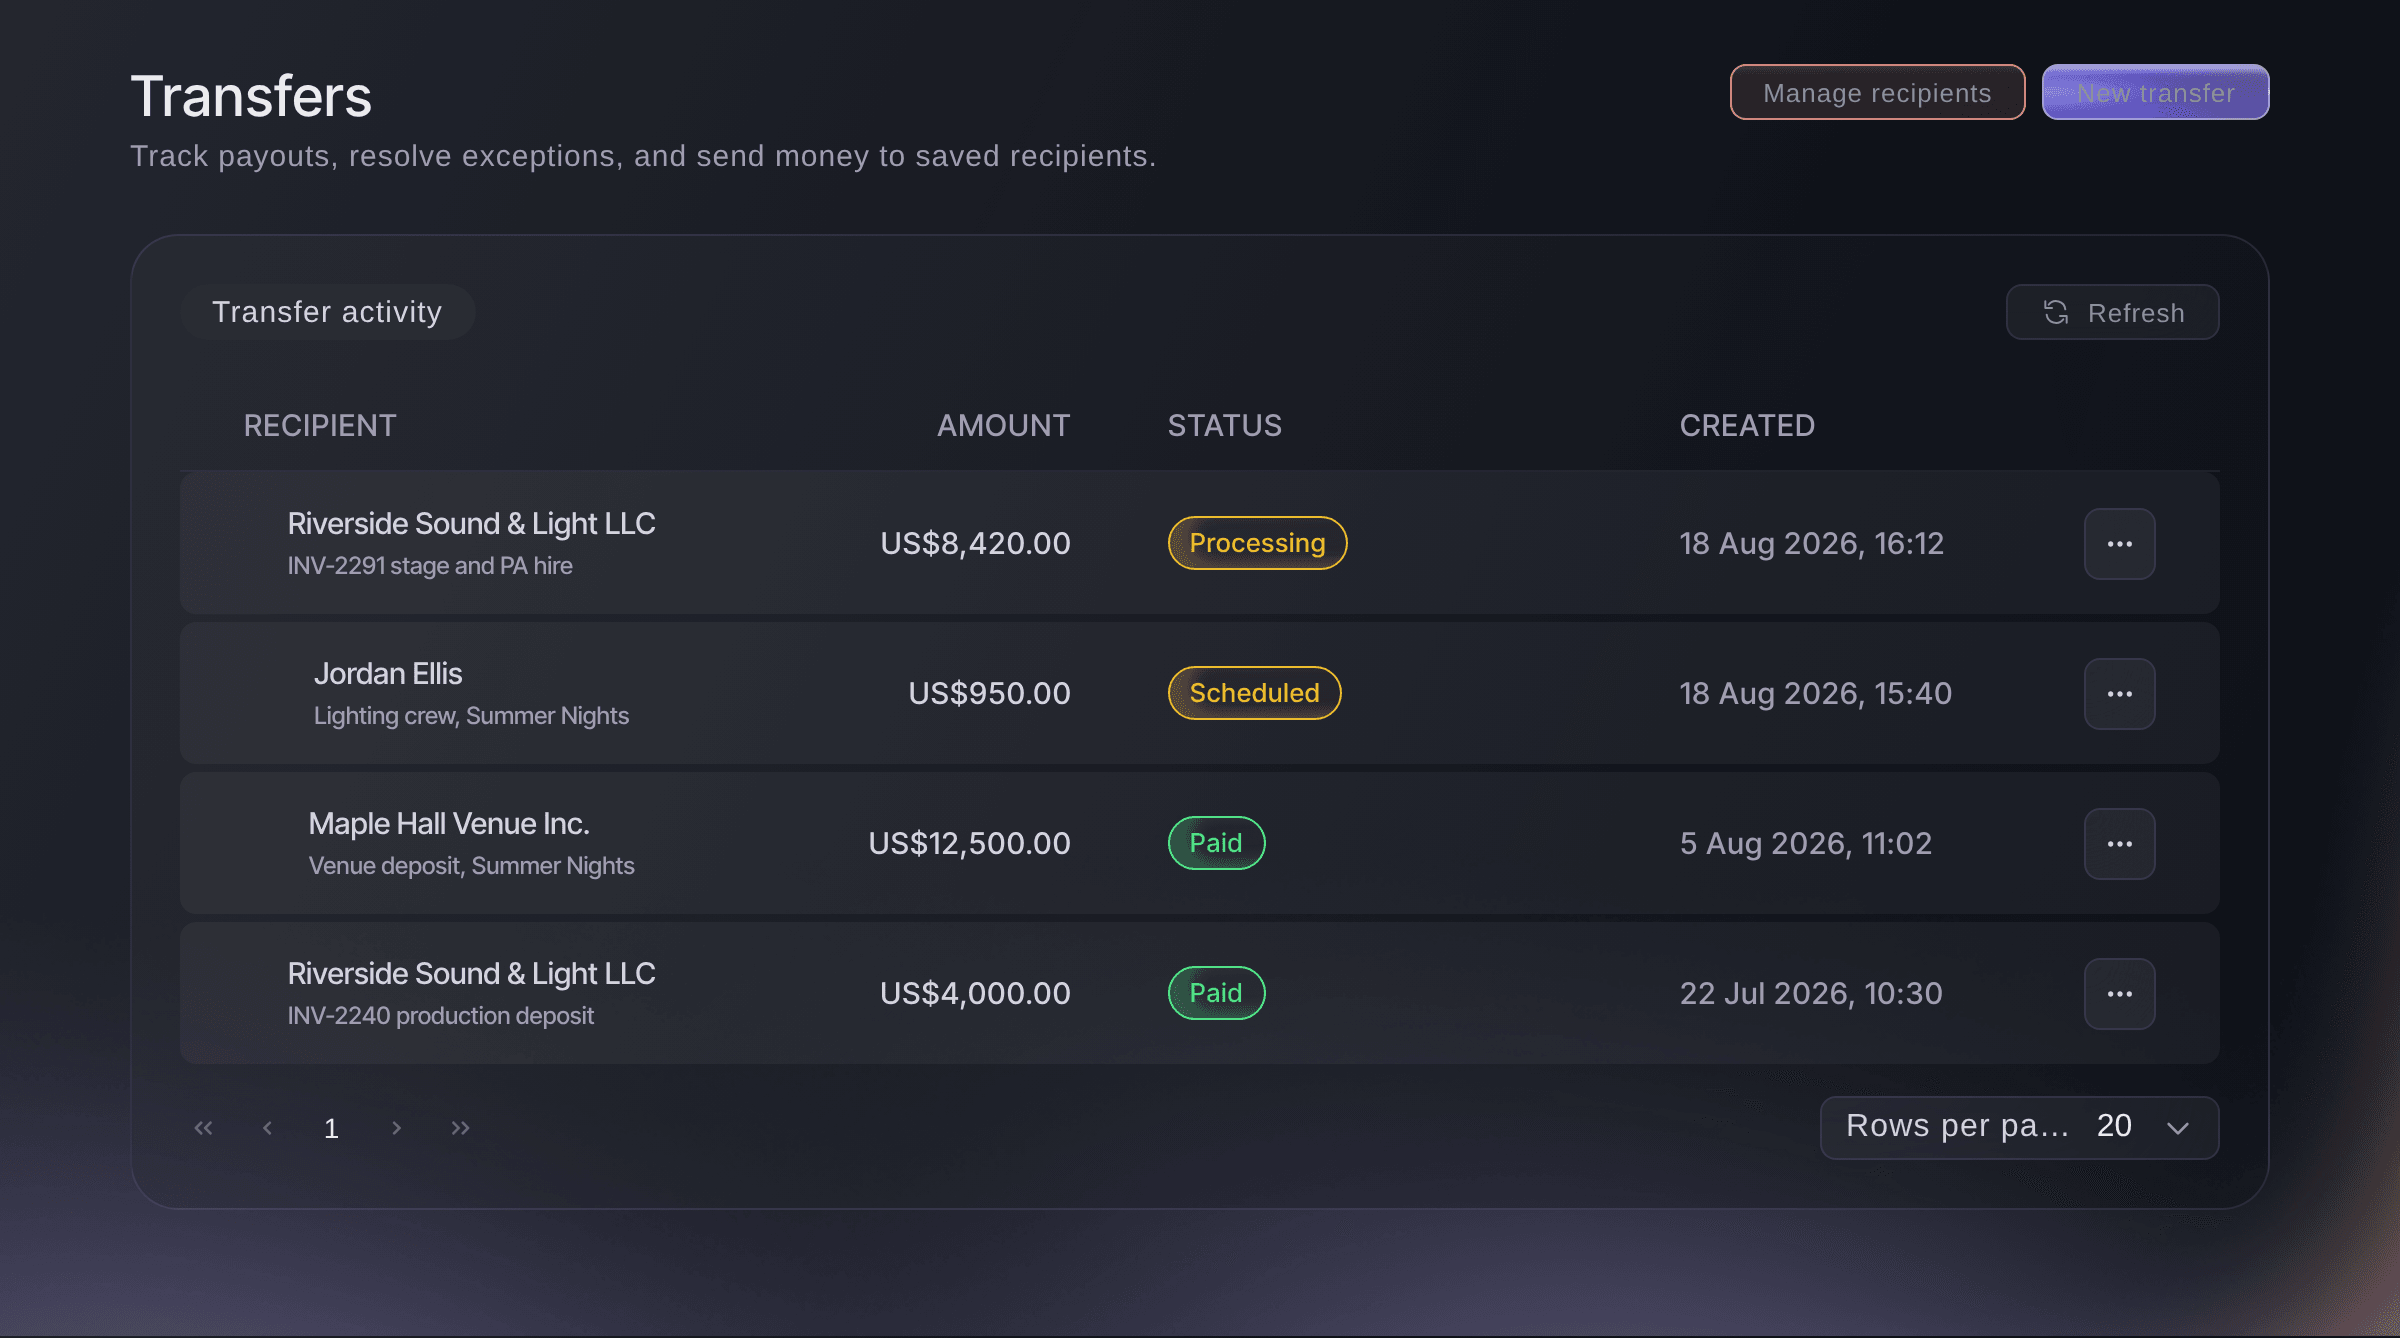
Vault, Transfers. -
Select New transfer
Select New transfer. The Create Transfer dialog opens.
Note: New transfer stays unavailable while an earlier payment is awaiting confirmation. The card at the top of Transfers shows which one and what to do.
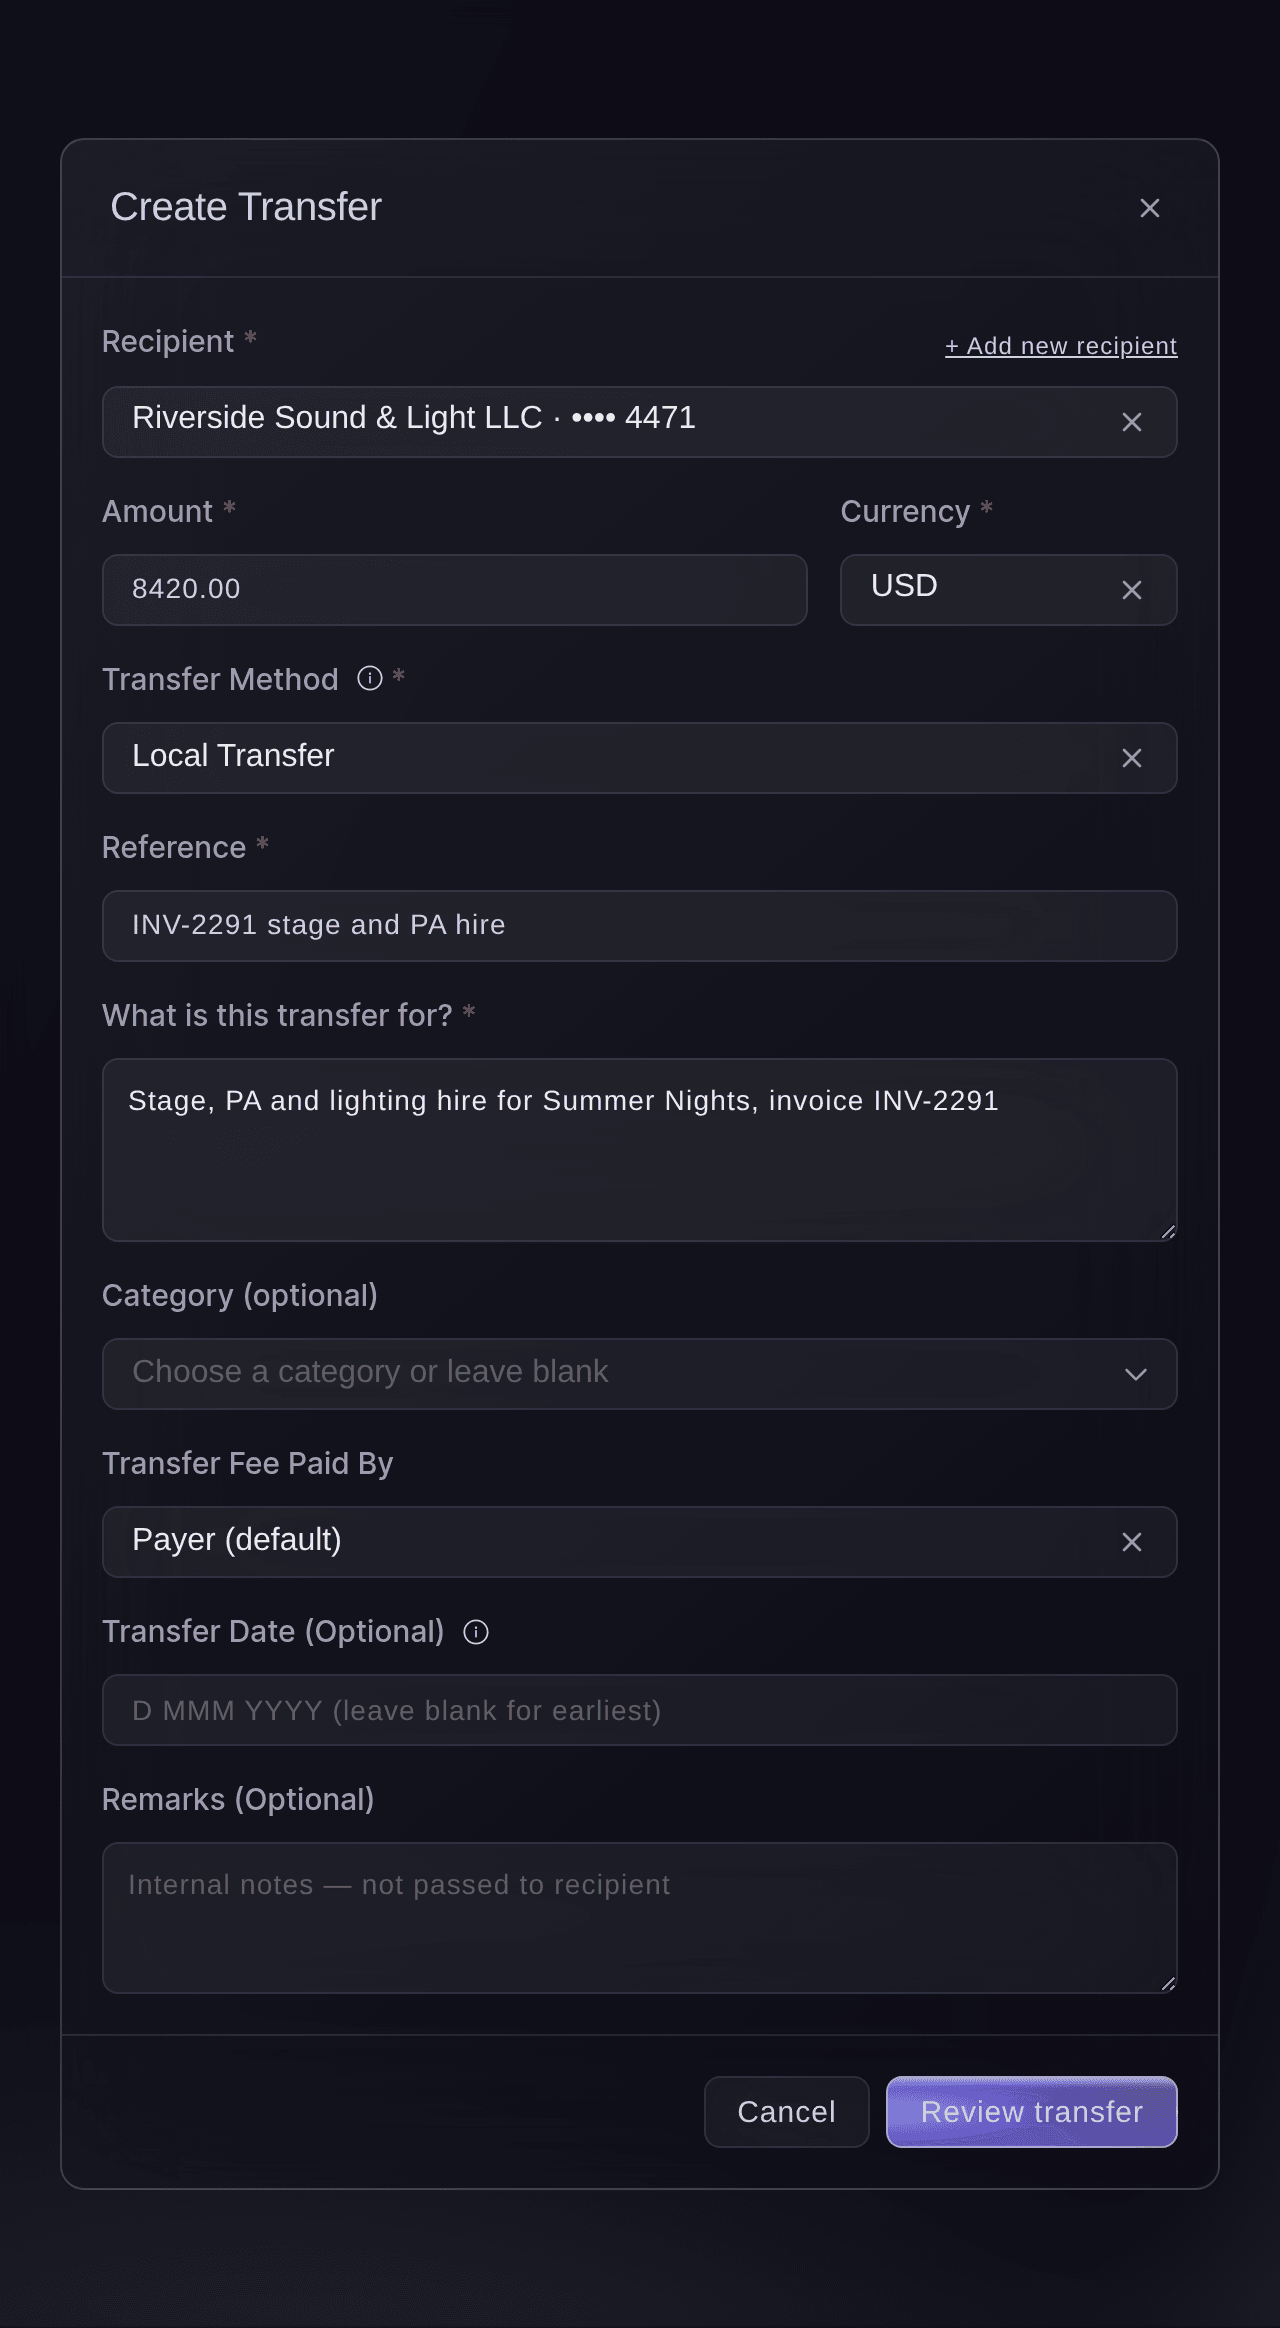
Vault, Transfers, Create Transfer. -
Choose the recipient
In Recipient, choose the supplier. Each one shows the last four digits of the account, so you can check it's the right one.
Note: A supplier you haven't paid from Vault before isn't listed yet. Select + Add new recipient and follow Add a supplier you haven't paid before.
-
Enter the amount
Enter the amount in Amount, then choose the Currency of the supplier's bank account.
Note: The dialog opens on USD. The currency has to match the supplier's account, and the payment comes out of your balance in that currency.
-
Choose the transfer method
In Transfer Method, choose how the payment travels.
Note: The recipient needs the matching bank details saved: a routing number and account type for a local transfer, or a SWIFT code and an account number or IBAN for SWIFT.
-
Enter the reference your supplier will see
Enter their invoice number or a short description in Reference. It appears on their bank statement, so keep it to 140 characters.
-
Enter what the payment is for
In What is this transfer for?, enter the reason in your own words, up to 255 characters.
Note: Vault keeps this reason with the transfer for your team and doesn't send it to your supplier. Category (optional) adds a label from a list, such as Professional services.
-
Choose who pays the transfer fee
In Transfer Fee Paid By, choose who pays the fee.
-
Pick a later payment date
Optional: To pay on a later day, choose it in Transfer Date (Optional). Left blank, the payment goes at the earliest time available.
Note: A transfer outside business hours or on a public holiday may not go until the next business day.
-
Add a note for your team
Optional: Enter a note in Remarks (Optional), such as the show or the budget line it belongs to. Remarks stay with the transfer and aren't passed to your supplier.
-
Review the transfer
Select Review transfer. Vault checks the details and shows the payment exactly as it will be sent.
Tip: Select Back to edit to change anything before you send.
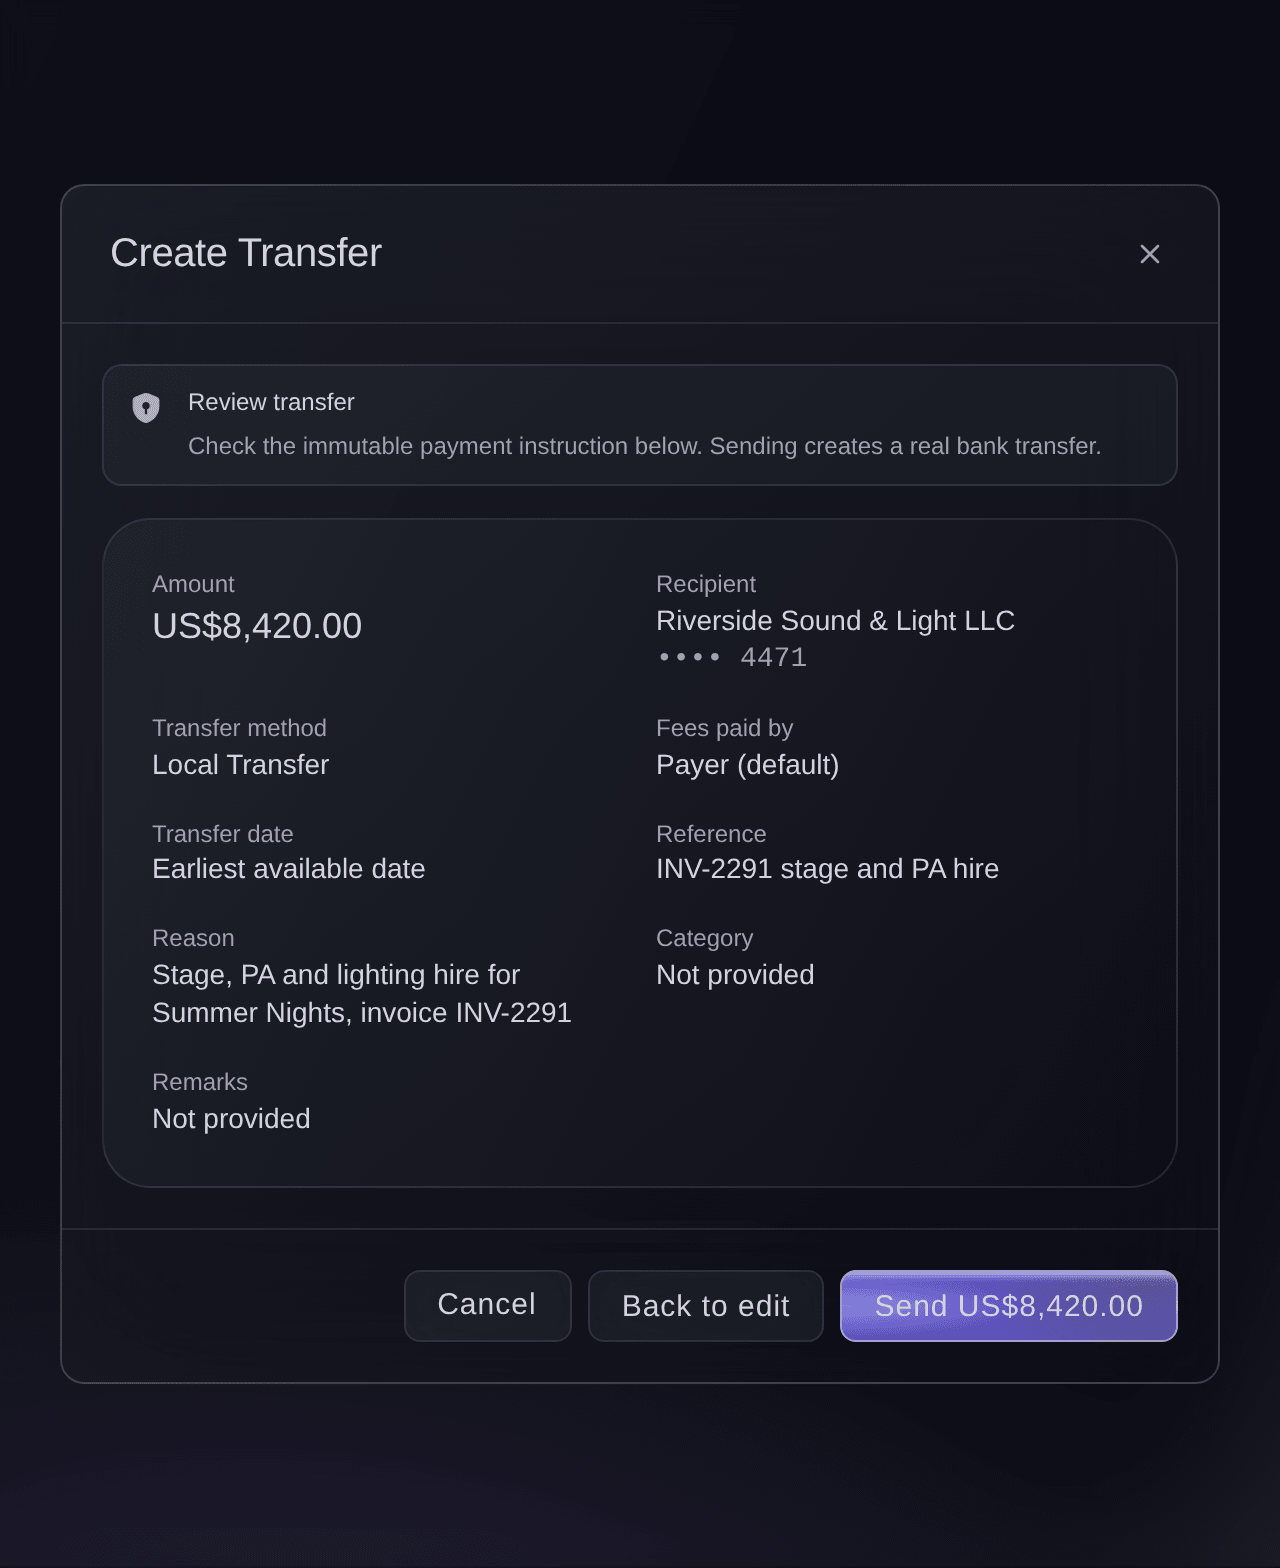
Create Transfer, the review before sending. -
Send the payment
Select the send button, which carries the amount, such as Send US$8,420.00.
Note: If Vault asks you to confirm it's you, the Authenticate to continue window opens, and the payment goes once you're verified.
Warning: Sending creates a real bank transfer, and a sent transfer can't be edited.
-
Check the payment in Transfer activity
Back on Transfers, find the payment in Transfer activity and read its status.
-
Open the payment's details
Select the supplier's name in the row to open Transfer Details.
Note: It shows what your supplier receives, the fee and who paid it, when the payment was sent and when it's expected to arrive.
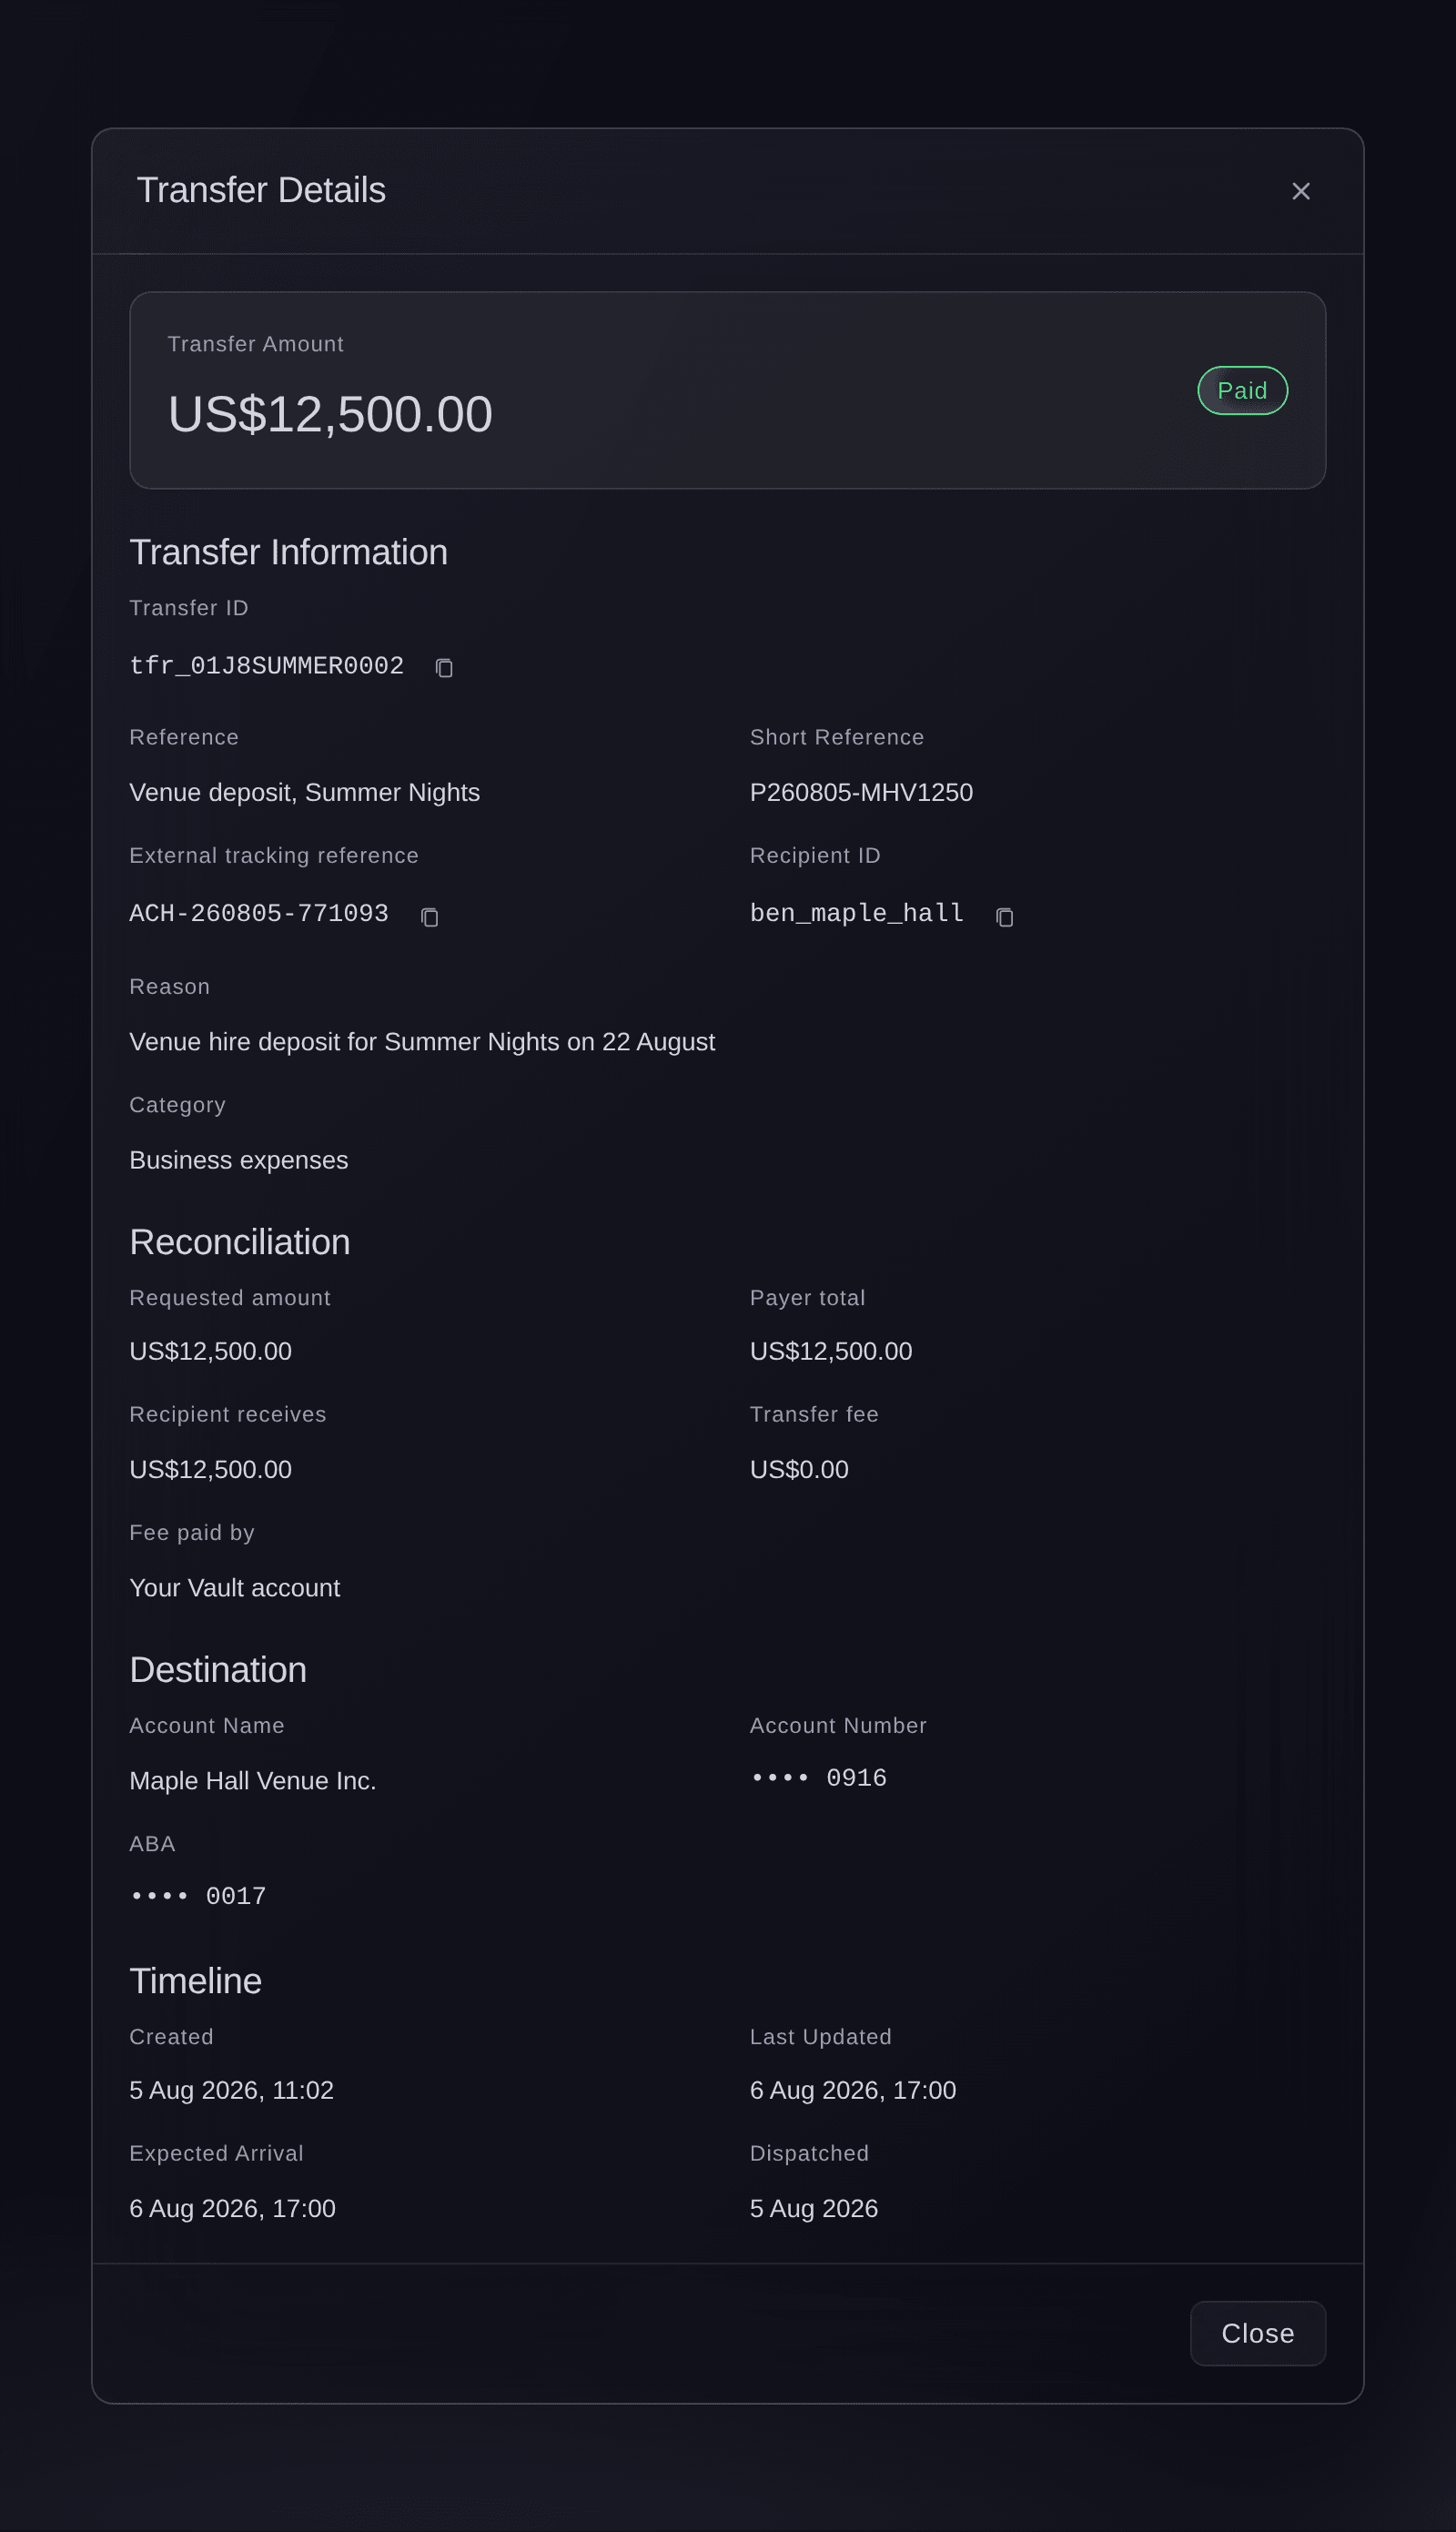
Transfers, Transfer Details.


Try these steps on your own event
Create a free account, build your event and follow the steps above in your own dashboard. It takes a few minutes and you do not need to book a sales call.
No setup fees. No required monthly ticketing fee. No credit card required.
Or have it done for you
Fai, the assistant inside your dashboard, can find a saved recipient and send them a transfer. She shows you the whole payment and asks before she sends it, and you may still need to finish the security check in Vault. Adding a supplier you haven't paid before is done in the dashboard.
In your dashboard, with Fai
Pay <SUPPLIER NAME> <AMOUNT> from our Vault for <BRAND NAME>, reference <INVOICE NUMBER>, it's for <WHAT THE PAYMENT IS FOR>
Let Fai do it for you
Fai works inside your Ticket Fairy dashboard. Create your account, open Fai and paste the prompt above.
No setup fees. No required monthly ticketing fee. No credit card required.
Add a supplier you haven't paid before
-
Select Add new recipient
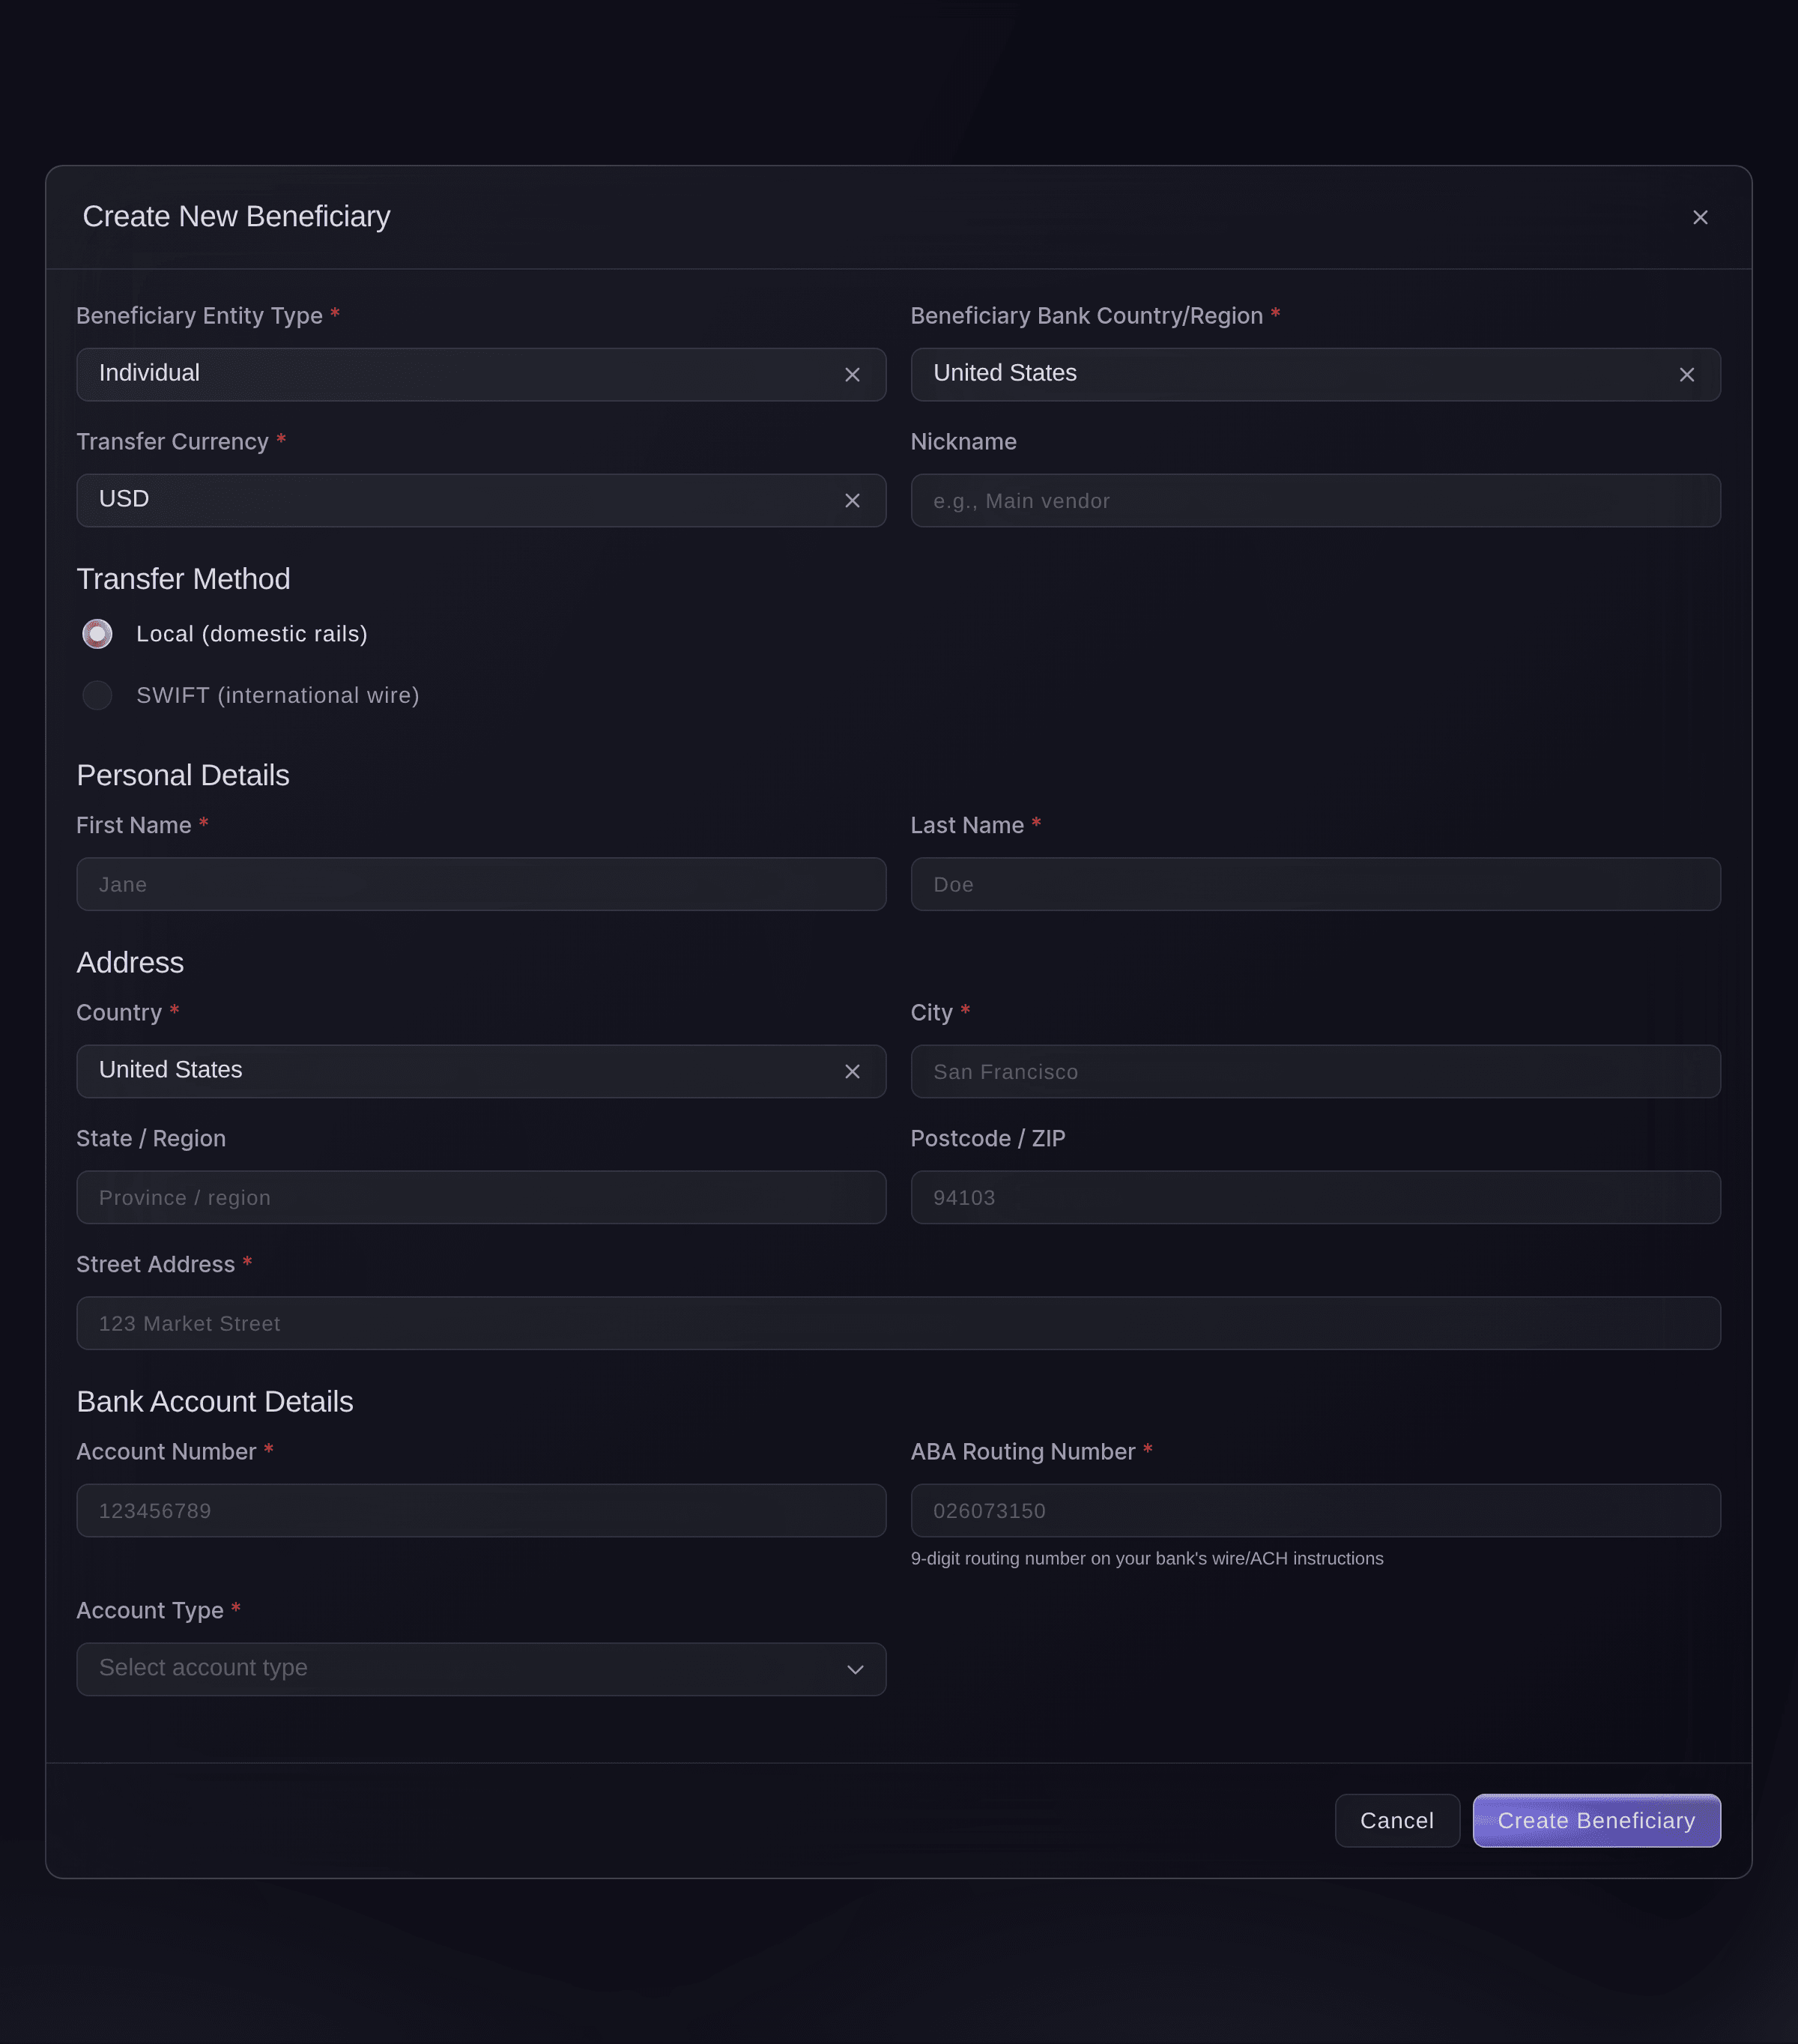
In Create Transfer, select + Add new recipient. The Create New Recipient dialog opens over your transfer, which keeps what you've entered so far.
Note: You can also add a recipient without starting a transfer: select Manage recipients on Transfers, then Create Recipient.
Create Transfer, Create New Recipient. -
Choose a company or a person
In Recipient Entity Type, choose the kind of account you're paying.
-
Choose the bank country and currency
Choose Recipient Bank Country/Region and Transfer Currency for the account you're paying into. The bank fields further down change to match.
Warning: The entity type, bank country, currency and name can't be changed after you save the recipient, so check them against the supplier's invoice.
-
Choose how the supplier's bank takes payments
Under Transfer Method, choose the route their bank account takes payments on.
-
Enter the supplier's details and bank account
Enter the name, address and bank account details the form asks for, such as Account Number and ABA Routing Number for a US account.
Tip: Add a Nickname, such as the name your team uses for the supplier, to find them quickly next time.
-
Save the recipient
Select Create Recipient. The dialog closes and the supplier joins the list in Recipient.
Note: The button stays unavailable until the form has loaded the bank fields for the country and currency you chose.

Adding a recipient takes the supplier's bank details, which you enter yourself in the dashboard. Fai can open Recipients in Vault for you.
In your dashboard, with Fai
Open the Vault recipients for <BRAND NAME>
Resolve a transfer awaiting confirmation
-
Check the transfer's status
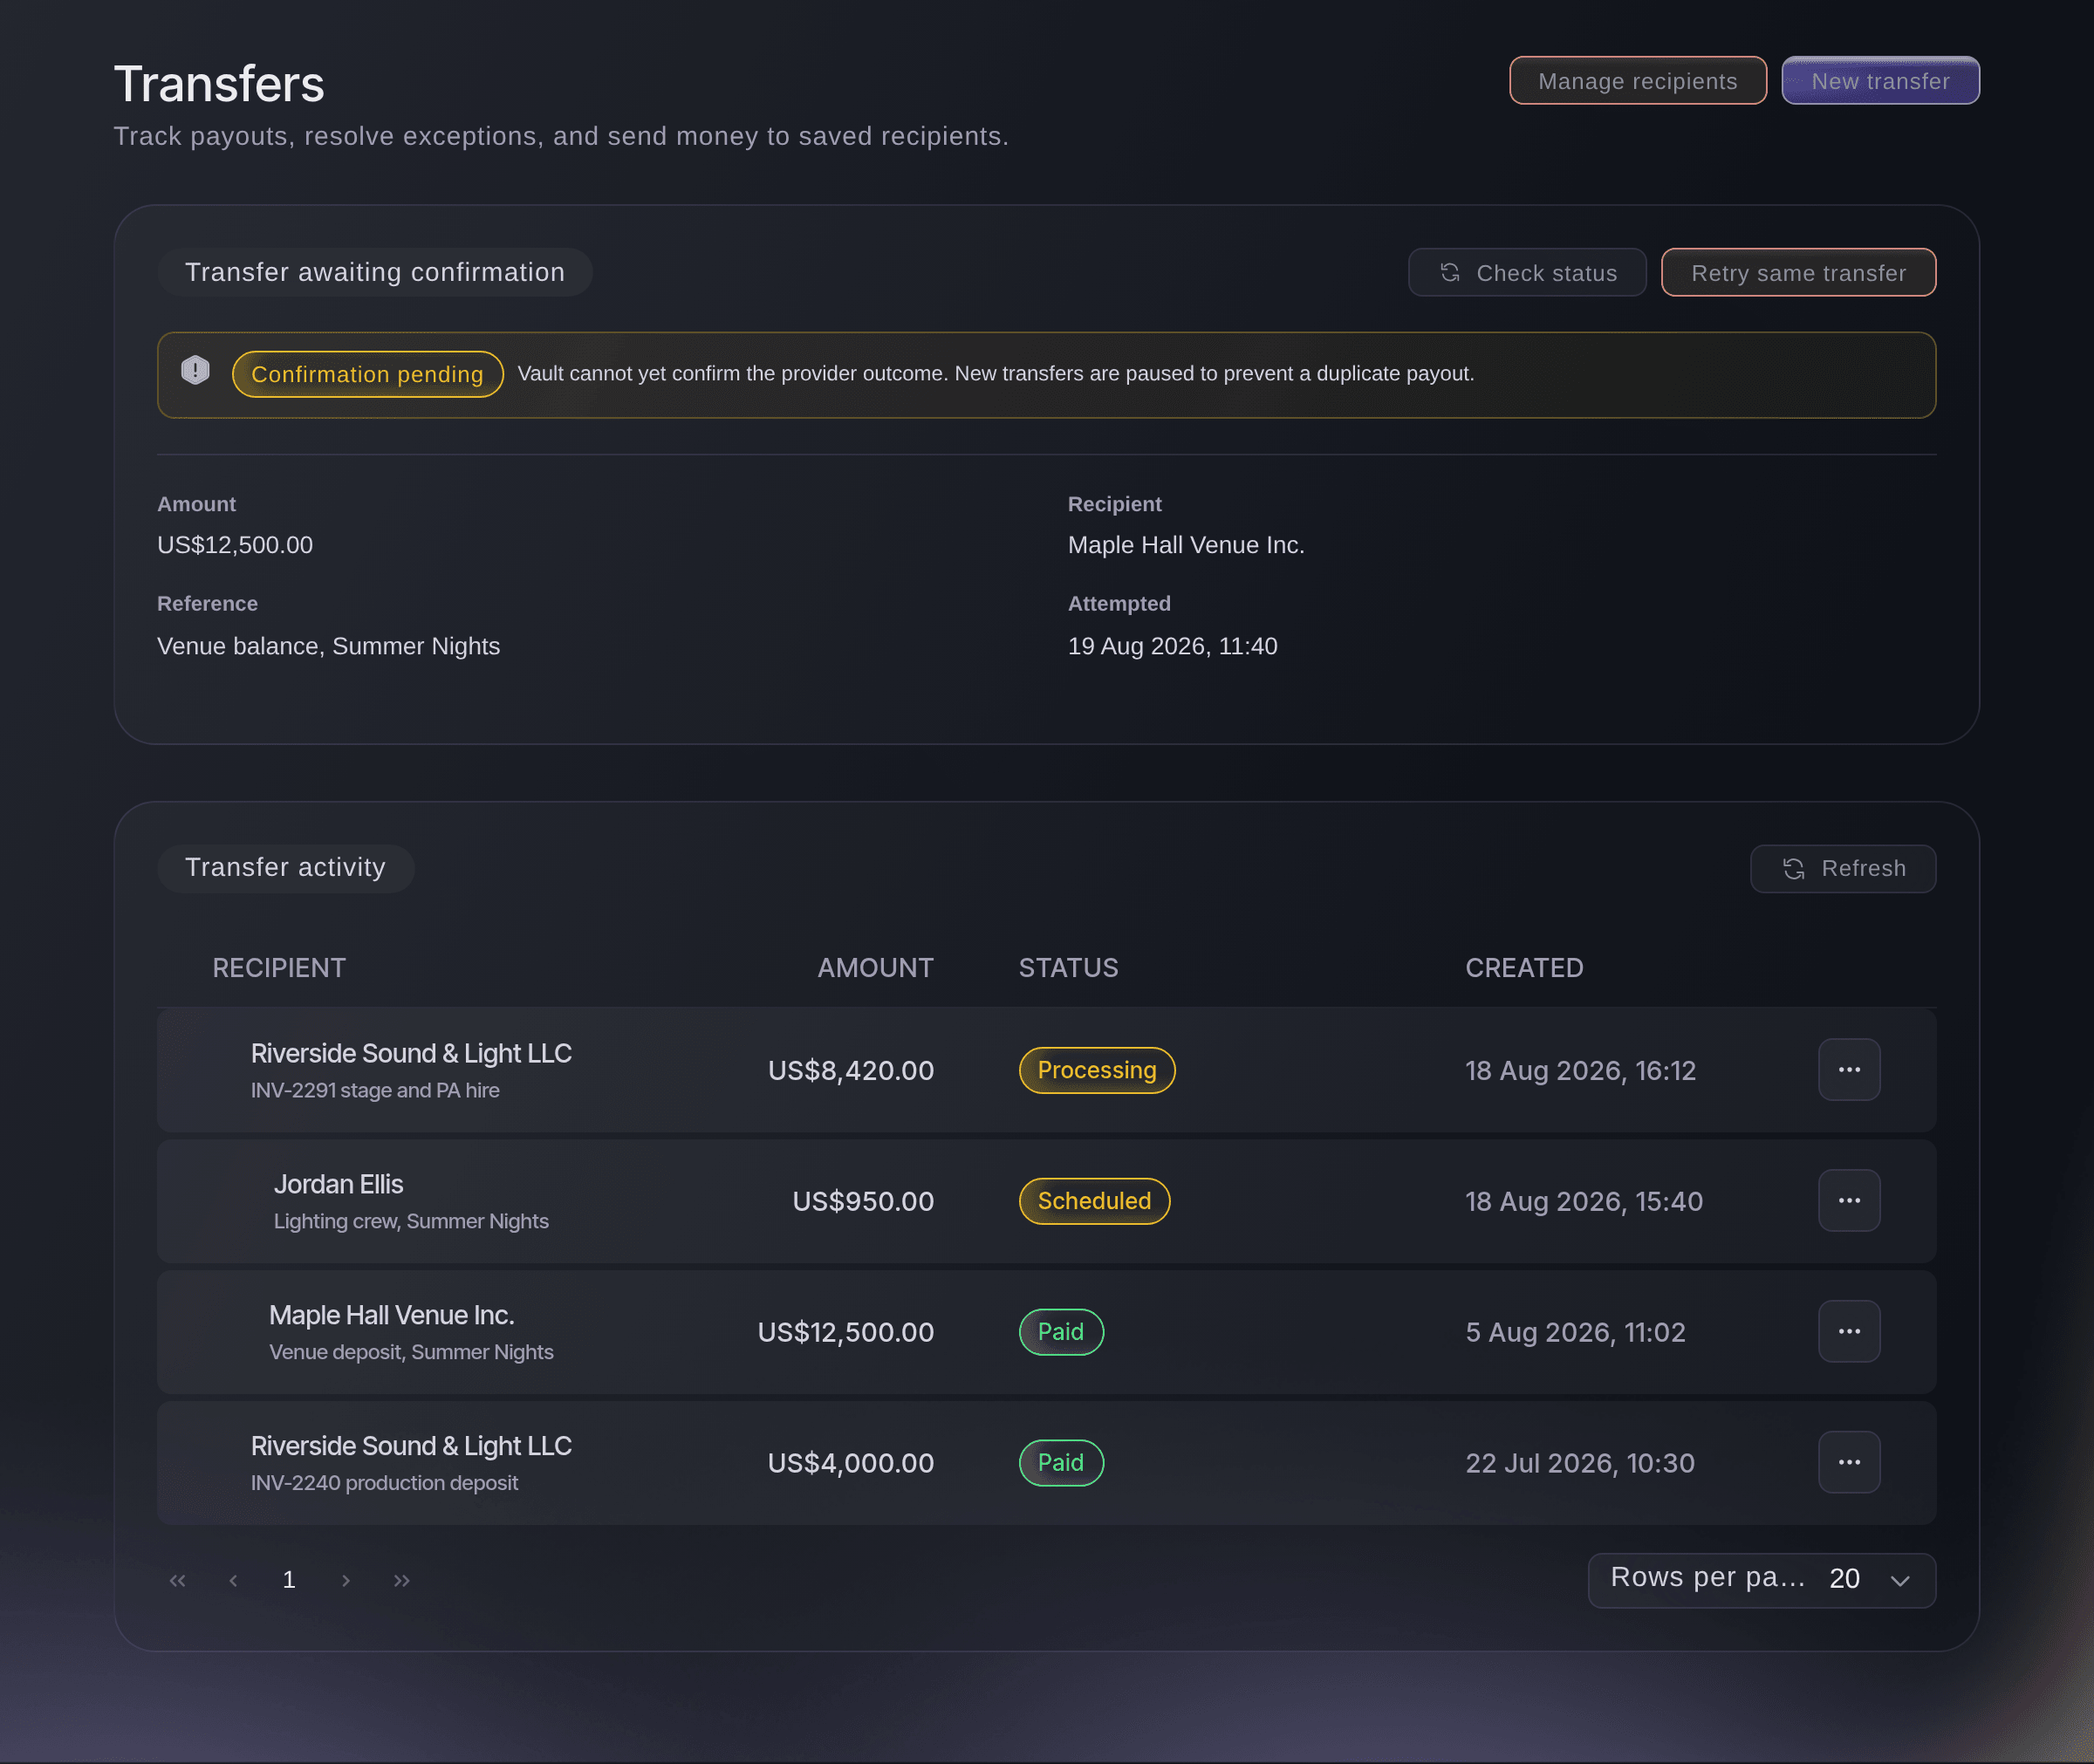
On Transfers, select Check status in Transfer awaiting confirmation. If Vault confirms the payment went, the card closes and the payment appears in Transfer activity.
Note: Vault holds new transfers while one is awaiting confirmation, so a supplier can't be paid twice by mistake.
Transfers, a payment awaiting confirmation. -
Retry the same transfer
If the card is still there, select Retry same transfer, then Retry exact transfer in the confirmation.
Note: Vault first checks whether the earlier payment went, then sends the exact same instruction, with the same amount, recipient and reference.
-
Contact support if it needs manual review
If the card shows Manual review required, contact Ticket Fairy support with the action number the card gives.
Fai can check whether a transfer is awaiting confirmation and retry the same payment for you. She shows you the amount, the recipient and the reference and asks before she retries, and you may need to finish the security check in Vault.
In your dashboard, with Fai
Is a Vault transfer waiting for confirmation on <BRAND NAME>? Check it, and retry the same payment if it's still stuck
Cancel a transfer
-
Open the payment's menu
In Transfer activity, open the menu at the end of the payment's row and select Cancel.
Note: Cancel appears only while the payment is still scheduled, processing, waiting for funding or has failed.
-
Confirm the cancellation
Check the amount, recipient and reference in Cancel transfer?, then select Cancel Transfer.
Warning: Cancelling can't be undone, and transfer, bank or currency fees already charged may not be refunded.
Cancelling a transfer is done in the dashboard. Fai can open Transfers in Vault for you.
In your dashboard, with Fai
Open Vault transfers for <BRAND NAME>
Questions you might have
- Why can't I select New transfer?
- Either an earlier payment is awaiting confirmation, which the card at the top of Transfers shows, or new transfers are paused for your account. A pause says
Your account team is completing a reconciliation. You can still review activity and cancel eligible transfers.
, and your Ticket Fairy account team lifts it when they finish. - Can I pay a supplier in a different currency from my balance?
- The currency you choose has to match the supplier's bank account, and the payment comes out of your Vault balance in that same currency. Hold money in that currency in Vault before you pay them.
- Why does the dialog say my recipient is missing required fields?
This recipient is missing required fields for LOCAL transfers
means the saved recipient doesn't have the bank details a local transfer needs, such as a routing number and account type. Choose SWIFT Transfer if the recipient has a SWIFT code, or edit the recipient on the Recipients page and add the missing details.- Does my supplier see the reason I entered?
- No. Your supplier sees the reference on their bank statement. The reason and any remarks stay with the transfer in Vault, where your team can read them in Transfer Details.
- What happens if a transfer fails?
- Open the payment's Transfer Details. A failed transfer says why it failed and what to do next, such as adding funds or correcting the recipient's bank details. Cancel the failed transfer, then send a new one.
- I closed the dialog while a transfer was sending. Did it go?
- Check Transfers before you try again. If Vault couldn't confirm the result, the payment waits in the card at the top of the page, and Check status tells you whether it went.
- Who on my team can send transfers?
- You can send transfers with an owner or admin login on the brand. Event-level logins such as promoter, door staff and stats don't see Vault at all.
- Can I skip the security check for a supplier I pay every event?
- Yes. Mark them as a trusted recipient: one owner or admin asks for it, a 24-hour cooling period runs, and a second owner or admin approves it. Payments to them then ask for fewer security checks.
Still have a question?
Book a demo and we will answer it on a call, on your kind of event. Or create your account and see it for yourself.
No setup fees. No required monthly ticketing fee. No credit card required.
Related guides
Do this on your own event
Create your account, build your event and follow the steps in your own dashboard. You do not need to book a sales call.