
Setting up an event
Set up ticketing for a multi-day festival
On the gate each morning, your door team has to know who is allowed in that day and who is not. Festival promoters group day and weekend tickets into categories and open each price release on its own date. Camping and parking go in the same checkout as admission, and names and ID on every ticket keep touts out.
Group day and weekend tickets so buyers find the right one, open each price release on its own date, sell camping and travel in the same checkout, and keep resale at face value.
- For
- Selling day and weekend tickets for a festival
- Takes
- 28 minutes
- Create a ticket category for each class
- When to create a separate ticket class
- Leave Resale Type on Current Tier
- Create a ticket type for each release
- Set a price and allocation for each release
- Set a sale window on every release
- Choose when each hidden release appears
- Set the door times on each day's tickets
- Leave your full-run tickets on the event's own times
- Add camping, parking and travel as add-ons
- Turn on names required
- Turn on the ID requirement
- Turn resale on
- Tell your buyers about the resale fee
- Check your event page the way a buyer sees it
Before you start
- You're an owner or an admin on this event. If you can't open the ticket pages, ask an owner or an admin to do this part.
- You know which ticket classes you need, such as general admission, VIP and day tickets.
-
Create a ticket category for each class
Open Ticket Categories on your Tickets page and select Create, then enter the name your buyers will recognise in Category Name, such as General Admission or VIP.
Note: A class is a ticket category, and it has to exist before you can assign ticket tiers to it. This is what turns a list of ticket types into the GA and VIP sections your buyers see.
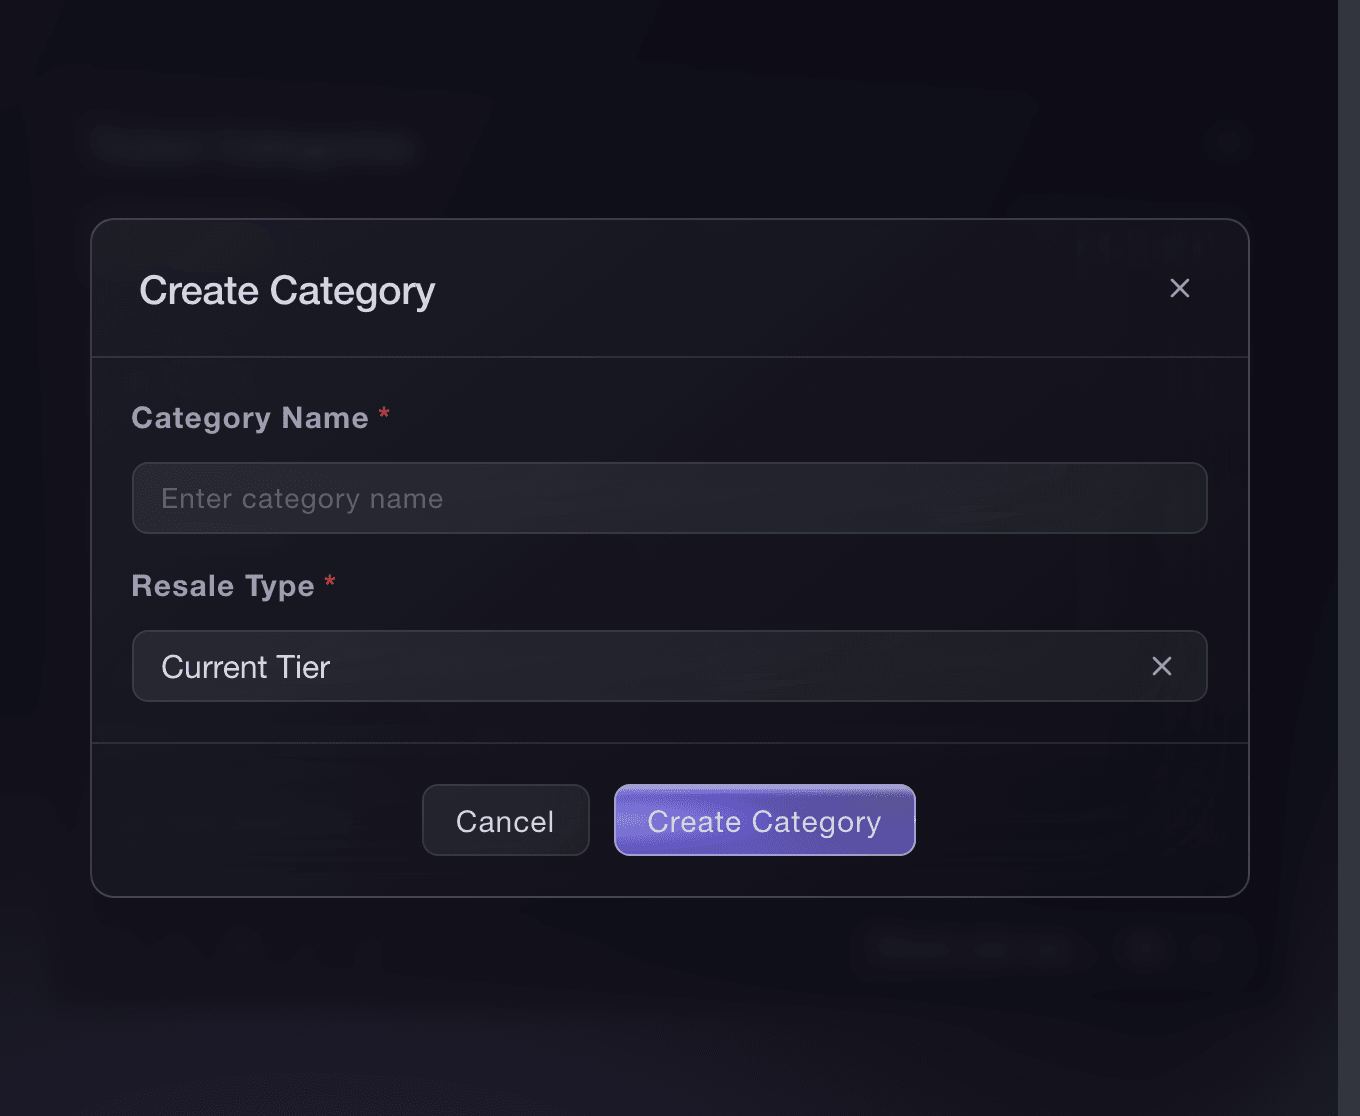
Event, Tickets, Ticket Categories, Create.

When to create a separate ticket class
A ticket class is what a ticket admits the buyer to: general admission, VIP and any day tickets. Create a separate class when the admission, access or day attended differs.
-
Leave Resale Type on Current Tier
Leave Resale Type on Current Tier.
Note: This field affects one kind of resale: a ticket bought through a waiting-list invitation on an event running the categorised waiting list. Every other resale keeps the tier the ticket was bought as; the full rule is in the ticket categories guide.
-
Create a ticket type for each release
Create early bird, first release, second release and final release as separate ticket types, and set the Ticket Category on each one to its class.
Note: A tier left on No category is still on sale, but buyers see it outside its class.
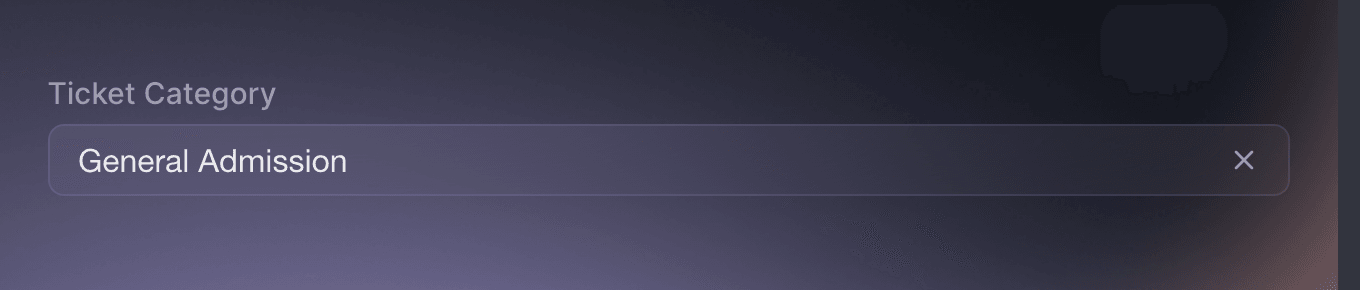
Event, Tickets, ticket type form, Ticket Category. -
Set a price and allocation for each release
Give each release tier its own allocation and price, so the price can rise as the festival gets closer.
-
Set a sale window on every release
Set a sale window on every release, and keep the later ones hidden until their turn.
-
Choose when each hidden release appears
For each hidden release, choose either when the previous ticket type sells out or at a specific time, whichever comes first.
Note: That one choice covers both ways the next price release can open: the date arrives, or early bird sells out early. Pick the date-only option and a release that sells out at midday leaves nothing on sale until the next release date.
-
Set the door times on each day's tickets
Edit each day ticket, turn on This ticket type has different door times, then set Doors Open Time and Last Entry Time to that day.
Note: Without these, a ticket works for the whole run, so a Saturday ticket scans in on Sunday. A category groups what a buyer sees; the door checks these two times.
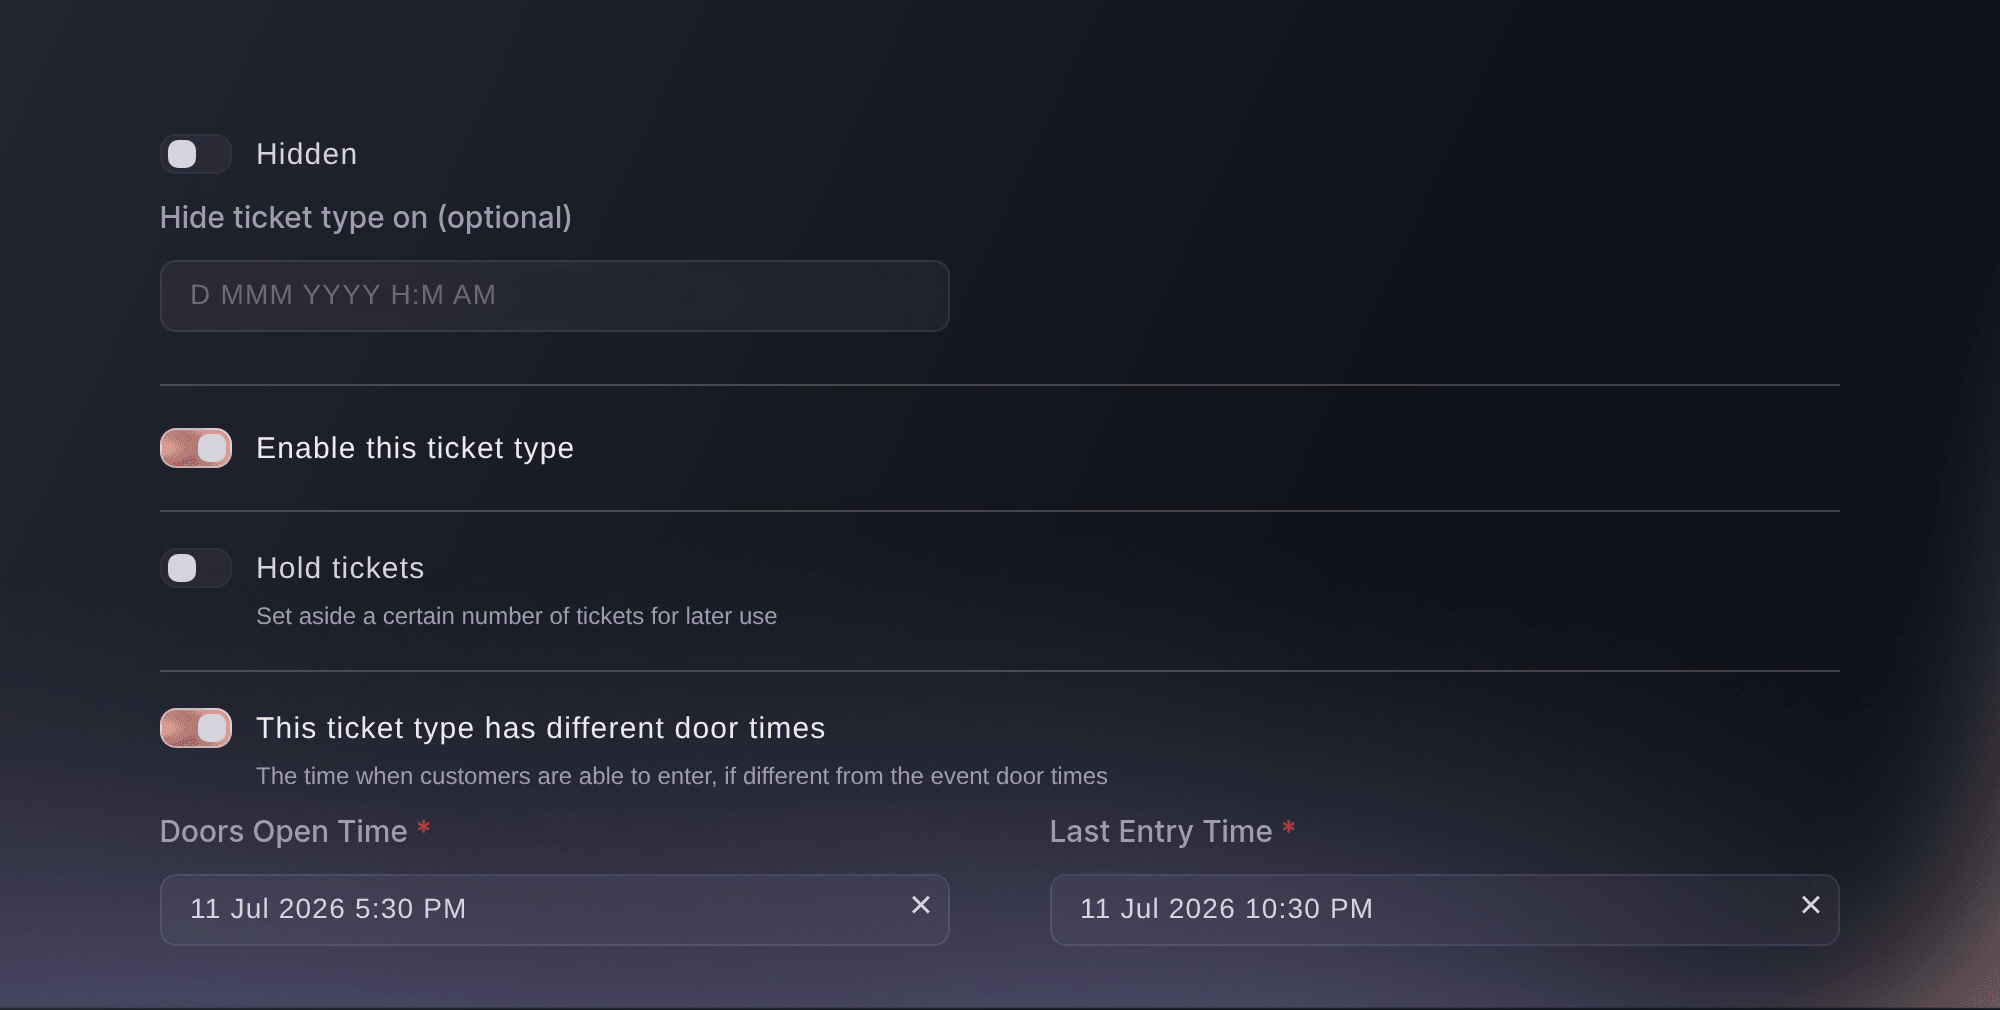
Tickets, Edit Ticket Type, ticket type options. -
Leave your full-run tickets on the event's own times
Edit each full-run ticket and check This ticket type has different door times is off. The ticket then opens and closes with the event rather than with one day of it.
Note: With the toggle off, the ticket uses the event's opening and closing dates. For one entry each day, turn on Tickets can be scanned multiple times per event, choose Day and set Max Scans to 1.
-
Add camping, parking and travel as add-ons
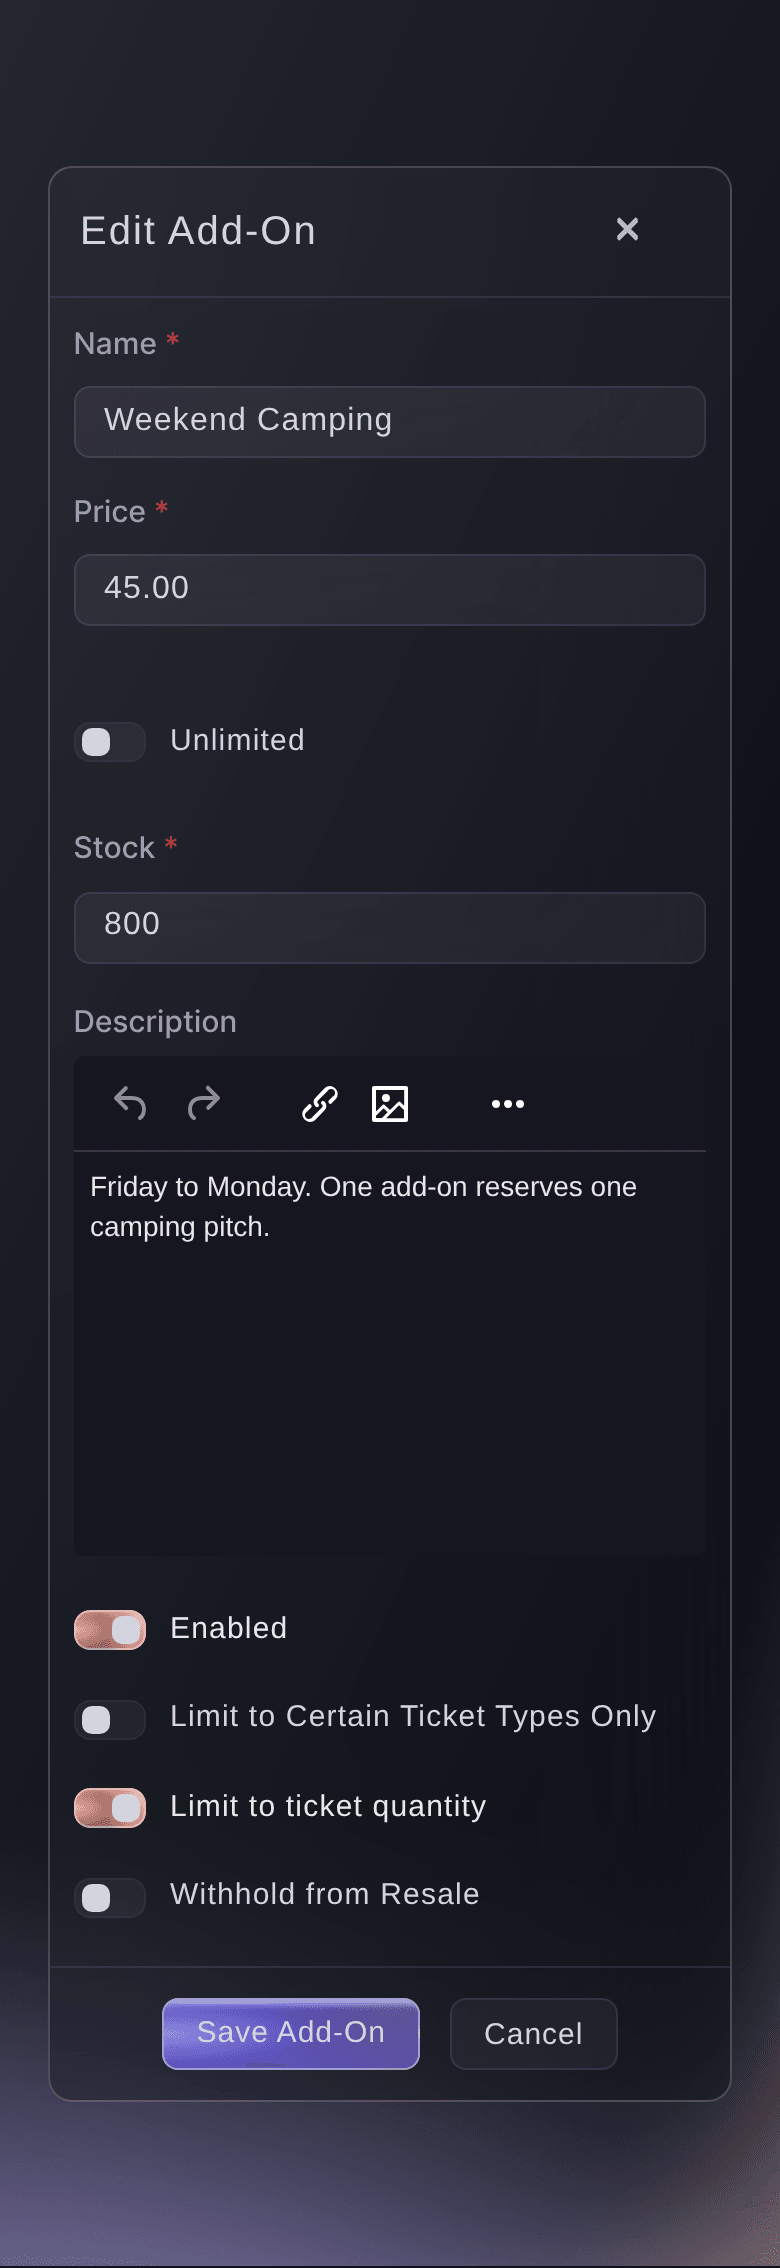
Put everything that is not admission in add-ons: camping, campervan permits, parking, meal packages, VIP upgrades. The buyer picks them in the same checkout, so a festival weekend is one order rather than three.
Note: Create each add-on once for the whole event rather than one per day, so a buyer books a pitch for the weekend in a single row. Where an add-on comes in sizes or options, use variants rather than a separate add-on for each.
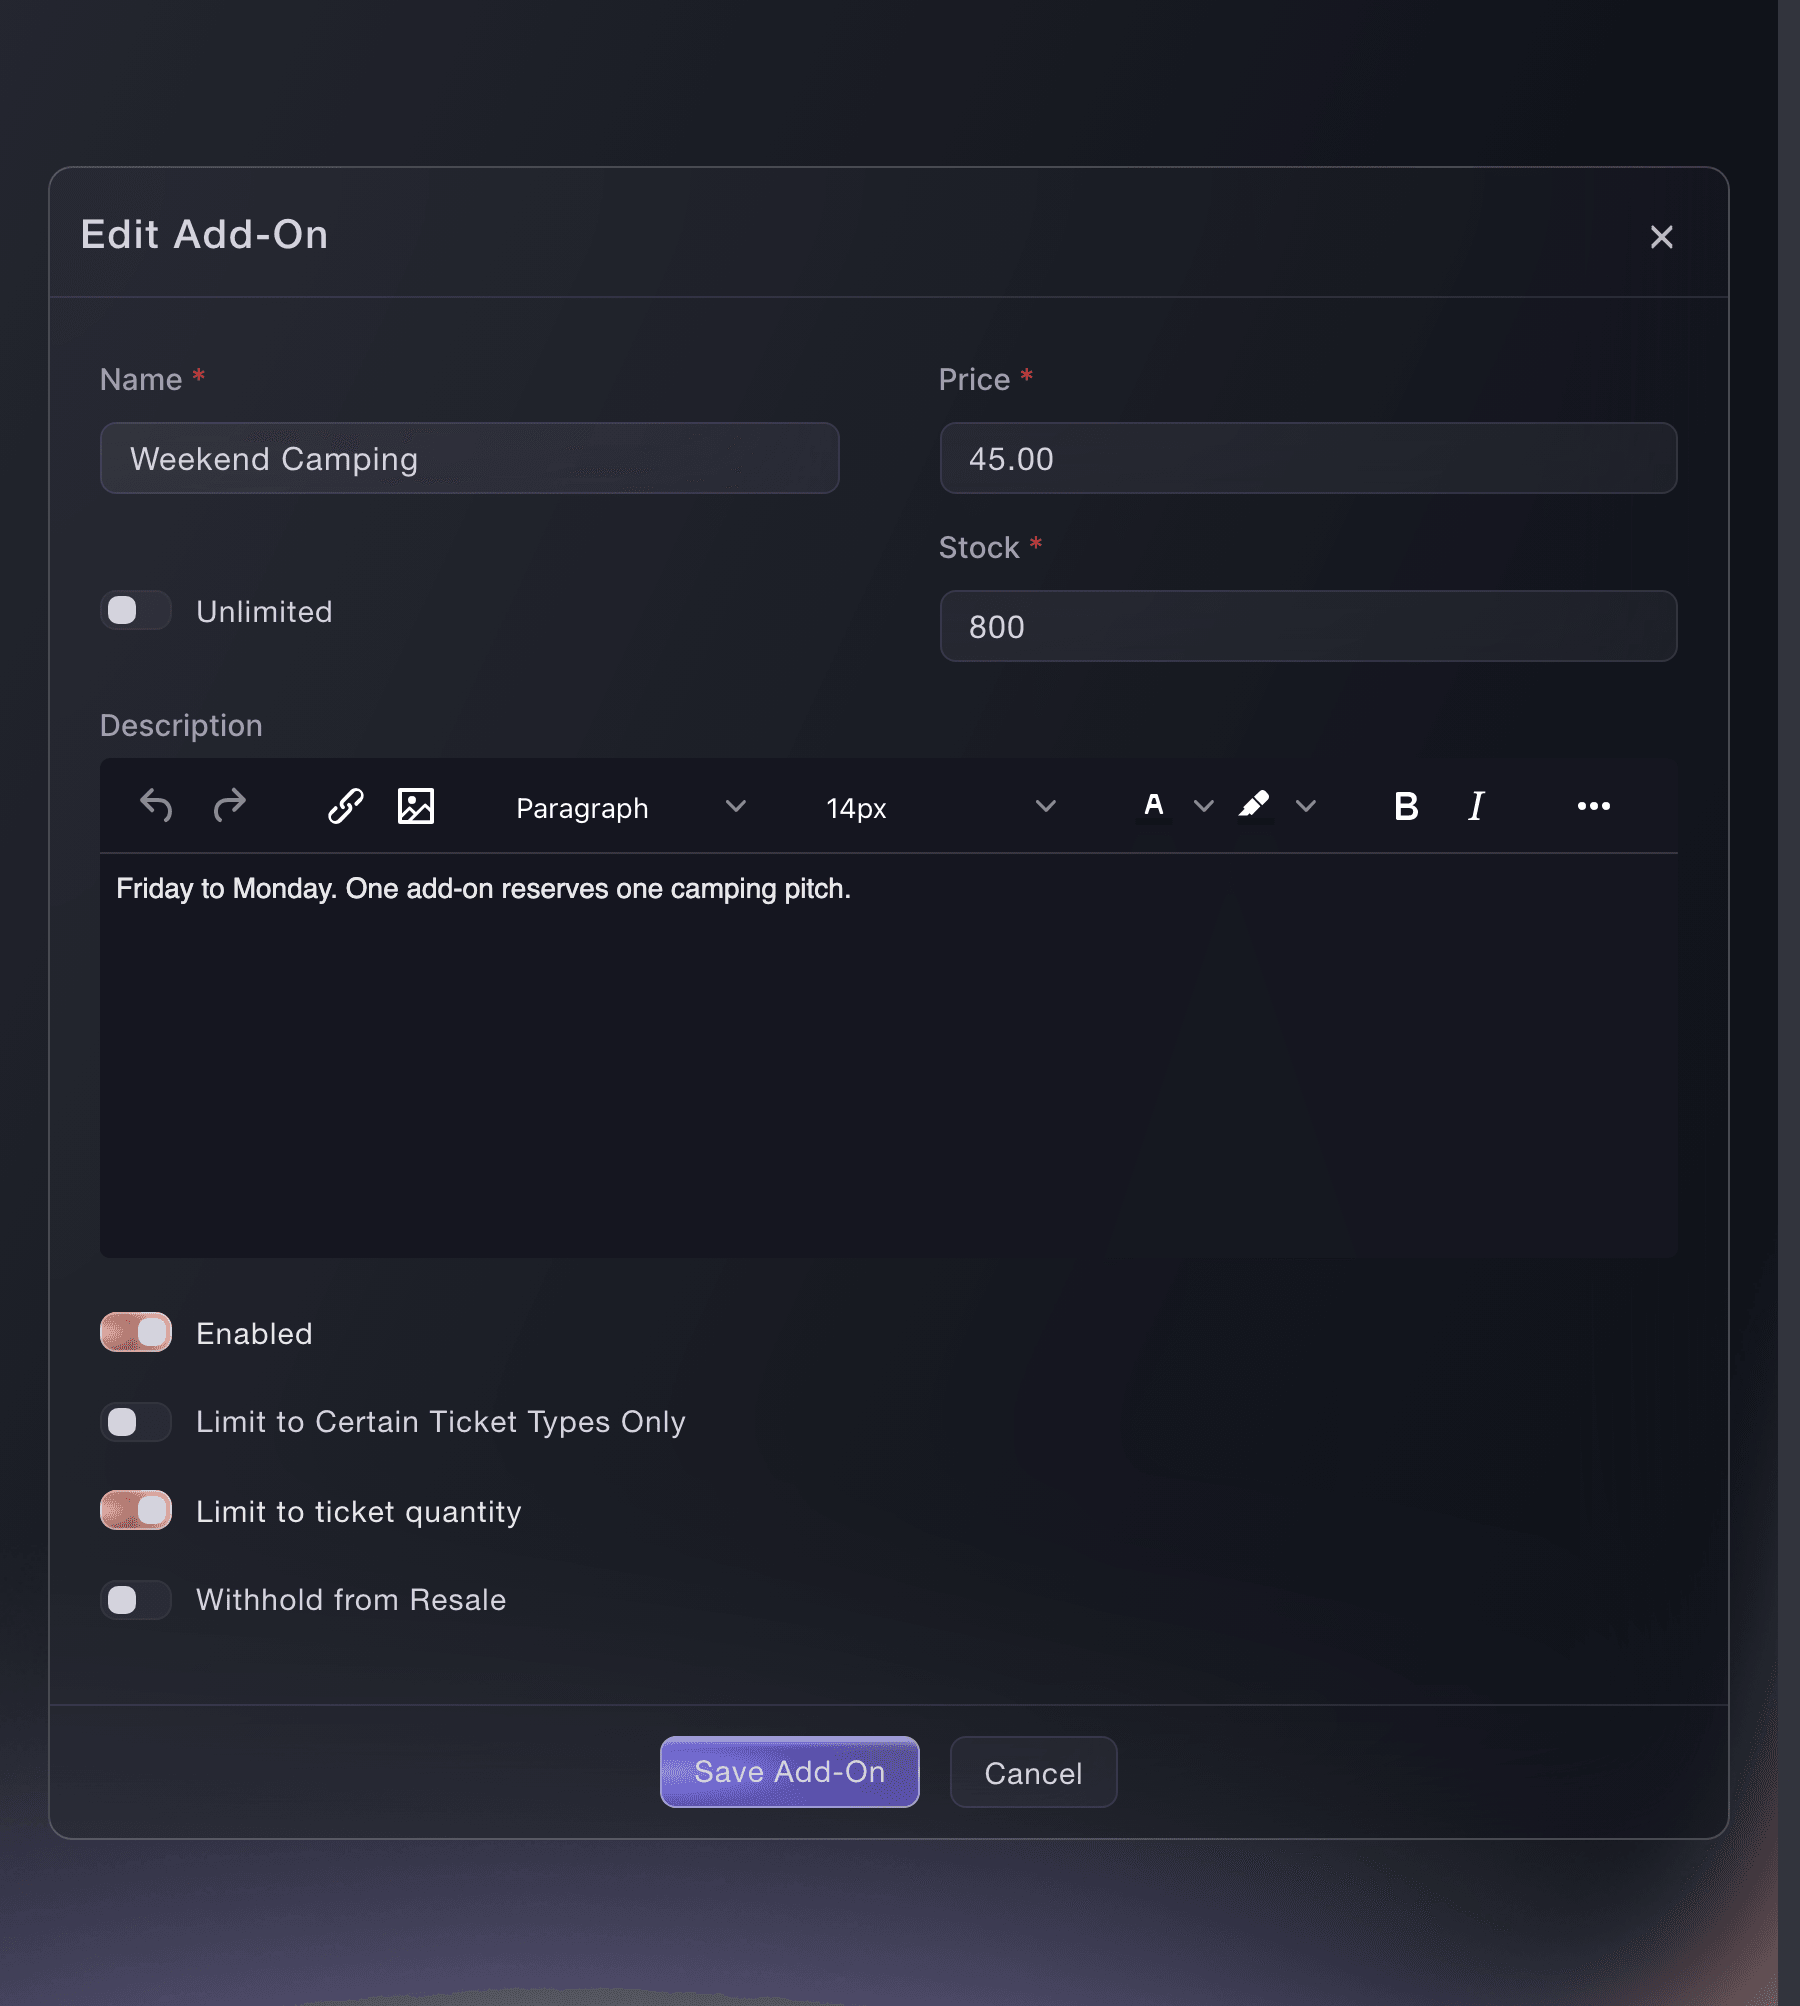
Event, Tickets, Add-Ons, Weekend Camping. -
Turn on names required
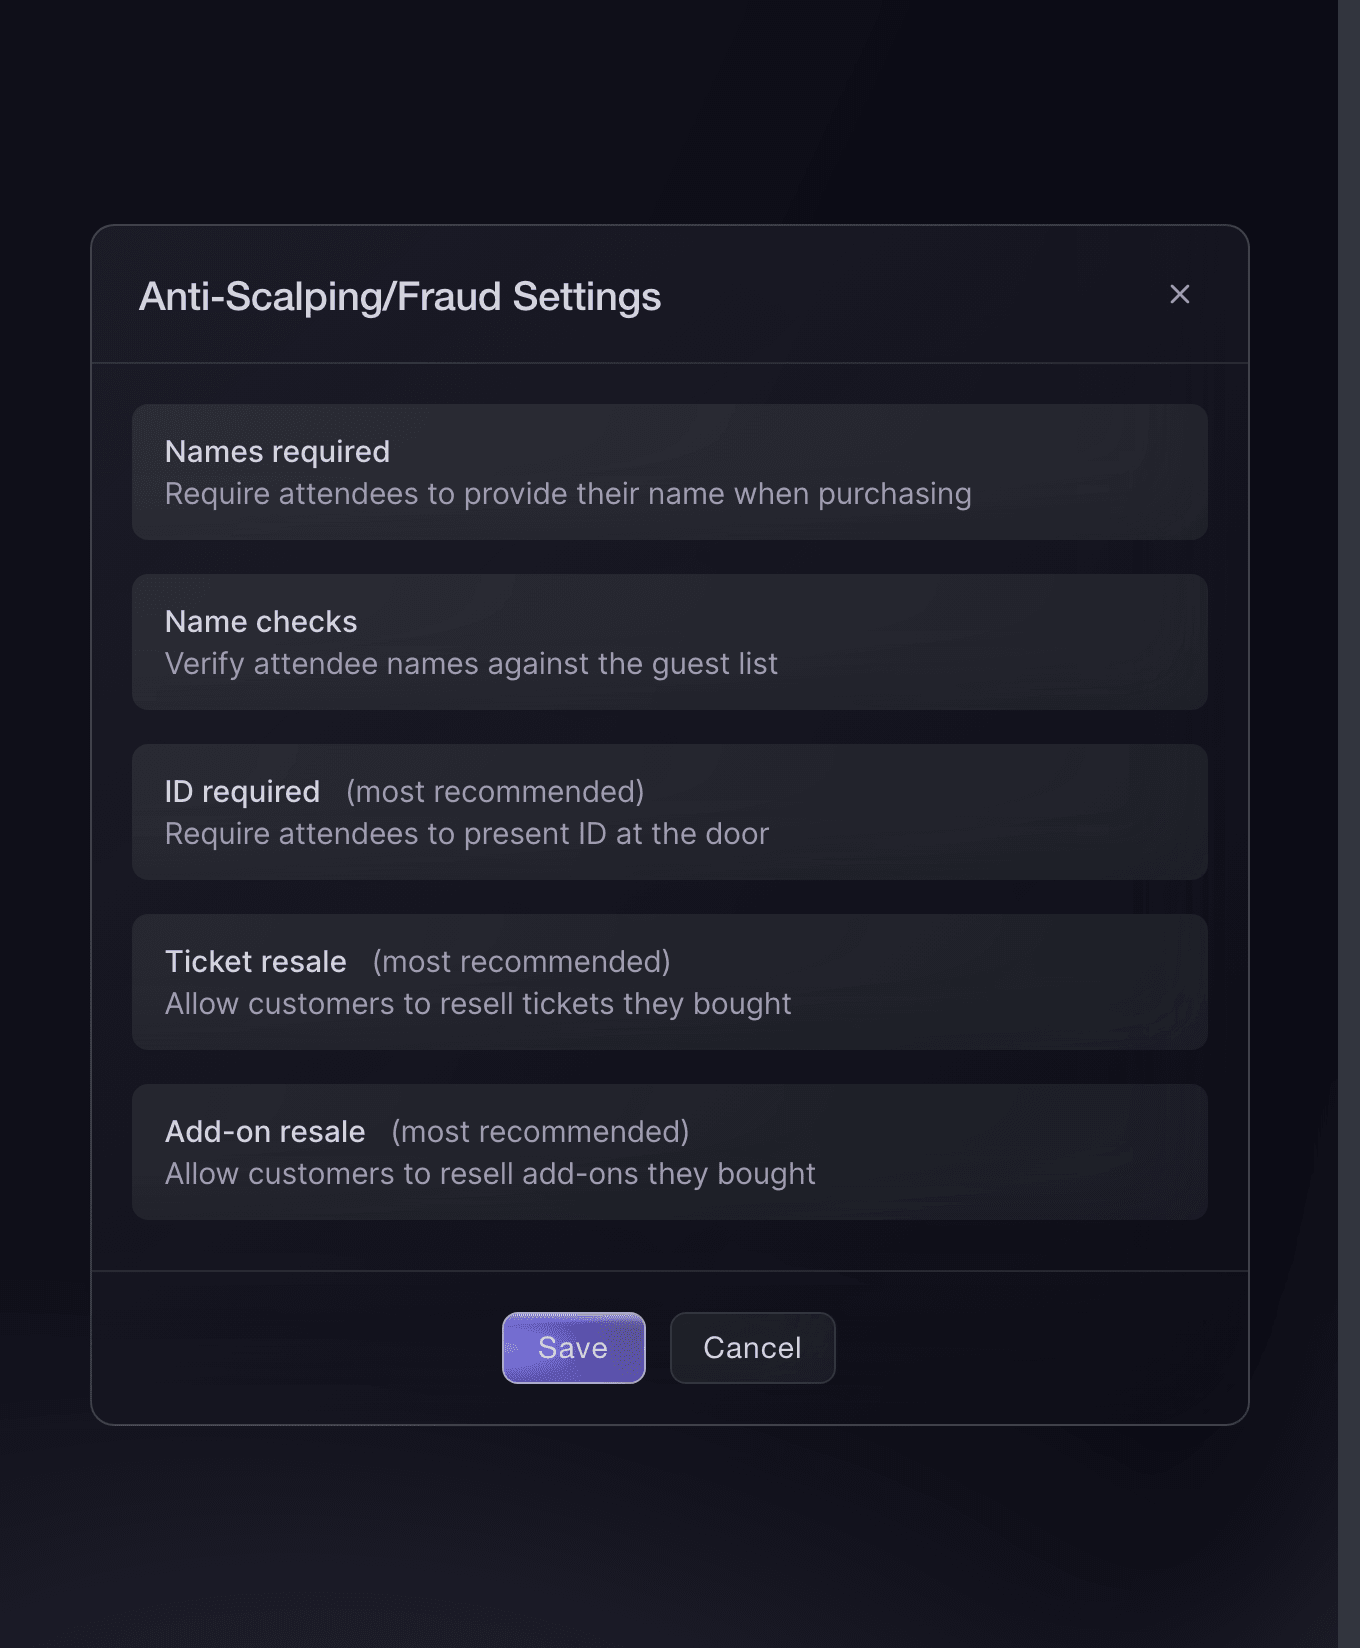
Open your anti-scalping and fraud settings and turn on names required, so each ticket shows the attendee name rather than only the buyer.
Note: Turn on name checks with it, and the door checks the name on the ticket against the person holding it.
Event settings, Anti-Scalping/Fraud Settings. -
Turn on the ID requirement
Turn on the ID requirement in the same place. It is a separate setting, and it is the one that puts "bring a valid photo ID" in the email your attendees get.
Note: Without it your door team has a name on a ticket and no way to check that the person holding it is that person.
-
Turn resale on
Turn resale on. A buyer who cannot attend can then resell an unused ticket through your event page rather than through a tout, and the new buyer pays the same price as everyone else, so there is no margin in touting it.
Note: The original code stops working and the new buyer gets a ticket in their own name, so your door team can reject the old code and scan the replacement.
-
Tell your buyers about the resale fee
Tell sellers about the resale fee on your event page before they list a ticket. Outside India, switching resale on puts a 10% resale fee on each resale.
Note: We refund the ticket price in full and charge the resale fee separately to the original card.
-
Check your event page the way a buyer sees it
Open your event page in a private browser window. Only the current release should show an available price, and your add-ons should sit under the tickets.
Note: A later release stays off the page until the one before it sells out or its time arrives, so it is correct to see nothing where tier two will appear.



Try these steps on your own event
Create a free account, build your event and follow the steps above in your own dashboard. It takes a few minutes and you do not need to book a sales call.
No setup fees. No required monthly ticketing fee. No credit card required.
Or have it done for you
Fai can create the ticket categories, release tiers, per-day door times, add-ons and resale settings after you provide prices, stock and sale dates. She shows you the complete setup and asks before making changes. MCP and the CLI can create ticket types and add-ons, but you must finish ticket categories, per-day door times, attendee-name checks, ID requirements and resale settings in the dashboard. Name which releases start hidden and what reveals each one. A new tier starts on sale and public unless you say otherwise, so leaving this out puts every release on sale together.
In your dashboard, with Fai
Set up general admission and VIP categories for this festival; inside each, create early bird, first release, second release and final release ticket types; keep only early bird visible, then reveal each later tier on its date or when the previous tier sells out, whichever comes first; set the door opening and last entry on each day ticket to that day; add camping and parking; require names, name checks and ID; allow resale; ask for prices, stock and dates before changing anything
From your own assistant, over MCP
Connect your assistant to our MCP server and ask it:
The copied MCP configuration includes --read-only. Remove --read-only only when you want your assistant to make changes. Routine changes run when requested; destructive actions ask you in a compatible client. If your client cannot ask, make the change in your dashboard.
Pick the brand and event, then create early bird, first release, second release and final release ticket types, plus camping and parking; keep only early bird visible and reveal each later tier on its date or when the previous tier sells out, whichever comes first; ask for prices, stock and dates before creating anything
From your terminal
Install the CLI from our CLI page, sign in with ticketfairy auth login, and choose the brand you are working on with ticketfairy brand use <BRAND_ID>. ticketfairy brand list and ticketfairy event list show the IDs the other commands use.
You need to be an owner or an admin on the event to run these. Both sale dates use UTC in a format such as 2027-04-01T00:00:00Z. The CLI creates the release tiers and add-ons. Complete the ticket categories, attendee-name checks, ID requirements and resale settings in your dashboard.
One release tier, priced, stocked and dated
ticketfairy ticket create <EVENT_ID> --name "Early Bird" --price 39 --max-inventory 200 --max-per-order 4 --sales-start <SALE_OPENS> --sales-end <SALE_CLOSES>
A tier that appears when the one before it sells out
ticketfairy ticket create <EVENT_ID> --name "Tier 2" --price 59 --max-inventory 500 --hidden --hiding-option previous_ticket_sold
A camping, parking or travel add-on
ticketfairy addon create <EVENT_ID> --name "Weekend Camping" --price 45 --quantity 800
Everything you have built so far, to check it
ticketfairy ticket list <EVENT_ID>
Let Fai do it for you
Fai works inside your Ticket Fairy dashboard. Create your account, open Fai and paste the prompt above.
No setup fees. No required monthly ticketing fee. No credit card required.
Questions you might have
- How do I set up early bird and release tiers for a festival?
- Make each release its own ticket type inside the class it belongs to, and give each one its own sale window. Keep the later ones hidden and set them to appear either when the previous ticket type sells out or at a specific time, whichever comes first. Early bird, first release, second release and final release then open one after another, whether the date arrives first or the tickets run out first.
- What is the difference between a ticket class and a tier?
- A class is what the buyer gets, such as general admission or VIP. A tier is what they pay for it depending on how early they buy. A ticket class can have several tiers.
- How do I sell camping passes with a festival ticket?
- As an add-on. Camping, parking, meal packages and VIP upgrades all sell alongside the ticket, so the buyer picks a pitch in the same checkout instead of coming back for a second order.
- What does the seller get back when their ticket resells?
- A resale re-lists at the tier the ticket was bought as, so the new buyer pays what the seller paid. The seller receives that amount minus any amount retained by your event and any previous refund on the ticket. Your resale settings decide whether the seller also receives the booking fee. The waiting list is where Resale Type changes which tier the ticket re-lists as.
- How is the resale fee set?
- Ticket Fairy applies a 10% resale fee automatically outside India, and the same fee applies to every eligible resale on your event.
- Which tickets can be resold?
- The ones a buyer paid for online at checkout and has not used yet. Scanning a ticket in ends its resale until you reverse that check-in, so a scanned ticket cannot be passed on part way through a multi-day event. A free ticket, a gift, and a ticket redeemed from a pass stay with the person holding them.
- Can I switch resale off completely?
- Yes. The same settings page can block resale outright, for tickets or for add-ons.
- How do I stop touts reselling my festival tickets?
- Require a name on every ticket and let buyers resell through your event page, where resale is face value only. There is no margin in touting a ticket you cannot mark up, the old code stops working at the gate, and the new holder gets their own.
Still have a question?
Book a demo and we will answer it on a call, on your kind of event. Or create your account and see it for yourself.
No setup fees. No required monthly ticketing fee. No credit card required.
Related guides
Do this on your own event
Create your account, build your event and follow the steps in your own dashboard. You do not need to book a sales call.