Running a convention’s exhibitor hall and artist alley is a high-stakes juggling act that can make or break the fan experience. The vendor floor is often the vibrant heart of a fan event – a bustling marketplace where attendees hunt for rare merch, meet artists, and engage with brands. Yet behind the scenes, organizing this space requires meticulous planning and on-the-fly problem solving. From designing a floor plan that avoids traffic jams to coordinating flawless load-ins and load-outs with hundreds of vendors, exhibitor hall management demands the skills of a logistics expert, diplomat, and showrunner all in one.
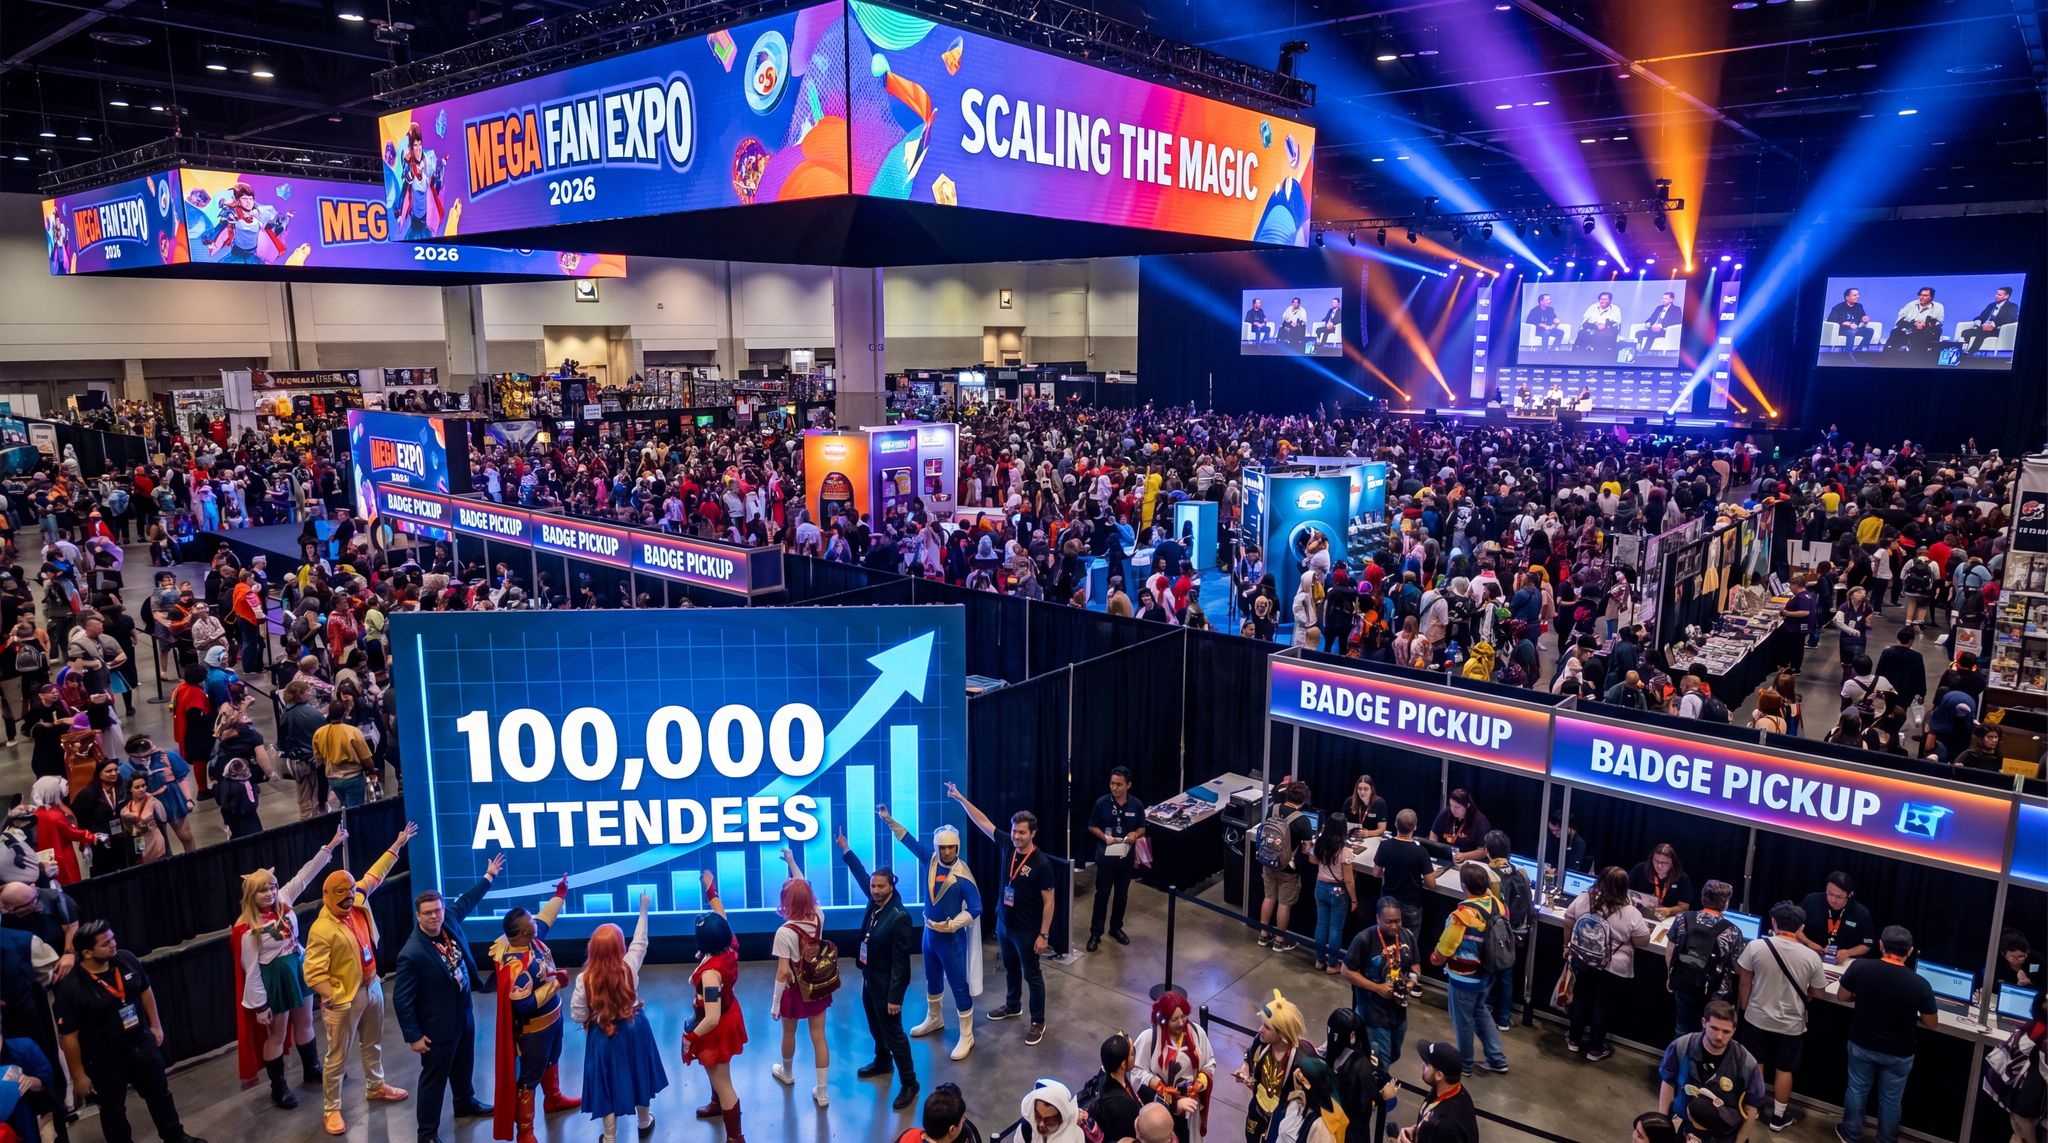
Whether you’re managing a cozy 2,000-person anime con or a 150,000-strong mega expo, the fundamentals remain the same. Veteran convention organizers have learned through hard experience how to optimize every facet of the exhibitor hall – mapping layouts, arranging artist alley tables fairly, scheduling deliveries, handling last-minute surprises, and more. This comprehensive guide distills decades of on-site lessons into actionable steps. We’ll walk through the process from initial layout plans to the final teardown, highlighting real examples from around the world. By the end, you’ll have a toolkit of proven strategies to keep your exhibitors happy (and coming back), boost your event’s revenue, and wow attendees with a lively marketplace.
Let’s dive into each phase of exhibitor and artist alley management, step by step.
Designing the Optimal Exhibitor Hall Layout
Mapping for Smooth Traffic Flow
A well-designed floor plan is the backbone of a successful exhibitor hall, and understanding why a trade show floor plan matters is the first step in your logistics journey. Start by sketching out the “big picture”: entrances, exits, and main aisles. Attendees should be able to wander without hitting dead ends or bottlenecks. Wide main corridors (often 10–20 feet at major cons) and clearly marked cross-aisles prevent the dreaded indoor traffic jams, a crucial design element that keeps foot traffic moving efficiently. Try to position high-traffic attractions (like a gaming demo stage or a celebrity signing table) in a way that their queues won’t block nearby booths. For example, Gamescom 2025 – Europe’s largest gaming expo – hosted 1,568 exhibitors across 233,000 m² by creating multiple broad avenues for the 357,000 visitors to flow through. This strategy was essential given Gamescom 2025’s record-breaking attendance numbers and the presence of major industry players like Epic Games and Xbox Game Studios. On a smaller scale, even a 50-booth comic con should avoid cramped 6-foot aisles that force people to squeeze through; it makes attendees leave early and hurts sales.
Go Cashless With RFID Technology
Enable contactless payments, faster entry, and real-time spending analytics with RFID wristbands and NFC-enabled ticketing for your events.
To map effectively, identify natural “route loops” that guide people through the hall. Attendees tend to turn right upon entering and circle systematically. Use that insight to ensure important booths aren’t hidden in a back corner. Many seasoned planners utilise digital diagramming tools (like ExpoFP or MapYourShow) to experiment with layouts and ensure every booth has good sightlines. As Cvent’s event design experts note, a fair layout gives every booth fair visibility while still letting anchor booths shine. In practice, this might mean avoiding placing a tiny indie artist directly behind a towering corporate booth wall. Stagger heights and use island booths sparingly so as not to create visual blackouts for those behind them.
Ensuring Fair Booth Placement and Visibility
Exhibitors invest significant time and money to be at your event – they expect a level playing field. A thoughtful layout will mix booth sizes and types so that one vendor’s setup doesn’t unfairly overshadow another, which ensures the floor plan gives every booth fair visibility. For example, group a few popular large booths in the center or along wide anchor aisles, but intersperse them with standard 10×10 booths or small press tables on the perimeter. This prevents any one zone from becoming a neglected “dead area.” Corner booths (open on two sides) are prime real estate, so consider rotating which vendors get corners year to year if demand exceeds supply.
Ready to Sell Tickets?
Create professional event pages with built-in payment processing, marketing tools, and real-time analytics.
Many conventions implement a seniority or loyalty system for space selection – long-time exhibitors pick earlier – but balance that with opportunities for new vendors to still get decent spots. One approach is to reserve some choice locations (e.g. near an entrance or a major attraction) for first-timers or unique content vendors to keep the floor diverse and exciting. Always double-check sightlines: ensure no banner or display blocks a neighbor’s signage from the aisle. A well-placed mirror or transparent display backdrops can allow visibility even in tight areas. The goal is that attendees meander and discover new booths naturally, rather than inadvertently skipping sections because a huge installation created a visual barrier.
From experience, seasoned organizers know to visit the venue in person if possible, or study its floor blueprints carefully. Note column positions, low ceilings, or odd corners that could impact booth layouts. If a hall has a structural pillar, you might place a lounge or photo op there instead of a booth, maintaining fairness. In one case, a mid-sized fan expo found that a few vendors were complaining about poor foot traffic – the culprit was a massive pillar near them blocking line of sight. The next year, the floor plan was tweaked so that space became a cosplay repair station (an attraction rather than a vendor), and those vendors were moved into a clearer line of sight. By proactively addressing such layout quirks, you keep all vendors feeling valued and visible.
Accessibility and Safety Considerations
Safety and accessibility must be baked into your layout from the start. Plan aisle widths and booth spacing to accommodate not just crowd comfort, but also wheelchairs, strollers, and emergency egress. Follow local fire code regulations on minimum aisle width (often at least 8 feet, more for main thoroughfares) and ensure there are clear exit paths. It’s wise to create a few “spillover” space pockets – small open areas that can act as relief valves if one section gets too crowded or if an impromptu line forms. For instance, if you have a super popular vendor expected to draw queues (say an exclusive collectible booth), design a holding area or a queue line path for them that’s out of main traffic. San Diego Comic-Con famously uses a wristband system for Hall H panels and designated line areas to prevent critical walkways from being blocked – a lesson any con can apply on a smaller scale for busy booths.
Accessibility also means clear signage and navigation for attendees. Mark each aisle with overhead banners or signs (“Aisle 100, 200, etc.”) so people can find booths easily. Include spaces for wheelchair-friendly viewing at demo areas and avoid overly cluttered aisles that would be hard to maneuver with mobility devices. If your venue floor isn’t level or has ramps, incorporate those into the traffic flow rather than relegating them to inconvenient detours. Additionally, consider quiet or sensory-friendly times on the exhibit floor if you know your audience includes neurodivergent fans – some conventions designate an hour with lower noise and smaller crowds to ensure everyone can enjoy the hall. A layout that accounts for these needs not only meets legal requirements but makes your convention welcoming, enhancing its reputation.
Data-Driven Event Marketing
Track ticket sales, demographics, marketing ROI, and social reach in real time. Exportable reports give you the insights to make smarter decisions.
Adapting Layout to Event Scale and Type
Conventions come in all sizes and flavours – your floor plan strategy should adapt accordingly. At intimate indie cons (under 3,000 attendees), the exhibitor area might just be a single ballroom or gymnasium, but you can still apply pro tricks: use pipe-and-drape or partition walls to define the space and create a circular flow around the room’s perimeter with additional rows in the center. Small events often blend vendors and artists together; if so, sprinkle popular artists among merch vendors to encourage attendees to traverse the whole room. Niche conventions with very specific audiences might have fewer total booths but deeper fan engagement per booth. Ensure the content mix reflects that niche – e.g., a horror convention exhibitor floor might group all the mask and prop makers in one spooky-themed aisle for atmosphere. These curated touches show you understand how niche conventions are shaping industry events.
On the flip side, mega-events (50,000+ attendees) require an almost mall-like approach. If you have hundreds of exhibitors spanning multiple halls, consider zoning the floor by content category (comics, gaming, crafts, etc.) or by sponsor level. Large expos like New York Comic Con or Gamescom often assign entire hall sections to major industry players (gaming publishers, movie studios) while still maintaining separate artist alley quarters. Just be careful that segmenting by category doesn’t silo attendees; provide enticing landmarks in each zone so people explore everywhere. Multi-hall venues should have navigation aids (floor decals, info kiosks, mobile app maps) to help attendees find exhibitors – we’ll discuss tech tools for this later. Finally, be ready to reconfigure: if pre-sales indicate one area will be underutilized, adjust the plan. A flexible layout mindset is key, as we learned in 2020 when many cons had to add wider aisles and sanitation stations with short notice. In summary, tailor your layout to your event’s character and size, but never lose sight of flow, fairness, and safety.
Grow Your Events
Leverage referral marketing, social sharing incentives, and audience insights to sell more tickets.
Setting Up a Successful Artist Alley
Fair and Transparent Artist Selection
Artist alley is a beloved staple of fan conventions – it’s where independent artists sell prints, crafts, and creative works, often at affordable table rates compared to commercial vendors. However, demand for artist alley spots usually far exceeds supply, so determining who gets a table can be sensitive. The key is to establish a fair, transparent selection process and communicate it clearly to the community. Common models include juried selection, first-come-first-served signups, or lotteries for artists. Each has pros and cons: a juried system (where organizers actively choose portfolios) can ensure quality and variety, but it requires time and may invite claims of bias if not handled by a neutral jury. Lotteries are seen as more even-handed, though pure randomness might result in an unbalanced mix. Some anime conventions blend approaches – for example, they randomly select a portion of tables and jury the rest, or give weight to new artists so the alley isn’t the same faces every year.
Whichever method you choose, outline it publicly: post guidelines and criteria well in advance. Many experienced organizers also set aside a few tables for special cases – e.g. featured guest artists or last-minute guest cancellations who want to table – but keep these exceptions minimal. Strive for a diverse range of art styles and products: fans appreciate when the alley isn’t 50 people all selling similar prints. If possible, rotate long-time artists and newcomers; seasoned artists understand that giving fresh talent a chance helps keep the scene vibrant (and many veterans still get in through grandfathered or VIP processes at bigger cons). Transparency is crucial: if people trust your selection process, there will be less backlash even from those who don’t get in. Some cons publish basic stats (e.g. “120 slots, 300 applications, 40% lottery, 60% juried”) to show the demand and their process, which can manage expectations.
Table Layout and Amenities for Artists
Designing the artist alley section brings its own considerations. Artist tables are typically smaller than vendor booths – often a 6’ or 8’ table with two chairs – but you should still apply good layout practices: decent aisle space, clear signage, and logical organization. Many conventions position Artist Alley adjacent to or at one end of the exhibitor hall, though some give it its own room. A separate space can create a more relaxed, artist-focused atmosphere (and allow you to enforce rules like no loud music or big backdrops, keeping it fair for the artists). However, isolation can hurt traffic if attendees don’t realize another room exists. A good compromise seen at events like Anime Expo is to colocate artist alley in the same general hall but clearly demarcated – for instance, using pipe-and-drape to section off the alley or a banner hung above reading “Artist Alley”. This way, fans naturally flow from the commercial booths to the artists without a hard separation.
Pay attention to comfort and basic needs. Artists often spend long hours at their tables solo. Provide easy access to water and restrooms, and if possible set up a small “artists’ lounge” or back-row space where they can take a quick break or have a helper cover their table. Offer services like on-site “art supply” vendors or battery charging stations nearby – these are little perks that show you care. Ensure the lighting is adequate (artists need good light to display details) and the temperature is comfortable. A notorious example of getting this wrong was Anime Expo 2016, where artist alley was moved to a large underground hall; despite the bigger space, concerns were raised about artist alley conditions due to ventilation issues that caused the area to become hot and stuffy. The lesson: if you repurpose a space like a parking garage or basement for artists, invest in extra fans or AC equipment. Nothing sours artists faster than feeling like they’ve been put in a worse location than the main exhibitors.
Smart Promo Codes & Presale Access
Create percentage or flat-rate discount codes with usage limits, date ranges, and ticket type restrictions. Plus unlock codes for private presales.
Another tip: consider traffic flow within artist alley. Attendees tend to slow down and chat more at artist tables than at vendor booths, which is wonderful but can clog narrow aisles. Make artist alley aisles a bit wider if you can (e.g. 10 feet instead of 8) to accommodate browsing clusters. Arrange tables in neat rows and label them (A1, A2, etc.) on a printed map so attendees can find their favorite artist from your program or app. If space allows, some cons include a small stage for art demos or drawing workshops in the artist alley area – this can draw attendees over and create cross-traffic that benefits all artists. Just be mindful of noise levels; keep any amplified sound minimal so artists don’t have to shout to talk to customers.
When finalizing your convention table setup, standardization is your best friend. Most organizers default to standard 6-foot or 8-foot rectangular tables paired with two chairs and a basic pipe-and-drape backdrop. However, the way you configure these elements dictates the flow of the room. Ensure that the drape height doesn’t obstruct venue sightlines or block essential exit signs. For a polished look, mandate that all tables include a fire-retardant skirting that reaches the floor, allowing artists to hide excess inventory and empty storage bins out of sight. This simple requirement instantly elevates the visual professionalism of the entire alley.
Balancing Independent Artists and Commercial Vendors
A thriving convention needs both the big vendors (comic retailers, toy companies, game studios) and the grassroots artists – they complement each other to create a rich fan marketplace. However, tensions can arise if one feels the other is encroaching on their turf, so striking a balance is important. Set clear policies on what types of products are allowed in Artist Alley versus the main exhibitor area. Typically, artist alley is for creators selling original or fan-made art, not mass-produced merchandise or licensed goods (and many alleys ban the resale of any manufactured items). Enforce these rules politely but firmly; if an “artist” shows up with a rack of bootleg t-shirts, they should really be in the vendor hall, and you may need to relocate or remove them to be fair to true artists.
Placement strategy can also help balance interests. If you know a popular artist (say a famous comic book artist or internet creator) is going to have massive lines, you might actually position them at a corner of artist alley or even within the vendor area as a special guest booth, to give breathing room for lines. Conversely, if an indie vendor primarily sells their own handcrafted art (like a self-published comic or handmade jewelry), you might offer them a choice to be in artist alley or a vendor booth, depending on which vibe fits them – but keep pricing consistent with the area they choose, to be fair to others.
Equitable pricing is another aspect of balance. Artist alley tables are usually much cheaper than standard exhibitor booths, acknowledging that independent artists operate on thinner margins. For example, at major comic cons, artist alley table prices might cost $300–$600 total for the weekend, whereas a regular 10’x10’ exhibitor booth can run $1000+ according to standard comic con booth pricing breakdowns. It wouldn’t be fair to let a commercial retailer sneak into artist alley rates. Thus, maintain category distinctions in your registration process. Some events introduce a middle tier (e.g. “Small Press” booths) to accommodate indie publishers or creators who are beyond artist alley but not a big company. This tiered approach – Artist Alley, Small Press, Standard Exhibitor, Premium Exhibitor – lets you serve different types of participants at appropriate fee levels, while ensuring everyone’s placed in the right zone.
Managing Artist Alley Crowds and Lines
Popular artists can draw big crowds – a new print by a fan-favourite illustrator might spark a line before the hall even opens. Prepare a plan to manage lines within the artist alley. One effective tactic is using a numbered ticket system for highly sought-after artists: attendees can come early, grab a ticket for a time slot or queue number, and return later rather than clogging the aisle. If that’s not feasible, assign a volunteer or staffer as a “line wrangler” for the busiest tables. They can hold a sign saying “Line for Artist X starts here” and ensure it snakes along a wall or an out-of-the-way path. Be mindful of neighboring artists; don’t let one table’s queue block another artist’s display. If needed, you might shift a superstar artist to an endcap table (end of a row) so their line can extend behind the row.
Smooth Entry With Mobile Check-In
Scan tickets and manage entry with our mobile check-in app. Supports photo ID verification, real-time capacity tracking, and multi-gate coordination.
It’s also wise to set expectations with attendees: clearly post the opening and closing times of artist alley (which might differ slightly from the main exhibitor hall hours to give artists a break or time to set up). Announce via signs or the PA if any artists have to leave early or have capped their sales for the day, so people aren’t queueing needlessly. Another crowd management tip from anime cons is having a “preview hour” or early access for VIP badge holders before general crowds enter. This can spread out the rush and give hardcore collectors a chance to snag limited items without everyone piling in at once. Just ensure that standard attendees still get a fair chance later, to avoid any resentment.
Above all, keep communication open. If an artist is overwhelmed by a crowd, empower them to signal staff for help. Conversely, if an artist has no one stopping by, see if staff or volunteers can engage attendees by showcasing that artist’s work or even relocating them to a better spot (perhaps a last-minute cancellation opened a table near a busier area). Treat the artist alley like a community within your con – a little extra care and responsiveness here goes a long way to maintaining a positive, creative vibe that fans and artists alike will rave about.
Recruiting and Curating Vendors & Exhibitors
Application Process and Vetting Criteria
Long before the doors open, you need to line up a roster of vendors and exhibitors that will appeal to your attendees. A well-run vendor application process sets the tone for professionalism and ensures you attract the right mix. Start by determining how many vendor booths you can accommodate (based on your layout plan) and what types of products or services fit your event’s theme. Then, craft an application form that gathers key info: the company/artist name, what they sell, any past convention experience, size of space needed, power or internet needs, etc. Make the application available early – many big conventions open exhibitor applications 6–12 months in advance to allow for navigating the application and allocation process. Promote it on your website and social channels, and consider reaching out directly to popular vendors from similar events.
For fan conventions, you might not need to turn away many vendors – often demand exceeds space and you’ll fill up quickly. But be prepared with a basic vetting process: ensure applicants align with your content guidelines (e.g. no ultra-mature content if you’re a family-friendly con, or no competing ticketed events promotion) and have a reputation for professional behavior. It’s common to ask for references or a history of other shows they’ve done, especially for first-time exhibitors. Some cons even check if a vendor has been reported for selling bootleg or unlicensed merchandise in the past – protecting your attendees from counterfeit goods is important, and license-holders at big cons are vigilant about rooting out bootlegs. Make clear in the terms that vendors found with counterfeit products or violating rules can be removed without refund; this deters bad actors from applying in the first place.
If you have more applicants than space, create a waitlist system. Let vendors know their status (accepted, waitlisted, or declined) by a certain date. Being prompt and transparent here shows professionalism. For waitlisted vendors, sometimes you can offer alternative participation like a sponsorship package or a shared promotional table, if appropriate. Also decide how you’ll allocate prime spaces – some expos charge premium fees for corners or high-traffic spots, while others assign all standard booths uniformly and maybe only sponsors get special placement. Whatever your approach, communicate it. A smaller gaming expo might simply do first-come-first-paid on booth selection, whereas a massive trade show uses priority points or seniority. Document the policy to avoid confusion or accusations of favoritism.
Balancing Vendor Mix and Avoiding Redundancy
Think of curating your exhibitor hall like curating a great playlist – variety and pacing matter. Attendees will spend hours browsing, and you want to offer a mix of categories: e.g. comics/manga sellers, toy retailers, apparel, crafts, indie game studios, fan clubs, maybe an artist alley, etc. If your con has a specific genre (say it’s an anime convention), of course most vendors will cater to that, but still aim for diversity within the niche (not 20 vendors all selling the exact same import figurines). Too much redundancy can hurt sales as vendors compete heavily on price or fans buy from the first booth and ignore the rest.
Automated Waiting Lists for Sold-Out Events
Capture demand when tickets sell out and automatically notify waitlisted buyers when tickets become available through cancellations or resale.
One strategy is to limit the number of booths in certain categories if possible. For instance, at a 10,000-attendee con you might decide that you’ll only accept up to 5 t-shirt vendors, 3 plushie vendors, 4 comic retailers, etc., adjusting ratios based on what attendees want most. Use your past experience or ask your community what they’re most interested in. Also, pay attention to vendor proposals that stand out: unique offerings (like an official VR demo station, or an academic institution promoting game design courses) can add unexpected value to your floor. Make room for these if you can, even if it means saying no to a 15th Funko Pop seller.
Geographic and cultural variety is another plus. At international-scale cons, it’s great to have exhibitors from different countries – like a Japanese anime studio booth next to a French comics publisher, giving fans a chance to see content they might otherwise miss. If you’re running a local fan con, you might prioritize local businesses and artists (boosting community ties) but also bring in one or two out-of-town specialty vendors to spice things up. The rise of niche conventions shows how passionate attendees are about specific interests, and niche conventions are shaping industry events by catering deeply to these communities. Even niche fanbases appreciate a few wild card vendors. For example, a steampunk convention could mainly host costume and prop vendors, but throwing in an antique book seller or a tea shop booth can pleasantly surprise the crowd.
Finally, keep an eye on exclusivity and competition. It’s generally not advisable (or fair) to grant any vendor exclusive rights to be “the only one” selling a certain very broad product unless they’re a title sponsor. But you can avoid clustering direct competitors side by side. If two vendors sell similar swords or artwork, try to place them in different areas so they each have their own zone. This is something returning exhibitors will notice – they often request “please don’t put me next to X Comics, we sell the same line.” While you can’t accommodate all requests, do your best to spread similar vendors apart to encourage a healthy distribution of attendee spending. A well-balanced hall means happier vendors and a more engaging shopping experience for fans.
Communicating Rules and Expectations
Clear, early communication with your exhibitors is essential. Once vendors are confirmed, provide them with an Exhibitor Handbook or Kit detailing all the rules, expectations, and key info. This packet (often a PDF or web portal) should include:
- Setup and teardown schedules: Exact dates and times for load-in and load-out, including any staged entry times if you’re doing it in waves. (E.g. “Booths 1-50 may begin load-in at 8:00 AM Friday.”)
- Booth specifications: Dimensions of their space, what’s included (tables, chairs, pipe-and-drape, carpet, etc.), and options to order extras like electricity or additional furnishings.
- Venue regulations: Any restrictions from the venue or city – for example, rules on open flames (if someone sells candles), weapons policy (for vendors selling prop weapons, outline peacebonding rules), noise limits, or helium balloons (many venues ban them). Also, safety rules like keeping fire exits clear.
- Sales tax/licensing info: In many locales, vendors need a temporary sales tax permit or must collect tax – provide guidance on how to obtain permits and any deadlines. This is a commonly overlooked area. If your event is in, say, California, you’d inform vendors they must have a BOE seller’s permit and list the event address. Show you’re on top of compliance to build trust and foster vendor friendships.
- Insurance requirements: More conventions are requiring exhibitors to carry liability insurance (often $1M policy). If you do, explain how they can purchase it, as utilities and insurance must be ordered separately. Don’t surprise vendors on-site with, “Where’s your insurance?” – tell them in advance.
- Code of conduct: Reinforce your event’s policies on harassment, conduct, and how vendors should treat attendees and staff. Also outline a dispute resolution path – e.g. if a vendor has an issue, who do they contact? Encouraging professional behavior on both sides ensures a friendly hall.
Distribute this info as early as possible – at least a few months out for big shows, or a few weeks for smaller ones. Then keep communication channels open. Many organizers send periodic exhibitor newsletters or emails with updates (“Reminder: floor map will be finalized next week” or “New security measures this year: all staff will check vendor badges each morning at hall entry”). It’s hard to over-communicate here; vendors appreciate being kept in the loop. A well-informed exhibitor is less likely to make mistakes that cause headaches (like arriving late for load-in or bringing forbidden items). As one convention veteran quips, “90% of exhibitor crises can be headed off by something you could have put in the manual.”
Managing Waitlists and Cancellations
Inevitably, life happens – vendors cancel last minute, or you have a waitlist of hopefuls in case space opens up. Have a plan for this scenario. For cancellations well in advance (outside your refund window), you can simply fill the spot from your waitlist. But close to the event, you might have empty booths that are already paid for – in those cases, consider allowing a booth share or transfer if your policy permits. Some cons let vendors on the waitlist take over a space by paying the original fee (and maybe the original vendor gets a partial refund if you’re generous). Others might upgrade an artist from Artist Alley to that booth at no charge, as a surprise opportunity. Whatever you do, avoid visible empty booths on show day; it not only looks bad for attendees, but it’s lost opportunity.
Grow Your Social Following With Every Sale
Require social media follows, shares, or playlist adds to unlock presale access or special pricing. Turn every ticket purchase into audience growth.
Maintaining a waitlist hierarchy (who’s first in line) should be done by the same criteria you accepted vendors – usually first-come or a ranking from your jury process. If a slot opens two weeks out, quickly reach out to the next on the list. It helps to ask waitlisted vendors in advance: “If a space opens last-minute, what is the latest you could be notified and still participate?” Many local vendors can jump in with just a day’s notice, whereas an international exhibitor might need weeks. Know these limits so you’re not scrambling or inviting someone who can’t make it, wasting precious time.
Another scenario is no-shows on the day of. By midday of move-in, check for any exhibitors who haven’t shown up. Try calling them – sometimes they’re just running late due to travel issues. But if by the show opening it’s clear a booth is abandoned, repurpose it. You might spread out nearby artists into that space (extra elbow room!), or use it as a promo/lounge area for attendees. At one small sci-fi con, a vendor no-show was quickly turned into a “fan art gallery” spot – staff gathered some art from attendees and made a mini-exhibit, salvaging the empty space. Be creative but also keep it fair (don’t, for example, let one vendor overrun into the empty space and effectively get two booths unless you’re okay with others complaining). Announce any available upgrades to all vendors if appropriate: “We have a vacant 10×10; if any artist wants to pay to move there, come to HQ.” That gives everyone equal chance.
Lastly, handle refunds or credits per your policy. If someone cancels last-minute and is not entitled to refund, that’s standard – but if you resell their space, you could consider a goodwill partial refund. Happy exhibitors are often repeat exhibitors, and a bit of empathy even when you’re contractually not obligated can foster loyalty. It’s a judgement call and depends on your budget, but experienced organizers know the long-term relationship is worth something. In any case, document how you handled it so you can refine your cancellation policies for next year.
Pre-Event Logistics and Communication
The Exhibitor Kit: Essential Information Packet
Once your floor plan is set and vendors are locked in, the next phase is detailed logistics planning. A cornerstone of this phase is the Exhibitor Kit (as touched on earlier in communications). This document or online portal is essentially the bible for all exhibitor operations. Beyond rules and schedules, it often includes order forms for services: electricity, internet, equipment rental, lead retrieval systems, etc. If you’re working with a general service contractor (like GES or Freeman for big trade shows), they usually help prepare this kit and manage service orders. But for fan conventions, especially medium and smaller ones, the organizer often coordinates many of these services directly.
Make sure the kit has a clear floor map with booth numbers – exhibitors will want to see where they are in relation to loading doors and major landmarks. Include contact info for key staff: e.g. who is the Exhibitor Coordinator (for questions), who to call during move-in for help, and how to reach security. Seasoned exhibitors appreciate a FAQ section like “What’s the height limit for my booth displays?” or “Can I ship items to the venue?” with answers (e.g. giving warehouse shipping address and dates). Providing these details in one place reduces the flood of individual questions you’ll get via email.
It’s also wise to share attendee demographic info if available (just broad strokes): for example, “Our attendance last year was 20,000 with an average age of 24, 60% male, 40% female” etc. Vendors use this to tailor what they bring. If you’ve sold out of VIP tickets or have data on how many 3-day vs 1-day passes sold, that can indicate what kind of buying crowd to expect on certain days. An informed exhibitor can stock enough inventory and plan staffing accordingly. Including this kind of info signals that you, as an organizer, are experienced and treating vendors as partners in putting on a great show.
Scheduling Load-In Times and Dock Access
Load-in day (or days) is when your carefully designed plan meets reality. Coordinating dozens or hundreds of vehicles, crates, and exhibitors arriving with their goods can be chaotic without a system. The best practice is to stagger load-in times by assigning each vendor a window and entry point. For example, “Friday 8:00–10:00 AM: booths 1-50” and “Friday 10:00 AM–12:00 PM: booths 51-100,” etc. Stagger by location too – if you have multiple loading bays or doors, group assignments so that people unloading in Hall A come in one way and Hall B another, to avoid traffic jams. Communicate clearly if vendors need to check in upon arrival or if they can go straight to their space.
Large venues may require a marshaling yard – a holding area where trucks queue up before being called to the dock. If your event is big enough to need that, you’ll work with the venue and possibly city authorities to manage it. But even smaller cons with a single loading dock should have a staffer or volunteer out front acting as a traffic warden on move-in day, directing vehicles, and checking credentials. Issue exhibitor badges or wristbands to vendors as they arrive (or allow pickup the night before) so you can control access to the hall.
Some events schedule a priority move-in for large or complex booths (like those that need forklifts, or corporate booths with heavy exhibits) a day early. This is common at trade shows where big booths pay for advance setup days. At fan cons, you might not have that luxury, but do identify if any vendor needs special accommodation – e.g. an artist with a huge sculpture piece might need extra time or door clearance. Work those out individually ahead of time. Also communicate any labor rules: if the venue is unionized, exhibitors might not be allowed to carry heavy items themselves beyond a certain weight, or there may be on-site labor to hire. Surprising a vendor with “you can’t use your own dolly, you must hire union crew” on the day-of leads to frustration, so if those rules exist, put them in the kit (especially important in some large U.S. convention centers).
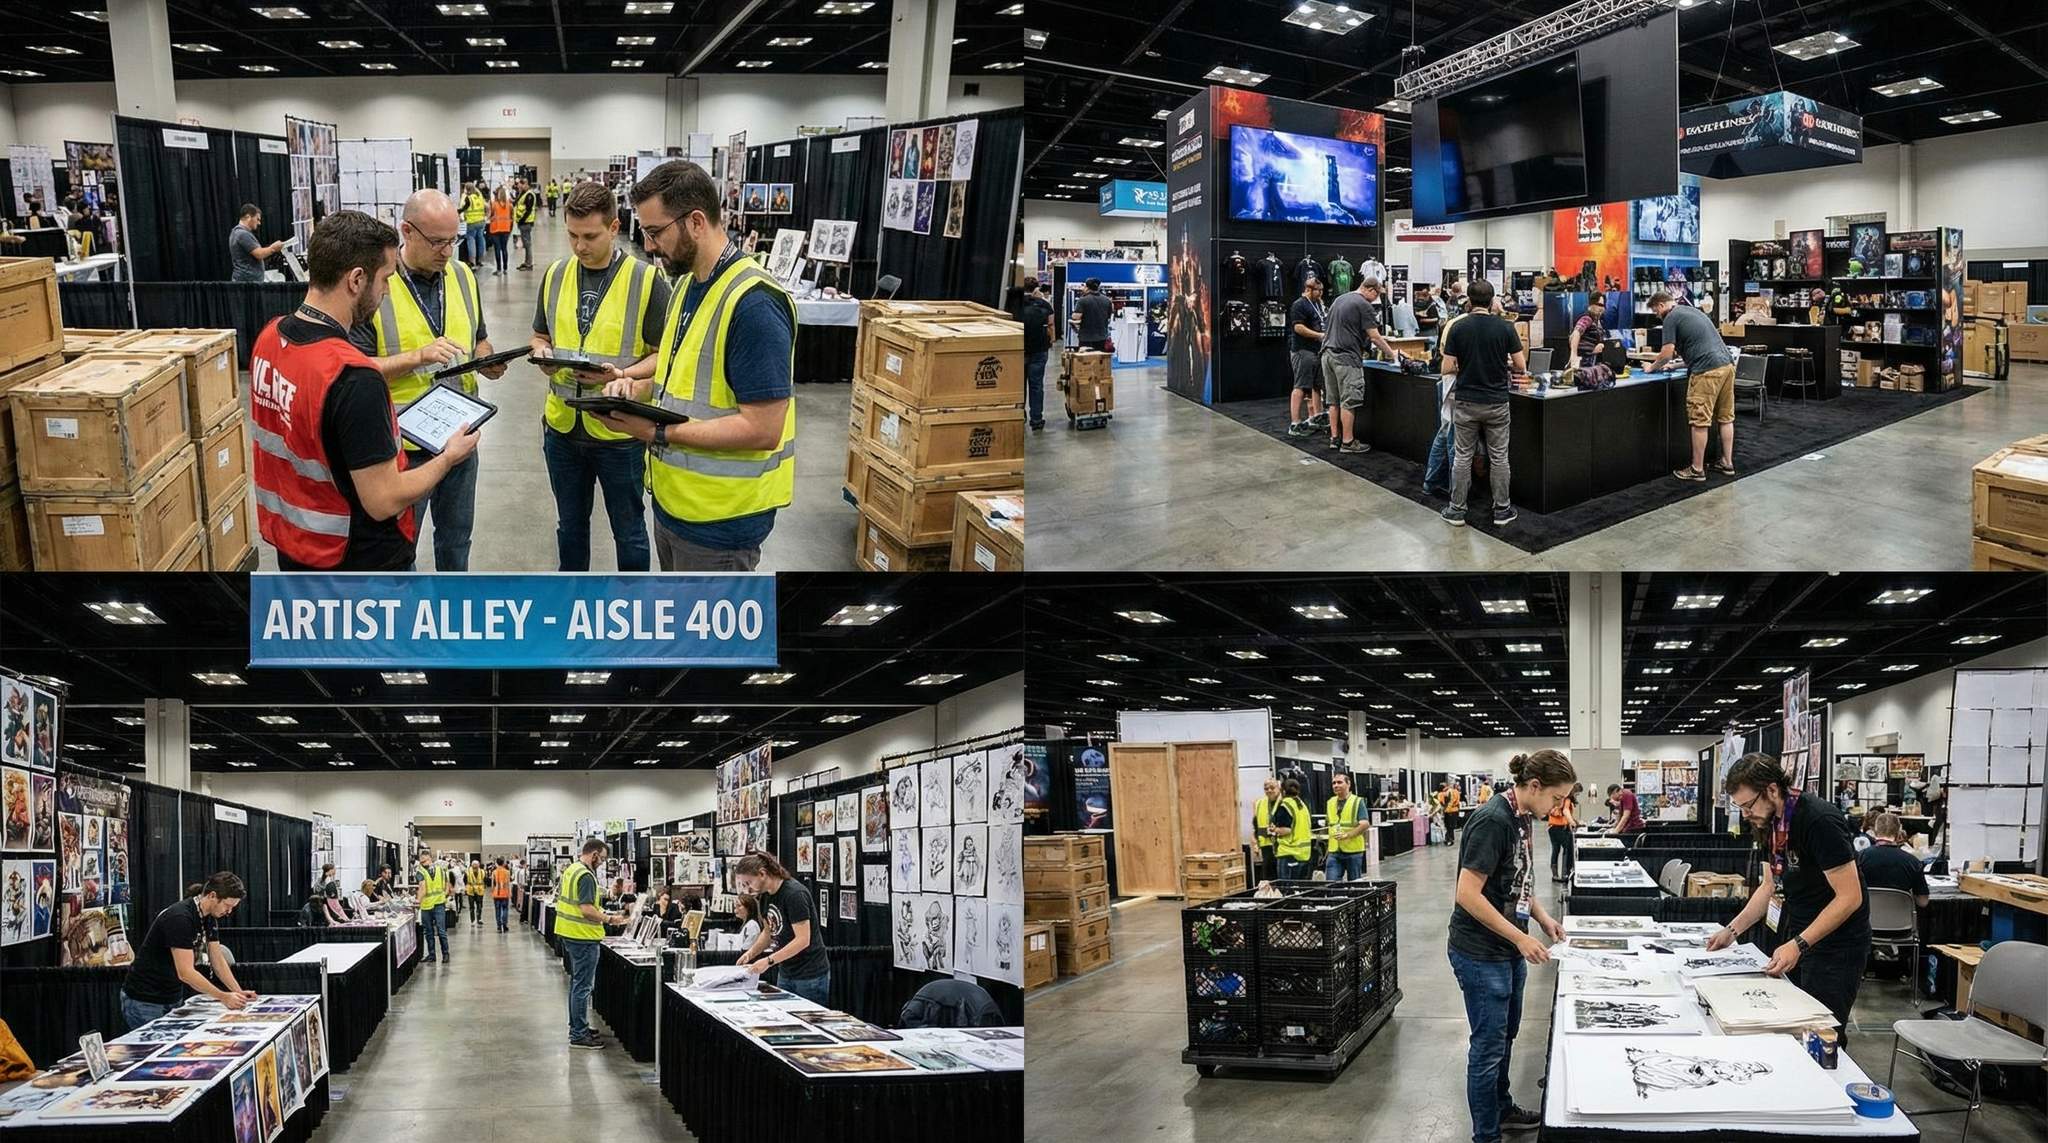
A pro tip from exhibition managers: create a load-in checklist and assign specific team members to zones of the hall. For example, Zone A manager checks that those 50 booths are arriving and setting up in the right spots, answers their questions, and ensures they’ve got what they ordered (table, chairs, etc.). This decentralizes the chaos and vendors know who to look for if they have an issue (“the person in the orange vest in our area”). Starting move-in on the right foot – orderly, on time, and with help readily available – gives exhibitors confidence in your operations.
Coordinating Booth Setup Needs (Power, Internet, etc.)
Most exhibitors will need some kind of utilities or special setup, and part of your pre-con logistics is coordinating these needs with the venue or contractors. Common requests include electricity drops, internet connections, and furniture rental. Typically, you’ll have gathered orders via the exhibitor forms; now ensure the venue has the layout showing where each drop goes. It’s a wise idea to do a floor walk with the venue tech team the day before move-in, marking the floor with tape or chalk where outlets should be, where pipe-and-drape goes, etc.
Double-check critical needs: if a vendor ordered a hardline internet connection because they’re running live demos, confirm with the venue IT that it’s live and at the correct speed. If a streamer or esports booth needs dedicated bandwidth, it might even be a separate VLAN or network – test it. Test power circuits in advance too. Nothing is worse than opening day and half the artist alley’s lights flicker because of an overloaded circuit. If there are heavy-draw devices (like a booth bringing arcade machines), they should be on their own circuits. Ideally, have an electrician on standby during setup in case someone decides to plug in extra gear last-minute.
Also arrange for any rentals and deliveries: for instance, if you rented carpet for the floor (common for larger expos to make booths look nicer), that installation might happen before booths set up. Plan the schedule accordingly. If you provide a table and two chairs per booth as standard, get them delivered and set overnight or early before vendors arrive so people aren’t waiting on furniture. It’s great to have a small cache of spare furniture too – inevitably someone will want an extra chair or the table you gave an artist is wobbly. Having a few on hand to swap out quickly shows responsiveness.
Don’t forget decor and signage for the hall itself. While vendors build their booths, your team should be putting up aisle signs, numbering each booth space (tape numbers on the floor or placards), hanging banners for section names (“Artist Alley” or “Gaming Zone”), and setting up any stages or special areas in the hall. All this should ideally be done before or concurrently with vendor setup so that by the end of move-in day, the hall looks like a cohesive, welcoming marketplace, not just a random assortment of tables. The smoother the setup phase, the more confident and happy your exhibitors will be going into Day 1.
For larger events, you will also need to coordinate closely with any external comic-con exhibit builder hired by your top-tier sponsors or mega-vendors. These professional fabrication teams construct massive, multi-story island booths that require early access, specialized rigging, and heavy machinery. As the organizer, your job is to act as the liaison between the exhibit building company and the venue’s union labor or safety marshals. Require these builders to submit their structural blueprints and rigging plots weeks in advance so your engineering team can approve weight loads and ensure their custom displays don’t encroach on neighboring aisles or violate fire codes.
Last-Minute Changes and Contingency Plans
Even with the best planning, expect the unexpected. Vendors will request last-minute changes (“Can I get an extra table?” “We need to move to a corner if possible.”), shipments might be delayed, or you might discover a measurement error where a booth doesn’t fit as planned. Go into the event with a contingency mindset. Have a few flexible spaces in your layout if possible – for example, a “Show Office” booth that could be condensed or moved if you desperately need to free a 10×10 space for an emergency reassign. Keep some basic supplies handy: gaffer tape, extension cords, power strips, pipe-and-drape pieces, and signage materials to handle on-the-fly fixes.
If a vendor no-shows (as discussed earlier), have that Plan B ready (fill it with something interesting). If a shipment of merchandise is lost or late, you can’t solve that directly but consider how to help the vendor salvage their presence – maybe you can feature them in an app notification or let them take online orders from customers for later delivery, so they don’t go home empty-handed due to a shipping snafu. For critical issues like a major exhibitor being delayed (imagine a big booth’s truck stuck in traffic), coordinate with the venue to possibly allow after-hours access for them to set up late, if rules permit. Many convention centers have strict hours, but they might allow an exception (with fees or staff overtime) to accommodate a VIP exhibitor. Those relationships matter.
From a communications angle, be ready to update your team and the exhibitors swiftly. If, say, weather causes a freight delay, send a notice through your exhibitor WhatsApp group or email: “We are aware some shipments are delayed due to the storm – we’re extending load-in hours tonight to 10 PM to accommodate.” That proactive approach keeps everyone calm. Likewise, brief your floor managers on what to do if, for example, power in one zone goes down or if an exhibitor sets up in the wrong space. (Pro tip: Always double-check that everyone set up at their correct booth number by end of move-in. It’s easier to fix before the show opens than to deal with two vendors claiming one spot!)
In short, have a Plan B (and C) for common issues: extra hand-trucks if the freight elevator is slow, an alternate entrance if a loading dock door breaks, even an emergency contact list of local backup vendors if you need to fill content. Veteran organizers often keep a roster of friendly local artists or exhibitors who can pop in on short notice (sometimes offering discounted day-of space) to maintain the hall’s energy if needed. It’s this kind of nimble problem-solving that defines great exhibitor hall management – your ability to adapt ensures that when the doors open, attendees and exhibitors alike see nothing but smooth sailing, even if you were up late fighting fires behind the scenes.
Smooth Load-In and Setup Day
Venue Coordination and Marshaling Yards
On load-in day, coordination with your venue operations team becomes paramount. Meet with the venue staff early in the morning to review the game plan: which doors will be open, where security checkpoints are, and how the traffic flow of carts and vehicles should go. If your event is large enough to involve a marshaling yard (where trucks queue before coming to the loading dock), ensure the marshaling coordinator has the latest schedule of when each big exhibitor is meant to come in. Radio communication is your friend here – equip your staff with walkie-talkies or a reliable messaging group so updates (like “Exhibitor X’s truck is here early, can we slot them in now?”) can happen in real time.
For smaller venues without formal marshaling, you might have to manage a parking lot line. Assign staff or volunteers to greet arriving vendors’ vehicles, check them against a list, and direct them to unload zones. If possible, implement a time-limited unloading policy: e.g. “15-minute unload then move your vehicle to long-term parking.” This prevents bottlenecks of vans at the door. Many cons include a placard in the exhibitor kit that vendors can print and place on their dashboard, indicating they are a vendor and which booth, which speeds up identification.
Be prepared for the venue to impose rules – some convention centers require all exhibitors to wear safety vests during move-in, or forbid children on the show floor on setup day, etc. Enforce these consistently. It’s wise to have a brief meeting with your floor staff just before opening the doors for load-in: go over key safety points (like watch for forklifts, no open-toed shoes if required, etc.), assign positions (who monitors the loading dock, who roams inside to help direct booths), and confirm everyone has the contact sheet of important numbers (venue manager, electrician, medical, etc.). When the trucks roll in and crates start moving, you want a small army of informed staff ready to assist both the exhibitors and the venue crew. A smoothly run load-in not only saves time and money, but it also leaves exhibitors impressed with your team’s professionalism right off the bat.
Check-In Procedures for Vendors
As vendors arrive, they need to check in and get credentialed. Typically, you’ll have an Exhibitor Registration desk or check-in station near the loading entrance or in the lobby. Staff this area with people who have the vendor list and can quickly hand out badges, badges holders, or wristbands, plus any welcome packet. The welcome packet might include things like their badge(s), perhaps meal coupons if you provide them, and a printed quick-guide of the con’s schedule or a thank-you letter. Time is of the essence during move-in, so keep check-in swift. Tip: have lines or windows alphabetically by company name or last name to distribute load if you have many exhibitors arriving at once.
Verify that the person picking up matches the records – you don’t want random people claiming to be “Bob’s Comics” and gaining access. Checking a photo ID against the registration name is standard for larger shows. For smaller cons, a confirmation email printout might suffice. It’s helpful to allow early badge pick-up the night before if possible; some exhibitors will be local and appreciate getting credentials in advance to avoid the morning rush.
In recent years, technology has improved check-in: some events use QR codes in confirmation emails that can be scanned to auto-print badges on-site, speeding up the process. This is part of a larger trend of utilizing tools to maximize exhibitor ROI and streamline operations. If your budget and tech allow, this can prevent long waits. Another emerging practice (especially in 2026 and beyond) is smart badging and RFID check-in, where each exhibitor badge is pre-loaded in the system and can just be tapped to activate it. This ties into security too: you can monitor that only verified exhibitors are entering during setup, which helps solve the problem of tracking engagement and access.
Make sure exhibitors know where to go after check-in. Often, you’ll give them a “move-in packet” with a map highlighting their booth location and the route to get there from the loading dock. Have plenty of staff inside the hall to escort or direct them, especially if the venue is large or maze-like. The first impression at check-in sets the tone – if it’s organized and friendly, even a nervous first-time vendor will feel at ease. Conversely, if they face a confused volunteer or missing badge, it plants seeds of doubt about the event. Plan this aspect as carefully as you do attendee registration. After all, exhibitors are your customers too, and their journey needs to start on the right foot.
On-Site Support During Move-In
As the setup progresses, aim to be the best host an exhibitor could ask for. Have a clearly identifiable Exhibitor Help Desk or office on the show floor where vendors can come with questions or needs (perhaps the same as the check-in desk, transitioning function after initial rush). Stock it with essentials: tools like scissors, tape, zip ties, hand carts to loan out, markers and paper for makeshift signs – all those little things someone might have forgotten. It’s common for an exhibitor to arrive and realize they need an extension cord or adapter. If you can lend them one on the spot (or sell it if appropriate), you save them a frantic trip to a store.
Deploy roving exhibitor support staff on the floor. These folks should proactively check on each booth: “Do you have everything you need? How’s your power? Any issues with your table placement?” This concierge-like service wows vendors, especially at fan cons where they might not expect it. It also helps you catch problems early. For example, an exhibitor might say, “Actually my outlet isn’t working.” Your staff can then immediately radio the electrician, rather than finding out after the hall opens. Keep a log of any requests or problems reported and follow up on each one. Even seemingly small issues (like a missing chair) should be resolved quickly – these details add up in exhibitors’ minds.
During move-in, maintain communication via announcements if needed: a PA system or loudspeaker can gently remind “We open to attendees in 2 hours, please finish any setup involving loud tools” or “Vehicle owners in the loading dock area, please move your cars as soon as unloaded.” Alternatively, using a text alert system or an exhibitors’ Telegram/Slack group can disseminate info in real time (“Heads up: the main roller door will close at 7 PM, use side door after”). Exhibitors appreciate being kept in the loop of the day’s timeline.
Another aspect of support is catering to basic needs. Move-in can be a long day – consider having water stations available, or even offering coffee and snacks for exhibitors. Some cons partner with a sponsor or the venue to provide a free coffee cart during morning load-in for vendors. It’s a small investment for a huge goodwill return. Additionally, clarify meal options: are concession stands open during setup? If not, maybe have a few menus from nearby restaurants that deliver, available at your help desk. A few thoughtful gestures here differentiate an okay organizer from an outstanding one. Remember, many vendors have traveled far and are tired – if your team’s support makes their setup painless, they’ll be in a great mood to start Day 1 and likely to return next year.
Ultimately, a flawless convention set up relies on this proactive, boots-on-the-ground support. The physical assembly of the show floor—from laying the aisle carpet to the final placement of stanchions—sets the operational baseline for the entire weekend. When your staff treats the setup phase with the same urgency and customer-service focus as the live event itself, you minimize opening-day friction and establish a culture of reliability that top-tier exhibitors expect.
Dealing with Overruns or Delays
Despite your carefully assigned schedules, sometimes move-in runs behind. Perhaps a truck arrived two hours late, or a complex booth installation (like a large prop statue) is taking longer than expected. First, pad in some buffer to your schedule if you can – for example, aim to have setup largely done the night before opening, leaving an extra few hours on show morning for stragglers or touches up. If you do hit a delay, prioritize critical path issues: what MUST be finished by opening? Focus manpower there. For example, if one aisle is still cluttered with shipping crates when doors are about to open, deploy all available hands to clear that aisle first.
Communicate honestly with your exhibitors if there’s a delay that affects them. If you decide to extend setup hours, let everyone know ASAP – many will be relieved to have extra time. Conversely, if the hall must be vacated at a certain time (union rules or venue closing), announce the countdown frequently (“Attention exhibitors: the hall lights will go off in 30 minutes…”). Exhibitors will hustle if you give clear warnings. Sometimes a small incentive helps: “We’ll have some pizzas in the exhibitor lounge at 8 PM for those staying late to finish setup,” which can maintain morale if folks are running late.
If an exhibitor simply cannot complete their elaborate build in time, you may have to make a tough call: either help them simplify it (leave out some elements, downsize) or delay opening that particular booth to the public. In a trade show, that booth might be closed with a curtain until ready. In a fan con, you might station a guard to keep attendees out of an unsafe half-built booth. These are last-resort scenarios, but be ready to manage them. Always loop in safety officials (like the venue/fire marshal) if any delay causes a safety hazard (like aisle obstruction) at opening – sometimes you might delay opening the hall to attendees by a few minutes if truly necessary to clear it safely, but try hard to avoid that.
One more tip: have a quick team debrief right after move-in ends (maybe later in the evening). Discuss what went well and what didn’t, while fresh in memory. Maybe traffic was snarled at one door – make a note to adjust that for load-out or next year. Continuous improvement is the mark of an experienced convention team. By catching and addressing issues early, you’ll ensure that delays on move-in day are just minor speed bumps, not roadblocks, in the convention’s success.
Managing the Exhibitor Hall During the Convention
Daily Operations and Floor Management
When the show opens and crowds pour in, your focus shifts to maintaining a smooth operation each day. Assign a dedicated Exhibitor Floor Manager or Hall Captain for every show day (often the same leads from setup). Their job is to roam the floor, be visible to exhibitors, and quickly address any concerns. Start each morning with a brief exhibitor update – perhaps an announcement 15 minutes before doors open, or a printed memo delivered to each booth via staff. This update can include the day’s highlights (e.g. “Today’s expected peak hours are around the celebrity signing at 2 PM; be prepared for heavier traffic then”) or reminders (“VIP early access starts at 9:30 AM, general at 10:00 AM”). Keeping vendors informed of the schedule empowers them to plan breaks and demos accordingly.
During show hours, ensure the help desk remains staffed. Common needs might include: badge reprints (someone misplaced theirs), ATM locations (if a vendor needs cash change), or reporting an issue (like “the booth across from me is playing music too loud”). Treat all inquiries seriously and resolve them if possible. If a vendor runs out of change, maybe a staff runner can help break a bill. If someone’s Square reader isn’t working, perhaps assist in troubleshooting or loan a backup if you have one. These little saves can be huge for a small business trying to maximize sales.
Keep an eye on traffic patterns as the day progresses. Are there any congested spots? If so, deploy volunteers to lightly redirect traffic or temporarily move a display causing the jam. Is any area too empty? Perhaps some programming or a cosplayer appearance near that area could draw people over – coordinate with programming staff if possible. Some conventions schedule roaming entertainers or cosplays exactly for this reason, to keep energy distributed throughout the hall. Also monitor the environmental conditions: temperature on the floor (massive crowds can heat a hall quickly, so coordinate with venue HVAC to adjust as needed), sound levels (is the PA too loud or a booth using a megaphone?), and cleanliness (schedule cleaning crew sweeps especially in food or demo areas).
It’s wise to have a quick end-of-day checklist for hall management: once attendees leave, sweep through and ensure no attendees lingered hiding under tables (it happens!). Announce the hall is closed and vendors should cover their booths or leave if required. Security will take over for the night, but you as an organizer might do rounds to verify high-value areas (like booths with expensive merchandise) are secure and that vendors who requested overnight power (for fridges or servers) have it functional. By actively managing the show floor throughout each day, you catch issues early and keep the machine running with minimal hiccups, much like a floor manager in retail who’s always circulating to check stock and customer needs.
Crowd and Line Management Tactics
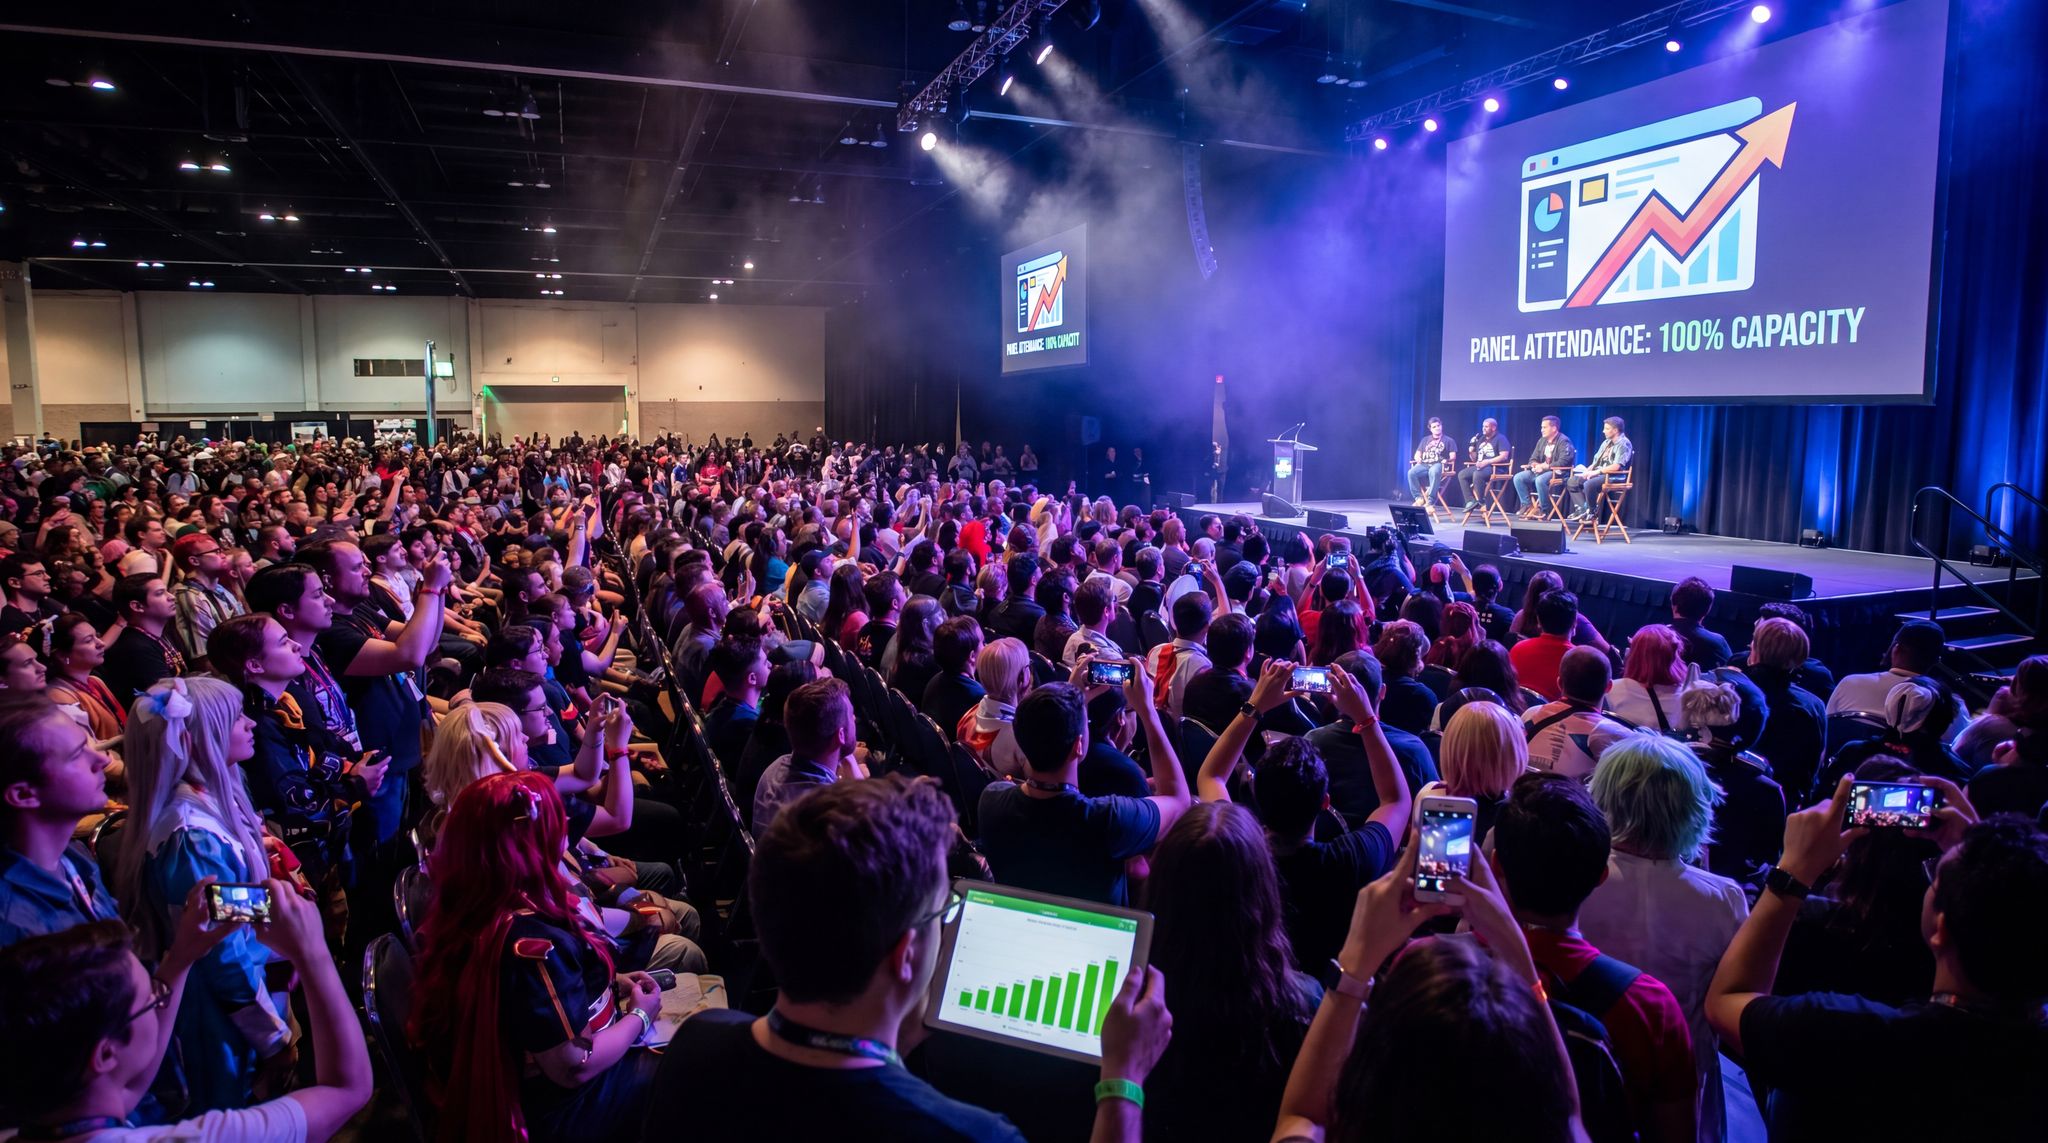
Big conventions know that crowd control on the exhibitor floor is a unique challenge. Unlike panel rooms where line queues are separate, here the “attraction” is scattered across booths. As mentioned earlier, have a plan and team for any anticipated lines: popular booths selling limited-edition merch, celebrity autograph tables (if they’re in the hall), or demo stations where people linger. Clearly mark where lines should form. A simple solution is to put tape on the floor with arrows or use stanchions for a few known hot booths. Some events give out line tickets or time allotments for shopping heavy-demand booths. For example, at San Diego Comic-Con, Funko has used morning lotteries to distribute limited booth shopping slots to manage the overwhelming demand. If your con has any exclusives or major launches, consider a ticket or wristband system to avoid massive queues.
For general crowd flow, deploy “aisle monitors” – staff or volunteers who subtly prevent bottlenecks. They might encourage attendees to keep moving if they stop in the middle of a congested aisle to take photos or chat. Train them to be polite and positive (“Hey folks, let’s slide over here to chat so others can get through, thank you!”). Also, empower them to enforce rules like no blocking fire exits, no sitting in aisles, etc. If the hall has a stage or event (like cosplay showcases or mini-concerts at a booth), those tend to draw crowds that spill into walkways. Roping off an area or arranging seating on the fly can contain that.
Emergencies or unexpected surges need special handling. If a surprise celebrity walks the floor (it happens!), a crowd may swarm. Be ready to dispatch security to gently escort them or disperse the crowd if it impedes safety. Have a code word or quick communication method for your team to signal if an area is over capacity or if there’s a medical emergency in the hall. Stopping entry to the hall temporarily is a last resort if density becomes unsafe, but it’s been done at events when aisles got too full. Better is to manage flow by maybe opening an alternate exit or announcing a cool activity elsewhere to draw people out naturally.
Attendee experience is also at stake with line management. Bored, frustrated people in a slow line will complain. Some conventions employ “line entertainment” – e.g. volunteers with trivia questions, or a cosplay volunteer who goes down the line interacting. This isn’t always possible for vendor lines, but at least ensure lines are acknowledged (“Estimated wait from here: 20 minutes” signs do wonders to set expectations). If a product sells out, have staff inform those in line as soon as that’s confirmed, to prevent needless waiting. In summary, watch your crowds like a hawk and be ready to adjust on the fly: re-routing foot traffic, adding a second cashier to a busy booth if you have a floater team, or coordinating with your event tech for announcements. A dynamic approach to crowd control keeps things safe and enjoyable rather than chaotic.
Security, Safety, and Compliance on the Floor
Security in the exhibitor hall goes beyond just preventing theft (though that’s a big part). It’s about protecting people, product, and intellectual property. Work closely with your security team (whether venue-provided or hired) to establish a presence without stifling the fun. Typically, you’ll want security guards at all entrances checking that only badged individuals (exhibitors or staff) are coming in during closed hours, and that during show hours no one sneaks in through a back door. Many events also check bags at the entrance for prohibited items – coordinate such checkpoints so they don’t create huge backups.
Theft can be a concern, especially in artist alleys or for vendors with valuable collectibles. Encourage exhibitors to be vigilant and perhaps to buddy up (watch each other’s booths during breaks). As organizers, consider providing a secure storage room where vendors can lock away high-value items overnight. At minimum, overnight security patrols should walk the floor. Some big cons hire off-duty police or dedicated overnight guards just for the exhibit hall. Make sure lights are dimmed but not fully off at night – enough illumination for security to see. If an incident does happen (like a report of shoplifting or a missing item), have a clear protocol: security should respond and also the convention team should follow up, maybe reviewing any CCTV if available, and helping the vendor file a police report if needed.
Safety includes things like prop weapons and content restrictions. If your con allows cosplay weapons, ensure enforcement of peace-bonding (tying off triggers, checking edges) is done at the door so no sharp blades or functional firearms get onto the floor. Likewise, if any vendor is selling something like a replica weapon, they should securely package it upon sale so it’s not swung around. Be attentive to anything potentially dangerous: an overloaded plug at a booth, an extension cord crossing an aisle (tape it down immediately), a display that looks like it could tip in an earthquake (ask the vendor to secure it or remove it). It’s all about preventing accidents. Have basic first aid available in or near the hall – maybe a first aid booth or roaming EMTs. With large crowds, you may see the occasional fainting or minor injury; a quick medical response is crucial.
Compliance matters too. Are vendors following the rules you set? Throughout the event, take note if someone is violating policies – maybe someone expanded their booth into the aisle, or a vendor started selling unapproved adult material openly. Address these firmly but professionally. Often a polite warning suffices: “Please move your display behind your line, we need to keep the aisle clear per fire code,” or “Remember our policy about explicit art – that needs to be binder-only display if minors are around.” For serious or repeated issues, you might have to escalate to removing a vendor from the show floor (rare, but it happens, for example if someone is selling bootlegs after being warned). Your willingness to enforce rules fairly will be noticed by other vendors and attendees and builds trust that you run a safe, quality show.
Handling Issues: Complaints, Conflicts, Emergencies
No matter how great your event, some issues will arise – how you handle them distinguishes a seasoned organizer. Set up an issue reporting channel for exhibitors. This could be as simple as instructing them to come to the Exhibitor Help Desk or message a certain phone number/Slack channel for assistance. When a vendor raises a complaint or concern, acknowledge it immediately, even if you can’t solve it right away. Common complaints might be “Attendees are blocking my booth taking photos” or “The vendor behind me is encroaching into my space” or “It’s too cold/hot in here at my spot.” Train your floor managers in conflict resolution: approach each problem calmly, hear all sides if it’s between vendors, and seek a compromise.
For example, if two artists argue over table boundary, remind them of the dimensions and diplomatically adjust things if needed, maybe giving them a little extra communal space if possible. If a vendor complains about low sales or placement, that’s tricky – you can’t re-floorplan mid-show (usually). In such cases, empathize and maybe suggest ways to drive traffic (offer to do a shout-out on social media about their booth, or place a directional sign if allowable). Showing you care can turn a soured vendor’s mood around, even if the root issue isn’t fully fixable on the spot.
Emergencies are the ultimate test. Have a clear emergency action plan and ensure staff know it. If there’s a medical emergency, who calls 911? If there’s a fire alarm, how do you evacuate the exhibitor hall? (Typically, exhibitors might need to leave via nearest exits, even if it means leaving cash boxes – safety first, with security guarding the area until people can return.) Conduct a quick refresher with your team each morning on what to do for various scenarios: injury, fire, power outage, unruly attendee, etc. One real-world example: at a comic convention, a portion of ceiling rigging fell onto the floor (no one was hurt thankfully) – staff instantly cordoned off the area, halted attendee entry, and coordinated with venue engineers to assess safety before resuming. They also informed exhibitors near that area about what was happening to keep panic low. This kind of composed, quick reaction only comes from prior thought and drills.
If an issue becomes public or “viral” (like an attendee live-tweeting a problem at a booth), address it transparently. Perhaps an attendee accuses a vendor of offensive behavior – you’d investigate promptly and take appropriate action (which could mean removing a vendor if harassment is confirmed, etc.), and communicate through official channels that you’re handling it. Conventions are communities, and news spreads fast. By handling complaints and emergencies with professionalism and empathy, you reinforce confidence among your exhibitors and attendees that your event is in capable hands. Remember, how you deal with the tough moments will likely be a big part of the post-con chatter. Aim to be the hero of those stories, not the villain.
Embracing Technology to Enhance Exhibitor Experiences
Interactive Floor Maps and Attendee Navigation
In 2026 and beyond, attendees expect digital aids to help navigate sprawling exhibit halls. Providing an interactive floor map through a mobile app or website is practically essential at larger events, and using interactive floor maps and booth discovery tools can significantly improve the attendee experience. These maps let users search for a specific vendor or booth number and see exactly where it is, often with a “you are here” dot for their own location. By implementing smart wayfinding and digital signage solutions, you make it easy for fans to find that obscure artist table or the vendor selling their must-have item. Many events also put large touchscreen kiosks or QR codes around the hall that open the map on a user’s phone, ensuring that trade show floors are easily navigable. During Comic-Con in 2023, for instance, attendees could scan QR codes in each aisle to pull up a list of all booths in that row.
Encourage exhibitors to update their profiles in the app (if you offer that feature) with a description and maybe a deal (“Mention the app and get 10% off”). This not only helps attendees plan their shopping, but can drive traffic to vendors who engage with the tech. Another innovation some cons use: augmented reality wayfinding – attendees hold up their phone camera and AR arrows guide them to a selected booth. For most, a good 2D map with search suffices, but AR adds a wow factor if you have the resources. The bottom line is, a well-designed digital map reduces frustration for attendees and keeps them circulating – which means more opportunities for every exhibitor.
On the organizer side, these navigation tools often provide analytics (like which booths are getting searched or bookmarked the most). Share some of those insights post-show with your vendors (“FYI, your booth was saved to 500 users’ itineraries!”) to demonstrate the reach and value of being at your con, which helps with retention. Good navigation tech is a win-win: happier attendees who don’t miss sections of the hall, and happier exhibitors who are easily found by their target fans.
Lead Capture and Real-Time Analytics for Vendors
Exhibitors, especially those from companies and publishers, crave measurable ROI from events. Rather than relying on a fishbowl of business cards, many are adopting digital lead capture apps and smart badge scanning to track booth visitors, moving away from the traditional fishbowl of business cards to seamless digital solutions. As an organizer, you can facilitate this by offering or integrating a lead retrieval system. For instance, each attendee badge could have a QR code or RFID chip that an exhibitor can scan (with attendee permission) to collect their info for follow-up. According to trade show research, 62% of exhibitors now use mobile lead capture tools at events, solving the lingering problem of lost leads. If your ticketing or event platform (like Ticket Fairy or others) supports exhibitor lead capture, highlight that to your vendors – it’s a selling point for why they should come back. It assures them they won’t lose out on potential customers just because the show is busy; every scan is a saved contact.
Real-time analytics are another game-changer. Forward-thinking conventions provide exhibitors with a dashboard showing metrics like foot traffic near their booth (if you’re using smart badges or floor sensors), number of scans, and even engagement time. For example, a vendor could see that on Day 1 between 2-3 PM (when they ran a demo), their booth traffic spiked by 30%. These insights allow mid-event adjustments – maybe they’ll schedule another demo at a similar time, or ask you for a little promo push if they see traffic is lagging. On the organizer’s end, you might use aggregate data to identify hot spots on the floor or which activation is drawing crowds. RFID badges can generate heat maps of crowd movement, which help in real-time crowd control as well as post-mortem layout planning.
Not every fan convention will have ultra-sophisticated analytics, but even simple data can help. For instance, use people counters at hall entrances to report daily footfall. Or equip volunteers to manually sample count at certain aisles. Then share some figures with exhibitors: “Approx 10,000 attendees visited the Exhibit Hall on Saturday between 10 AM and 6 PM.” It gives context for vendors to evaluate their conversion rates. The more you can empower exhibitors with information – both during and after the event – the more they can justify their spend and improve their approach, leading to better sales and satisfaction. As one event technologist put it, data turns a convention from a shot in the dark into a targeted engagement opportunity.
Cashless Payments and On-Site Sales Tech
The world of payments at events is rapidly evolving. At modern conventions, attendees often prefer cashless transactions – using credit cards, mobile payments, or even event-specific RFID wristbands linked to wallets. This shift is part of a broader trend of using technology as the game changer for event commerce. As an organizer, you can encourage your vendors to accommodate fast, cashless sales. This might involve working with a payment processing partner or simply educating smaller vendors on easy tech like Square, PayPal Here, or other POS systems. Some venues are even 100% cashless now for their own food & beverage, etc., a policy seen at major events like San Diego Comic-Con 2025, which primes attendees to expect cashless everywhere.
Consider providing robust Wi-Fi or wired internet in the hall, specifically for vendors processing transactions. Too often, a crowded event means cell networks jam and card readers fail. Investing in good connectivity (perhaps a dedicated network for exhibitors separate from public Wi-Fi) pays off in quicker sales and happier vendors. If you have the capability, you might integrate a unified payment system for the event – for example, some festivals use NFC wristbands that attendees preload with funds and can tap to pay at any vendor. This can speed up lines and even boost spending (people tend to spend more when it’s just a tap). However, implementing that across a comic con with independent vendors can be complex unless your registration platform supports it widely.
At minimum, ensure electrical power is available so vendors can keep devices charged, and tip them off about bringing backup batteries. Check if any vendor plans to use printers or heavier POS hardware – they might need a stronger power drop. Shorter lines through better tech will directly impact sales, and integrating gamification through RFID and NFC can further enhance the experience. Nobody wants to lose a sale because a card reader timed out or the ATM ran dry. Encourage vendors to have multiple payment options (cash, card, mobile) and consider having an ATM machine on site if cash is still in play – position it centrally and note it on the map.
In terms of sales tracking, you could gather interesting macro stats like sales volume (if vendors are willing to share post-show data anonymously) to attract sponsors or justify your attendance figures. There are case studies of conventions integrating point-of-sale data to identify top-selling product categories, which in turn helps guide future vendor curation. That might be advanced, but it’s on the horizon as events get more data-driven. At the end of the day, facilitating smooth commerce on your show floor is key to everyone’s success – attendees get what they want, exhibitors make money, and you as the organizer likely earn return business and perhaps a cut via booth fees or even revenue share in some cases. So it’s worth embracing the latest payment tech and making sure the infrastructure can handle the weekend sales frenzy.
Virtual Extensions and Online Marketplace (Hybrid Models)
An interesting trend growing from the pandemic era is the integration of virtual components or online marketplaces alongside the physical convention. While nothing replaces the energy of an in-person exhibitor hall, offering a way for fans to purchase merch online (during or after the event) can greatly expand vendors’ reach. Some conventions now host a “virtual artist alley” for a week after the con – essentially a webpage with listings for each artist or vendor, linking to their online store or allowing direct purchases of items that maybe sold out on-site. This is a great value-add for exhibitors, as it helps them catch additional sales from attendees who couldn’t attend or budgeted after going home. It also makes the event more accessible globally (people from other countries can participate in the shopping experience), which was a big focus during 2020-2021 virtual cons.
If you do a virtual marketplace, plan it in agreement with exhibitors. Some might opt out if they don’t have shipping capability. Others will jump at it. You’ll need to coordinate either listing their products or at least their contact/shop info. This could even be a revenue opportunity for the con (e.g. charging a small fee or commission for listing on the official post-con store). For example, Anime Expo Lite 2021 had an online exhibitor hall with exclusive drops time-synced to the event, driving buzz and sales beyond the show floor.
On a simpler note, maintain an exhibitor directory page on your event website year-round. List all vendors and artists with a short description and links. This gives exhibitors SEO value and traffic long after the con, and helps attendees rediscover that cool vendor they saw. It’s essentially free marketing for your partners, which strengthens their loyalty to your event. In 2026, conventions are increasingly seen as community builders year-round, not just a weekend event. By continuing the marketplace in the digital realm, you keep the community engaged (attendees appreciate getting that one print they missed) and you demonstrate to vendors that you’re invested in their success beyond the booth.
Hybrid models also cover things like live-streaming booth showcases or enabling attendees to book virtual appointments with exhibitors (the latter mostly for trade shows or art commissions). If your convention has the bandwidth, doing a couple of live video tours – “let’s walk through Artist Alley live on Twitch” – can drive online followers to become future attendees or at least purchase from artists online. It’s promotion for your event and your vendors simultaneously. The key is ensuring the virtual doesn’t cannibalize the physical experience but rather complements it. Done right, a hybrid approach can extend the exhibitor hall’s impact, turning a 3-day con into a continuous cycle of engagement and sales that benefits everyone.
Keeping Exhibitors Happy and Ensuring ROI
Providing Amenities and Hospitality
Happy exhibitors are the backbone of a thriving convention – if they enjoy the experience, they’ll not only come back, but also spread the word to other high-quality vendors. One way to boost satisfaction is by treating your exhibitors with a bit of hospitality. This can be as basic as free coffee in the mornings, or as fancy as a dedicated Exhibitors Lounge away from the crowds where they can relax. Some large cons provide complimentary snacks, charging stations, even massages in a vendor lounge to combat the long hours on their feet. While that level might be out of budget for many events, consider at least having water coolers and maybe a few comfortable chairs in a staff-only area where vendors (with badge) can catch their breath.
Another appreciated amenity is help with the mundane logistics. For example, coordinate with a shipping provider for an end-of-show freight pick-up – vendors love when they can hand off their packed boxes to UPS/FedEx on-site Sunday night or Monday morning, rather than hauling them themselves. If your venue has limited food options, see if you can get a vendor delivery service or pre-order system so exhibitors can get lunch brought to their booth. Even arranging vendor-exclusive discounts (like a deal with a local restaurant or the venue cafeteria for exhibitors) shows you’re thinking of their needs. At anime conventions in Japan, it’s common to see volunteers do drink rounds, selling bottled tea to artists behind their tables so they don’t have to leave – a small convenience that goes a long way.
Don’t forget intangible amenities: recognition and appreciation. Thank your vendors publicly in closing announcements or in the program book. You might host a simple “Exhibitors Mixer” after hours if people are staying at nearby hotels – giving a chance for vendors, artists, and staff to network and unwind. This fosters community; many veteran con runners know that the bond with their regular vendors is like a partnership. Some cons have annual awards or shout-outs (“Best Booth Display” or “Fan Favorite Artist” voted by attendees) – even if it’s just a fun ribbon or certificate, it gamifies the experience and gives exhibitors additional pride in their participation.
Gathering Feedback and Post-Event Surveys
The show might be over, but your work isn’t done until you’ve gathered feedback and measured results. Shortly after the event (within a week), send out a post-event survey or feedback form specifically for exhibitors and artists. Ask about their sales, the traffic they perceived, which aspects of the organization were good or bad, and if they’d return or recommend the event. Keep it concise – they likely have survey fatigue – but target key areas: e.g. “Rate the load-in process,” “Rate communication and staff helpfulness,” “Was the booth price fair for the value received?” and open-ended questions for suggestions.
Look for patterns in responses. If 50% say the hall music was too loud or the Sunday hours too long, that’s actionable. If several mention disappointments like “not enough foot traffic in our area,” examine your floor map hot spots versus cold spots – your data or simply walking observations might confirm if some corners need rethinking. Also pay attention to how many say they profited or met their ROI goals. An industry benchmark: a lot of exhibitors consider a show successful if they make at least 3-5x their booth cost in sales. Of course, this varies, but if many are below that, either the attendance wasn’t as promised or the crowd wasn’t the right target for them. Such insights can inform how you attract different vendors or market to attendees better.
Sometimes it’s helpful to do a more personal touch: as you walk the floor on the final day, talk to vendors. Thank them for coming and ask “How was the show for you?” You’ll get candid answers. Right after load-out, while everyone is tired, you might still ask a few top exhibitors for quick thoughts or do so via email in follow-up. Use this feedback to compile an internal report on exhibitor hall performance: note attendance vs. number of vendors, estimate of total vendor sales if you can get it (some will share their numbers privately), and any major issues or successes (e.g. “New ticketing system allowed scanning 500 leads, which translated into measurable sales and vendor X loved” or “Need to increase security overnight due to one theft incident”). This report not only helps next year’s planning but can be useful when pitching to new exhibitors or sponsors – showing you have a data-driven approach to improving the marketplace.
Most importantly, act on the feedback. Quick wins like “let’s provide clearer loading dock signs” can go on your to-do list immediately for next time. For bigger requests (e.g. “expand artist alley”), you might need budget or layout changes, but at least research feasibility. By closing the feedback loop – even emailing exhibitors later to say “You spoke, we listened: here are changes we’re making next year” – you build trust and enthusiasm. As the Center for Exhibition Industry Research notes, too many organizers focus on new sales and neglect retention, asking why exhibitor churn isn’t a bigger priority. Yet keeping even an extra 10-15% of exhibitors returning can save tens of thousands in acquisition costs, proving that retention is key to profitability. Listening and responding to feedback is the best retention strategy of all.
Building a Year-Round Exhibitor Community
Why limit the interaction with your exhibitors to just the event days? The top conventions foster a community feeling among their vendors and artists year-round. One way is through social media groups or forums – consider creating a private Facebook group or Discord for your confirmed (and even prospective) exhibitors. This becomes a space to share updates but also for vendors to network with each other, share tips (“Which hotel are you guys staying at?” or “Does anyone want to share a pallet shipment to save costs?”). It’s like an ongoing exhibitor club that people want to be part of. As an organizer, you can drop teasers about next year (“booth sales open next month, stay tuned”) and keep excitement up.
Periodic newsletters spotlighting an “Exhibitor of the Month” or sharing industry news (like new licensing laws or fan trends) are another way to keep engagement. For instance, if reports indicate that convention spending trends are rising, mention that to your partners, showing them the market is strong and your con is a part of it. Some conventions even organize off-season vendor meetups or attend other shows to scout and bond with exhibitors. If you or your team go to another con, say hi to your regular vendors there – they often do a circuit and appreciate the camaraderie.
Also, involve exhibitors in your planning when appropriate. Maybe run a poll in the group: “We’re considering extending Sunday hours by 2 hours – would you support that or prefer to end earlier?” Getting input makes them feel heard and can lead to decisions that benefit all. When you open applications for the next show, loyal past exhibitors could get early access or a loyalty discount as a thank you (some events do a 5-10% discount if you rebook on the last day of the con, locking them in). These practices acknowledge that your vendors aren’t interchangeable; they’re partners who contribute to the con’s uniqueness.
Another angle is sponsorship or cross-promotion. If you have a star vendor who’s been with you 5 years, maybe they’d sponsor a small prize or event at your con, further entwining them with the community. For example, an artist might design the badge art in exchange for a free booth – giving them exposure and you a cool design. Ultimately, treating exhibitors as part of the fan family (while still maintaining professional boundaries) creates a positive cycle. Many big cons have exhibitors with literally decades of attendance – they’ve grown alongside the convention. That kind of stability in your marketplace is gold, because it means attendees can count on their favourite vendors being there and new vendors see a reliable event with a supportive culture. Experienced con runners know that when exhibitors feel genuinely valued, they become some of your event’s greatest advocates and assets, ensuring exhibitors want your event to work.
Incentives for Returning and Long-Term Partnerships
In the competitive landscape of fan events and trade shows, securing repeat exhibitors is like keeping loyal customers – it’s far more cost-effective than finding new ones. So, create incentives for returning vendors that make them feel special. One common practice is a loyalty program or point system: for each year a vendor exhibits, they earn points that might translate into priority booth selection or slight discounts after a certain number of years. For example, a comic con might let 5-year veterans choose their booth a day before general sales begin, virtually guaranteeing them a prime spot if they want it. Be transparent about how this works to avoid confusion or a sense of unfairness from newer folks.
Early-bird rebooking deals are another tactic. Many expos will open next year’s booth sales on the last day of the current show – sometimes even having a dedicated rebooking desk – and offer, say, 10% off or a perk (like extra badges) if you commit and put down a deposit during the show. This leverages the excitement and (hopefully) the successful sales vendors are experiencing right then. It can lock in a good portion of your floor before everyone departs. Just be sure to follow up with a formal contract/invoice soon after and thank them for rebooking.
For key anchor exhibitors or sponsors – maybe a major comic publisher or game company that really draws crowds – think in terms of partnerships, not transactions. Have a debrief call or meeting with them post-event to discuss how it went and what could be improved for next year. Perhaps they want a bigger space or to host a tournament at your con; working that out early deepens their investment in your event. In return, maybe they can commit to a multi-year deal or bring an exclusive content drop next year. Multi-year contracts can provide financial stability (locking in rates and presence) but ensure they remain mutually beneficial, adjusting terms if your attendance grows significantly, for example.
Showcase success stories: if certain vendors did exceedingly well (record sales or huge crowds), and they’re okay with it, highlight that in your promotional materials or pitch deck for future exhibitors. It builds trustworthiness – new vendors see that others have thrived at your show, and returning ones feel proud to be part of an event where “Exhibitor X sold out of all inventory and made 200% ROI” (it happens!). According to industry analysis, average exhibitor retention rates can be as low as 65-75%, but the best events keep 85%+ coming back, as exhibitor retention below 85% requires significant effort to replace lost revenue. Strive for that high retention by continually rewarding loyalty and listening to concerns. Over time, you may even cultivate a waitlist of would-be exhibitors eager to snag any spot a departing vendor leaves – a great position to be in, illustrating that your exhibitor hall is a valued marketplace that vendors compete to be part of.
Smooth Load-Out and Tear-Down
Planning a Structured Load-Out Schedule
As the final day winds down, it’s crucial not to let the careful management fall apart. Load-out (tear-down) can devolve into chaos if everyone rushes to the docks at once. Just as you staggered move-in, have a structured load-out plan. Communicate the plan on the last morning or mid-show: for instance, “On Sunday, load-out will occur in waves. We will announce by aisle when you may bring vehicles to the loading area.” Often, it’s wise to allow smaller vendors (artist alley, those who can hand-carry) to pack up and exit first, since they don’t need dock access. Meanwhile, larger booths might take longer to dismantle anyway, so by the time they’re ready, the loading dock will have freed up from the first wave.
Enforce that no vehicles enter the dock area before the hall is officially closed and attendees are cleared – safety first. You may need security at dock entrances to check that vehicles have the proper credentials or timing. Some venues issue dock pass tickets with specific times (like a parking valet system: you get a call/text when it’s your turn to pull in). Figure out what method suits your scale. At a 500-exhibitor expo, they might assign colored passes: “Red group: 6:00–7:00 PM access, Blue group: 7:00–8:00 PM,” etc. Smaller events might not need formal passes but still coordinate via staff letting a few in at a time.
Make sure to communicate any hard deadlines: when must everything be out of the hall? Venues often have an “out by midnight” clause or similar. Exhibitors need to know this so they don’t dilly-dally. Encourage packing up promptly but safely. It helps to announce a couple of times: “The exhibitor hall is now closed to the public. Exhibitors, please begin your tear-down. You must be clear of the hall by 9:00 PM.” Then perhaps a 1-hour warning: “It’s 8:00 PM, one hour remains to load out.”
One more thing: consider traffic around the venue. If it’s a big downtown convention center, loading trucks leaving at the same time attendees are departing can snarl traffic badly. You might hold freight for a bit or have marshals direct flow. Some conventions stagger egress by keeping loading docks closed for 30 minutes after show close to let attendee foot traffic clear out first. These logistical touches ensure load-out isn’t a free-for-all, preserving the professional tone right to the end.
Tear-Down Procedures and Volunteer Support
During teardown, have your team ready to assist and supervise just like during setup. Volunteers can be a huge help here: consider a “strike team” of volunteers specifically assigned to assist with load-out. They might help artists carry boxes to their cars (artists especially appreciate this after an exhausting weekend), or return rented tables and chairs to stacks. Make sure volunteers are easily identifiable and know not to touch any exhibitor merchandise without permission, of course, but rather to ask “Need a hand with anything?” Many will gladly accept help moving heavy bits or watching their stuff while they get the car.
If you provided any rental equipment like tablecloths, containers, etc., have a clear system for collecting those. Volunteers can go around with carts to gather linens or other rentals from booths once vendors are done with them. This speeds up your own teardown and ensures nothing is lost. It’s often effective to give vendors clear instructions in that final hour, like an announcement: “If you have rented table covers or chair covers from us, please pile them at the end of your aisle for collection.” It saves you chasing each person.
Remind everyone about trash and cleanup: provide garbage bags to each booth (some cons hand them out in that final hour) so vendors can throw away trash from packing. This prevents a massive mess on the floor. Emphasize that any abandoned items will be tossed – you don’t want to be left with surprise couches or tons of unsold stock. However, sometimes you’ll have charities or local fan clubs willing to collect leftover giveaways or materials – if so, coordinate so that as soon as a vendor says “I don’t want to ship this box of flyers back,” your charity partner can take it. This is a win-win (less to throw out, and items get a second life). Some conventions partner with organizations to donate leftover art prints or books to hospitals or libraries.
Volunteers and staff should keep an eye on safety during teardown too. People are tired, pushing heavy carts, maybe not as careful. Ensure no one is blocking fire exits with crates for too long, and if anyone is using ladders (to take down signage), that a buddy is with them. Security should still be present to monitor for any theft – ironically, teardown can be a vulnerable time as everyone’s guard is down. Control access as you did before; ideally, only badged folks in the hall now. As booths empty out, direct people to consolidate so you can close off sections that are done, which helps security focus.
Finally, thank your volunteers and staff profusely – load-out is often the least glamorous task and they’ll be just as exhausted. Provide water, maybe pizza, and high-fives all around. A well-orchestrated teardown (where vendors leave feeling everything was just as organized at the end as it was at the start) leaves a lasting positive impression. It’s the last memory they have of the event logistics, so you want that memory to be “wow, even breakdown was easy!” rather than “what a nightmare getting out of there.”
Recovering Badges and Preventing Losses
One small but important detail in load-out is collecting any reusable items like badges or leads and preventing losses (of equipment or credentials). Some cons print special high-quality exhibitor badges meant to be turned in (to reuse next year or just to avoid extras floating around). If that’s you, set up a drop box at the exit or send volunteers to collect badges as exhibitors depart. Many will forget or want to keep them as souvenirs, so decide if it’s critical. If it’s more about not having active badges out there, you can also simply deactivate them in your system at show end (for RFID badges) or not worry too much if none of your badges grant post-show access.
For preventing material losses: do a sweep after everyone’s out to ensure no one left valuables. Surprisingly often, someone leaves a box of product under a table or a rolling rack in a corner. Have lost-and-found procedures for vendors as well as attendees. If a vendor realizes later “Oh no, I left my banner stand,” they should know who to contact. Ideally, an on-site lost & found or a policy that venue security will hold items for X days. Communicate that in a follow-up email.
Another thing to recover are any rented lead scanners or devices. If you provided handheld scanners, make sure those are all returned to you or the vendor before exhibitors leave. Announce periodically “If you borrowed any event equipment (scanners, radios), please return them to the service desk now.” It’s easy for a small device to wander off in a van.
Financially, check with the venue about any charges that could hit due to exhibitors – e.g., damage or leaving big trash. Some contracts have clauses where if an exhibitor leaves giant debris (like pallets), the organizer gets charged a disposal fee. During load-out, watch for this and politely ask the vendor to take care of it, or enlist your crew to handle it and note not to let that exhibitor do that next time. It’s part of protecting your budget and relationship with the venue.
Finally, secure the hall once done. Ensure all loading doors are shut and no one unauthorized is wandering in as you wrap up. Venues often do a walk-through with you to confirm nothing is damaged – join that and have your floor plan to tick off that all rental gear is picked up, all areas are cleared. Once you and the venue are satisfied, you can officially breathe a sigh of relief that the exhibitor hall was a success from move-in to move-out.
Post-Event Wrap-Up with Exhibitors
In the days following the convention, it’s a great practice to formally wrap up communication with your exhibitors. Send a thank-you email that also includes any key stats or outcomes you want to share (attendance numbers, perhaps an estimate of total sales across the hall if you have one, or media highlights like “our event was covered on TV or trended on Twitter”). Exhibitors appreciate knowing the bigger picture of the event they were part of. It reinforces that their presence helped make the con a success. If you had any special awards or recognitions (e.g. best booth as voted by attendees), announce those winners in the email – it’s feel-good info that others might aspire to next time.
Include a reminder of the timeline for next steps: when will they receive the post-event survey (if separate), when applications or rebook for next year open, etc. If you’ve already set the dates for the next convention, definitely mention those and that you’d love to see them return (maybe even an early booking link or code). This gentle nudge can secure renewals while the positive memories are fresh – a strategy in line with boosting retention that competitive events often overlook at their peril.
If any incidents occurred that affected certain vendors, consider reaching out individually to them. For example, if one vendor had a theft issue, a personalized note acknowledging it and offering any assistance with insurance or just expressing regret can turn a negative into a somewhat positive impression of your care. Similarly, if a major guest cancellation impacted foot traffic on a certain day (and vendors noticed), you might address that transparently: “Saturday saw slightly lower attendance due to the headliner’s no-show, but we hope our at-door promo mitigated it.” Honesty and a bit of empathy go far in building trust, addressing why exhibitor churn happens before it starts.
Finally, keep those relationships warm. If social media saw any shout-outs – like attendees praising a certain booth or haul – share those with the respective exhibitors (“Check out this tweet – people loved your booth!”). It shows you’re paying attention and celebrating them. Some organizers even send a small gift or discount code for their other events if an exhibitor also does cons in different cities – a cross-promo idea. At minimum, close the loop by letting exhibitors know their feedback is valued: “We will be reviewing all exhibitor feedback to make improvements for next year.” Then, when you invite them next year, mention a couple of changes you’ve implemented based on feedback (“We added a second loading dock crew to speed up move-in, as you asked”). This proves you’re not just hearing, but listening.
Wrap-up communications and actions cement the goodwill. After all, a convention’s success isn’t only measured by attendee joy – it’s also in the exhibitor satisfaction and financial success. Conclude strong, and you turn one-off exhibitors into long-term partners and advocates for your convention’s future.