Immersive Visuals in 2026: Setting the Stage
The Rise of LED Walls & Projection Mapping
Immersive visual technology has become a cornerstone of live events in 2026. From towering LED video walls blasting vivid graphics to mind-bending projection mapping that transforms architecture into art, event audiences now expect to be visually wowed. Concerts, festivals, corporate shows – even esports tournaments – are investing in massive screens and projection effects. For example, modern esports arenas deploy stadium-scale LED displays so fans catch every detail of the game action, just as concert-goers expect dynamic backdrops at shows like Lana Del Rey’s stadium tour. This surge is driven by rapid tech advances: LED panels are brighter, sharper, and more affordable than ever, while laser projectors deliver unprecedented clarity and longevity. The result? Event producers have an expanded toolbox to create unforgettable visual spectacles that were impractical just a few years ago.
Audience Expectations in 2026
Today’s audiences are visually savvy and hard to impress. Thanks to exposure to high-definition screens and AR effects in daily life, attendees arrive with sky-high expectations for event visuals. A mediocre screen or simple slide show won’t cut it – fans want to be immersed in the environment. At major music festivals, giant LED walls synchronized with music and lighting can elevate the energy of a crowd of 50,000. At corporate keynotes, seamless floor-to-ceiling visuals keep attendees engaged and help messages land with impact. Event technologists acknowledge that stunning visuals aren’t just eye-candy – they influence attendee satisfaction, social media buzz, and even event ticket sales. An Instagrammable stage design can become free marketing as attendees share videos of breathtaking LED content or 360° projection effects. On the flip side, if screens go dark or visuals glitch, audiences will notice immediately. Reliability and polish in visual delivery have become non-negotiable for maintaining professionalism and trust.
Lessons from Past Productions
Veteran event producers recall early 2010s shows where ambitious visuals sometimes backfired – like projection mapping shows that fizzled under venue lighting or LED walls that overheated mid-performance. Those hard lessons have driven evolution in best practices. By 2026, most large events approach visual design with meticulous planning and technical rigor to avoid repeat mistakes by using backups for sources and displays. For instance, experienced festival technologists know to load-test LED structures and double-check projector alignments after seeing past instances where poor rigging or calibration led to warped images on show day. Real-world case studies continue to shape the industry’s wisdom. One global festival learned the importance of weatherproofing after rain penetrated an LED wall and knocked out half the screen during a headline act. Another live-streamed concert discovered that failing to genlock cameras to the LED refresh rate caused distracting flicker on the broadcast. Each stumble has pushed the community to develop stronger standards – from using redundant media servers to enforcing content guidelines – to ensure today’s events can deliver jaw-dropping visuals without a hitch.
Grow Your Social Following With Every Sale
Require social media follows, shares, or playlist adds to unlock presale access or special pricing. Turn every ticket purchase into audience growth.
LED vs. Projection: Choosing Your Canvas
Strengths and Limitations of LED Walls
LED video walls have become the digital canvas of choice for many events. Brightness is a major advantage – premium LED panels can exceed 5,000 nits of brightness, remaining clear even under stage lighting or daylight, as noted in comparisons of LED video walls versus projection. This makes LED walls ideal for outdoor festivals, daytime fan zones, or any venue where projectors would struggle. LED screens are modular and scalable: you can build a seamless display of virtually any size or shape by tiling panels together. Modern panels offer fine pixel pitches (often 1–3 mm for close viewing), delivering stunning resolution and detail even in relatively compact spaces. Color vibrancy and contrast on LED are also top-tier; deep blacks and rich colors pop thanks to self-illuminating diodes, which far surpass the contrast ratios of typical projection. In terms of durability, LED walls are workhorses – rated for tens of thousands of hours, with no bulbs to burn out. They’re robust against ambient light and there’s no focus to worry about once installed. Live content flexibility is another plus: an LED wall can display video, graphics, live IMAG, or interactive content in dynamic layouts, without needing a physically separate screen or surface.
When deploying LED walls for immersive production, technical directors are increasingly looking beyond flat backdrops to create fully enveloping environments. By utilizing right-angle corner cabinets, LED ceilings, and interactive floor panels, organizers can build a continuous digital volume that places the audience—or the broadcast camera—directly inside the content. This approach to immersive stage design not only elevates the attendee experience but also provides high-value, dynamic branding inventory for sponsors, making the initial hardware investment highly justifiable for B2B event producers.
Ready to Sell Tickets?
Create professional event pages with built-in payment processing, marketing tools, and real-time analytics.
When conceptualizing an LED stage design for events, technical directors are increasingly moving away from traditional flat screens in favor of multi-dimensional, architectural layouts. Modern 3D stage design incorporates forced perspective content, angled LED fascia, and tiered video risers to create an illusion of infinite depth. This evolution in stage design not only maximizes the visual impact within a limited venue footprint but also provides a dynamic, sculptural centerpiece that elevates the overall production value.
However, LED walls have some trade-offs. Cost is significant – high-quality indoor LED panels (especially fine-pitch ones) are expensive to purchase or rent, and large surfaces require many panels. The initial setup is labor-intensive: panels must be rigged on sturdy structures or trusses and cabled together with power and data. Weight can be a concern; even lightweight panels accumulate mass, so supporting structures need the capacity (e.g. a 10m x 6m LED wall can weigh well over a ton including hardware). Power consumption for big LED installations is substantial as well (though surprisingly, an LED wall’s power use for equivalent brightness is often lower than a projector’s – a 10 m² LED wall might consume ~25 kWh per 8-hour day, compared to ~40 kWh for projectors achieving similar brightness, according to data on automatic color syncing software). Another limitation is viewing distance and pixelation: up close, viewers may see the pixel grid on larger-pitch LED screens. Choosing the right pixel pitch is crucial so the audience perceives a crisp image from their viewing positions. Also, while LED walls are impressive for flat backdrops or even curved displays, they can’t natively wrap around complex 3D objects or architecture – that’s where projection mapping shines. Event teams must balance these factors – brightness needs, budget, venue constraints – when deciding if LED is the optimal canvas for a given show.
Smooth Entry With Mobile Check-In
Scan tickets and manage entry with our mobile check-in app. Supports photo ID verification, real-time capacity tracking, and multi-gate coordination.
Strengths and Limitations of Projection Mapping
Projection mapping remains unparalleled for transforming 3D surfaces and environments into immersive visual landscapes. With high-powered projectors and clever mapping software, you can turn almost anything into a screen: the side of a building, an intricate stage set, a dome ceiling, even moving performers. This makes projection ideal for creative applications where LED panels would be impractical or impossible – for example, casting animated visuals onto a historic cathedral for a festival, or projecting across an entire arena floor for a spectacular opening ceremony. One huge benefit is the minimal physical footprint: projectors can be mounted out of sight, leaving the stage or venue free of large structures. They’re also great for irregular and curved surfaces, blending multiple images together seamlessly to cover a huge area with one giant composite image. A famous recent example is Expo 2020 Dubai’s Al Wasl Plaza dome, which wowed visitors with a 360° projection show across a massive dome canvas – the world’s largest projection surface, achieved with over 250 synchronized projectors enveloping the audience, creating immersive content for the Dubai World Expo. Projection can create that “magic” of objects appearing and disappearing on real scenery – an effect that LED panels (which are physically present) can’t replicate in the same way.
Advances in 2026 have also mitigated some projector drawbacks. Laser projectors now offer 20,000+ hours of operation with no lamp changes, maintaining brightness and color consistency far longer than older lamp units. They come in higher resolutions (4K and beyond) and smaller form factors, making it easier to deploy multiple projectors for one scene. Modern projection mapping software can auto-calibrate and edge-blend images, saving time in setup and ensuring a crisp unified picture. Despite these improvements, projection mapping still has challenges and limitations. Ambient light is the biggest: projections require controlled lighting or darkness to really punch. A projector that looks amazing in a blackout might appear washed out if house lights are on or if used outdoors before dusk. Even the most powerful projectors (20,000+ lumens, roughly 2,000–4,000 nits equivalent) can’t compete with direct sunlight or bright stage lighting, a fact highlighted in technical head-to-head comparisons of video projectors and LED walls and contrast viability studies. Thus, scheduling and lighting design must accommodate projection – often meaning projection segments happen at night or with theatrical blackouts. Another factor is contrast and black levels: projected “black” is just the absence of light, so on anything but a pitch-black surface it will never be as deep as LED black. Complex mapping setups can also be technically fragile – multiple projectors mean multiple points of failure or misalignment, so extensive testing and calibration is needed (especially if outdoor conditions like wind or temperature can shift equipment). And while projectors themselves may cost less than giant LED walls, the labor to map content perfectly and the need for backup units can add to costs. Finally, consider sightlines: any object (or person) crossing in front of a projector beam will cast a shadow and break the illusion – a logistical concern for staging and choreography. In summary, projection mapping’s creative flexibility is unmatched, but it demands careful environmental control and technical precision to pull off successfully.
Grow Your Events
Leverage referral marketing, social sharing incentives, and audience insights to sell more tickets.
When to Use One, the Other, or Both
The decision between LED and projection often comes down to the event’s specific needs and constraints. Here are common scenarios:
- Outdoor Daytime or High Ambient Light – LED walls are usually the only viable choice. In bright conditions, LED’s intense brightness and direct-view clarity maintain visibility where projectors would wash out. Music festivals and sports events in daylight lean heavily on LED screens (e.g. jumbotrons and stage LED backdrops) because they can deliver vivid video under the sun.
- Massive Surfaces or 3D Structures – Projection mapping shines for covering irregular or huge surfaces that would be impractical to build with LED. For instance, a city festival might project onto a 100m-wide building facade or across a field, far larger than any rentable LED wall. Projection is also ideal for wrapping visuals around statues, cars, or custom stage decor to create immersive illusions at product launches and art installations.
- Close-Proximity Viewing – In a small venue or expo booth where attendees will stand just a meter or two from the display, fine-pitch LED panels (1–2 mm) are often chosen to ensure a seamless image. High-resolution LED can function like a giant television, delivering 4K visuals in a compact space. Standard projectors could also work for smaller screens, but ambient light and clarity must be considered.
- Budget-Conscious or Temporary Installations – When budgets are tight and ultra-high brightness isn’t required, projection can be more cost-effective. A couple of rental projectors and a screen or wall may cost less than constructing a comparable LED wall, especially for one-off corporate meetings or conferences in controlled lighting. Projection gear is also portable – quick to load in/out – which suits pop-up experiences or touring shows where minimizing freight is important.
- Creative Effects and Atmosphere – Projection often creates a more “blended” atmospheric look, useful for theatrical environments or experiential events. Because projections can be softer-edged and integrated with real-world textures, they’re great for mood-setting visuals (like ambient moving backgrounds). LED, by contrast, delivers a very high-impact, high-intensity look – perfect for when you want a literally in-your-face digital backdrop or razor-sharp live video feeds on stage.
- Hybrid Approach – Increasingly, events use LED and projection together to exploit the best of both. A common approach is using LED walls for main stage screens and IMAG video, while using projection mapping on surrounding set pieces or venue walls to extend the visual theme. Concert tours might have a big LED video backdrop for the band and live camera feed, supplemented by projection mapped onto props or scrims for artistic effects. The key is to synchronize the content so that LED and projection complement each other, not compete. One example is a stadium tour that combined LED walls with transparent gauze projections to add 3D depth – the LED provided the bright core imagery and IMAG, while projection added ethereal holographic layers in front of the stage, as seen in Lana Del Rey’s stadium tour mesmerizing visuals. When using both, pay attention to color and brightness balance (you might tweak content so the projection elements don’t get washed out by the LED’s intensity).
In short, match the tool to the job. Many events find a clear winner between LED vs. projection once they evaluate venue lighting, audience size, surface geometry, and creative goals. And if you have the resources, blending both can deliver truly multilayered visuals. The table below summarizes key differences to help guide the choice:
| Factor | LED Walls | Projection Mapping |
|---|---|---|
| Brightness & Visibility | Extremely bright (up to 5,000–8,000 nits) – visible even in daylight, as detailed in LED wall versus projection comparisons. Great for outdoor or well-lit venues. | Moderate brightness (?2,000–4,000 nits for high-end projectors), see contrast viability studies. Requires low ambient light or darkness for full impact. |
| Best Use Cases | Flat or gently curved screens, stages, IMAG video feeds, outdoor daytime shows, anywhere a large digital backdrop is needed. | Mapping images on 3D objects, buildings, irregular surfaces; 360° domes; creating illusions on existing architecture or scenery. |
| Installation & Footprint | Requires physical structure (truss/frames) to mount panels. Significant weight and setup time. Once built, forms a solid screen. | Projectors can be placed discreetly (ceiling, FOH tower). Minimal physical structure on stage; needs clear projection line-of-sight. |
| Resolution & Detail | Determined by pixel pitch and screen size. Fine pitch (1–3mm) yields very high resolution even at short distance. No blurring at angles – image is direct view. | High resolutions available (4K+), but image clarity depends on focus, throw distance, and surface. Can lose sharpness if viewing angle to surface is sharp (projector keystoning). |
| Color & Contrast | Very rich colors (95%+ DCI-P3 gamut) and deep blacks. LED offers high contrast (100,000:1 or more) and supports HDR content well, according to color performance analysis. | Good color (laser projectors ~90% DCI-P3) but blacks are limited by surface brightness. Contrast typically 2,000–10,000:1, lower in non-blackroom environments. HDR impact is modest. |
| Flexibility & Creativity | Limited to essentially 2D screen (though can be curved or 3D array of screens). Content can be any video/graphics but confined to panel shape. | Can cover complex 3D shapes, irregular and giant surfaces seamlessly. Enables immersive environmental effects (e.g. make a building facade come alive). |
| Maintenance & Lifespan | Long lifespan (> 80,000 hours typical). Individual LED modules are replaceable if they fail. Needs periodic calibration for color uniformity. Durable once installed. | Laser light source life ~20,000 hours; minimal maintenance (no bulbs). Needs recalibration if projectors are moved or if alignment shifts. Susceptible to dust, requires occasional cleaning. |
| Cost Factors | High upfront/rental cost for large areas or fine pitch. Significant labor to install. Higher power draw on site (though efficient per brightness). Scales linearly with display size. | Lower cost for small-to-medium applications (one projector can cover a big area). But large-scale mapping may need many projectors + extensive content work. Lower shipping weight. Cost scales with complexity (more projectors, more mapping work). |
As the table shows, each technology has distinct strengths. The key is to assess your event’s requirements – venue, audience, content, and budget – to choose the right canvas or combination. In a world where event tech spans everything from intimate conference rooms to 500,000-capacity festivals utilizing high-end video solutions, mastering both LED and projection options ensures you can design the perfect immersive visuals for any scenario.
Optimizing LED Wall Setup and Performance
Selecting the Right LED Panels for the Job
Not all LED walls are created equal. Choosing the right LED panels is a critical first step to a successful visual setup. Start with pixel pitch – the distance between LED pixels, which determines resolution and optimal viewing range. A useful industry guideline is roughly 1 mm of pitch for every 1.5 meters of viewing distance, which helps choose the optimal resolution for trade show events. For example, if your nearest audience member will be about 3 meters from the screen (common for small corporate events or trade show booths), you’d want ~2mm pitch to ensure a crisp image without visible pixelation. For larger concert venues where the crowd is 20+ meters away, 5mm or even 8mm pitch panels might suffice, and they’ll be more budget-friendly. Fine-pitch indoor LED (sub-2mm) delivers gorgeous detail for close viewing, but is significantly more expensive. Therefore, match pixel density to the venue: don’t overpay for ultra-fine pitch if the audience will be far enough that they couldn’t tell the difference. Conversely, avoid the mistake of using coarse-pitch outdoor boards in an intimate setting – the screen-door effect of large pixels will undermine the experience.
Go Cashless With RFID Technology
Enable contactless payments, faster entry, and real-time spending analytics with RFID wristbands and NFC-enabled ticketing for your events.
Also consider the panel type and specifications. If the event is outdoors or in a humid, dusty environment, you need outdoor-rated LED panels (IP65+ weather resistance) that can handle rain and heat. These panels often have higher brightness output (5,000–6,000 nits or more) to compete with daylight in outdoor conditions. Indoor panels may be lower brightness (800–1,500 nits is plenty for dark theaters) and can have tighter pitch and better color calibration out-of-the-box. Check the refresh rate as well – a high refresh rate (?3,840 Hz, for instance) is important if the event will be filmed or live-streamed, to avoid flicker on camera. Many modern LED processors allow genlock to a common clock, synchronizing the LED refresh with camera shutters to eliminate scanning artifacts – a crucial detail if IMAG video or broadcast is involved. Color depth and calibration settings matter for color-critical uses; premium LED systems come with calibration reports and software to tune color uniformity across all panels.
Physical factors include panel size and shape – larger panels mean fewer seams, but also less flexibility in configuration. Standard rental panels are often around 500mm x 500mm squares or 500x1000mm rectangles. Determine what screen dimensions you need and ensure you can configure those from available panel sizes (taking into account aspect ratio and content resolution). If your stage has curved set pieces, look into curvable or flexible LED panels or at least modular panels with adjustable angling between them. Many events use creative LED configurations – such as LED archways, columns, or floors – by leveraging panels with custom frames or the ability to mount at angles. For instance, some stage designs feature a center LED backdrop plus extending “wing” panels angled toward the audience for a panoramic effect. It’s wise to consult with the LED vendor on the practical limits: Up to what curve angle can panels connect? Can they be hung from the venue roof, or do they need ground-support? Knowing these constraints early avoids design ideas that can’t be built safely.
Another emerging consideration for technical directors is utilizing video surfaces as dynamic illumination. When evaluating the best LED panel for stage wash lighting in 2025 and 2026, organizers are increasingly looking at high-brightness, high-refresh-rate video tiles that can double as environmental wash fixtures. By driving solid colors or slow-moving gradients across these panels, the video wall effectively becomes a massive, pixel-mapped wash light. This dual-purpose approach reduces the need for traditional static wash fixtures, saving truss space and power while enveloping the audience in synchronized, immersive color.
LED Control Systems and Processing
Behind every great LED wall is a powerful control system. LED panels themselves are essentially dumb displays that must be fed correctly formatted data from a sending unit or video processor. Selecting a reliable processing system ensures your gorgeous screen isn’t limited by tearing, latency, or poor scaling. Leading LED processing brands in 2026 (e.g. NovaStar, Brompton, Colorlight) offer advanced features: high bit-depth processing (HDR support), low latency switching, and calibration tools for color and brightness uniformity. Ensure your processor can handle the resolution of your wall – large LED walls often exceed 4K resolution in total, which may require multiple 4K outputs or a network of linked processors. The processor maps video signals to the matrix of LED modules (via sending cards installed in the panels). During setup, the tech team will configure the mapping so that each panel knows which part of the image to show. It’s important to create accurate pixel maps in the software, especially if the LED configuration isn’t a simple rectangle (for example, if you have separate screen clusters or a creative layout).
For dynamic content playback, you’ll likely use media servers or playback software feeding into the LED processor. Choices range from full-fledged media server systems like Disguise (d3), Hippotizer, or Resolume Arena, to simpler solutions like a high-end playback laptop running software such as Millumin or ProPresenter (often used in corporate events). The complexity of content and show control will dictate this choice. Large shows with multiple acts and complex cue sequences often go for robust media servers that can handle layers of video, real-time effects, and timecode. Smaller events might get by with a single machine looping background visuals or slides. Either way, redundancy is key – feed the LED wall via a primary and backup source if possible. Many pro media servers allow two units to run in tandem (master and understudy) so that if one fails, the other can cut in without missing a beat, utilizing backup features or downstream switchers. Even if using something simpler like a laptop, consider having a second device on standby, outputting a safety graphic or logo that can be switched on in case of emergency. Modern LED switchers or processors often have a backup input feature where they will automatically switch to a secondary feed if the main feed is lost, a critical backup feature for festival content pipelines.
Also think about content management: ensure you have all media in the correct resolution and format to match the LED wall. If your wall is 3840 x 1080 pixels, for example, exporting content in that exact pixel dimension will result in the sharpest image. The LED processor/scaler can resize standard HD or 4K content to fit, but it’s always best to avoid unnecessary scaling for critical visuals. Establish a “master canvas” size for your visuals based on the LED mapping, and communicate that to all content creators well in advance to ensure content pipelines don’t break. Consistency here prevents last-minute challenges like letterboxing or stretched images. To illustrate: if a music artist’s VJ delivers video content in 16:9 HD but your LED wall is an ultrawide 3:1 aspect ratio, you’ll end up with black bars or need to crop on the fly unless the content was tailored to the wall’s spec. Proper content specs and advance communication (aspect ratio, resolution, frame rate, and file format) are a hallmark of professional LED visual planning.
Free Tool: When Should You Announce?
Pick your event date and genre — the free planner outputs a recommended announce, presale, on-sale and reminder schedule anchored to how your audience actually buys.
As display canvases grow to stadium proportions, managing the sheer scale of the digital workspace becomes a technical hurdle. The best practices for handling large coordinates graphics in 2026 dictate moving away from single massive video files and instead utilizing sliced, node-based rendering workflows. Technical directors now segment ultra-high-resolution canvases into manageable coordinate zones within the media server. This ensures that when a 16K or 32K pixel map is deployed across a sprawling festival stage, the processing load is distributed efficiently, preventing frame drops and ensuring pixel-perfect alignment across complex stage LED wall designs.
LED Wall Mapping Design and Crew Training
Beyond basic playback, advanced mapping an LED wall requires specialized design approaches, especially when dealing with non-standard screen shapes or fragmented displays. LED wall mapping design involves creating a pixel-accurate canvas in your media server that perfectly mirrors the physical layout of the panels on stage. For instance, if your stage features disconnected LED columns or a ceiling canopy, the mapping software must slice the master video file and route the correct pixels to each specific processor output. Because this process is highly technical, investing in proper led wall mapping training for your video crew is essential. Promoters and technical directors should ensure their operators are certified or formally trained on the specific media servers (like Disguise or Resolume) being used. A well-trained crew can troubleshoot mapping anomalies on the fly, ensuring that complex geometric designs translate flawlessly from the rendering engine to the physical stage.
Rigging, Safety, and Power Considerations
Installing a large LED wall is as much an engineering project as it is a creative one. Safety must come first. These structures often hang above stages or crowds, so use certified rigging hardware and professional riggers to build support. Whether it’s a ground-supported truss or flown from roof beams, the weight and load distribution of the LED wall must be calculated. Each panel might weigh 5–10 kg; multiply by dozens or hundreds of panels plus the weight of the frame, and you can easily have several metric tons of load. Venues have specific rigging point weight limits – always get a structural plan and ensure your design stays within safe limits (or bring in additional support structures if needed). Outdoors, consider wind: solid LED walls act like sails. For festival stages, it’s common to design intentional blow-through areas or use semi-open LED mesh for very large walls to reduce wind load. Even then, high winds might require lowering the wall for safety, so have a plan for weather interruptions. Some events erect wind bracing or rear scaffold behind LED screens, and use anemometers (wind speed sensors) to monitor conditions. Work with staging vendors and temporary infrastructure experts on these aspects – for instance, techniques from large festival infrastructure planning and live event design) can ensure your visual setup is both spectacular and safe.
Power is another critical factor. LED walls draw significant power, so early in planning, coordinate with the electrical team for adequate supply and distribution. Calculate the approximate wattage: a mid-size indoor LED wall might draw a few kilowatts, while ultra-large outdoor screens can require 50kW or more at full brightness. Power distribution should be on dedicated circuits whenever possible – you don’t want the LED wall on the same circuit as audio equipment due to potential interference or an overload tripping during the show. Many large events use separate generators for video systems to ensure quality. Also, account for inrush current (when LED panels first power on, they can spike power draw briefly). Use proper gauge cabling and avoid daisy-chaining too many panels on one power run beyond the manufacturer’s recommendation. It’s wise to have an electrician or power distribution specialist on-hand during load-in to verify everything. Additionally, think about backup power: if the venue has UPS units or if you can put critical control equipment (like the media server and processor) on UPS, that can prevent a momentary power flicker from rebooting your system. At minimum, ensure a controlled shutdown in case of power loss – abrupt power cuts are not great for electronics or the audience experience.
Finally, plan for maintaining the wall during the event. Keep spare LED modules and power supplies on site. It’s common to have a small “tech stash” of a few panels (from the same batch for color consistency) ready to swap in if a section dies. Train the crew on how to replace a panel quickly – many LED panels can be front-serviceable, meaning you can pop out a faulty module with a specialized tool from the front of the wall without dismantling the whole structure. However, rehearse this process or at least identify when it can be done (e.g. between acts or during a video blackout cue) – you wouldn’t want crew climbing a wall during a performance unless absolutely necessary. Some failures might be acceptable to leave until intermission (like a single pixel line out or one module flickering) if it’s minor, to avoid disruption. Monitoring systems or a sharp-eyed tech watching the screen can alert if any section goes down. With these precautions – solid rigging, sufficient power, and contingency for swaps – your LED wall will be a reliable centerpiece of the show.
Optimizing LED Content and Calibration
To get the best visual performance, you’ll need to dial in both the content and the technical calibration of the LED wall. Color calibration is often done at the factory for high-end panels, but when assembling a wall, slight variations between batches or modules can cause some tiles to look brighter or off-color. Professional LED systems come with calibration files for each panel that the processor can use to uniformize output. As an extra step, especially if using panels sourced from multiple suppliers or different production lots, you can hire a calibration specialist to tune the wall with a colorimeter or camera-based system, ensuring perfect uniformity. This is usually only necessary for ultra-critical applications (like a broadcast studio video wall). For general events, a good practice is to set brightness and white balance uniformly across all screens. Do this in the venue under show conditions – for example, if you have LED screens on either side of a stage, view them from various angles and distances to ensure they match in color temperature and intensity. Nothing looks worse than one LED screen looking warmer or dimmer than its twin.
Free Tool: Size Your Festival Site
Zoned capacity planning for arena, campsite, parking and entry lanes — against UK Purple Guide and NFPA density standards. Finds your bottleneck zone.
When it comes to content, aspect ratio and resolution matching were already mentioned, but also think about content design for LED. LED screens are super bright and high-contrast; content that is overly bright (like mostly white graphics) can be blinding and fatiguing to look at, especially indoors. Experienced content designers often limit the peak whites and favor vibrant colors and high contrast elements that read well at a distance. Also, consider the “screen canvas” in the overall stage picture – if the LED wall is behind performers, pure video can sometimes overwhelm them (turning performers into silhouettes). That’s why many concert visuals incorporate darker backgrounds or moving patterns that complement live lighting, rather than just showing a continuous bright video. Coordinate with the lighting designer so that the LED content and lighting are harmonious rather than clashing. For example, if the content has a lot of cool blue tones during one song, lighting might steer clear of blasting the stage with warm amber at the same time, which could look odd in combination.
Another tip: prepare some backup or ambient visuals to use in case of unplanned situations. Let’s say an artist’s custom video content fails to play – you can fall back to a neutral but attractive graphic (like event branding, abstract animations, or a live camera feed). Having these ready in your media server’s playlist can save the day and keep the audience none the wiser. It’s also wise to implement proper prefixing and file organization for content files, especially when multiple acts or speakers are involved. Clearly label each video or graphic with what it is and ensure the show operator has a cue sheet. This kind of organization reflects the lessons learned from many event tech implementations – where a chaotic content library can lead to the wrong video playing at the wrong time. A solid preparation regime (as outlined in an event tech implementation playbook) will include content reviews, backups of all files, and perhaps even a quick run-through with show producers to verify everything is correct before doors open.
Mastering Projection Mapping Techniques
Choosing Projectors and Lenses Wisely
The success of a projection mapping project hinges on using the right projectors for the venue and content. The key specification is brightness, measured in lumens. How many lumens are needed? It depends on image size, surface color, and ambient light. As a rule of thumb, for a moderate indoor stage with controlled lighting (e.g. a 12-foot wide screen in a ballroom with lights dimmed), something in the 8,000–12,000 lumen range might suffice. For larger theatrical stages or dimly lit outdoor scenarios (e.g. projecting 100 feet wide on a building at night), 20,000+ lumen projectors are standard. The biggest outdoor spectaculars now use 30K and even 45K lumen units, sometimes doubling them up for extra punch. If you have competing light – say you’re projecting while some stage lights are on – you might need to overshoot brightness or use multiple projectors overlaying the same area to boost effective brightness. Remember that perceived brightness doesn’t scale linearly with lumens; doubling lumens gives only a small boost in how bright it looks to the eye, so you really need big jumps (5k to 10k, or 10k to 20k, etc.) to see a notable difference in challenging environments.
Resolution is the next key factor. Common high-end projectors in 2026 are WUXGA (1920×1200), Full HD (1920×1080), with many now offering native 4K (4096 or 3840 width) and even some 8K specialty projectors. If your content has fine detail or text (like at a conference), resolution is paramount for clarity. It’s often better to use two moderately bright 4K projectors blended for a large surface than one super-bright lower-res unit, to get both brightness and detail – assuming you have the alignment tools and time to blend them. Lens choice also matters immensely. Throw distance (the distance from projector to surface) dictates whether you need a short-throw lens, standard, or long-throw. In tight spaces or for large images with short distance, ultra-short throw (UST) lenses or mirror bounce setups can project huge images from just a few feet away, though they can introduce distortion which the mapping software must correct. In arenas or large outdoor shows, you might be mounting projectors 30-100 meters back, in which case a long-throw lens that can focus at that range is needed. Check lens zoom and lens shift capabilities too – good projectors have swappable lenses or at least motorized zoom to adjust image size, and lens shift to move the image optically up/down or sideways without tilting the projector (helpful for alignment if you can’t place the projector dead-center).
Because projection mapping often uses multiple projectors, you’ll want consistency. Ideally use the same model of projector for all synced projections to ensure color and brightness match. If that’s not possible, at least stick to the same type (e.g. all laser projectors of similar brightness) and calibrate them to each other. Many pro projectors allow fine adjustments of color temperature, gamma, and output intensity – take time to match these across units. It’s much easier to blend two identical projectors than two different models. Reliability features are a selling point of newer units: look for things like redundant dual lamps (in older lamp models) or dual laser banks so that if one fails you don’t lose the image entirely. Some high-end systems have built-in autoblending and warping – which can simplify setup – but often you’ll handle that with external media servers or mapping software anyway. One note: always secure some backup if the visuals are mission-critical. For example, if using two projectors for a backdrop, having a third on standby (even if lower brightness) that could be quickly swapped or refocused in if one dies might be worth the rental cost for peace of mind. At the very least, stock spare lamps or laser modules if your projectors use them – swapping a lamp in a few minutes could rescue a show if one pops, whereas not having a spare means losing that projector’s output entirely.
Surface Preparation and Environmental Factors
Unlike LED screens which are the surface, projection mapping uses existing surfaces – so you need to optimize those surfaces for projection. Start by analyzing the surface color and texture. The best projection surface is neutral matte white with minimal texture (like a projection screen or a painted flat wall). Of course, many mapping projects involve surfaces that are not ideal – brown brick, glass, uneven scenic pieces, etc. If you have influence over fabrication, consider applying a projection-friendly coating to surfaces. For example, scenic elements can be painted with a high-reflectance paint (special projection paint or even just matte white or gray paint) to dramatically improve image brightness and color accuracy. Even a light gray surface can work well and won’t catch as much ambient light as white. Avoid glossy finishes – they cause hotspots and reflections. If mapping onto a building, you obviously can’t repaint it, but you can survey it for trouble spots (e.g. mirrored windows that might reflect light away or back to the projector) and adjust your content accordingly (like using darker content on those areas to hide the issue).
Data-Driven Event Marketing
Track ticket sales, demographics, marketing ROI, and social reach in real time. Exportable reports give you the insights to make smarter decisions.
Ambient light is the enemy of projection, so plan to control the environment. If indoors, work with the lighting team to integrate projection segments into the cue stack – often this means doing projection scenes in darker moments. If outdoors, schedule the mapping after sunset or in a naturally darker area of the venue. You can also use physical means like shades or flags to block stray light from hitting the projection surface (for instance, for an exhibit projection in a gallery, cover windows and use black drapes to frame the area). Another trick: use high-contrast content if some ambient light is unavoidable. Bright, high-saturation visuals will punch through better than subtle dark imagery if there’s competition from other lights. In partial-light conditions, a bold graphical approach (bright whites, strong colors, crisp lines) reads better than moody low-contrast visuals which may fade away. Some cutting-edge events even coordinate projection with special UV or LED lighting; for example, an artist might design a piece where under certain lights the projection isn’t visible and then suddenly turn lights off to “reveal” the projection as a surprise.
One often overlooked factor is the projector mounting environment. Projectors need stability: any vibration or movement will derail your mapping alignment. Secure projectors on solid trusses or platforms. If outdoors, consider environmental enclosures – not just for weather (though that’s crucial if rain or dust is a risk) but also for thermal stability. A projector’s alignment can drift if it overheats or cools unevenly. Many outdoor mapping projects use climate-controlled enclosures (with AC units) to keep projectors at consistent temperature and prevent dew or dust ingress. Additionally, make sure the projector lenses are accessible for last-minute cleaning – an unnoticed fingerprint or bit of dirt on a lens can blur part of your image. Clean lenses right before showtime. And have a procedure for focus touch-up: if you set focus in the afternoon and then the temperature drops at night, the focal length can change microscopically. Check focus at final operating conditions (projectors warmed up, nighttime temp) and tweak as needed so that edges are sharp.
Mapping Software and Workflow
Executing a projection mapping is as much a software exercise as a hardware one. Modern mapping projects leverage powerful media server software or dedicated mapping tools to warp and blend content precisely onto the target surfaces. If you’re running a complex show, consider industry-standard media servers like Disguise (d3), Resolume Arena, Watchout, or Hippotizer – all of which support advanced mapping workflows. These systems let you import a 3D model or measurements of your projection surface, then pre-program content positioning and warping offline. For instance, if projecting onto a custom stage set, you’d 3D model the set, create content in that shape, and use the media server to mesh-map the content to the projector outputs. The server handles slicing the full image into multiple projector feeds, warping each slice so when projected from its angle, everything lines up perfectly on the set. This pre-production goes a long way to ensure a smooth on-site setup. The day of setup, you’ll use test patterns (grids, crosshairs) to do fine alignment: adjusting each projector’s position, lens shift, and the software warping mesh so all pieces of the image converge correctly.
For simpler setups or budget-conscious events, you can use more entry-level mapping software like MadMapper, QLab (with its mapping features) or MapMap. These allow you to manually drag corners of content to fit surfaces. They work well for straightforward tasks like mapping a rectangle onto a not-quite-flat screen or keystoning around a simple object. The key is to give yourself plenty of tech time for mapping. It’s an iterative process: position projector, rough focus, play alignment pattern, adjust warp, refocus, adjust blend, etc. If using multiple projectors for one image, turn them on one at a time to do individual warps, then enable overlaps and set blending regions. Use a consistent gamma for blending and watch out for double-brightness in overlap zones – that’s where soft-edge blending comes in, usually your software will let you define gradient overlap areas to even it out. A well-blended multi-projector image should look uniform, without visible brighter banding where two images overlap. Achieving this often requires test content and tweaking – for example, project a pure white image across the blend and use your blending controls until that white looks even across the seam.
When evaluating the best projection mapping software in 2026, technical directors must weigh licensing costs against feature sets. While enterprise-grade platforms dominate massive stadium tours, organizers of mid-tier events often seek scalable alternatives. For those exploring budget-conscious or experimental setups, free projection mapping software options—such as open-source tools or trial versions of premium suites—provide a risk-free sandbox for pre-visualization. However, for mission-critical B2B applications, investing in robust, paid 3D projection mapping solutions ensures dedicated support, advanced auto-calibration, and seamless integration with complex media server ecosystems. Understanding how to do projection mapping at a professional scale means recognizing when to graduate from entry-level applications to industry-standard engines that can handle massive coordinate graphics without dropping frames.
Managing content in mapping software also brings unique considerations. If your projection surface isn’t a simple 16:9 screen, you’ll likely be rendering custom content. Often content creators will deliver visuals as pre-warpped for the surface (especially if working off a 3D model), or as individual layers per projector. Keep naming conventions clear – e.g. “MainBuilding_LeftProj.mov” and “MainBuilding_RightProj.mov” for left/right projectors – so you load them correctly. Alternatively, if using something like Disguise, you might have a single timeline with content mapped to virtual surfaces and the system handles splitting to projectors. For live aspects, media servers can also integrate real-time inputs (camera feeds, live text, etc.) into the mapping. For instance, you could have a live Twitter feed dynamically mapped onto a section of a building in your projection content. This raises the complexity, so ensure your software and hardware can handle any additional live rendering without dropping frames. Whenever possible, lock down content changes well before the event. Projection mapping content often needs more lead time for rendering and testing – last-minute content swaps are risky because even a small error (like an incorrectly exported video that doesn’t align) can be glaringly obvious on a mapped surface.
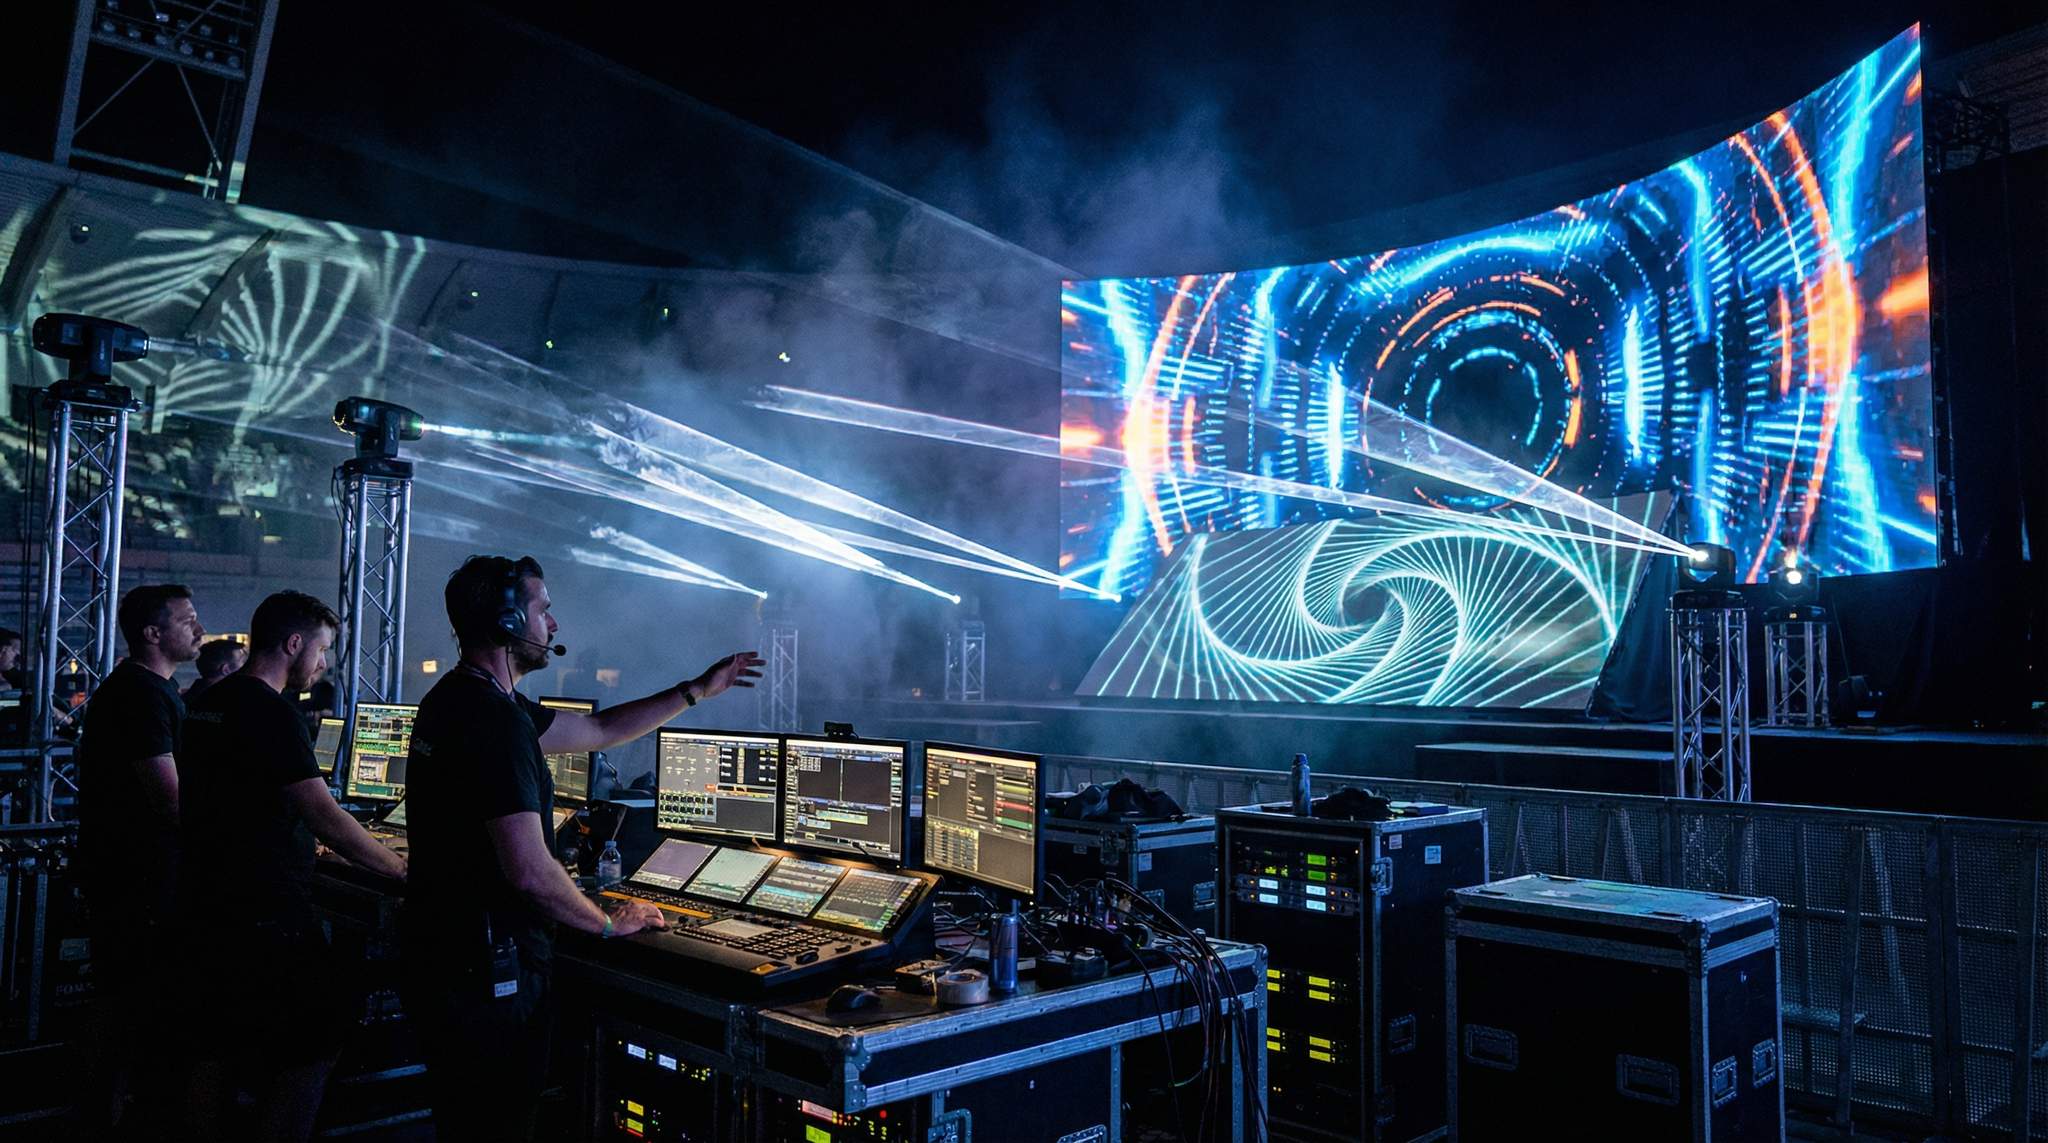
Advanced Techniques: Interactivity and Live Adjustments
One of the exciting frontiers in projection mapping is adding interactivity and real-time control. While standard mappings rely on pre-rendered content, new tech allows visuals to respond to input from the environment or audience. For example, motion tracking systems (like infrared cameras, LIDAR, or even Kinect-style sensors) can detect a performer’s position and adjust projected elements accordingly – making it appear as if graphics follow them around or react to their gestures. Dance performances have used this to great effect: a dancer “throwing” particles that are projection-mapped on a floor, or visual effects that ripple where they step. Implementing this requires specialized software (sometimes built in TouchDesigner, OpenFrameworks, or custom game engines) that takes tracking input and feeds dynamic visuals to the projector in real time. Latency becomes critical here; any tracking lag will break the illusion. In 2026, high-speed tracking cameras and protocols like Stage Network DMX/ArtNet or even CV outputs can bring latencies down to a few tens of milliseconds, making interactive projections quite seamless when done right.
Meeting the strict technical requirements for interactive projection mapping in stage design involves a delicate balance of hardware bandwidth and environmental control. Technical directors must ensure that the media server ecosystem can ingest high-frequency positional data while simultaneously rendering complex 3D geometry without dropping frames. Additionally, the physical fabrication of the set plays a crucial role; stage elements must utilize matte, projection-optimized finishes that do not reflect the infrared light used by tracking sensors. By addressing these foundational prerequisites, production teams can prevent sensor interference and maintain the seamless illusion of responsive, living architecture.
Another advanced approach is using augmented reality (AR) and XR (extended reality) techniques in conjunction with projection. Some events are exploring a mix of physical projection and AR content viewable through attendees’ smartphones or AR headsets, aligning both to create a layered experience. While not mainstream at most events yet, we can imagine an audience member pointing their phone at a projection-mapped structure and seeing extra digital effects (via the phone) that align with the physical projection – effectively adding another dimension. For broadcasts and live streams, AR graphics are becoming common (e.g. sensors on cameras allow virtual 3D graphics to be composited into the live feed on top of stages or LED walls). Event producers should consider if any portion of the visual experience will be augmented for the at-home audience. A seamless hybrid event strategy often means ensuring the stunning visuals in-venue are also captured or enhanced for those watching remotely, perhaps using specialized LED frames built for broadcast. This could involve simple steps like providing clean camera angles of projection-mapped sequences, or more elaborate ones like integrating XR content into the live stream . Coordinating with the broadcast team is essential if going this route, as it requires calibrating the AR content to real-world markers on stage.
Finally, plan for on-site adjustments and maintenance of the mapping. Unlike a physical LED wall, a projection can drift out of alignment if a projector is nudged or its focus drifts. Assign a video engineer the task of checking alignment periodically, especially if the setup spans multiple days. Often, heat or vibration over time can subtly misalign things – a quick touch-up via the mapping software’s grid before each evening’s show can save embarrassment. Always have your calibration assets handy: test patterns, grids, perhaps a quick reference image for each surface. If someone accidentally moves a projector (maybe a curious crew member or a strong wind in an outdoor rig), you may need to redo part of the mapping fast. Knowing your key control points or having saved presets in the software will expedite this. Some advanced setups use automatic calibration systems where cameras monitor the projection surface and the software auto-corrects the image geometry if it shifts – cool tech, but not yet common in most event budgets.
In sum, mastering projection mapping is a mix of art and science. It requires choosing the right hardware, preparing the canvas, and leveraging powerful software to bend light to your will. With thorough planning and testing, you can turn virtually any venue or object into an immersive digital experience that leaves attendees awestruck.
Interactive & Real-Time Visual Content Integration
Live Camera Feeds (IMAG) on Big Screens
Most large events combine pre-made visuals with live video feeds – known as IMAG (Image Magnification) – to engage the audience. If you have speakers on stage or performers, it’s important even those in the back can see them close-up. LED walls are superb for IMAG, as they can show a crystal-clear camera feed even in bright environments. To integrate IMAG, you’ll need a video switcher or mixer (e.g. a Barco E2, Analog Way Aquilon, or Blackmagic switcher for smaller setups) that can cut between live camera inputs and your content sources. During speeches or certain song sections, the production might switch the LED screen to show the live camera feed (close-ups, different angles), then switch back to graphics or video content for other moments. Some events dedicate side screens to IMAG while the center screen stays on content. If using projection, IMAG can similarly be shown by feeding the projector a camera signal when needed. A best practice is to match the resolution and frame rate of your camera system to the display system to minimize any scaling delay or frame conversions. For instance, if your LED processor runs at 1080p/60 Hz, configure cameras to output 1080p60.
Latency is crucial for IMAG – you want the video on screen to be as close to real-time as possible so that the actions on stage sync with the screens (especially for music, to avoid the dreaded “lip-sync” discrepancy). Modern LED processors and switchers can achieve very low latency (often a frame or two, i.e. 16–33ms), but ensure any scalers or wireless camera feeds aren’t adding too much delay. Sometimes audio is delayed slightly via the sound console to match video if needed, but ideally keep video fast. Conduct tests: have someone clap on stage and see if the clap on screen is simultaneous. If off, investigate and tweak the signal chain. Genlocking all cameras and displays to a common sync clock (house sync) can further reduce visual artifacts and latency issues.
For more complex productions, consider the screen layout and mixing effects. For example, a screen could show IMAG and graphics simultaneously via picture-in-picture or creative layering. A concert might overlay live footage of the singer onto an animated background on the LED wall. This is achieved through the media servers or switcher using keying or layer blending. It looks impressive but requires content and camera framing that work together (plus more rehearsal with the video director). If you plan such effects, storyboard them in advance. Also, think about camera-friendly content design: extremely high-motion or high-contrast LED content can actually interfere with camera exposure or cause moiré patterns on camera sensors, although newer cameras handle LED walls much better. Still, a video director might ask to slightly dim or tweak LED content during heavy IMAG use so faces on camera aren’t blown out by a bright background. Communication between the lighting/video director and the screen content team is critical here. Veteran technical directors say coordinating IMAG visuals with stage backgrounds is a cross-discipline effort – the payoff is a seamless audience experience where everything feels integrated, not like competing elements.
One more consideration: remote and virtual audiences. In hybrid events or live-streamed concerts, the IMAG feed on the big screen might also be part of what online viewers see. Some hybrid event setups even display remote participants on LED walls on stage (like a “Zoom wall” of faces during a conference Q&A or a virtual fan wall during a sports event). If you plan to show remote attendees or live social media feeds on your screens, treat those as additional live sources. Ensure the network connectivity and software (e.g. a Zoom gallery view or a social media visualization tool) are robust and tested in the venue environment, considering user experience and cost of ownership. The last thing you want is a live video call dropping on a 50-foot LED wall in front of thousands. Platform choice matters too – some events use special broadcast-grade video return feeds for remote presenters rather than relying on consumer video call apps, to improve reliability and quality. In any case, whenever you integrate live video with content, rehearse it. Do a full run-through with cameras, graphics, and switches so all operators know the cues and potential hiccups can be resolved before the audience arrives.
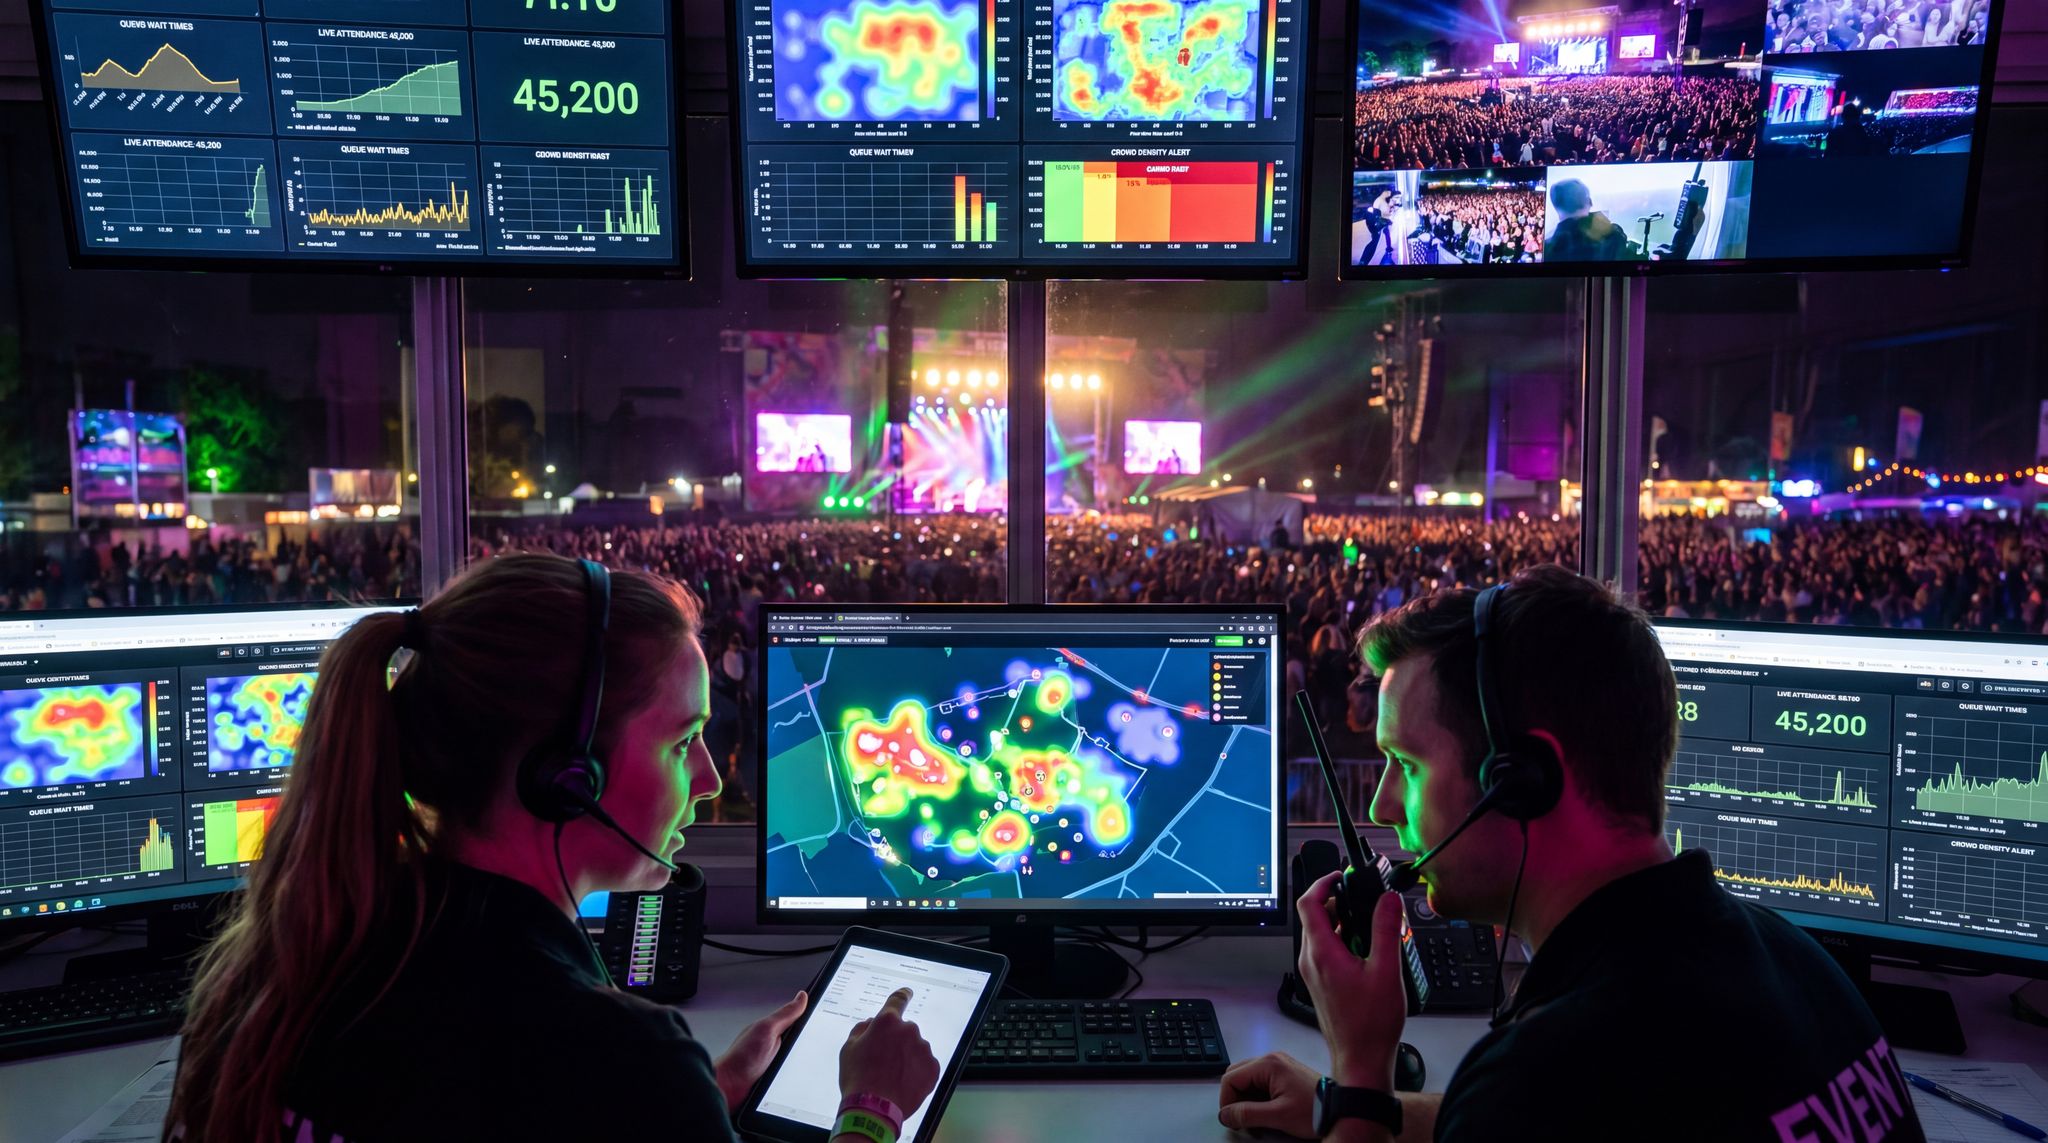
Dynamic Data and Social Media Displays
Immersive visuals aren’t limited to scripted content – they can also incorporate real-time data and social interaction, which boosts engagement. Many events in 2026 set up live social media feed displays or interactive Twitter/Instagram walls on their screens. With the right tools, you can pull in posts tagged with the event hashtag and display them in a moderated feed during breaks or pre-show. This gives attendees a thrill to see their own content up on the big screen and encourages more social sharing (free publicity!). There are services and software specifically for events to display social content in styled formats, often with moderation features to filter out inappropriate posts. Run this on a separate machine or cloud service that feeds into your visual system. It could be a dedicated layer on the LED wall that you pop up occasionally, or a ticker at the bottom of the screen that runs continuously. Be mindful of readability – choose large, high-contrast text and only show a few posts at a time, since attendees may be far from the screen.
Live polls and interactive Q&A are another popular element. These usually tie in with a mobile app or SMS system where the audience votes or submits questions, and the aggregated results or selected questions are displayed on screen in real time. For example, a conference keynote might ask “Which trend are you most excited about?” and as people vote, a live bar chart or word cloud updates on the big screen. Technically, this involves integrating an API or using an event engagement platform that outputs a graphic. Some modern event apps have this feature built-in and provide an output for projectors/LED that can be styled with event branding . If going custom, a web browser capturing a live dashboard (like a Google Slides poll or a custom HTML visualization) can be an input into the media server. Just ensure internet connectivity is solid for those systems – a flaky Wi-Fi could freeze your live results display at the worst time. A pro tip is to run such interactive graphics on a slight delay or with a manual trigger, so you can curate what goes live. For Q&A, definitely moderate which questions appear on the screen (using a person or AI moderator) to avoid any offensive or off-topic surprises in giant text.
Data-driven content isn’t just about the audience phones; it can also be pulling from sensors or external data streams. For instance, at a tech exhibition, you might live-visualize data like number of check-ins, environmental data (temperature, sound levels from the crowd), or even stock prices in a financial conference setting. At sports events, the big screen might show real-time player stats and updates. All this requires bridging the data source to a visual representation. Custom software or node-based visual tools (like TouchDesigner) can be invaluable for translating data to graphics in real time. As events push for more hyper-personalization and dynamic content , we see AI creeping in too – some events have used AI analysis of crowd reactions and reflected that with changes in content (e.g. if the audience volume goes up, visuals become more intense). While cutting-edge, ensure any AI or algorithm-driven content is thoroughly tested and has fail-safes. You don’t want an automated system spitting out odd visuals or crashing because of unexpected data. As always, a manual override (like a technician ready to switch back to a default screen) is advisable whenever external data is driving your main screens.
Interactive and Immersive Installations
Beyond the main stage screens, consider adding interactive visual installations around the venue for added immersion. In 2026, events are embracing experiential elements like LED tunnel entrances, projection-mapped art pieces, and AR activations that attendees can engage with. For example, an entrance tunnel lined with LED panels might show a swirling galaxy that reacts to people’s movements via motion sensors – essentially turning the entry into part of the show. Or a projection mapping setup on a sculpture in the lobby could let attendees control the visuals with gestures or a touchscreen, providing a fun hands-on experience. These installations often use smaller-scale versions of the main tech (like a few LED panels or a portable short-throw projector) plus interactive sensors. They can run on independent systems from the main stage, but you should still include them in the overall tech plan and network. Often these interactive pieces require a technician or artist to monitor them, especially if the public can touch or tamper – have someone check that the sensors stay aligned and the software is running smoothly throughout the event.
Augmented reality photo ops are another trend: event organizers set up large LED walls or projections as dynamic backdrops for attendee selfies. These might display branded content or imaginative scenes, and sometimes use AR to insert the attendee into the visual (e.g. a screen that shows wings on the participant or places them in a virtual environment on the display). While largely for fun and marketing, these need all the same technical care – the screens should be high-resolution and bright so photos come out nicely, and any camera or AR tech must be calibrated and easy to use. We’ve seen events where a “mirror screen” (a screen with a camera that displays the crowd with effects) draws huge engagement. If doing this, consider the user interface – make it obvious how people trigger the photo or where to stand. Also, if networked (say the AR filters are cloud-based), again, ensure the network is robust, especially when dealing with professional LED video wall specifications.
Furthermore, festival organizers and venue operators are increasingly commissioning bespoke light art to elevate the overall aesthetic of their spaces. These installations blend structural design with dynamic illumination, turning dark corners of a venue into highly photogenic landmarks. By investing in technology art—such as kinetic LED sculptures or interactive projection-mapped monoliths—promoters create secondary attractions that keep attendees engaged away from the main stage. This fusion of creative lighting and digital media not only enhances the atmospheric vibe but also provides lucrative branding opportunities for sponsors looking to attach their name to cutting-edge, experiential art pieces.
A spectacular new dimension is the use of drones and robotics as part of the visual show. Swarm drone light shows have risen as a replacement or enhancement for fireworks at outdoor events. Hundreds of drones with LED lights can paint patterns in the sky, synced with music. While not “screens” in the traditional sense, they are choreographed to integrate with on-ground visuals. Coordinating with drone operators is crucial: they usually run on a precise GPS and timecode schedule, so sync their segment with your lighting and video cues. For instance, if you have a big reveal moment, it could combine a stage LED graphic, a pyro burst, and drones forming an image above – an ultimate 360° immersive moment. The article on drones and automation elevating live events notes how these elements must be carefully programmed to complement traditional AV, not distract, a sentiment echoed in technical comparisons of visual technologies. Additionally, some events use moving LED robots or kinetic LED sculptures – these require coordination between motion control and content. A grid of moving LED panels, for example, might rearrange to form different shapes; your content and the motion must be in sync to avoid content breaking apart oddly. This blurs the line between staging and video content and is highly advanced, but incredibly impactful when done (think of Olympic ceremony performances or high-end touring shows that invest in such kinetic visual elements). If you venture here, bring in specialists for motion control and rehearse extensively, since it adds mechanical points of failure to the visual equation.
The sky’s the limit (literally, with drones) for interactive and immersive visuals. The guiding principle is to ensure any interactive element serves the attendee experience and is technically reliable. Attendees will remember unique touches like walls that respond to them or being part of the show themselves. Just be cautious not to introduce untested tech without backup options – if your grand interactive piece fails, have a backup plan (even if it’s static content or a manual mode). When executed well, these interactive visuals can deepen engagement and set your event apart as truly cutting-edge.
Coordinating Visuals with AV & Production Teams
Early Planning with Production Design
Immersive visuals cannot exist in a silo – they must be woven into the event’s overall production design from the start. This means collaborating early with the production designer, stage designers, and technical director to ensure the stage architecture, lighting rig, and video elements all align. In pre-production, map out where screens or projection surfaces will be, and how they fit with scenic elements like banners, sets, or lighting fixtures. A common rookie mistake is deciding to add a big LED wall after the stage design is done, only to find it blocks sightlines or clashes with other elements. Avoid this by making video a core part of the design discussion. Use renderings or 3D models to visualize the stage with the LED/projection content placeholders – many designers use software like Vectorworks or Depence2 to simulate how screens and projections will look from audience perspective. This helps identify issues such as a projection that might spill onto areas you don’t want, or whether an LED screen is sized appropriately relative to the stage.
Embracing 3D stage design for events has become a non-negotiable standard for top-tier technical directors. By utilizing advanced pre-visualization software, production teams can build a digital twin of the venue to test various LED stage design concepts before a single truss is rigged. This three-dimensional approach allows organizers to evaluate sightlines from every ticketed seat, ensuring that complex LED volumes or sculptural video elements don’t obstruct the performance. Furthermore, a robust 3D stage design workflow facilitates better communication with sponsors, as promoters can provide accurate virtual fly-throughs of the proposed environment, proving the ROI of high-end visual investments.
Also, involve the content creators in these early talks. If you have a visual content team (graphic designers, VJs, animators), loop them in when creative concepts are being developed. They might have innovative ideas for how content can interact with stage elements (e.g. maybe the LED wall content could extend onto LED podiums or DJ booth panels). Conversely, they need to know any physical limitations: for example, if part of the screen will be obscured by a drum riser or if projection surfaces have seams or pillars that might distort an image. By sharing the stage plans and technical specs with content creators, you empower them to design visuals that fit the canvas perfectly, ensuring they deliver media that fits your specifications. This is especially true for projection mapping – content must be tailored to the exact geometry of the surface. Often, the content team will request measurements or will do a site visit to scan the surface (sometimes using photogrammetry or LIDAR to build an accurate 3D model). Grant them that access because the more precise the content matches reality, the better the end result.
It’s worth creating a production timeline that includes all visual-related milestones. For instance: content concept lock by X date, LED supplier confirmed by Y date, artists’ media submission by Z date, technical rehearsal on whatever date. Share this timeline with all stakeholders. This ensures, for example, that an artist’s team knows the deadline to send their custom visuals (and in what format), preventing last-minute chaos. Big festivals that feature many acts often give each artist a “video content advance” packet with specs (screen resolution, accepted file formats, content due date) to ensure high quality MP4 or H.264 delivery and avoid issues with unsupported formats or codecs. Emulate that practice even if your event is smaller – it sets professional expectations and reduces headaches. If the event is bringing in external media (like sponsor videos or a CEO’s presentation deck), get those in the pipeline early as well. In summary, treat video like any other production department (sound, lights, staging): integrate it into kickoff meetings, walk-throughs, and design reviews from day one.
Working with Artists, VJs, and Presenters
In many events, especially music festivals and tours, the performers themselves (or their teams) will have specific visual needs or contributions. DJs and touring artists often travel with a VJ (Visual Jockey) or a stash of custom content that plays during their set. Managing this requires clear communication and technical coordination. Before the event, gather technical riders from artists that outline their video requirements – do they need a media server input for their own laptop? Are they bringing special LED props? Or do they expect the house to provide content/screens for them? Some artists might say “we have our own VJ who will send video to your screens via HDMI at 1080p” – in which case, you must provide a connection at the stage and possibly a preview monitor so their VJ can see the output. Make sure to advance these details well ahead of time, utilizing a secondary backup method or quick rehearsal. If an artist’s request is unclear or seems beyond your setup, jump on a call to clarify and, if needed, negotiate a solution. For example, if a band requests a very specific projection effect that you can’t replicate, you might discuss alternatives or request they supply additional equipment. Most artists are flexible if you engage early and find a compromise that keeps their show vision intact.
For festivals or multi-artist shows, it’s common to allocate time for a quick video rehearsal or content test with each act (often in the morning or day before). Use this to let artists/VJs test their content on your screens. This flushes out any format issues (e.g. their video looks cropped, or colors are off) while there’s still time to fix. Pro tip: have a utility media encoder laptop on-site with software that can convert videos between codecs/resolutions fast. Despite best efforts, you will occasionally get a media file 30 minutes before show that “just has to run.” Being able to encode that 4K ProRes into a 1080p H.264 or apply a quick resize can rescue the situation, ensuring the system is crystal clear up front. That said, set expectations with artists firmly about deadlines – gently remind them that late submissions risk not being included or may not look as intended. When everyone knows you have a cutoff (like “all visuals must be submitted by 48 hours pre-show”), they’re more likely to comply.
In scenarios with live VJs (common in EDM festivals), treat them almost like another live performer plugging into your system. They might run their own Resolume or similar software on a laptop. Give them a direct input feed to the LED wall switcher or media server, and ideally a chance to do a quick line check. Ensure the resolution/frame rate they output is matched to your system to avoid any sync problems. Also, have a backup plan for VJ sets: if a guest VJ’s laptop crashes mid-set, do you have a neutral visual or company logo you can cut to? Often the house media server sits upstream so that if needed, the video director can override the VJ feed with a safety graphic. Another trick is running the VJ feed through a small delay (like a few frames buffer) in a switcher, which sometimes gives just enough time to switch to another source if a drop occurs – though this isn’t always feasible. Essentially, don’t treat artist-provided visuals as plug-and-play without oversight. Have a video tech assigned to shadow those inputs, verify signal integrity, and switch away if something goes wrong, again relying on a secondary backup method or quick rehearsal to mitigate issues that could otherwise take minutes to resolve.
For corporate events or conferences, the “artists” are presenters, and their content often comes in the form of slide decks or videos to play during sessions. The same principles apply: collect presentations ahead of time, test them on the system (fonts, embedded videos, etc.), and standardize formats (maybe all presentations are run from one master PC using PowerPoint or Keynote in presenter mode). For consistency, some conference producers re-template all slides into a uniform look – this helps avoid odd aspect ratios or tiny text that would be illegible on big screens. If there are multiple presenters with different laptops, discourage live laptop swaps on stage if possible (they tend to cause delays and resolution mismatches). Instead, centralize content on a show laptop or use a switching system with all laptops pre-plugged and tested. And always insist on backup copies of critical presentations – if a CEO’s laptop fails, you want a copy of their deck on another machine ready to go. In essence, herd the cats when it comes to presenters and artists and their visuals. By diplomatically enforcing timelines and offering technical help, you’ll align everyone toward a smooth show where the visuals enhance rather than complicate the performances.
Syncing Lighting, Audio, and Special Effects
A truly immersive event visual experience comes from the synchronization of all production elements – video, lighting, audio, special FX – into one cohesive show. Achieving this requires close coordination between departments and often the use of timecode or show control systems. If the event has tightly choreographed moments (like an opening sequence or a headliner music set with specific cues), consider using SMPTE timecode or MIDI timecode to lock visuals and lighting. Many media servers can either chase an incoming timecode or generate one. For example, the playback of a video clip on the media server can send timecode that lighting consoles (and pyro controllers, etc.) listen to, ensuring the lighting changes exactly on the beat with the video content. Conversely, a DJ might have a timecode track in their audio mix to drive both lighting and video cues in sync. Timecode isn’t always necessary – for simpler shows, a good comms system and a human calling cues (“Standby video… GO video!”) works well. But at high levels, timecode is a safety net that guarantees sync even if communication fails or if things get out of sequence.
Even outside of fully timecoded shows, communication protocols can link systems. Some lighting consoles support sending triggers via OSC or Art-Net to media servers. For instance, a lighting designer might press “Go” for cue 10 on the console, and that simultaneously triggers a media server to start visual Cue 10 because the systems are networked. This kind of integration is part of building a connected event tech ecosystem. When developing a cohesive technology stack that connects lighting, video, and other systems, you ensure all departments work in lockstep rather than isolation, which is key for managing complex event tech ecosystems. It might take extra setup time (configuring network addresses, testing triggers), but the result is smoother cues and less reliance on someone hitting a button at the perfect millisecond. Just make sure every operator understands the plan: if video is auto-following lighting cues, the lighting op needs to double-check the video is ready each time, etc. Redundancy in communication helps – for example, even with triggers, the show caller might still verbally call the cue as a backup.
Musical synchronization is another aspect. If visuals are meant to react to music in a more freeform way (common in EDM shows), consider feeding an audio input to the media server. Some VJ software can analyze waveform or beat in real time to modulate the visuals (e.g. pulsing brightness to the bass drum). This adds an organic sync that elevates the sensory impact. It’s not frame-accurate like timecode, but it creates that feeling that the visuals “dance” to the music. Ensure the feed is a clean, latency-free audio line from the mixer. Alternatively, if working with a band, you might tie into their MIDI instruments or backing tracks. We’ve seen tours where hitting a note on a keyboard triggers a visual effect via MIDI signals to the media server. This blurs the line between lighting, video, and performance – essentially turning musicians into visual operators too. If going this deep, a pre-show rehearsal with all elements is non-negotiable. You need to verify the MIDI mappings or audio frequency triggers are firing correctly. And have a fallback: e.g. if the MIDI fails, perhaps the visuals have an automatic mode or the VJ can take manual control.
Don’t forget pyrotechnics, lasers, and other special effects. These can outshine screens literally (a big pyro flash can white out a projection or LED momentarily), so integrate them creatively. Some shows design content that goes to all-white at the moment of a pyro blast, using the blinding light as a transition. Others coordinate laser graphics with screen content (like extending animated lines from the LED onto the air with lasers). If pyro is involved, be mindful of physical effects on screens – e.g. pyro flames too close to an LED wall can heat or even melt modules (a known catastrophic failure mode). So physically coordinate with the FX team on safe distances and maybe put protective buffer panels if needed. With lasers, ensure scanning areas don’t hit projector lenses or camera sensors directly, as that could damage equipment. Good planning will slot these effects such that they complement the visuals: perhaps during a projection segment, you avoid pyro and heavy lights, focusing audience attention on the projection, and then during a high-energy song with LED content, you bring in CO2 jets and lasers to accent beats the video is already emphasizing. It’s about layering without cluttering.
Finally, maintain open comms during the show. The lighting director, video director, stage manager, and audio engineer should ideally be on a common intercom channel or at least connected. If, say, the video op sees a problem (content didn’t reset, or a cue got skipped), they can quickly ask the stage manager to hold the next cue for a second. Or if a musician extends a song unexpectedly, the video op can tell the lighting op “looping visuals, song still going” so lighting can also improvise. This real-time teamwork makes a huge difference when things inevitably deviate from the script. By having each other’s backs and communicating, the AV crew ensures that the audience experiences a seamless spectacle, completely unaware of the rapid-fire adjustments happening behind the scenes.
Show Ops and Live Troubleshooting
Once the event is live, the focus shifts to operational execution and quick problem-solving. The best defense is a good offense: thorough rehearsals and prechecks. However, live shows being live shows, the unexpected can occur. It’s vital to have a skilled crew monitoring the visuals and ready to pounce on issues. Assign specific roles – for instance, a screen graphics operator (playout operator) who triggers all content cues according to the cue sheet, a projectionist/LED tech stationed where they can see the whole image to spot any anomaly, and perhaps a technical director overseeing video who can direct responses if something fails. These individuals should have clear communication lines (intercom headsets usually) and ideally their own channel to discuss video-specific fixes without clogging the main comm.
Monitoring tools help greatly. Set up a multi-view feed in the production area that shows all media server outputs, camera feeds, and any backup feeds. This way, if one media server’s output freezes or a backup feed goes live, the team knows instantly, and you can equip the video team with a preview monitor. Many media servers also have dashboards showing system health – keep those visible. If you see CPU usage spike or frames dropping, you might proactively switch to another source for a moment and reload that server. If you’re running a fully redundant A/B system (two synchronized servers), usually the monitoring will show if one falls out of sync or goes dark, and ideally auto-switch. But sometimes manual intervention is needed – train the op on the switcher to know how to quickly swap to backup source on the LED or projectors. For LED setups, monitoring the LED processors is key too – they often have status LEDs or software that indicate if any panel lost signal or if a power supply failed. A single dead panel might not be apparent to the general production crew, so rely on the LED tech or sharp eyes to catch it. They can decide if it’s worth swapping immediately or if it’s minimally visible and can wait.
One scenario to be ready for: cue misfires or operator error. Maybe a video cue is missed or played at the wrong time. It happens even to seasoned ops. When it does, stay calm and have a procedure. Often it’s less noticeable to the audience than it is to you. If a wrong video starts, a quick cut-to-black or to a neutral backing graphic can cover the hiccup while you get back on track. Some productions keep a “holding loop” of generic visuals ready at a keystroke, so if anything goes awry, they hit that and at least something appropriate is on screen. Similarly, if a live camera feed is supposed to be up and a camera isn’t ready, train the switcher op to switch to a wide safety shot or a logo screen instead of, say, leaving a test pattern up. It’s all about graceful recovery. Post-show, you can analyze what went wrong (like in a post-event analysis of technical wins and flubs – a practice not just for marketing, but production teams too). But in the moment, quick thinking and ample backups are your saviors.
Have a plan for partial failures: e.g., one projector out of four dies – do you carry on with a slightly dimmer image on that corner, or pause to reboot it? This depends on the show flow. In a fast-paced concert, you likely push forward and hope redundancy covers it. In a conference, you might politely pause the program for a “technical adjustment” if the main screen went down (over-communicate with the audience in those cases to maintain trust; a quick announcement that you’re fixing a screen issue is better than awkward silence). Your plan should include who makes that call – typically the show caller or technical director will decide if a pause is warranted. If the content is still understandable (say one of two side screens went black but the other is fine), often you just continue and fix it in the next break.
Audience management is another subtle aspect. Bright flashes, content with intense strobing, or very loud audio tied to visuals should be signposted with warnings if needed for epilepsy or comfort. Also, consider accessibility: if you have attendees with visual impairments, are there any accommodations, like descriptive audio of important visual content? At minimum, ensure that critical spoken info isn’t only shown as text on screen (or if it is, also have voiceover). These details tie into producing an inclusive experience, which includes keeping your festival’s projection and LED systems running to avoid disappointing attendees.
In summary, coordinating visuals with the broader production means thinking holistically and having each other’s backs. It’s about uniting the creative and the technical: aligning vision with execution. When the screens, lights, sound, and performers all work in harmony, the result is pure event magic – and the audience will walk away remembering how incredible it all looked and felt, without ever knowing about the army of professionals and the careful planning that made it possible.
Ensuring Reliability: Redundancy and Fail-Safes
Building Redundancy into Visual Systems
When thousands of eyes are on your screens, you simply cannot afford a blackout. That’s why redundancy is the buzzword for mission-critical event visuals. The idea is to eliminate single points of failure so that if any one component fails, the audience doesn’t notice a thing. Start with your media playback: use dual media servers or playback machines running in parallel to ensure backups for everything. Many modern server setups have a main and backup unit genlocked and running frame-synced content; the output from both goes into a switcher with an automatic failover. So if the main server crashes or loses signal, the backup is already live on screen within a fraction of a second, utilizing backup features or downstream switchers. Even with simpler setups like a laptop, you can rig a second laptop with the same cues ready, and use a matrix switch to toggle over if needed (though manual, it’s better than nothing). For IMAG camera feeds, often redundancy means multiple routes – e.g. each camera might feed two separate switchers (the main and a backup video mixer) especially in high-profile broadcasts. In live events, you might not fully duplicate the switcher, but you could have a secondary way to bypass it (for example, a direct cut from camera to screen if the mixer fails).
Redundant signal paths are also vital. In large LED wall setups, the LED panels are usually daisy-chained in segments to receiving cards. High-end systems allow dual feed cables: a Main feed and a Backup feed running to every panel chain, ensuring good quality connections and redundancy. If the main feed cable is unplugged or a sending card dies, the panels auto-switch to the second feed. Enable and test this feature during load-in – literally unplug the main feed and confirm the screen stays on via backup. The same goes for projectors: if you have two media outputs going to a projector (some accept dual-link input or have a switcher in front), ensure a fallback input is configured with a “safety slide” or mirrored content. Some events even keep a completely separate backup projector mounted and aligned, turned off but ready. If projector A fails, projector B can be powered on and shutter opened quickly. This is expensive but for critical shows (like a world premiere where a projection must work), it’s worth it.
Hardware redundancy extends to distribution and infrastructure. Double up on critical cables where possible – run two fiber lines for long data runs (and use a fiber auto-switch or at least have crew ready to switch if one is damaged). Use matrix switchers with internal redundancy – many pro video matrices have redundant power supplies or even a mirror unit. Keep spare parts on hand: extra LED panels/modules, spare LED receiving cards, backup media server components like extra GPU or output cards, etc. Anything that can fail will eventually fail, usually at the worst time, unless you have a spare. This is something top-tier productions budget for: essentially a small stock of replacement gear on-site. It’s saved shows countless times, whether it’s swapping an LED PSU that died in one panel or replacing a faulty SDI cable that was causing flicker.
Common Failure Points and Backups
| Failure Point | Primary Mitigation | Backup Solution |
|---|---|---|
| Media server crash | Dual redundant media servers running in sync, utilizing backup features or downstream switchers. | Automatic failover switch to backup server output. |
| Video switcher failure | Main switcher with redundant PSU or secondary switcher. | Bypass path: route critical feed directly to screen. |
| LED panel/module failure | High-quality panels & regular maintenance. | Hot-swap spare LED module or panel during a safe cue. |
| LED data cable or card fail | Redundant data feed cables to LED chains, ensuring good quality connections. | Panels auto-switch to backup feed; spare receiving card ready. |
| Projector bulb/laser fail | Use laser projectors (no bulbs); dual lamp models if lamp-based. | Redundant projector covering same area (overlapping blend) or quick-swap backup unit. |
| Power loss to AV systems | Independent circuits/generator for AV, ensuring good quality power sources; UPS on servers. | Backup generator with automatic transfer for critical power. |
| Network/control failure | Isolated show network for AV; redundant switches. | Backup control method: manual cues or secondary control system (e.g. spare lighting console). |
| Content file corruption | Validate all media pre-show; keep copies on separate drives. | Load backup copy from alternate source (cloud or spare storage). |
| Operator error (wrong cue) | Thorough rehearsal and clear cue sheet. | Ability to override quickly (e.g. pause, black out, or backup logo to screen). |
As the table highlights, virtually every component in the visual chain should have a plan B. A guiding principle from experienced show techs is “No single failure should take down the whole show.” That mindset will lead you to creative safeguards – for instance, even if all your video systems failed, do you have a contingency to entertain the crowd? Perhaps the lighting and audio teams are prepared to carry on while video is rebooted. It might be playing an extra song or having an MC engage the audience. These show flow backups are as important as the technical ones.
Power and Environmental Fail-Safes
Keeping the visuals running isn’t just about the screens and projectors – it’s also about ensuring continuous power and stable environment. A significant portion of crisis-proofing your event tech involves power planning. We touched on separate generators; let’s expand that. If using generators, have them in redundant configuration (e.g. two smaller gensets running at half load rather than one big one at full, so if one dies, the other can take over critical load). Use automatic transfer switches if possible so the handover is instant. If on venue mains power, verify the circuits and consider a battery backup (UPS) especially for the media server rack and network gear. Even a 1-second outage will reboot those, but a UPS can ride through short brownouts or let you gracefully shut down if needed. One common approach is using UPS units that give, say, 5-10 minutes of power – enough to continue through a short flicker or to pause the show safely if a longer outage occurs.
Environmental controls are about cooling and weather protection. Heat is the enemy of electronics. Ensure proper cooling for racks (media servers and processors throw off a lot of heat). In an outdoor festival container, you might need portable AC units. LED panels also generate heat; while they’re designed to handle it, avoid direct midday sun on LED control equipment and projectors as that can cause overheating. For outdoor LED walls, many crews shade the back where the electronics are or at least cover them until showtime to prevent solar heating. Weather-wise, have rain contingency – rain covers for projectors (there are rain hoods or secure enclosures that don’t obstruct output). LED walls are mostly waterproof front and back, but if extreme weather comes (heavy rain + wind), you might decide to lower or shut off the wall for safety. Set thresholds in advance: e.g. if wind exceeds X mph, content is cut and wall is lowered. That way the decision is protocol-driven, not a panic call. Communicate those thresholds to the show caller and safety officer.
If your event is multi-day or overnight, secure the gear during off hours – physical security (so no one tampers with projectors or climbs LED structures) and also maintain power. Some systems don’t like power cycling repeatedly; if possible, leave processors and servers on (or in standby) rather than fully off each night, to reduce cold start issues. But also have an overnight support plan – who will respond if at 2am a projector shuts down due to a safety trigger or a fan error? Someone should check systems well before doors each day. Running a quick health check on all visuals each morning of an event day is a great habit; it can catch issues like overnight dust clogging a projector filter or an LED panel that failed and needs replacement before attendees enter.
Testing and Rehearsing Failover Scenarios
The time to discover a backup system doesn’t work is not during the show – it’s during rehearsals. A truly bulletproof visual setup is one that’s been put through the wringer in pre-show testing. Incorporate fault simulations into your production rehearsals. For example, during a full run-through, intentionally pull the plug on the primary media server to see if the backup takes over seamlessly, ensuring you trigger every piece of backup equipment. Or have the LED tech kill the main feed to test the backup feed path. These drills not only test the equipment but train the crew’s reflexes. Everyone should know “If X fails, I do Y.” For instance, if the projectionist notices one projector dim out, perhaps their protocol is: call it out on comms (“Projector 2 down”), and then either start the backup or request lighting to boost stage lights slightly (to not have one dark patch on stage) until fixed. Rehearse those communications too. Running through a “black screen scenario” with the team will reduce chaos if it ever really happens – people will have muscle memory on how to respond.
During rehearsal, also verify content backup strategies. If using multiple media players (like a primary and a secondary with just basics), test switching to the backup content manually. Does it look okay on the screens? Is it correctly formatted? It’s easy to neglect the backup media – and then when you throw it up in a pinch, maybe it’s the wrong aspect and looks unprofessional. So do a quick flash of backup content on the actual screens pre-show to be sure. Similarly, do a dry run of a show stop: if something truly catastrophic required stopping, does the crew know how to gracefully stop playback, mute outputs, etc? It might be as simple as hitting a “Logo” button to display a holding graphic while an announcer addresses the crowd.
A critical area to rehearse is crew communication during a crisis. In stressful moments, adrenaline hits and people can talk over each other on comms. Establish a clear chain of command – often the Technical Director or Video Lead will have the say on video issues. If an LED wall goes out, perhaps the LED lead speaks to the show caller with the issue and an estimate (“Screen down, need 2 minutes to reset”), and the show caller decides to fill that time or hold. Without pre-thinking this, a minor glitch can become extended if nobody communicates. Therefore, explicitly assign: who informs production of a visual issue, who decides on stopping/continuing the show. Some events have pre-written “Technical Difficulty” announcements or graphics. If you can, prepare one – even a slide “Please bear with us, we’re resolving a technical issue” that can be switched to, is better than a confusing silence or a half-working screen.
Remember, redundancy and planning are not just about hardware – it’s people and procedures. A well-drilled team can turn a potential show-stopper into a barely noticeable blip. As one seasoned production manager put it, “The audience should never know something went wrong until maybe they read about it in a post-show case study.” By then, you’ll have already fixed it and learned from it. Reiterate these lessons in post-event debriefs: update your checklists if a new failure mode was discovered. Over time, this continuous improvement approach is how some events boast near 100% uptime on all their tech systems year after year. And that reliability builds trust with audiences, artists, and all stakeholders.
Crisis Management in the Moment
No matter how much redundancy you have, truly bizarre scenarios can still unfold – a freak power outage to the whole venue, a last-second content change demand by a VIP, etc. This is where crisis management skills come in. Train your team to be solution-oriented and calm under pressure. In the event of a major unexpected failure (say all projectors die because the venue power blew), the team should immediately have an impromptu huddle on comms: What happened? What can we do right now? Perhaps the short-term answer is to revert to a simpler setup – e.g. “Feed cameras directly to LED side screens, forget the fancy content” – basically simplifying to keep something running. Resilience often means graceful degradation: the show can continue in a reduced mode if needed.
Having a backup show flow for worst-case scenarios is wise. For example, if none of the video works, do you have extra lighting cues to carry the scenes that relied on video? Could the MC or band do an extra number to fill time? Some large ceremonies have a whole backup segment prepared (like a musical interlude) that can be inserted if a key system isn’t ready. While not every event can prepare spare acts, at least identify which parts of your show can be trimmed or extended to accommodate tech fixes. Communicate these to the show caller so they have options. Say during a festival set change, an LED processor needs reboot – maybe the MC can be sent out to engage the crowd for 3 minutes to buy time, rather than awkward silence.
If the crisis is not fixable quickly, transparency with the audience can actually preserve goodwill. As long as it’s a safe situation, a brief apology and explanation often works (“Ladies and gentlemen, we’re experiencing a technical difficulty with our video system. Our team is on it and we’ll resume shortly. Thank you for your patience!”). Audiences understand that technology can act up, especially if it’s something clearly not in the crew’s control (like venue power failure). It’s better to acknowledge than to leave people confused. One trick: if you know roughly how long the fix will take, mention it (“we expect to be back in 5 minutes”). If you fix it faster, great, you look super efficient. If it will take longer, consider whether the event should pivot – sometimes, you may decide to continue the program without the visuals (if possible) rather than losing attendee attention for too long. For instance, if a presenter’s slide system is down, maybe they can do a conversational segment with the moderator instead of showing slides.
Document every incident and resolution. Those notes feed back into your planning for the next event (the continuous improvement loop). Many event tech teams keep a “post-mortem” document listing what went wrong and what was learned. Over years, this builds a knowledge base that can be shared among staff – further increasing trustworthiness and expertise. It’s quite analogous to how the aviation industry handles near-misses: as learning opportunities to improve safety. Developing this culture of openly addressing failures and fixes will make your team ever more robust. It’s how you crisis-proof not just one event, but your whole approach to event technology, ensuring you use backups for everything from sources to displays.
To conclude: reliability in event visuals is achieved through redundant design, rigorous testing, and prepared humans. Your attendees may never fully appreciate all the backup systems humming silently or the drama that was averted backstage – and that’s exactly the goal. They’ll simply remember an amazing visual experience where nothing ever interrupted the magic.
Real-World Highlights: Immersive Visuals in Action
Festival Stages Pushing Visual Boundaries
Major music festivals are often the proving ground for the latest in LED and projection technology. Take Belgium’s famed Tomorrowland festival – known for its over-the-top stage designs – where the main stage features an enormous LED wall embedded in fantasy-themed scenery, complemented by strategic projection mapping on set pieces to add depth. In recent editions, Tomorrowland’s main stage spanned over 150 feet wide with high-resolution LED surfaces integrated into a castle-like structure. During headline DJ sets, the entire stage transforms: LED panels display surreal 3D visuals (dragons flying, waterfalls, abstract art) synchronized to the music, while hidden projectors map accents onto physical props (like making a carved face appear to move and sing). The result is a 360° immersive environment where the performers, lighting, video content, and special effects all play together. Such complex productions rely on everything we’ve discussed – weeks of pre-programming content, multi-layered tech (a suite of media servers driving different portions of the display), and robust backup plans. Festivals have learned to invest heavily in redundancy after some hard lessons; fans might recall a few instances years ago when a main stage screen went dark mid-show at big festivals, but in 2026 it’s rare to see a serious outage even with these mammoth setups.
Another festival example is California’s Coachella, which has pioneered creative uses of visuals. Beyond the big stages with LED backdrops for performers, Coachella introduced an immersive 360° projection dome experience (“The Antarctic”) where attendees enter a temporary dome theater for a 10-minute mind-bending audio-visual show. Inside the dome, dozens of projectors projection-map across the entire interior surface, surrounding viewers in animated art. This required ultra-high alignment precision and a custom media system to drive a ~5000 x 5000 pixel canvas seamlessly. The team behind it treated it like a planetarium, using calibration cameras and auto-blending to achieve a uniform image. It’s a brilliant case of using projection mapping tech for mass immersive storytelling at an event (and also shows that not all visuals have to revolve around the main stage – having experiential visual attractions elsewhere on site adds value for attendees). Coachella has also famously integrated augmented reality for live stream viewers – in one year, those watching at home saw AR graphics overlaying the live stage feed via the mobile app, e.g. virtual astronauts dancing on stage during an EDM set. While the in-person crowd didn’t see those astronauts, the at-home audience did, creating a novel hybrid experience . It hints at a future where events design visuals for multiple layers of audiences.
Festivals also demonstrate the importance of scaling tech for audience size, as seen in 500,000-capacity festivals utilizing high-end video solutions. A local 5,000-person festival might get by with two 9×5 meter LED screens and some simple VJ clips, but a mega-festival drawing 200,000 per day elevates that to an art form: massive LED arches or wraparound screens, interactive wristbands in the crowd syncing colors with screen content, and multi-sensory mapping shows (sometimes incorporating the audience themselves as part of the canvas, like lighting up sections of the crowd with coordinated LED wristbands to extend patterns outwards). These ambitious projects show what’s possible when budget and creativity align. However, they all rest on the fundamentals covered in this guide: selecting the right technology for the environment, carefully planning content and integrations, and bulletproof execution with backups. As festival production veterans will tell you, the devil is in the details – a groundbreaking stage design only succeeds if every LED module, every projector, and every cue is flawlessly managed through the chaos of a live outdoor event.
Corporate and Arena Spectacles
Immersive visuals aren’t just for music events – corporate and sporting events have stepped up their game tremendously by 2026. Consider a tech company’s annual keynote conference that draws 10,000 attendees and millions online. These conferences now rival rock concerts in their visual production. Companies like Apple, Google, and Samsung invest in enormous fine-pitch LED walls that span the entire stage width, sometimes even wrapping around for a partial 360 effect. At a recent global product launch, the stage featured a 8K-resolution LED screen so crisp that product images looked life-sized and tangible. The production team coordinated every slide and video with lighting cues, and even did a live demo with AR on-screen – the presenter pointed a device at the LED wall and triggered an AR animation that the audience could see on the wall, effectively floating next to the presenter. This required integration between the presentation system and the media server feeding the LED, timed perfectly. Corporate shows also emphasize clarity and fail-safe operation because the stakes (brand reputation, stock prices) are extremely high. You’ll often find triple-redundant playback systems at these events: two media servers plus a standby machine with static graphics, and on-site tech from the LED manufacturer to assist with any panel swap instantly. The ROI of these visuals can be measured in press coverage and consumer buzz – think of how many times you’ve seen jaw-dropping stage visuals from a product launch splashed across social media. It doesn’t happen by accident; it’s a result of meticulous design and execution aimed at delivering wow moments that translate into marketing gold.
In the sports world, arena and stadium events have embraced LED and projection to create immersive fan experiences. The halftime shows and player introductions at NBA and NHL games, for example, often use projection mapping on the court/ice. Teams project highlight reels and graphics that span the entire court, turning it into a giant display that can show anything from a roaring panther (for the Florida Panthers) seemingly breaking the ice, to a parade of past championship teams. These projection shows are usually done with arrays of 30K+ lumen projectors placed in the rafters, precisely calibrated to the arena floor. They also coordinate with the arena’s LED ribbon boards and scoreboard screens, effectively using the whole venue as a canvas. An important lesson from sports events is the value of rehearsing in the real environment – teams get very limited time in the venue (can’t practice on the ice for long as it’s needed for games), so they often run projection tests late at night or use previous seasons’ content as placeholders to fine-tune alignment quickly. The end result when the arena goes dark and the mapping begins is a unified spectacle that pumps up fans and players alike. On the reliability front, sports tech crews know they have no second chances – a game timeline won’t pause for tech issues. So they lean heavily on proven gear, backup projectors, and simple show control that triggers content at exact times (often linked to the game clock). Also worth noting is esports, which merges corporate AV and sports arena vibes: esports tournaments feature huge LED walls showing the game action live, plus augmented graphics like player stats and instant replays. In 2026, some venue operators are adapting to esports needs by installing higher refresh rate LED screens (since game visuals might be 120fps+), and ultra-low latency links from gaming PCs to displays, effectively scaling live production for the world’s largest activity, ensuring the live audience experience is as fast as the players’ own monitors. It’s a great example of tailoring tech to a niche application – and a hint that as new event genres rise, visual tech will evolve to support them.
Lessons from Visual Triumphs and Troubles
Every event – even the immensely successful ones – offers lessons for mastering visual technology. Let’s reflect on a couple of contrasting anecdotes that underline best practices:
-
Triumph – Lana Del Rey’s 2025 Stadium Tour: This tour was widely praised for its stunning visuals that married LED and projection. The production used massive LED walls and IMAG screens for bright, sharp imagery even in partially outdoor stadium settings, while also employing holographic-style projection effects for a dreamlike aesthetic, as reported in Lana Del Rey’s stadium tour mesmerizing visuals. They achieved the “holographic” look by using a fine scrim in front of the stage onto which projectors cast visuals of dancers and scenery, making them appear ghostly in mid-air. The entire system was driven by powerful Hippotizer media servers in a master-backup configuration, ensuring smooth playback and immediate failover, a setup detailed in Lana Del Rey’s stadium tour technical breakdown. Key takeaways: the success came from blending technologies (LED for core imagery, projection scrims for special effects) and investing in top-tier control gear with redundancy. Critically, the content was tailored to each medium – bold, high-contrast content on LED, and lighter, ethereal content on scrims so the projected illusions looked clear. This demonstrates the value of matching content design to the display tech’s strengths.
-
Trouble Averted – Major Conference Keynote: At a 2026 global tech symposium, moments before the CEO’s keynote, the tech team discovered the main playback machine was dropping frames on a heavily animated opening video. This was despite it working in rehearsals. Instead of gambling on it, they made a quick call to switch to the backup machine for that segment, which ran it flawlessly. Post-mortem showed an unnoticed software update had disrupted the primary server’s performance overnight. Lesson: Always have a backup ready to go and don’t assume everything that worked yesterday will work today – re-check critical playback systems day-of. The team’s preparedness and willingness to trust the backup saved the show from a stuttering opening, which would have looked extremely unprofessional in front of press and stakeholders.
-
Visual Disaster – and Recovery – at a Festival: A few years back, a notable EDM festival had a nighttime main stage with a huge LED wall, but the generator feeding the video system overheated and failed, plunging the screens into darkness mid-set. The music continued and the artists performed on, but visuals were gone for nearly 10 minutes. The organizers responded by immediately launching extra lasers and lights to fill the visual void while the power issue was resolved, and an apology message was later posted on social media. Fans were forgiving since audio and lighting kept the energy going, but it was a wake-up call about power redundancy. That festival now uses redundant generators and UPS backups for all critical systems, and in subsequent years hasn’t had that issue. Lesson: plan power as part of fail-safes (the most beautiful LED setup means nothing if it’s underpowered), and have a secondary plan to entertain the audience (lighting in this case) if the primary visual medium fails. Also, owning the failure openly can mitigate PR damage – fans appreciate honesty and effort to resume the show.
These examples underline a final truth: experience is the best teacher in event tech. By studying real-world outcomes – the spectacular successes and the near-misses – we continuously improve our strategies. Events that consistently deliver amazing visuals have often learned from past mistakes and invested in prevention. As an event technologist, never stop gathering those stories and lessons, whether from your own shows or industry peers. It’s the accumulated wisdom that allows us to innovate boldly (with 100 drones or interactive AR or whatever next year brings) while keeping the fundamental promise: the show will go on, and the screens will light up as intended, every time.
Emerging Trends and Innovations
Projection Mapping Trends and News for 2026
Staying ahead of the curve means keeping a close eye on projection mapping trends in 2026. One of the biggest shifts making projection mapping news in 2026 is the democratization of automated calibration tools. Previously reserved for multi-million-dollar stadium tours, camera-based auto-alignment and blending systems are now accessible for mid-sized corporate events and regional festivals. Additionally, there is a massive trend toward utilizing ultra-short-throw (UST) laser projectors to map complex stage props from within the footprint of the stage itself, eliminating the need for massive front-of-house projection towers. Venue operators are also seeing a rise in permanent mapping installations, where projectors are rigged long-term to transform venue architecture dynamically for different touring acts or corporate clients without requiring a fresh load-in every night.
Augmented Reality and Extended Reality (XR) Stages
Looking ahead, the line between physical and virtual visuals at events is blurring. Augmented Reality graphics – which overlay digital elements onto the real world through cameras or devices – are becoming more common in event broadcasts and apps. In the next few years, we’ll see more events where on-site attendees and remote viewers alike enjoy AR enhancements. For instance, concert tours may provide an AR mobile app that concert-goers can use: point your phone at the stage and see additional 3D effects synchronized with the show, like dragons flying around the band or song lyrics appearing in the air. This requires precise stage tracking and latency-free delivery, but pilot programs in 2025 showed it’s feasible. For the remote audience, AR is mainly a broadcast feature – expect award shows or big sports events to include AR elements visible on TV (like AR confetti cannons, player stats hovering next to them, etc.). Event producers should plan these in tandem with traditional visuals. The AR graphics should complement stage LED content, not duplicate or clash. One strategy is to create AR content that “extends” what’s on the LED – e.g. if the LED shows a forest, the AR might show birds flying out of that forest into the wider venue space. This kind of extension can make home viewers feel like the stage is bigger than reality. It’s essentially a new creative layer to design for.
On a related front, XR stages – extended reality stages – are being used for hybrid events and broadcasts. An XR stage typically involves an LED wall (or walls) and floor forming a partial or full “volume” (like a cube or cylinder of LED), with cameras tracked in 3D space. It’s akin to what’s used in film production (like the Mandalorian’s famous virtual set), but events are adopting it to create immersive presentations without physically being on location. For example, a presenter could stand in an XR studio and appear to be on a giant virtual stage with graphics all around them; this feed is then streamed live. Some award shows during pandemic times tried this with mixed results, but by 2026 the tech is maturing. The Ticket Fairy hybrid events guide touches on integrating virtual stage elements for remote audiences, perhaps using specialized LED frames built for broadcast. The challenge for live events is how to incorporate XR without alienating the live crowd. One approach is double-staging: have a modest physical stage for the in-person audience and simultaneously a virtual set extension for the broadcast. It takes careful choreography so the presenter always stays within the tracking area for cameras, etc. It’s complex, but as rendering tech and LED resolutions improve, we’ll likely see more events (especially corporate and television events) using XR to wow remote viewers and create scenes that would be impossible or too costly physically. Event pros should keep an eye on developments here, as it could open new sponsorship/branding opportunities in virtual space while maintaining a reasonable physical production footprint.
When planning these advanced setups, extended reality stage design considerations must heavily factor in LED wall geometry. The physical shape of the LED volume—whether it is a flat curve, a sharp 90-degree corner, or includes an integrated LED ceiling—directly impacts how the camera tracks and renders the virtual background. For instance, a smooth, continuous curve minimizes color shifts and moiré patterns on camera, whereas sharp angles can complicate the virtual lighting and blending. Technical directors must collaborate closely with XR content creators to ensure the 3D environments are optimized for the specific physical geometry of the LED panels, preventing the illusion from breaking when the camera pans across the seams.
Beyond the camera tracking, extended reality stage design considerations must also account for the physical pitch and pixel density of the LED wall geometry. If the physical curve of the stage LED wall design is too tight, or if the pixel pitch is too coarse for the camera’s focal length, moiré artifacts will destroy the XR illusion. Venue operators investing in permanent XR volumes must balance these geometric constraints with the need for a versatile stage design that can accommodate both traditional live presentations and advanced virtual production workflows.
Holographic Displays and 3D Visuals
The buzz around “holograms” at events tends to resurface every few years – from the late 2010s when a famous example was Tupac’s quasi-hologram at Coachella (achieved with Pepper’s Ghost technique and projection) to new 3D display technologies emerging now. In 2026, holographic-style displays are closer to reality with the advent of volumetric LED panels and advanced Pepper’s Ghost setups. Companies are developing transparent LED meshes and glass panels that can float graphics in mid-air when viewed from the right angle. While not true Princess Leia holograms, these are finding uses in trade shows and experiential marketing (e.g. a car launch where a 3D model of the engine rotates above the vehicle via a transparent display). Another tech is the fan LED display – spinning LED fan blades that persistence-of-vision creates a 3D image – often used for retail installations, now scaled up for stage effects like a gigantic spinning 3D logo hovering over a DJ. The effect is novel but these require safety distance (spinning parts!) and controlled lighting to see clearly.
For live concerts, some producers are revisiting modern Pepper’s Ghost: using high-resolution LED floors and angled glass or film to create holographic illusions visible to the audience. Since LED floors are now capable of blending seamlessly with LED backdrops, you can place a reflective film at 45 degrees and project a virtual performer on stage, making it appear as if an ghostly figure is really there. We might see this used to have “virtual cameos” by artists who aren’t actually present, or to create large-scale illusions (imagine a magician act but for concerts, with virtual monsters appearing on stage). The coordination with actual performers and lighting is crucial – any stray light can spoil the illusion – so if you design something like this, consult specialists and run separate rehearsals for the hologram sequence. There are also true volumetric displays (like cubes of LED that can show a 3D object) but those are more exhibition curiosities at this point due to size and resolution limits. Still, keep an eye on that space; as 3D content creation becomes more common (thanks to VR/AR development), events will have more 3D assets to play with in novel display formats.
AI in Visual Content Creation
Artificial Intelligence has started to influence event visuals as well. On the simpler side, AI-driven tools can generate visuals or assist content creation. For example, an AI might generate variations of background animations based on a theme, giving VJs a quick library of content to match a particular mood. AI image generators (like DALL-E, Midjourney) have matured such that with a good prompt, you can get high-resolution artwork or textures to incorporate into screen content – useful when you need a lot of unique assets that tie together stylistically. Beyond creation, AI is also used in real-time content modulation: some media servers now have AI modules that analyze live camera feeds or audio and apply artistic effects on the fly. An AI might detect the crowd mood from camera images (happy, neutral, excited) and trigger color scheme changes in visuals accordingly to elevate energy . Or take lyric recognition: AI could listen to a performer’s freestyle rap and simultaneously display key words in creative typography on screens behind them, essentially live closed-captioning with style.
Another AI application is in workflow automation and optimization. Think of calibrating 20 projectors on a complex mapping: traditionally tedious, but AI vision algorithms can potentially adjust warping and blending far faster, by “seeing” the test pattern with cameras and learning the optimal correction. Some high-end projectors and servers already incorporate this to a degree (auto-blend, auto-focus routines). By 2026 and beyond, we’re likely to see more “smart” setup features that shorten load-in times and reduce the chance of human error.
One must be careful, though – AI is only as good as its programming and training. It’s augmenting but not replacing the human creative and technical director. Always vet any AI-generated content for appropriateness and correctness (stories have circulated of AI systems showing unexpected images that were off-brand or offensive because of training data quirks – you do not want that surprise mid-event). Use AI tools as assistants: great for brainstorming visuals or crunching calibration data, but keep a human in the loop for quality control.
Green and Sustainable Visual Tech
Lastly, a trend worth noting is the push for sustainability in event tech. Massive LED walls and multi-projector setups can be power-hungry. Events in 2026 are increasingly conscious of their carbon footprint and energy usage. We’re seeing movement toward more efficient tech: LED panels with better power efficiency (some manufacturers boast 20-30% lower power draw for the same brightness thanks to improved drivers and LED efficacy), and laser projectors that, while high wattage, output far more lumens per watt than old lamps. If sustainability is a priority (and it should be for the industry’s future), event organizers might choose a slightly lower brightness or smaller screen if it dramatically cuts energy consumption, especially for multi-day events where generators pump out emissions. There’s also interest in reusing and recycling visual set pieces. Instead of custom-building an LED wall support that gets trashed after one use, productions design modular systems that can be reconfigured and used across different events. Content, too, might be repurposed or generated in an energy-friendly way (though digital content’s main footprint is rendering time on computers, which is relatively minor compared to the show energy).
Another angle is attendee experience and light pollution. Communities are prompting festivals to reduce light spill after certain hours – projection mapping that once blasted buildings all night might now have curfews, and LED screens are being equipped with auto-dimming sensors to lower brightness when not needed at full (also energy-saving). It’s a balance: we want amazing visuals but also to respect the environment and neighbors. Creative solutions like more targeted projection (to avoid lighting up the sky) or using drone shows (electric, precise) in lieu of fireworks (chemical, spread out) are becoming part of how events adapt. For indoor events, ensuring LED panels are RoHS compliant (less toxic components) and projectors use laser phosphor (no hazardous waste bulbs) are small but meaningful steps.
Frequently Asked Questions About Event Visuals
What is the best projection mapping software in 2026 for large-scale events?
For massive, complex productions, industry-standard platforms like Disguise (d3), Resolume Arena, and Dataton WATCHOUT remain the top choices. These systems offer robust 3D projection mapping capabilities, seamless media server integration, and advanced auto-calibration features essential for high-stakes B2B events.
Are there viable free projection mapping software options for professional use?
While open-source tools or trial versions of premium software are excellent for pre-visualization, training, or small-scale art installations, major commercial events typically require the reliability, low latency, and dedicated technical support found only in paid, enterprise-grade mapping solutions.
How do technical directors approach 3D projection mapping on complex stage geometries?
Professionals start by creating a precise digital twin of the physical stage using CAD or LIDAR scanning. They then use advanced mapping software to pre-warp and slice the high-resolution content, ensuring that when the media is routed to multiple projectors, the image converges perfectly across irregular or multi-dimensional surfaces.