Introduction
Switching event technology providers is one of the most daunting projects an organizer can undertake. Many events stick with outdated platforms far longer than they should, fearing that migration will disrupt ticket sales or confuse attendees. Yet as we head into 2026, technology needs and attendee expectations are higher than ever. Legacy systems with high fees, inflexible terms, clunky user experiences, or weak support have prompted more organizers to seek better solutions. In fact, industry reports have highlighted hidden fees and sub-par support among the ways some ticketing vendors short-change events – underscoring why so many festivals and venues are actively exploring new partners.
The good news is that with careful planning and a structured approach, switching vendors can be achieved without disrupting your events. This guide provides a practical step-by-step roadmap to manage the entire migration process smoothly. We’ll cover everything from planning the transition timeline and overlapping old/new systems, to migrating data securely, retraining staff and attendees on the new tools, and integrating the new platform with your existing tech stack. Throughout, we’ll share real-world examples of both smooth and rocky transitions – because sometimes the difference between a success story and a cautionary tale is all in the preparation. By learning from these lessons and applying proven best practices, you can ensure your 2026 vendor switch is seamless, secure, and sets your events up for long-term success.
Planning Your Vendor Switch
A successful migration starts long before any data moves or new scanners are installed. Thorough planning is essential to minimize risks. This phase is about deciding on the right new platform, mapping out a realistic timeline (with plenty of buffer), and handling the logistical and contractual groundwork for a smooth handover.
Assess Needs and Select the Right Platform
Before anything else, take a step back and clearly assess why you’re switching and what you need from a new vendor. Is your current system lacking specific features (e.g. RFID support, analytics, mobile integration)? Are high fees or poor support the issue? List out pain points and must-have requirements for the new platform. This will guide your selection process.
Smooth Entry With Mobile Check-In
Scan tickets and manage entry with our mobile check-in app. Supports photo ID verification, real-time capacity tracking, and multi-gate coordination.
If you haven’t chosen a new vendor yet, evaluate potential platforms thoroughly. Consider not just feature checklists, but also scalability, reliability under peak loads, integration capabilities, and support responsiveness. It’s wise to involve multiple stakeholders (ticketing managers, IT staff, on-site operations, marketing) in demos to catch any deal-breakers early. Some organizers even debate whether to continue with off-the-shelf software or build a custom solution in-house – but building your own system is a massive undertaking. In most cases, a proven platform that meets your needs with configuration (and maybe a few custom integrations) will be the safer, faster path.
As you evaluate vendors, due diligence is key. Speak to reference clients about their experiences. Ask pointed questions about uptime, support during events, and how the vendor handles migrations. Ensure the new provider can import your existing data (attendee lists, orders, etc.) and integrate with your other tools. Finally, negotiate favorable terms: you want a contract that aligns with your interests and timeline (more on that below). By the end of this phase, you should have a clear choice of new platform and a signed agreement to move forward.
Ready to Sell Tickets?
Create professional event pages with built-in payment processing, marketing tools, and real-time analytics.
Timeline and Milestones: Don’t Rush It
Migrating event tech is not a task to cram in last-minute. A well-structured timeline is your best defense against chaos. Work backwards from your next major event and set realistic milestones for each stage of the migration. This should include buffer time for unexpected issues – because in the world of tech, something always comes up.
Experienced event technologists know that rushing a complex implementation is a recipe for failure, as time is one of the most critical resources in any migration. Instead, break the project into phases with clear deliverables. For example, your timeline might look like:
| Phase | Timeframe (before event) | Key Tasks & Milestones |
|---|---|---|
| Initial Planning | 9–12 months out (ASAP) | Define objectives & requirements; build budget/ROI case; get stakeholder buy-in and approvals. |
| Vendor Selection | ~7–9 months out | Research and shortlist vendors; conduct demos and security reviews; finalize contract with new provider. |
| Data Migration Prep | ~6 months out | Audit all data in old system; decide what to migrate; export sample data for mapping tests. |
| Configuration & Training | ~3–5 months out | Configure new platform settings; develop integration scripts; train core team on the new system. |
| Testing & Pilot Run | ~2–3 months out | Import data into staging environment; run test events or a pilot event if possible; fix issues; train extended staff. |
| Go-Live & Overlap | ~1–2 months out | Begin limited use of new system (e.g. launch ticket sales for a smaller event) while still on old system for main event; monitor performance closely. |
| Event Day Execution | Event date | Full cutover to new platform for live event operations; have vendor support on-site and backups ready. |
| Post-Event Review | +1 week after | Debrief on what went well or not; measure KPIs (entry wait times, sales, etc.); complete any remaining data transfers; decommission old system. |
The exact timing will vary based on the scale and frequency of your events (a large festival might need a year-long plan, whereas a monthly webinar series might execute a switch in a couple of months). The key is to avoid a rushed, last-minute migration. Account for vendor lead times (e.g. ordering new wristbands or equipment if needed) and include extra days/weeks in case something takes longer. By plotting a detailed timeline early, you create accountability and can track progress. Remember, it’s much easier to adjust a plan on paper than to improvise on the fly under event-day pressures.
Overlap and Phased Transition
One of the smartest strategies for reducing risk is to overlap the old and new systems rather than doing a cold-turkey switch. If possible, plan a phased transition where you run certain aspects of the new platform in parallel with the old one before fully cutting over.
Data-Driven Event Marketing
Track ticket sales, demographics, marketing ROI, and social reach in real time. Exportable reports give you the insights to make smarter decisions.
For example, you might start selling tickets for a smaller upcoming event on the new system while your flagship event is still being ticketed on the old platform. This gives your team a chance to get familiar with the new interface and uncover any quirks on a low-stakes event. Alternatively, you could open registration for next year’s conference using the new system while wrapping up this year’s event on the old system. Parallel runs can expose data sync issues or integration gaps in time to fix them.
During the overlap period, decide how you will handle any duplicate data. You may need to reconcile two databases if the same customer could be in both systems (for instance, someone buys a ticket to one event on the old platform and another event on the new platform). Clear communication internally is vital: everyone should know which system to use for which purpose on which dates.
Grow Your Events
Leverage referral marketing, social sharing incentives, and audience insights to sell more tickets.
It’s also wise to maintain access to the old system for a while even after going live on the new one – at least in a read-only mode. This way, if something was missed in migration, you haven’t lost vital info. Many organizers keep the old platform active (but not customer-facing) through the first event or two on the new system, just as a safety net.
Contracts, Exit Clauses and Data Ownership
Switching vendors isn’t just a technical process – it’s a contractual one. Review your current contract to understand notice periods and termination clauses. You’ll need to time your switch so you’re not paying hefty penalties or overlapping fees longer than necessary. If your existing agreement auto-renews or requires 90-day notice, factor that in. On the flip side, ensure your new vendor contract allows a ramp-up period (e.g. starting with a pilot event) without locking you into full payments from day one if you’re not fully cut over.
Critically, confirm that your contracts cover data ownership and transfer. You should have the right to export all your data from the old system in a usable format. If it’s not explicitly stated, negotiate it or get written assurance from the vendor. Hopefully you addressed this when negotiating the event tech contract for the new platform – savvy organizers insist on clauses that guarantee data portability and cooperation during a transition. Likewise, an easy exit clause (with minimal notice and no steep penalties) can save you from staying stuck with a bad vendor.
Be aware of common pitfalls if contracts aren’t ironed out. Problems with data access after a vendor relationship ends are sadly common – think delays in retrieving data, incomplete transfers, or proprietary formats that make your export hard to use, creating problems with data access after vendor relationships end. Ambiguous data ownership terms can also be a nightmare if the outgoing vendor drags their feet. Avoid these issues by securing clear agreements up front. Put timelines in writing for the old vendor to deliver final data exports and shut down services gracefully. And don’t forget security and privacy: include provisions about securely deleting data from the old vendor’s servers once the transfer is confirmed (you don’t want your attendee data lingering indefinitely on a system you no longer control).
Finally, involve your legal and IT teams in reviewing all contracts and plans. Data protection laws like GDPR may require notifying attendees or obtaining consent if you transfer their personal data to a new processor – check with legal counsel about any privacy implications of the migration. With solid contractual footing and a plan for overlap, you’re setting the stage for a smooth technical transition.
Migrating Data Without Losing Anything
Data migration is the heart of the vendor switch – and often the scariest part. This is where you move years’ worth of attendee information, ticket orders, transaction records, and more into the new system. Mistakes here can result in lost records, angry customers, or financial discrepancies. The goal is to carry over all essential data accurately and securely. A meticulous, step-by-step approach is crucial.
Inventory and Export Your Data
Start by auditing exactly what data you have in the old platform. Ticketing and event systems can contain multiple data sets, including:
- Attendee personal data – names, emails, contact info, demographics.
- Ticket orders and transactions – purchase history, payment details, dates, amounts, promo codes used.
- Event configuration – your event listings, pricing tiers, capacity settings, schedules or session info (for conferences).
- Access control data – ticket barcodes or QR codes, RFID wristband IDs, check-in timestamps if applicable.
- Financial and accounting records – payouts, invoices, tax reports, etc.
- Analytics data – engagement metrics, survey results, heatmaps from apps, etc.
Decide which of these are critical to bring into the new system, versus what can be archived externally. It’s usually neither feasible nor necessary to migrate every single historical record. For example, you might export the last 3-5 years of data for active use, and keep older archives as static files. Focus on data that will be needed for operations, customer service, or comparative reporting going forward.
Once you know what you need, perform a full data export from the old vendor. Many platforms provide export tools (CSV files, Excel, or via API). If possible, do a test export early in the process – don’t wait until the final hour. Early exports let you inspect the data format and see if anything is missing or oddly formatted. It’s not uncommon to discover that certain fields aren’t available via the standard export and require a special request. Now is the time to surface those surprises.
As you export, think security. You’re handling sensitive information (personal data, credit card tokens, etc.). Use secure methods – for instance, have the vendor deliver files over SFTP or a secure cloud bucket rather than email. And always keep backup copies of any exports in a safe location. Until the new system is fully live and verified, you’ll want a fail-safe copy of all your data.
Clean, Map and Prepare the Data
Raw data dumps from one system rarely import cleanly into another without preparation. Expect differences in how platforms structure data – one system’s “Buyer First Name” might be another’s “Customer_FName” field. To avoid garbage in/garbage out, invest time in data cleansing and mapping.
First, clean the data. Remove obvious duplicates or outdated records (like test orders or junk customer entries). Standardize formats if needed (e.g. consistent date formats, country codes, etc.). This is also a chance to correct any known data issues from the old system – for example, if state names were in a free-text field leading to inconsistencies, you might normalize those values now.
Next, map every data field from the old system to its destination in the new system. This is essentially creating a translation guide: Old System Field A -> New System Field X. Include data type and format expectations. Many migrations hit snags because of mismatched schemas – in fact, industry analyses note that schema mismatches affect up to 70% of data migration projects. To prevent that, collaborate with your new vendor on the mapping. Get their input on how to handle any fields that don’t have a one-to-one equivalent. For instance, your old system might have separate fields for “First Name” and “Last Name” while the new one uses a single “Full Name” field (or vice versa). Decide on the transformation rules in advance.
A pro tip: start the field mapping very early. Don’t wait until weeks before launch. The sooner your team and the vendor’s engineers identify tricky conversions (like how seating assignments, loyalty points, or access permissions will be represented in the new system), the smoother the technical integration will go, ensuring information will flow into your new system correctly. In some cases, you might need custom scripts or middleware to transform data during import. Knowing that ahead of time is gold.
If the new system allows custom fields, plan for those too. You may have data in the old platform that doesn’t naturally fit into the new one’s default fields. Decide if you will create custom fields in the new system to hold that info (preferred, to keep data continuity), or if you’ll store it elsewhere.
Before doing the big import, test the process with a subset of data. Import maybe a single event’s data or a few hundred records to see how it goes. Validate everything: Are names displaying correctly? Do orders line up with the right ticket types? Are financial figures accurate to the cent? It’s much easier to adjust your mapping and scripts after a small trial run than after you’ve migrated 100,000 records and realize something was off.
Securely Import into the New Platform
With clean, well-mapped data on hand, you’re ready to import into the new system. Depending on the platform, this might be done through admin upload tools, an API, or with the help of the vendor’s migration services. Ensure that large data transfers are done in a secure environment. Ideally, perform imports in a staging or test environment first, not directly into production. This way you can double-check in the new interface that data appears correctly without affecting live attendees.
It’s crucial to maintain data integrity during import. Common issues to watch for include character encoding problems (e.g. accented names getting garbled), truncation if fields have length limits, or misaligned columns if the import format is finicky. For any financial or transaction data, verify totals. Your accounting team should compare revenue reports from the old system vs. new system after import – they should match if all transactions came over. Even minor discrepancies should be investigated, as they could hint at missing orders or calculation differences.
Also consider sequence: if you have relational data (like attendee records that link to ticket orders, which link to events), you may need to import in a specific order. Some systems require the event and ticket types set up first, then attendee/customer records, then orders, to maintain the links. Follow the new vendor’s guidance on import sequencing to avoid orphaned records.
During import, aim to do it well before the new system goes live for sales or check-ins. You want time to spot-check and correct any issues. If your events are ongoing (i.e., sales are continuous), you might do an initial bulk import of historical data, then closer to cutover do a “delta import” of any new orders that happened since the initial export. The closer you can get to an exact cutover snapshot of data, the less you’ll rely on the old system post-switch.
Validate and Secure the Data Post-Migration
After importing, validation is your quality assurance. It’s not enough to assume the data landed correctly – you need to verify it. Run test queries or reports: for example, pick a few random customers and ensure their entire order history is present and accurate in the new system. If you have attendee accounts or logins that are migrating, test that those users can sign in on the new platform (you might have to trigger password resets for security). Validate that any unique IDs (like ticket barcodes or RFID codes) came through and still correspond to the right people.
Keep an eye on privacy and compliance here. All that data in the new system needs to be handled according to GDPR, PCI, or other relevant regulations just as it was (hopefully) in the old. The new vendor should be up to speed on compliance (this is something you’d vet in selection), but double-check that things like credit card info didn’t accidentally come over in a non-compliant form. Typically, payment data isn’t migrated (you’d just reconcile transaction IDs), but if you, for example, stored any personal sensitive data, ensure it’s equally protected on the new side.
Finally, once you are confident the migration is complete and correct, establish a cut-off date after which the old system is no longer authoritative. Communicate to your team that as of that date, all new attendee updates or sales go in the new system only. This avoids confusion of data diverging. You’ll likely keep the old platform read-only for reference for a while, but your team should now be fully oriented around the new database.
At this stage, pat yourself on the back – you’ve moved the heaviest load of the migration. But the work isn’t done: you need to ensure people and processes adapt to this new technology. That’s where training and communication come in.
Training Staff and Educating Attendees
Even the most advanced event tech platform will fall flat if your team and attendees don’t know how to use it. In fact, one Gartner study found that around 75% of large software projects fail to achieve their goals, often due to low user adoption and inadequate training. To avoid being part of that statistic, invest in getting your people – and your audience – comfortable with the new system. Effective change management can make the difference between a seamless switch and a barrage of complaints on event day.
Training Your Internal Team
Start with those who will use the new platform day in and day out: your staff (and any key contractors or vendors). This includes ticketing managers, customer support reps, on-site gate personnel, finance team members pulling reports, and so on. They all need to be proficient and confident with the new tools well before they’re thrown into a live event scenario.
Begin training early, at least a couple of months before your first event on the new system. A festival ticketing support guide recommends training staff starting 1–2 months out, with refreshers closer to the go-live date. Early training gives everyone time to practice and ask questions. Use a sandbox or test environment of the new platform for hands-on exercises – for example, have staff simulate finding an attendee’s order, issuing a refund, scanning a ticket, etc., in a risk-free setting.
Consider a train-the-trainer approach if you have a large team. Identify a few power users or tech-savvy staffers and have them become subject matter experts on the new system. They can then help roll out training to others and be on-the-ground support during the transition. Create manuals or quick reference guides tailored to your event processes (the vendor’s generic manual is a start, but you’ll want to annotate it with your specific workflows and screenshots).
Also, address the “why” behind the change when training staff. Change can be unsettling, and some team members might be comfortable with the old system. Clearly communicate the benefits of the new platform – perhaps it’s faster, or reduces check-in times, or offers new revenue opportunities via better marketing tools. Getting buy-in from your team will make them more enthusiastic about mastering the new system rather than quietly resisting it.
Finally, don’t skimp on support training. If you have a customer support team or even just a couple of people who field attendee questions, make sure they know the ins and outs of the new attendee-facing experience. They should be ready to answer questions like “How do I find my ticket now?” or “I never got my confirmation email from the new system.” A well-trained support staff can turn a potentially frustrating transition for attendees into a positive interaction.
Updating Operational Workflows
Switching systems often means your internal processes will change. Take this opportunity to review and update your standard operating procedures (SOPs) for ticketing, entry, and other relevant areas. Don’t assume your old way of doing things will fit the new platform – adapt and optimize it.
For example, if your old platform required manually compiling a guest list in Excel for the door, but the new system has a live guest list app, change your process to use the app. If refund requests used to come via email to support but now can be done with a self-service link, update your communications to attendees accordingly. Every touchpoint from purchase to entry might have slight differences under the new system. Map out the “day in the life” scenarios for your team under the new setup and document the steps.
This also involves any third-party vendors or volunteers who interact with your systems. If you have a contract security team scanning tickets, for instance, you’ll need to train them on new scanners or apps. If your marketing team pulls attendee data for email campaigns, show them how those exports or integrations work on the new platform. Communicate workflow changes clearly and update checklists or runbooks that will be used during the event.
Testing these workflows is key. Do an end-to-end simulation: pretend it’s event day, and walk through every operational process with the new tools. Issue test tickets, have staff “check in” pretend attendees, process a fake on-site sale or ticket transfer, etc. This exercise will often reveal gaps (“Oh, we need to pre-print a QR code lookup sheet for the box office just in case”). Catch those now and refine the process, rather than discovering them at the gate with a line of people in front of you.
Communicating Changes to Attendees
Your attendees might not need to know all the behind-the-scenes details, but if the switch affects their experience, proactive communication is crucial. Craft a communication plan to inform ticket buyers and attendees about what’s changing and if they need to do anything differently.
Some aspects to cover:
- Ticket Purchase Process: If the interface for buying tickets is new, consider an announcement or a simple guide. For instance, if you moved to a new ticketing website or app, announce that “We’ve upgraded our ticketing system for a smoother purchase – you’ll notice a new look and feel when buying tickets.” Emphasize benefits (faster checkout, new payment options, ability to save tickets to a mobile wallet, etc.).
- Existing Orders: Let ticket holders know that their existing tickets are still valid. If you issue new tickets or barcodes as part of the migration, you must communicate that clearly and re-send tickets in the new format. There’s nothing worse for an attendee than showing up with an old QR code that no longer works because the organizer switched platforms. If attendees need to download a new app or access a new portal to retrieve their tickets, send step-by-step instructions well in advance.
- Account Changes: If your attendees had user accounts on the old system (for example, a portal to manage their registration or view purchase history), tell them if that is changing. Perhaps the new system will require them to create a fresh password or their old login won’t work. Plan an email to those users explaining the transition (you might even import accounts and simply force a password reset email so they can activate on the new system – whatever the method, be transparent about it).
- On-site Experience: Highlight any improvements or differences attendees will see at the event. For example, “This year we’re introducing RFID wristbands for entry and payments – when you arrive, you’ll quickly tap your wristband at the gates instead of scanning a ticket QR code.” If new technology is involved for entry or cashless payments, educate attendees on how it works ahead of time to reduce confusion. FAQs on your website, social media posts, and an email in the final info pack can cover these points.
The tone of attendee communications should be positive and reassuring. Emphasize that the changes are intended to improve their experience (shorter lines, more convenient features, enhanced security, etc.). Also encourage attendees to reach out with any questions or issues – and ensure your support channels (email, chat, call center) are primed to handle any incoming queries about the new system.
Providing Extra Support During Transition
No matter how much you prepare people, expect that some attendees (and staff) will need extra help when the new system goes live. Plan to over-communicate and over-support during the first event or two on the new platform.
For attendees, that might mean setting up a dedicated helpdesk at the venue entrance for any ticket issues, staffed with someone who has access to both the old and new systems just in case. It could also mean having additional support staff on phones or live chat on the event day, ready to resolve access problems quickly. Common issues might include “I never received my ticket email” or “I can’t log into the app” – have scripted solutions for these (like quickly verifying identity and emailing them a new ticket from the new system).
For staff, consider having vendor representatives on-site or on-call during the event. Many ticketing companies will offer (for a fee, sometimes included for big clients) to have a support person at your event to ensure all tech runs smoothly. If your new provider offers that, it’s often worth it for the first big event with their system. Even if not, arrange an open line (like a Slack channel or hotline) to the vendor’s support team and engineers on event day, so any critical issues get immediate attention.
A neat idea some events use is a “technology command center” or war room for the go-live (we’ll talk more about that in the next section). Basically, gather your tech-savvy team members in one place during the event so they can collaboratively monitor systems and tackle any glitches together. This central coordination ensures nothing falls through the cracks as you debut the new platform in a live environment.
Overall, be patient and encourage patience. There will be a learning curve, but with strong training and support, your team and attendees will quickly acclimate. After a couple of events, the new system will feel routine. By prioritizing people in your migration – not just the tech – you vastly increase the chances of a smooth, even uneventful, transition (and in event operations, uneventful is what you want!).
Integrating the New Platform with Your Tech Stack
Modern events rely on a constellation of tech tools working in harmony – ticketing, CRM, marketing emails, mobile apps, access control, payment systems, analytics dashboards, and more. When you switch your core event platform, all those integrations must be rebuilt or reconfigured. A new vendor that promises to “do it all” might replace several point solutions, but there will still be other systems to connect. Careful integration planning ensures your new platform doesn’t operate in a silo but rather enhances your existing ecosystem.
Auditing Your Existing Systems
Start by mapping out every system, software, and device that interacts with your current event platform. This could include:
- Website – e.g. embedded ticket purchase widgets or links on your site.
- Customer databases/CRM – where attendee info might be sent for marketing.
- Email marketing tools – sending confirmation emails or promo campaigns.
- Mobile event app – pulling schedule, attendee profiles, or using the ticket for entry.
- On-site hardware – ticket scanners, access control gates, cashless payment points, point-of-sale systems for merch/food that tie into attendee accounts.
- Analytics/BI tools – any dashboards or reports that currently ingest data from your old system (maybe via API or exported reports you upload).
- Financial systems – accounting software that receives payout reports or transactions.
- Volunteer/staff management systems – if linked for credentialing or cross-checking lists.
For each, determine how it’s connected to your old platform. Is it using an API integration (and if so, what data is sent/received)? Is it a manual process (like someone downloads a CSV from the ticketing system and uploads to the CRM weekly)? Document these, because for each one you’ll need an equivalent solution with the new vendor.
Also talk to your partners and stakeholders. Sometimes an integration is informal – for example, a sponsor might have been given access to your attendee list via some portal, or a marketing agency might be tapping into your ticketing analytics. Make sure you have the full picture so nothing breaks unexpectedly when you switch.
Setting Up Integrations on the New Platform
Armed with your integration inventory, work with the new vendor to configure those connections. Ideally, your new platform has a robust API and a marketplace of integrations for popular tools. Prioritize the mission-critical links first – often that’s your website ticketing integration, email system, and any access control hardware.
Some key integration tasks include:
- Website embedding: Get the new ticket purchase flow embedded or linked on your website. You might need to update
Buy Ticketsbuttons, replace old widget codes with new ones, or redesign parts of the site if the new flow is different. Do this early and test that transactions go through smoothly end-to-end (including payment gateway handoff and confirmation emails). - Payment processing: If your new vendor uses a different payment processor (or if you switched from, say, using the old vendor’s merchant account to your own), ensure the payment gateway is integrated and tested. You don’t want surprises with credit card declines or settlement issues at go-live. This might also involve setting up fraud rules, tax rates, and currencies properly in the new system.
- CRM & Marketing: Connect the new platform to your CRM or email marketing tool so that attendee data flows as before (or better, in real-time if possible). For example, if you use MailChimp to send event updates, make sure new ticket buyers are being added to the right audience list via the new system’s integration. If the new platform doesn’t have a native integration, you may need to use middleware (like Zapier, Mulesoft, or custom scripts) to bridge the gap. Test it by creating a test order and verifying it appears correctly in the other system.
- Mobile App: If you have a dedicated event app, update it to integrate with the new platform’s database or APIs. This could affect schedule syncing, attendee personalization, or how tickets are pulled into the app for scanning. Many event apps can integrate with major ticketing platforms via SDK or API – coordinate with your app developer to plug into the new source. If the new vendor also offers a mobile app or mobile tickets, decide how to handle that (you might even replace a custom app with the vendor’s app if it meets needs, or run them in tandem). The goal is that attendees have a seamless digital experience – they shouldn’t have to manage two separate systems.
- Access Control Tech: This is a big one – how tickets will be verified on-site. If you’re changing the method (for instance, moving from printed QR codes to RFID wristbands), integration and hardware rollout go hand in hand. You’ll need to ensure your new ticketing system works with the scanning devices or gate control software. The choice of QR codes vs. RFID vs. biometric entry has implications on hardware and network needs. With a new vendor, confirm what scanning equipment is required: Do they provide handheld scanner apps? Turnstiles? Are they offline-capable? Integrating here really means end-to-end testing of the on-site entry process with the new system. A wise step is to visit another event that’s using the new platform’s access control, or set up a demo at your office with sample tickets and scanners, to ensure everything communicates correctly and speedily. If you discover, for example, that the new RFID system needs an internet connection at every gate, you might have to upgrade venue Wi-Fi or set up a local server – better to know that now.
- Analytics and Reporting: Recreate any dashboards or reports you rely on. If you previously had a custom Google Data Studio or Tableau report connected to the old database, you’ll need to point it to the new data source or use the new system’s analytics. Pull sample reports from the new platform and compare them with old reports to make sure you’re capturing equivalent metrics. This is important for continuity – your bosses or clients will expect to see year-over-year comparisons, etc., and a vendor change shouldn’t mean “we can’t report that metric anymore.” If the new system lacks some analytics, plan how to compensate (maybe exporting data to an external BI tool periodically).
It’s a lot to juggle, but approaching it systematically helps. Create an integration matrix like below to track the status:
| System / Tool | Old Vendor Integration | New Vendor Integration | Action Needed |
|---|---|---|---|
| Event website | Embedded iframe checkout | API-based widget | Update web code with new widget script; test cross-domain session. |
| Email marketing (ESP) | Nightly CSV export & import | Native integration (real-time) | Connect via OAuth in new admin; map fields (name, email, ticket type); test auto-sync. |
| CRM (Salesforce) | None (manual download of leads) | Direct Salesforce app provided | Install new vendor’s Salesforce connector; configure mapping and trigger points. |
| Mobile event app | Pulled ticket QR from old API | No native integration | Build custom API calls to fetch ticket QR or attendee check-in status from new platform; update app version. |
| Entry scanners | Proprietary handheld scanners | Android/iOS scanning app | Provision devices (tablets/phones) with new app; load test offline mode with 1000+ sample tickets. |
| Finance system (QuickBooks) | Manual report reconciliation | Manual (format changed) | Adjust financial report format as needed; double-check VAT/tax calculations match. |
This is just an illustration – your matrix will vary. The point is to explicitly list what needs doing, assign owners (IT team, vendor assistance, etc.), and track progress so nothing gets forgotten.
Testing End-to-End Workflows
Integration testing is not just about individual connections, but the whole user journey and data flow. Before declaring “we’re ready!”, simulate real-world scenarios that traverse multiple systems. For example:
- Purchase to CRM: Have a team member act as a customer and buy a ticket on the website (new system) using a test credit card. Then check: did the confirmation email from the new system arrive correctly? Did that customer’s data appear in the CRM with the correct tags or campaign? Does the marketing system show them in the right segment (e.g., attendees for Event X)? If they opt-out or unsubscribe in one system, does it sync to the other?
- At-Event Experience: Create a few test attendee entries (with tickets) and then run through an on-site routine. Pretend to scan their ticket (does the entry app validate it instantly and mark it used?). If you have RFID wristbands, simulate the pairing of a wristband to a ticket at a check-in counter: is that process straightforward in the new system’s UI? If a wristband is lost, test issuing a replacement and voiding the old one in the system. These edge cases need to be practiced with the new tech, as workflows might differ from the old system.
- Data Consistency: During testing, also keep an eye on whether all integrated parts stay in sync. If you refund a ticket in the new system, does that reflect in your CRM or downstream reports as well? If an attendee updates their email or preferences via a new attendee portal, does it update in your email marketing list? Check two-way syncs if they exist.
- Load Testing: If you expect high volume (like a big on-sale or a festival gate rush), do what you can to stress test. This might involve asking the vendor to run a load simulation or, at minimum, performing a quick hands-on test with many devices. For instance, have 5 staff simultaneously logging into the new system and performing check-ins or sales to see how it holds up. Some events have even recruited a small group of friendly beta testers (or staff pretending to be attendees) to hit the system at once, mimicking real load. While you can’t fully replicate 50,000 people hitting “Buy Tickets” at noon on a test, you can at least ensure nothing obvious breaks with moderate concurrent usage.
If any test shows an error or discrepancy, pause and fix it now. It’s much easier to tweak integration settings or get vendor support to resolve an API bug before you have real customers in the mix. Keep iterating tests until you consistently get the expected results across the board. Only then are you ready to flip the switch with confidence.
Final Switch-Over of Integrations
As the go-live approaches, plan the cut-off for all integrations pointing to the old system. You’ll likely have to update API endpoints, redirect webhooks, or turn off jobs that were tied to the old platform. It can be helpful to do a “freeze” period on the old system’s data a day or two before cutover, where you stop any non-essential changes. This ensures a clean break where new data (new registrations, etc.) flows into the new system only.
Coordinate with all departments for the final switch. For example, let the marketing team know which date they should start pulling lists from the new system instead of the old. If there’s a custom integration (say a partner’s system consuming your data), communicate the switchover time and provide them new API keys or endpoints as needed.
After cutover, keep monitoring those integrations like a hawk during the first event cycle. Set up alerts if possible – for instance, if an API call fails or if data hasn’t synced in X hours. Often, any lingering issues will surface in the first day or week when real data is flowing. Be ready to jump on those quickly.
If you’ve followed the steps methodically, by the time of your first big event on the new platform, all your systems should be talking to each other as intended. The ideal outcome is that no one outside your core team even realizes a major tech change occurred – because registration works, emails go out, tickets scan, and reports populate just like clockwork. Achieving that seamlessness takes a lot of work behind the scenes, but it’s immensely satisfying when it pays off.
Executing the Cutover at Event Time
When it’s time to officially switch over (usually aligned with an event on the calendar), you need to run the event with the new tech and no safety net. This is where all your preparation is put to the test. A smooth cutover event builds trust in the new system and lets you fully move on from the old. Here’s how to execute the transition when the stakes are highest.
Pilot Events and Soft Launches
If at all possible, treat your first use of the new vendor as a pilot rather than an all-or-nothing proposition. Many organizers will debut the new system on a smaller event or a less critical part of an event before the “main show.” For instance, a conference might use the new registration system for a one-day workshop ahead of the main conference, to work out kinks. Or a music festival might quietly use the new scanning system for a side stage or a VIP entrance on day 1 while still running the main gates on the old system, then fully switch on day 2 once confident.
A soft launch could also mean opening the system to a limited audience first. Perhaps you release tickets to staff/volunteers or a loyal subset of attendees via the new platform to get feedback, before the general on-sale or event open. Their experience can highlight any last adjustments needed.
During the pilot, keep detailed notes of any hiccups. Did staff encounter any confusing screens? Did any ticket not scan properly? Was any data missing from a report? Even small issues should be ironed out, because what’s a minor annoyance during a 100-person pilot could become a major headache at a 10,000-person event.
Use the pilot to also test your support plan. Make sure your help channels and backup processes were sufficient for the small scale – that will be a good indicator if you have enough capacity for the full scale. A soft launch essentially serves as a dress rehearsal so that the “opening night” goes flawlessly.
Final Data Sync and Cut-Off
Right before the final cutover event, perform any last data synchronization needed. Despite earlier migrations, if there was ongoing activity in the old system (like ticket sales or changes that happened after your initial migration), you need to capture those. Ideally you stopped selling or updating things in the old platform a few days out, but reality can be messy. Do a sweep: reconcile any new orders, customer profile changes, or refunds between the time of data import and now. Import or update them in the new system so it is 100% up to date.
Double-check critical counts: number of tickets sold per ticket type, total revenue, guest list numbers, etc. should match between old and new. This is your confidence check that nothing fell through the cracks at the last minute.
Once done, officially cut off the old system. This could mean disabling the old ticket purchase pages, turning off any service that was running on the old platform, and communication to the team that “we are live on NewSystem as of now.” It’s a psychological milestone too – like launching a rocket, at some point you commit to the new course.
Ensure everyone knows the plan for event day. Distribute an event tech run sheet if needed, outlining key tech ops: when gates open (and with which scanners), when to switch on any new features (like live audience tracking or new dashboards), etc. Share contact info for the tech leads and vendor support one more time so everyone has it handy.
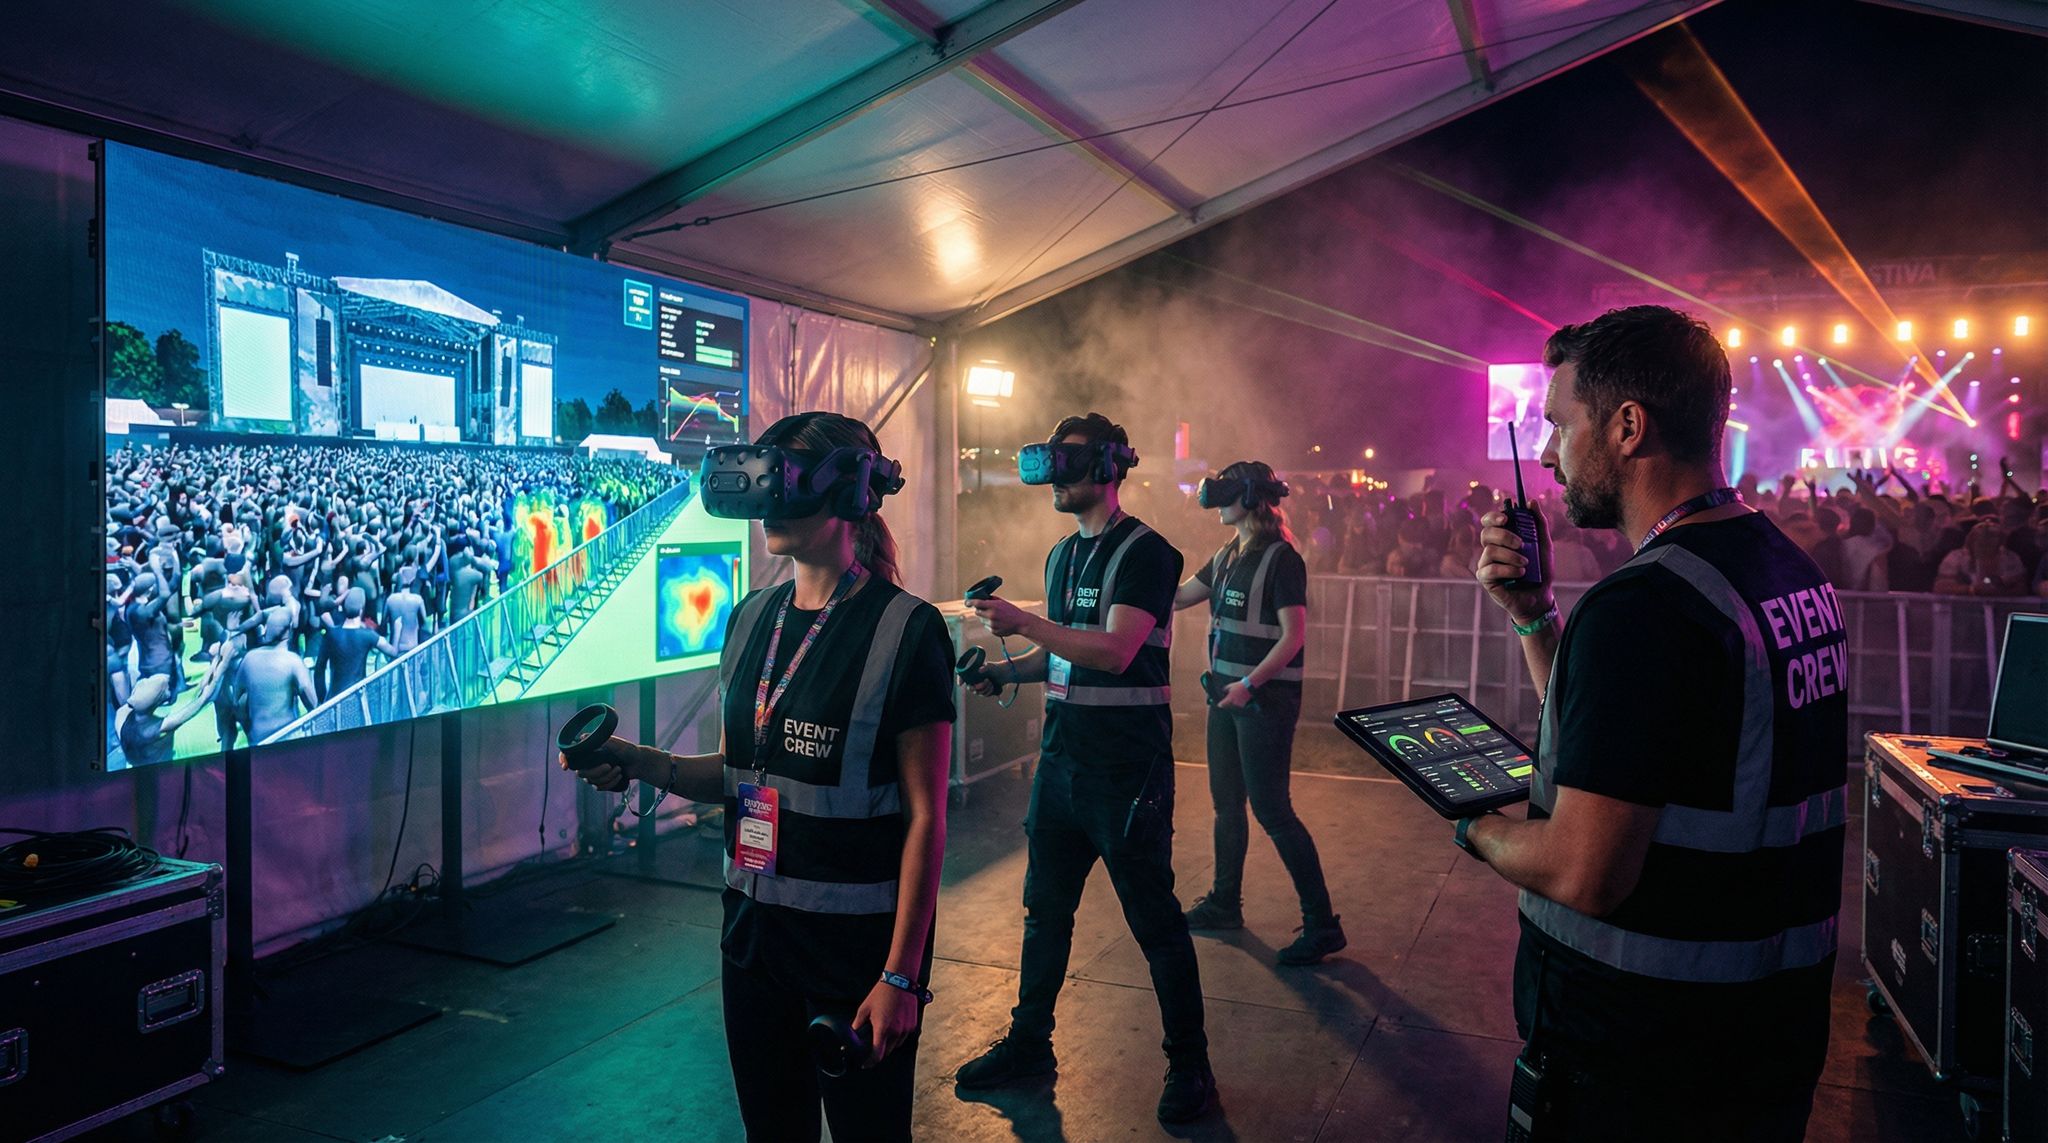
Real-Time Monitoring and Support (Mission Control)
During the first full live event on the new platform, treat it as a mission-critical situation (because it is). Set up a central “mission control” for your tech operations – this could literally be a dedicated room or trailer on-site where your tech team, vendor reps, and key staff are stationed with all the monitors and communications tools at the ready. From this command center, you can monitor entry scans, network health, ticket sales in real time, and coordinate any response needed. Think of it like NASA during a launch, keeping eyes on all systems.
Having a tech command center to monitor systems in real-time is a proven best practice for large-scale events. For example, you might have one screen showing live entries per gate (to spot any slowdown if a scanner goes down), another screen on social media or support tickets (to catch attendee issues bubbling up), and someone watching the payment/transaction dashboard for any anomalies. With everyone in one place, communication is instant – if the entry manager radios that scanners at Gate 2 are acting up, your lead tech can liaise with the vendor rep next to them to troubleshoot immediately.
Keep a tight feedback loop with on-ground staff. Equip your front-line teams (gate staff, customer service desk, etc.) with a direct line to mission control – whether that’s a radio channel, a WhatsApp group, or an event-day Slack channel. They should report any issue however small: “Scanner #4 is showing error message X” or “Attendees are saying they didn’t get the app download link.” Early reports allow you to resolve problems before they escalate or go viral on social media.
During the event, have the new vendor’s support on high alert. Ideally, a senior technical person from the vendor is physically present or on a live video call with your team throughout the critical hours. They can access system logs, deploy hotfixes, or quickly escalate issues within their organization. Even if you’ve tested thoroughly, real-world use can reveal unexpected issues – a particular combination of phone and ticket format that fails, or higher load on a report function than anticipated. Quick reaction is everything. The first few hours of use will set the tone; if any system problem arises, jump on it and communicate transparently to staff (and attendees if needed) while it’s being fixed.
Monitor performance metrics as the event progresses. Watch entry throughput (e.g., how many people are scanning per minute). If it’s significantly slower than expected, you might adjust operations (open more lanes, or temporarily switch to a backup scanning method if truly necessary). Watch for any signs of system strain like lag in the app or delayed scans, and have contingency steps ready.
Yet, avoid the temptation to panic at every minor blip. Some team members might get anxious with the new system – part of mission control’s job is also to assess whether an “issue” is user error (solved by quick training reminder) or a system fault. Keep everyone calm and focused; confidence is contagious. By showing that the command center has things under control, your front-line staff will feel reassured, and that vibe passes to attendees as well.
If you’ve done everything right, most attendees won’t even notice all this behind-the-scenes vigilance. They’ll just enjoy faster entry, shorter waits, and wonder how you pulled off such a smooth experience. That’s the goal!
Contingency Plans and Fail-safes
Despite all best efforts, you must have backup plans in case something goes wrong. Hope for the best, plan for the worst. What’s your plan if the new ticketing system goes down at the gate? Or if the internet at the venue fails, crippling your cloud-based platform? Or if a critical integration like payment processing has an outage mid-event?
Prepare a “break glass in case of emergency” toolkit. This might include:
- Printed or Offline Lists: Before the event, print out the attendee list or have an offline copy on a laptop. In a pinch, you can do manual check-in with a spreadsheet and later reconcile. Some modern systems allow offline mode – make sure to use it. For instance, many RFID or QR scanning apps can sync a list of valid tickets to the device beforehand; confirm how many scans or how long they can operate offline and test that capability thoroughly. If the network drops, staff can continue scanning, then sync the usage data later. Train them on how to switch to offline mode if needed.
- Fallback Devices: Have a few spare devices (scanners, laptops, even tablets) loaded with the new system’s software and cached data. If one device fails or battery dies, you can swap quickly. Also, if your new system has a web interface for check-in as a backup to a native app, ensure you have that URL handy and tested on a laptop, so you could theoretically check people in via browser if needed.
- Old System Access: In worst-case scenarios, could you revert to the old system for the remainder of the event? This is tricky and ideally avoided, but if you kept the old platform live and there’s a catastrophic failure, you might decide to quickly sell tickets or check in using the old system to avoid cancelling an event. This would be messy data-wise, but it’s better than a total shutdown. Know the login URLs and credentials for the old system and keep a small emergency workflow ready. (Using it would be a last resort, and you’d have to sort out data after, but it’s good to have thought it through.)
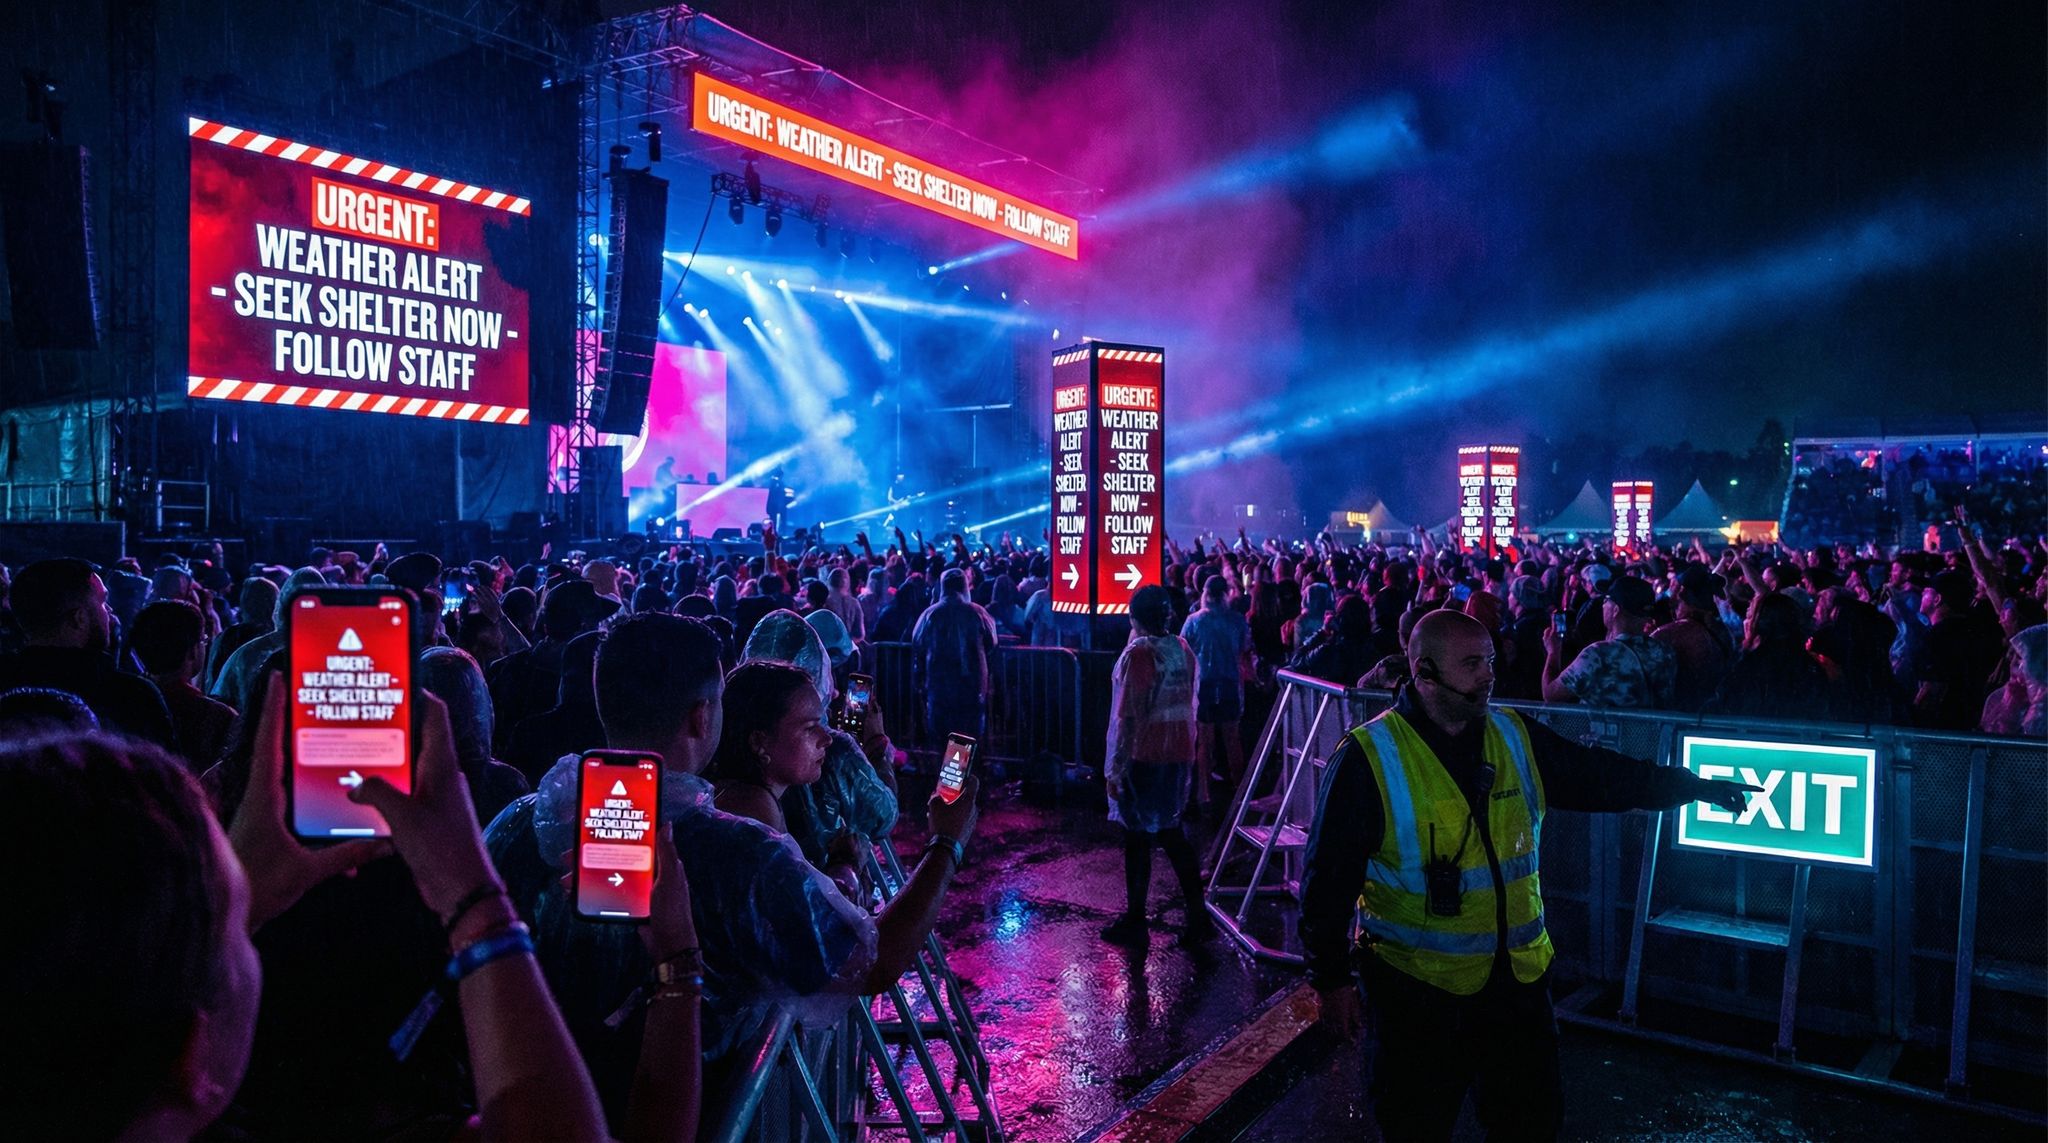
- Communication Plan: If something major fails, how will you communicate to attendees in real-time? Draft some holding statements in advance. For example, if the new mobile ticket app isn’t working at doors, you might need to announce “We’re experiencing technical issues – please have your ID ready while we verify your ticket manually.” Having wording prepared saves precious minutes when under pressure. Also decide who is authorized to make that call and that announcement.
- Technical Support Contacts: We mentioned having vendor contacts – ensure you also have any other tech contacts (like your internet service provider for the venue, or the payment gateway support line) readily available. During an outage is not the time to go looking for the phone number.
- Backup Power & Network: Many new event tech solutions are cloud-based, so internet connectivity is their lifeline. Arrange backup internet (a 4G/5G hotspot, a secondary ISP line, etc.) for critical systems. Likewise, keep UPS (battery backups) on your networking gear and devices so a power blip doesn’t take down your check-in. As venue managers know, having solid backup plans for power and Wi-Fi is essential to keep things running in any modern event.
By planning contingencies, you position yourself to respond gracefully if something does go wrong. In live events, problems can and do happen – what matters is that you have a plan and your team knows how to execute it. This turns potential disasters into minor speed bumps.
Execute your cutover event with the mindset that failure is not an option – but preparedness is your safety harness. Most likely, with all your preparation, the event will go smoothly and you won’t need those emergency measures. Still, the very act of having them in place gives your team the confidence to tackle whatever comes, which often means nothing major goes wrong at all.
Post-Switch: Review, Optimize, and Move Forward
Congratulations – if you’ve reached this phase, you successfully ran an event (or a series of events) on the new platform! But the migration project isn’t truly complete until you’ve done some post-mortem analysis and housekeeping. Now is the time to catch any remaining issues, optimize configurations, and ensure you capitalize on the new system’s capabilities moving forward.
Post-Event Debrief and Audit
Within a few days after the first big event on the new system, gather your team for a post-event debrief focused on the technology transition. This should include key staff from all areas (ticketing, on-site operations, marketing, finance, support, IT, plus your vendor rep if they’ll join). The goal is to openly discuss what went well and what didn’t, so you can improve for next time. Conducting a thorough post-event debrief process is a hallmark of high-performing event teams and will boost your operations in the long run.
In the debrief, cover questions like:
- Data accuracy: Did we encounter any issues with missing or incorrect data during the event? (e.g., a ticket that wasn’t recognized at the gate, or a report that didn’t reconcile.) If so, determine why and how to fix it before next time (maybe an additional data sync or a fix from the vendor).
- System performance: How did the new platform perform under pressure? Any slowdowns or downtime? If entry was slower at any point, was it the system or some other factor? Collect metrics – average scan time, peak transactions per second, etc., if available. If anything was borderline (say, check-in devices struggled when 20,000 people arrived at once), escalate that to the vendor and get their input on performance tuning or infrastructure scaling.
- Staff feedback: What did staff report about using the new system? Get feedback from the people who used it hands-on. Was the interface intuitive for them? Were there any steps that felt cumbersome or took longer than the old way? Often staff will have great suggestions like “If the search function could also look up by phone number it’d save us time” – you can relay such feedback to the vendor or tweak your processes accordingly.
- Attendee feedback: Look at any attendee complaints or comments relating to the technology. Did anyone struggle to find their ticket or operate the new app? Check social media mentions, support tickets, and any survey responses for mentions of the ticketing/check-in experience. If there were common issues (e.g., many people didn’t realize they needed to activate their wristband), that’s a sign to improve communications or adjust the user interface next time.
- Support load: Analyze how many support queries you got related to the transition versus normal. If support was inundated with “I can’t log in” or “I never got my ticket email,” figure out why. It could indicate that your pre-event communications or instructions need tweaking, or perhaps some system emails went to spam, etc. Use this info to prevent the same questions in the future.
Document these findings and create an action list. You may find there are a few outstanding tasks – for example, “Follow up with vendor about adding X feature or fixing Y bug,” or “Update attendee FAQ to clarify Z,” or “Train staff on new refund procedure, as there was confusion.” Treat the first event as a learning experience to make subsequent ones nearly flawless.
Also, audit the data and finances post-event. Ensure all transactions that should have been processed were processed. Reconcile payments – do the amounts in the new system match what hit your bank account or payment gateway? Audit attendance numbers – does the number of tickets scanned match the number of people that actually attended (accounting for staff, comps, etc.)? These checks give you confidence that the new system is reliable in its record-keeping. If you find discrepancies, investigate immediately with the vendor so they can help resolve any accounting issues.
Optimizing Configuration and Settings
Often, when you first switch, you might run the new system in a very basic way just to match what you had before (to minimize variables). Now that the main event is done, you can look into optimizing and enabling more advanced features of your new tech that you might have held off on.
For example, maybe your new ticketing platform supports dynamic pricing, waitlist automation, or on-site upselling – but you didn’t turn those on for the first event to keep things simple. Consider gradually rolling out such features once basic stability is confirmed. Each new feature should be tested and staff trained, of course, but now you can start reaping the full benefits of the platform that likely influenced your decision to switch in the first place.
Likewise, optimize the configurations based on what you learned. If scanning was slow at first because an option wasn’t set (e.g., perhaps enabling offline mode or turning off an unnecessary on-screen prompt speeds things up), change those settings now. If your team found a certain dashboard useful, see if you can set it as a default homepage in the system for easier access.
Take advantage of any analytics the new system offers that you might not have had. Run reports and compare to your old benchmarks: did the new tech actually improve entry times, or boost online conversion rates, or increase revenue through cross-sales? Identifying these wins is important to justify the switch to stakeholders. For instance, if you can show that entry wait times were cut by 40% thanks to the new RFID system, that’s a big success to trumpet. Or if merch sales on-site went up because the cashless payment system made transactions faster, quantify it.
Also look for any under-utilized capabilities. Maybe the new system allows automated post-event surveys to attendees – set that up to gather feedback (and even link it with your CRM). Or perhaps it has a referral program module or a social media integration that you haven’t tried. Now’s a good time to pilot those for future events to further engage your audience.
In short, don’t just replicate your old system’s workflow on the new platform – leverage the upgrade. Many times, switching vendors is driven by wanting more innovation or efficiency; make sure to capitalize on those possibilities once the base operations are stable.
Sunsetting the Old System
After a successful transition, it’s time to gracefully decommission the old platform. Keeping legacy systems around longer than necessary can incur costs and even security risks, so have a plan to wrap things up.
Steps to consider:
- Final Data Extracts: Do a last pull of any remaining data you might ever need from the old system. Even if you migrated all operational data, sometimes it’s useful to export a full archive (all orders, all customers, etc.) in a common format and store it securely. This is your “just in case” backup should anyone question an old transaction or for long-term analysis beyond what you imported.
- Data Retention/Deletion: Check your obligations – for example, GDPR might require that you don’t keep personal data longer than needed. Once you’re confident all useful info is in the new system or archived, you should purge it from the old one. Work with the old vendor to ensure they delete your data from their servers (and get confirmation of that). If there’s a self-service way to delete, use it carefully after exports. You don’t want to accidentally violate privacy laws by leaving an old account full of personal data indefinitely.
- Shut Down Integrations: Disable any API keys or integrations related to the old system, to prevent any accidental cross-talk or unauthorized access. If any third parties had access to the old system, revoke it and let them know the old platform is no more.
- Notify Customers (if appropriate): In some cases, if attendees had direct accounts on the old system (e.g., a user profile on old ticketing site), you might send a courtesy note like “We’ve moved to a new system, and your account on OldPlatform will be closed.” Provide them info on how to access the new system. Oftentimes attendees don’t notice or mind, but for the rare ones who do, this heads off confusion.
- Cancel Contract and Payments: Make sure you formally terminate the contract with the old vendor (assuming you haven’t already aligned this). Stop any recurring payments. If you arranged it such that it ended right after the last event on it, great – if you still had some overlap, ensure it doesn’t auto-renew. Confirm with the vendor that the account is closed and no further charges will accrue. Also, if you leased any equipment from them (scanners, etc.), arrange to return it.
Take a moment to document the entire project for internal knowledge. Future staff or even yourself a year later will appreciate a summary of “We switched from Vendor X to Vendor Y on this date; here were the key steps, here’s where archives are stored, and here were the outcomes.” This record is helpful historically and in case of any audit or analysis of the decision.
Finally, celebrate the accomplishment! Vendor migrations are complex and not for the faint of heart. You’ve effectively laid a new foundation for your event technology. As you move forward, keep nurturing the relationship with your new vendor – treat them as a partner. Continue to provide feedback and stay on top of updates they release. With your events now running on a more suitable platform, you can focus on growth and innovation rather than fighting fires or workarounds. The switch, once a major challenge, will soon fade into memory as just “how we do things now,” especially as your team and attendees fully embrace the new and improved experience.
Real-World Migration Stories: Lessons Learned
To put all this advice into perspective, let’s look at two real-world scenarios that highlight how vendor switches can go – one that went off without a hitch thanks to thorough planning, and another that ran into trouble due to rushing and underestimating challenges. These examples illustrate why each step we’ve discussed matters.
Smooth Migration Case Study: A Conference’s Seamless Tech Upgrade
In 2025, a mid-sized annual tech conference (5,000 attendees) decided to switch its event management platform. The motivation was to unify several functions (ticketing, attendee networking app, and live streaming) under one integrated system. The organizers gave themselves almost a full year to make the change, timing it between their 2024 and 2025 editions.
What They Did Right: The conference team followed a playbook similar to what we’ve laid out:
- Early Planning & Selection: They evaluated vendors 10 months out and chose a platform that could handle both in-person and virtual components. Importantly, they negotiated a contract that allowed them to pilot the new system on smaller meetups leading up to the main event, and they secured an exit clause from their old ticketing provider with minimal hassle.
- Phased Rollout: Three months before the conference, they used the new system for a one-day roadshow event in a single city. This trial run exposed a few integration snags with their CRM, which they fixed. It also built confidence among staff. By the time of the main conference, the staff had already used the new tools in a real setting.
- Comprehensive Data Migration: They migrated attendee records and ticket purchases from the past 3 years, so the new system’s CRM had rich historical data. This allowed them to personalize marketing emails through the new platform, which contributed to a 15% higher early registration rate (an unexpected bonus of the switch).
- Intense Training: The conference organizers held training workshops for different teams (registration desk, tech support, speaker management) around two months out. Everyone had hands-on practice. A cheat-sheet of common tasks in the new system was provided in the staff welcome packets.
- Communicating with Attendees: Attendees were informed well in advance that “We’ve upgraded our event technology for a better experience.” The email included screenshots of the new registration page and how to use the new event app. They emphasized benefits – e.g. “one login” for both the web ticket and the app, which attendees appreciated.
- Expert Support on Deck: During the conference, the new vendor had two staff members on-site at the central command room. When a slight network latency issue occurred on Day 1 (causing a few seconds delay in badge printing), the vendor team immediately tweaked some settings to optimize caching, and the issue was resolved before most attendees even noticed.
The Result: The 2025 conference ran on the new platform with virtually no hiccups. Check-in lines were shorter than the previous year (average wait time dropped from ~10 minutes to <5 minutes). Attendee satisfaction scores regarding registration and tech experience rose significantly. Also, by consolidating systems, they eliminated a lot of manual data reconciliation work – the post-event survey could be sent out within hours of the conference because all the data was in one place.
Internally, the team’s stress was lower. One organizer noted that having the overlap period and pilot event was key: “By the time we went live, it honestly felt like we’d been using this system for years.” This smooth migration reinforced the wisdom of ample preparation and gradually rolling out changes. It wasn’t cheap – they invested a lot of time – but the payoff was a seamless transition and immediate improvements in event operations and attendee feedback.
Rocky Transition Case Study: A Festival’s Rushed Switch
Contrast that with the story of a large music festival (50,000+ attendees) that attempted a vendor switch in 2023 under tight timing – with painful results. The festival organizers were unhappy with their longstanding ticketing partner due to high fees and customer complaints, and they decided about three months before the event to change to a new provider promising lower costs and fancy new features. Unfortunately, that decision, while well-intentioned, set off a cascade of issues.
Where It Went Wrong:
- Insufficient Timeline: With only 3 months to go, the team was scrambling. They signed with the new vendor and immediately cut off ticket sales on the old platform, moving everything to the new one. There was barely time for due diligence. Crucially, they did not have an overlap – they just stopped using the old system cold turkey. This abrupt shift meant there was no safety net if things went wrong.
- Data Migration Misses: The export from the old system was rushed and not fully checked. They imported the attendee list into the new system but missed some data – notably, some of the VIP ticket buyers’ information didn’t map correctly, and a batch of installment payment plan orders weren’t captured. These issues weren’t discovered until those attendees showed up at the festival gate and staff couldn’t find their tickets in the new system (nightmare scenario!).
- Little Testing: There was barely any time to test scanning and entry processes. The new vendor shipped RFID wristbands and scanners that arrived just a week before the festival. Staff had never used them. On Day 1, when gates were supposed to open, the scanning system failed to sync properly – essentially the scanners weren’t validating wristbands because of a server configuration error. Because this wasn’t caught in testing (there was no full end-to-end rehearsal), it caused a major delay. Gates opened nearly two hours late as tech teams scrambled to disable the online validation and switch scanners to offline mode.
- Poor Communication & Training: Many of the front-line staff (some were volunteers and temp workers hired seasonally) were not adequately trained on the new devices. When the system glitched, they didn’t know how to troubleshoot or move to contingency plans. Attendees in line got restless, and with sparse communication, some attempted to rush the entrances. It became a security issue with authorities nearly shutting it down. This mirrors real incidents where crowds nearly stormed in due to tech delays.
- Attendee Confusion: On top of that, the festival hadn’t clearly told attendees about the new ticket delivery method. Many regular attendees expected to use the same mobile ticket as previous years, but now they needed to have an RFID wristband (which they received via mail rather late). Dozens showed up without their wristbands (thinking they could just show an email) – leading to long lines at customer service to issue replacements. It was chaos largely borne from lack of attendee guidance.
- No Backup Plan: When the entry system failed, the organizers had no immediate backup. They hadn’t printed out a list of ticket purchasers, and the old system had been shut off. For a while they literally had no way to verify tickets until the new system was coaxed into a limited fallback mode. This is about as close to a worst-case scenario as it gets for a sold-out festival.
The Aftermath: The festival eventually got everyone in, but the experience left thousands of fans frustrated. Social media and press coverage pummeled the organizers for the disorganization. A subsequent investigation (as reported in industry news) found that the root cause was inadequate preparation and communication during the tech switch – essentially, the organizers bit off more than they could chew time-wise, and the new vendor (who was also relatively new in the market) didn’t have the resources to support such a rushed launch either. The festival had to offer partial refunds to VIPs and worked hard to rebuild trust for the next year.
The lesson here is clear: a vendor switch done in haste, without the proper timeline, testing, and training, can lead to a tech meltdown that tarnishes your event’s reputation. Many of the issues could have been avoided with more careful data auditing, attendee communication, and a contingency plan for entry. It’s a cautionary tale that echoes a fundamental project management rule – fast, cheap, good: you can’t have all three. They tried to do it fast and cheap, and the quality suffered.
Key Lessons from the Case Studies
Comparing the two scenarios, we can distill a few critical lessons:
- Plan Early and Phased: The conference had a long runway and phased their rollout; the festival tried to cram everything into a few months. Early planning and a phased approach dramatically reduce risk.
- Data Integrity is Paramount: The festival’s data migration gaps directly caused customer service nightmares. Never assume data moved correctly – always double-check completeness and accuracy, especially for VIPs or edge cases.
- Test in Real Conditions: A small pilot or at least a simulation could have revealed the festival’s scanning issues beforehand. Lab testing isn’t enough; test with actual workflows and load when possible.
- Train Everyone (and then some): The conference staff were comfortable by go-time, whereas the festival’s staff were learning on the fly. Thorough training (with refreshers) empowers your team to handle issues and reduces panic if something goes off-script.
- Over-communicate to Attendees: Attendees should never be surprised by how to access their tickets or get into the event. The festival could have prevented many on-site issues by sending clear instructions about the new wristbands well in advance. Your attendees will generally adapt to changes if you explain clearly and highlight the benefits.
- Have a Plan B and C: The lack of a backup for the entry system was the festival’s fatal flaw. The conference likely didn’t need theirs because they planned so well, but they had backups in place. Always prepare for failure, even if you don’t expect it.
Real-world outcomes like these underline that switching event tech vendors is a high-stakes project. But as the success story shows, when done right, it can significantly enhance your event and justify the effort. The rocky story, meanwhile, shows that cutting corners on a migration can have dramatic negative consequences. By following the comprehensive steps in this guide, you’ll be firmly on the path of the smooth migration and avoid the pitfalls that lead to the rocky one.
Frequently Asked Questions
How far in advance should I plan an event tech vendor switch?
A successful migration requires starting planning 9 to 12 months before your next major event. This timeline allows sufficient buffer for vendor selection, data migration preparation, and configuration. Rushing the process increases risks, so working backward from your event date with realistic milestones is essential for a smooth transition.
How do I migrate attendee data to a new ticketing platform?
Begin by auditing and exporting essential data like attendee details and order history from your old system. Clean and map every field to the new platform’s schema to prevent errors, as schema mismatches affect many projects. Perform a secure import into a staging environment and validate the data before the final cutover.
Should I run old and new event systems simultaneously during a switch?
Running systems in parallel through a phased transition significantly reduces risk compared to a cold-turkey switch. You can sell tickets for a smaller upcoming event on the new platform while maintaining the old system for your flagship event. This overlap exposes integration gaps and allows staff to learn the interface in a low-stakes environment.
How do I integrate a new event platform with my existing tech stack?
Start by auditing all current connections, such as CRMs, email marketing tools, and access control hardware. Work with your new vendor to configure APIs or middleware for these critical links. Test every integration end-to-end—from ticket purchase to on-site scanning—to ensure data flows correctly across your entire ecosystem before going live.
What backup plans are needed for event technology failures?
Essential contingency plans include having printed attendee lists or offline-capable devices ready in case of network outages. Prepare a “break glass” toolkit with backup power, secondary internet connections, and spare scanners. Establishing a clear communication plan and holding statements allows your team to respond quickly and maintain order if technical issues arise.
How should I train staff on new event technology?
Training should begin at least one to two months before the first event using a sandbox environment for hands-on practice. Adopt a train-the-trainer approach where power users master the system first and guide others. Update standard operating procedures to reflect new workflows and ensure support teams are ready to assist attendees with the transition.