Introduction
Implementing new technology at events can make the difference between a seamless, memorable experience and a logistical nightmare. By 2026, attendees expect high-tech conveniences – from cashless payments to interactive event apps – and they have little patience for tech hiccups. Successful event tech rollouts don’t happen by luck. They’re the result of meticulous planning, rigorous testing, and learning from past failures. Event organizers have seen it all: ticketing systems that crashed under load, RFID gates that left thousands waiting, and live streams that went dark at the worst moment. But they’ve also witnessed the magic when everything clicks. This playbook distills decades of hard-won experience into actionable steps to help you avoid common pitfalls and confidently deploy new tech, even at festival scale.
Real-world lesson: When a major festival’s entry system failed to go live on time, gates opened two hours late and frustrated crowds nearly stormed in, as reported in coverage of the Electric Zoo festival crowd surge. In contrast, another festival integrated an NFC wristband system across entry, payments, and VIP areas – and sailed through opening day with record-fast check-ins and happy attendees. The difference was all in the preparation. By following a structured implementation process – from initial planning and vendor onboarding to on-site execution and contingency planning – you can ensure your next event tech integration is a success story, not a cautionary tale.
In this comprehensive guide, we’ll walk through each phase of a new technology rollout. You’ll find practical checklists, case studies, and pro tips under each section. Whether you’re adding an RFID cashless payment system to a 50,000-person festival or launching a mobile app for a 500-person conference, these strategies will help you deploy with confidence. Let’s dive in and set your event up for tech success in 2026!
Defining Your Event Tech Needs and Vision
Setting Clear Objectives and Requirements
Every successful tech implementation starts with a clear vision of what you need to achieve. Before getting dazzled by vendor demos or fancy features, define the problems you’re solving and the outcomes you expect. Are you trying to eliminate long entry lines, boost attendee engagement, increase on-site spending, or improve data insights? Set concrete objectives (e.g. “reduce check-in time per attendee by 50%” or “increase merchandise sales by 20% with cashless payments). These goals will anchor your entire project.
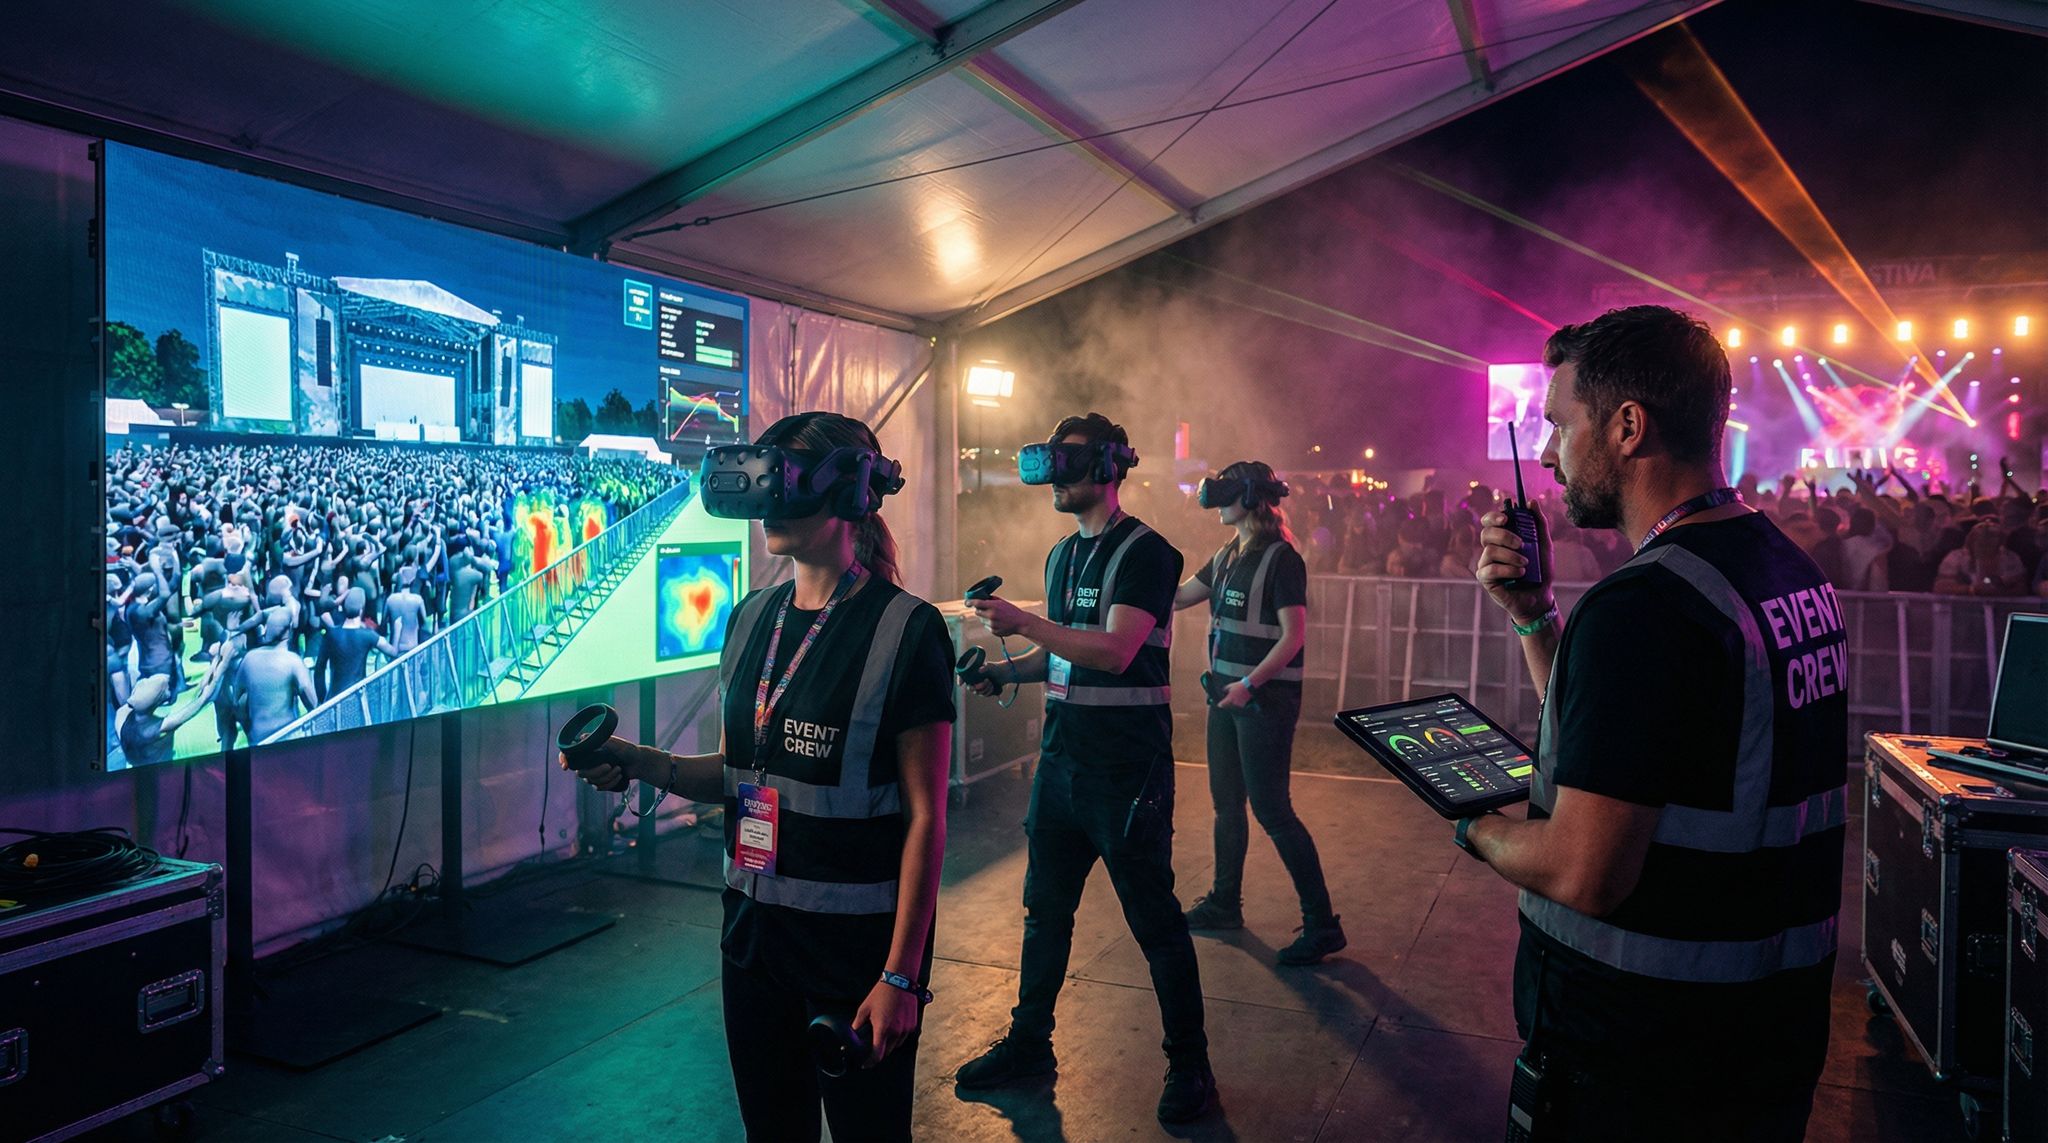
Smooth Entry With Mobile Check-In
Scan tickets and manage entry with our mobile check-in app. Supports photo ID verification, real-time capacity tracking, and multi-gate coordination.
Next, translate objectives into detailed requirements. Experienced event technologists recommend creating a requirements document that lists out must-have functionalities, integration points, capacity needs, and compliance mandates. For example:
- Access control: Must handle 5,000 ticket scans in 30 minutes at peak, integrate with ticketing database in real time, and support offline scanning.
- Mobile app: Should work offline for schedule and maps, handle 10,000 concurrent users, and integrate with push notifications and surveys.
- Live streaming: Target 50,000 concurrent viewers at 1080p with <5 seconds latency, with adaptive bitrate and a backup stream server.
- Payments: 100% cashless via RFID wristbands; system must process 200 transactions per minute during breaks, PCI-compliant and with instant balance updates.
Involving stakeholders early is key. Bring all departments into the requirements phase – operations, IT, marketing, finance, and customer experience teams should all weigh in. They will highlight needs you might miss (e.g. the finance team might remind you of local tax reporting integration, or ops might flag a need for multi-language support in the app). Collaboration prevents silos and ensures the tech aligns with every aspect of your event.
Ready to Sell Tickets?
Create professional event pages with built-in payment processing, marketing tools, and real-time analytics.
Finally, don’t chase technology for technology’s sake. In 2026 there’s plenty of hype around trends like AR/VR activations, AI personalization, and drones at events. Filter the fads from the functional. If a tool doesn’t directly enhance your attendee experience or operational efficiency, think twice. Many events have wasted budget on flashy tech that wasn’t a good fit. As veteran organizers put it, “Cool tech is cool – but only when it solves a real problem.” Focus on solutions that deliver clear value, not just headlines. (For example, cutting through hype to prioritize tech that adds genuine festival value has been a winning strategy for forward-thinking producers.)
Accounting for Total Cost and ROI
Once your needs are defined, take a hard look at the budget and return on investment (ROI). New event tech often promises big benefits, but it comes with costs – some obvious, many hidden. In fact, experienced implementation specialists approach budgeting with a “total cost of ownership” mindset, accounting for every expense from software licenses down to extra cables.
Start with vendor quotes, but don’t stop there. Map out all related costs:
- Hardware and infrastructure: Do you need handheld scanners, tablets, servers, or networking gear? For instance, RFID or cashless systems may require purchasing or renting readers at each gate or point-of-sale. One festival signed up for a cashless RFID platform, then discovered they had to rent hundreds of payment terminals and upgrade on-site networking at additional cost, a scenario highlighting the hidden costs of event technology budgeting.
- Connectivity: Budget for dedicated internet lines, Wi-Fi upgrades, or mobile hotspots if your tech needs connectivity. A conference was blindsided by a five-figure dedicated Wi-Fi bill that wasn’t in the venue’s initial quote, because they assumed the basic venue Wi-Fi would suffice, as noted in guides on budgeting beyond vendor quotes for event tech. Don’t make that mistake – if your event relies on internet, invest in a robust network (more on that later).
- Customization and integration: If a platform needs custom development or API integration with your other systems, consider the developer hours or middleware services (and test everything). Integration work often carries hidden costs in both money and time – it’s wise to overestimate effort here.
- Support and staffing: Will you need vendor technicians on-site? Are you paying your staff extra hours for training and testing? Factor in staff time to learn the new system and additional crew during the event to manage it. If volunteers will use the tech, perhaps budget for a few paid super-users or extra training sessions.
- Contingencies: Savvy organizers set aside a contingency (often 10-20% of tech budget) for unplanned needs – whether it’s overnight shipping of replacement hardware or emergency IT support. It’s insurance against Murphy’s Law.
When pitching the tech investment to stakeholders, tie it to ROI wherever possible. Will faster entry allow more time for attendees to buy food and merch (increasing revenue)? Will a better event app boost sponsorship value due to higher engagement metrics? Quantify these benefits. For example, going cashless might increase average spend per attendee by 30% – if your event historically sees $50 per person in sales, a cashless system could add $15 extra each, which at 10,000 attendees is $150k more revenue. Putting numbers to the upside helps justify the cost and gets everyone committed to making the implementation work.
Data-Driven Event Marketing
Track ticket sales, demographics, marketing ROI, and social reach in real time. Exportable reports give you the insights to make smarter decisions.
Also consider long-term ROI beyond a single event. A technology with a heavy upfront cost might pay off over multiple events or open new business opportunities. Calculate the payback period. If a self-service check-in kiosk costs $20,000 but saves $7,000 per event in staffing and significantly improves the attendee experience (leading to higher return attendance), it might break even in 3 events and enhance your reputation. Those strategic perspectives ensure you’re investing wisely and not just chasing the latest gadgets.
In 2026, most event organizations are actually increasing their tech budgets, but with a keen eye on efficiency. Surveys indicate high adoption rates – over 60% of organizers now deploy a mobile event app, and nearly 80% use some form of event management software – precisely because the ROI can be substantial, aligning with top event industry trends for 2025. The takeaway: budget enough to do it right, and plan for all expenses, because cutting corners on implementation often costs more in the long run (as emergency fixes or lost attendee goodwill).
Grow Your Events
Leverage referral marketing, social sharing incentives, and audience insights to sell more tickets.
Aligning Stakeholders and Building Your Team
Implementing event technology is a team sport. To set yourself up for success, get all stakeholders aligned early and assemble a capable implementation team. Stakeholders include internal departments (marketing, operations, finance, legal, IT) as well as external partners (the venue, vendors, sometimes sponsors or exhibitors if they interact with the tech). Everyone should understand the plan, timeline, and their role in it.
Start by securing executive and client buy-in. Make sure the event owner or executives understand both the benefits and the requirements of the new tech. Nothing derails a project faster than lukewarm support from the top or a client who doesn’t grasp why you’re allocating resources to a new system. Present your objectives and ROI case clearly. Set realistic expectations about what the tech will and won’t do, to avoid disappointment later. For example, don’t let anyone believe “going cashless” means zero queues at the bar – there still might be lines, but they will move faster and you’ll have better spend data. Honesty upfront builds trust and prevents later blame if things are imperfect.
Next, define the implementation task force. This team will drive the project from planning to event day. Typically it includes:
- A Project Manager (or “technology lead”) who coordinates everything, maintains the timeline, and is the point person with vendors. This person keeps all the moving parts in sync.
- IT/Technical experts who understand systems integration, networking, and security. They evaluate technical feasibility and handle things like API connections, hardware setup, and troubleshooting protocols.
- Operations/Crew lead who knows the event logistics. They ensure the tech fits operational workflows (e.g. how tickets are scanned at the door, how cashless top-up stations are placed) and coordinate training for the on-site crew.
- Vendor representatives from each major tech vendor, included as extended team members. Treat them as partners in planning meetings so they understand your event deeply (in a sense, make them care about your success as much as you do).
- Marketing/Communications roles if the tech is attendee-facing (they will plan attendee messaging, app promotion, etc., which we’ll cover later).
- Finance/Legal advisors, as needed, to review contracts (ensuring SLAs and data protection clauses are in place) and to set up any new payment flows or financial accounts (for example, escrow accounts for a cashless system’s funds).
Define clear ownership for each major component. For instance, who “owns” the registration system setup? Who owns the mobile app content population? Who will be responsible for monitoring the live stream feed? Assigning these owners now avoids confusion later (“I thought you were watching the stream bitrate!” – not a conversation you want during the keynote). Share a responsibility matrix so everyone knows their duties.
Effective communication is also critical. Schedule regular check-ins for the implementation team (e.g. weekly calls during planning, daily huddles in the final lead-up). Use collaboration tools or group chats to keep everyone informed of updates or issues. Some events create a Slack or WhatsApp group that includes internal team plus vendor liaisons, so that questions are answered quickly and everyone sees decisions in real-time. As one integration expert advises, bring all your tech vendors together for joint planning sessions rather than siloed conversations – collective discussions can surface compatibility issues and creative solutions early.
Crucially, get the venue onboard with your tech plans. The venue’s IT and operations staff should know what you’re bringing in, because their infrastructure might be involved (power, internet, rigging points for screens, etc.). If you need to run cables or set up servers on site, coordinate with them well in advance. Venues can be your allies or roadblocks; early courtesy and coordination make a big difference. In some cases, venues have seen many events’ tech setups and can offer valuable tips or even on-site support. At minimum, you may need their sign-off for network usage or to arrange access to the facility earlier for setup – so keep them in the loop.
By aligning all stakeholders and forming a strong team, you create a support network that will carry the project through. Everyone will know the vision, and you’ll have the right expertise at the table to solve problems proactively. As the saying goes, “If you want to go fast, go alone. If you want to go far, go together.” In event tech implementations, you actually need to go far and fast – a well-synchronized team is how you do it.
Building a Realistic Implementation Timeline
Time is one of the most critical (and often underestimated) resources in rolling out new technology. Rushing a complex implementation at the last minute is a recipe for failure. Working backwards from your event date, create a detailed timeline with milestones for each phase of the project. This timeline should be realistic about how long tasks take and include buffer time for unexpected delays.
Below is an example of an implementation timeline for introducing a major new tech system (say a new ticketing + RFID access control + cashless payments stack) for a large festival. Your specific timeline will vary based on the event’s scale and the complexity of the tech, but it illustrates the planning horizon to aim for:
| Phase | Timeframe | Key Tasks & Milestones |
|---|---|---|
| Initial Planning | 9–12 months out (or ASAP) | – Define objectives & requirements – Build budget and ROI case – Get stakeholder buy-in and approvals |
| Vendor Selection | 7–9 months out | – Research and shortlist vendors – RFPs, demos, and technical evaluations – Negotiate contracts & SLAs (signed by ~6 mo. out) |
| Integration Design | 6–7 months out | – Kickoff meetings with chosen vendors – Map out integration points (APIs, data flows) – Venue infrastructure assessment (Wi-Fi, power, etc.) – Detailed project plan (shared with all parties) |
| Development & Setup | 4–6 months out | – Vendor system configuration (branding, settings) – Custom integration development (APIs, middleware) – Order hardware (wristbands, scanners, kiosks) and network equipment |
| Core Testing (Phase 1) | 3–4 months out | – Lab testing of individual systems (functional testing) – Unit tests of API integrations with sample data – Iterate on fixes with vendors |
| Simulated Event Testing | 2–3 months out | – Integration testing: full workflow test (e.g. buy ticket -> scan -> payment) – Load testing (simulate peak loads on systems) – Adjust configurations based on results – First staff training sessions on the systems |
| Final Pre-Event Prep | 1–2 months out | – Field test at a smaller event or in a mock setting if possible – Finalize offline/backup procedures and print backup lists – Comprehensive staff training & drills – Attendee communications about new tech (emails, FAQs) |
| On-Site Setup & Rehearsal | 3–7 days before event | – Vendors load-in: set up hardware (scanners, servers, kiosks) – Venue network setup (dedicated internet lines, Wi-Fi APs) – On-site dress rehearsal: end-to-end test with staff as pretend attendees – Go/no-go meeting: all systems green-lighted for show |
| Event Days | Event live | – Go live! – Real-time monitoring of systems and support team on standby – Daily briefings to adjust any settings or processes – Fallback to contingency plans if issues arise |
| Post-Event Review | 1–2 weeks after event | – Post-mortem meeting with team & vendors (discuss issues/solutions) – Collect feedback from attendees and staff – Analyze performance data (throughput, errors, downtime) – Document lessons learned for next time |
A few observations from the timeline:
- Larger events need longer lead times. Enterprise ticketing or festival tech rollouts often start 9–12 months in advance. For smaller events (say a 500-person conference with fewer systems), you might compress phases, but even then, a 3–6 month lead is advisable for any new mission-critical system.
- Overlap tasks where possible. Notice that some phases can run in parallel – for example, you might begin basic integration design while final vendor negotiations are wrapping up, or start staff training on a sandbox system while final refinements are being coded. Just be careful that overlapping doesn’t mean skipping; every phase (design, testing, training, etc.) still needs to happen in sequence, even if timelines overlap a bit.
- Include buffer time in each phase. The timeline above assumes things go relatively smoothly, but in real life, expect delays – a vendor might take extra weeks to deliver a feature, shipping for hardware could get held up, you might need a second round of load tests after tweaking. Pad your schedule so that a slip in one area doesn’t cascade into catastrophe. A rule of thumb: if a task is truly critical (e.g. on-site network setup), plan to have it completed at least a day or two before you absolutely need it, giving space for troubleshooting.
- Milestones and checkpoints: Build formal go/no-go checkpoints, especially before the event. Have a frank go/no-go meeting a week out – if a critical piece isn’t ready by then, you may need to activate Plan B (whether that’s reverting to old tech or simplifying the offering). It’s better to scale back or delay a tech feature than to push something half-baked into a live event. Set an internal deadline (like “if the mobile app’s live chat feature isn’t stable 2 weeks out, we won’t enable it for this event”).
By laying out a thorough timeline, you make the process transparent to everyone and reduce last-minute scrambles. It also reinforces the discipline to follow all the steps: planning, integration, testing, training, etc., instead of skipping ahead. As you proceed, treat the timeline as a living document – update it frequently, communicate changes to the team, and check off milestones as you hit them. This not only keeps everyone on track but also builds confidence: you’ll see tangible progress and know you’re event-ready by the time Day Zero arrives.
Selecting the Right Technology and Partners
Evaluating Vendors and Solutions
With your requirements set and timeline in motion, it’s time to pick the technology solutions and vendors that will bring your vision to life. The event tech marketplace is crowded in 2026, so a structured evaluation is essential. Rather than being swayed by the flashiest sales pitch, assess each vendor against clear criteria that matter for your event.
Key evaluation criteria for event tech vendors include:
- Capabilities & Features: Does the product meet your “must-have” requirements out of the box? Make a features checklist. For example, if you need offline ticket scanning, can the system truly operate with no connectivity? If you require real-time analytics, does it have dashboard tools? Don’t assume – verify each capability through demos or trials.
- Integration and Openness: In today’s ecosystem, integration is non-negotiable. Favor vendors with robust API offerings or native integrations to your other systems. Ask if they’ve integrated with your registration or CRM platform before. Open standards and well-documented APIs (or webhooks) are a green flag. Conversely, a closed system that can’t export data or play nicely with others will create data silos. Modern events thrive on united tech systems sharing data seamlessly, so an integration-friendly vendor saves you headaches.
- Scalability & Performance: Insist on evidence that the solution can handle your event size. Ask the vendor for references or case studies of events similar in scale and type to yours. If you’re running a festival for 50,000 people, a system proven only at 5,000-person conferences may not cut it. In vendor discussions, pose scenarios: “What happens if 100 people try to buy a drink at the same second?” or “Can your stream support 50k concurrent viewers? Have you done it before?” The right partner will have data or test results to back up claims. Some may even agree to simulate high loads in a demo environment for you.
- Reliability & Fail-safes: Downtime during an event is unacceptable, so gauge the vendor’s approach to reliability. Do they have cloud redundancy, 24/7 network monitoring, backup servers? Ask for uptime statistics or SLA guarantees (e.g. “99.9% uptime”). Evaluate how the system handles failures: If a device loses connection, does it queue transactions for later? If a server goes down, is there an automatic failover? Crisis-proof design should be evident. The best vendors will proudly explain their disaster recovery plan and maybe even offer guidance on on-site backups and fail-safe measures for you.
- Security & Compliance: Given the sensitive personal and financial data event tech often handles, check each vendor’s security standards. Do they comply with PCI-DSS for payment processing (for cashless/payment systems)? Are they GDPR compliant for attendee data, and will they sign a Data Processing Agreement? Look for things like data encryption, secure user authentication, and privacy controls. An authoritative sign is if they have certifications like ISO 27001 or regular third-party security audits. You are trusting this vendor with your attendees’ data and possibly your reputation – due diligence here is a must.
- User Experience (UX): Even the most powerful tech will flop if it’s not user-friendly. Try the product from the perspective of all users: the attendee, the staff, and the admin. Is the attendee-facing app or interface intuitive and slick? Can staff operate the admin dashboard or scanner device with minimal training? A clunky system will frustrate users and increase the chance of errors. For example, test how quickly a staff member can lookup an attendee or how many taps it takes for a attendee to complete an action in the app. Those little UX details matter during the live event crunch.
- Support & Training: Evaluate the level of support the vendor provides. Will they have a support technician on-call during your event (some offer on-site support for large events or at least a direct hotline to engineers)? What’s their response time for critical issues per the SLA? Also, review their training resources – do they provide documentation, tutorials, or live training sessions for your team? The more support, the better, especially if this is your first time implementing their tech. A responsive, knowledgeable support team can be a lifesaver if something goes wrong at hour two of a 12-hour festival day.
- Reputation and References: Do some reputation digging. Talk to other event organizers who have used the vendor if you can (many vendor sales reps will happily connect you with a reference client). Ask the reference about their implementation experience: Did the vendor deliver on promises? How was the system’s performance during the event? How did they handle any problems? Industry forums and conferences can also be a place to gather informal feedback. In the event industry, word of mouth is powerful – if a platform consistently underperforms, people will know.
- Total Cost & Terms: Naturally, consider cost, but in context of value. Compare pricing models (flat fee, per-ticket fee, revenue share, etc.) and triple-check for any “hidden” fees (transaction fees, overage charges for high usage, costs for additional support or features). Negotiate contract terms that include flexibility and protection: for example, a clause that allows you to scale up usage or get refunded if certain SLA metrics aren’t met, etc. Price is important, but the cheapest option is not worth it if it can’t deliver on game day. Aim for the best value – a balance of robust capabilities and fair cost.
Create a vendor scorecard with these criteria to keep comparisons objective. It can help to rate each vendor on a scale or assign weights to what matters most for you. For instance, if you’re running a high-security event, security might be weighted higher. If you’re primarily concerned about user adoption, UX might take priority. This systematic approach cuts through marketing fluff and yields a partner that truly fits your needs.
Demos, Proof-of-Concepts, and Site Visits
Seeing is believing when it comes to event tech. Never commit to a new system without a hands-on demonstration. Coordinate live demos with your shortlisted vendors. Have them show you the workflows that you will actually use: an attendee buying a ticket and receiving a confirmation, a scanner app validating that ticket at entry, a patron tapping a wristband to pay, a dashboard updating in real time, etc. Don’t be shy about asking the demonstrator to take detours – “what if we need to reprint a badge?” or “how do we handle a refund in the system?”. A good vendor will accommodate these requests. If they gloss over parts or stick to a canned demo that doesn’t answer your key questions, that’s a red flag.
Better yet, arrange a proof-of-concept (POC) or trial if possible. Some vendors offer trial accounts or will help set up a sandbox environment so you can actually test the system with your data. For a ticketing or registration system, you might try a mock event setup: create sample tickets, go through the purchase process, and practice scanning those tickets yourself using their scanner app. For a mobile app provider, you might ask for a temporary test app build to play with. There’s no substitute for feeling exactly how it works. One event organizer recounted how a trial saved them from a poor choice: the system looked great on paper, but in a test they found the badge printing took 15 seconds per attendee due to a software quirk – unacceptable for their throughput needs. They switched to a different solution well before that could become an on-site disaster.
If your tech involves physical hardware or on-site infrastructure (like RFID gates, kiosks, networking gear), consider a site visit or pilot deployment. For example, if implementing turnstiles with RFID, maybe visit another event using them (vendors might arrange a visit to a client event with permission). Observe it in action or ask to see the equipment in person. Similarly, for a complex A/V production technology, you might invite the vendor to do a small demo at your venue ahead of time to evaluate sound, visuals, or connectivity in the actual space. While not always feasible, these real-world glimpses can surface issues that a boardroom demo won’t – like how sunlight might affect scanner screens, or how quickly staff can actually attach RFID wristbands to attendees at scale.
Ask the tough questions during demos and POCs. For instance, if evaluating an RFID cashless payment system, ask: “What’s the longest outage any of your event clients experienced in the past year, and how was it resolved?” A strong vendor will answer transparently (nobody is perfect; it’s the response that matters). If evaluating a live streaming platform, ask them to show a concurrency test or share how they handle sudden viewership spikes. If it’s an event app, simulate losing connectivity and see what still works. Basically, think of your worst-case scenarios and test the vendor on them now. It’s much better to see a hiccup in a demo (and gauge the vendor’s ability to address it) than to be blindsided on event day.
Throughout this process, document your findings. Keep notes from each demo and feedback from each test. These will be invaluable when comparing final contenders or justifying your choice to stakeholders. It also provides a trail to hold the vendor accountable – if they promised something in a demo or sales meeting, note it and ensure it gets into the contract or implementation plan.
Lastly, consider the cultural fit and communication with the vendor. During demos and calls, are they listening to your needs or just pushing their agenda? A vendor that’s genuinely invested in your success – demonstrated by asking smart questions about your event and offering thoughtful solutions – is a partner, not just a provider. For example, if a ticketing vendor rep says, “We know that festival gates can get crowded; we would recommend you set up X number of scanning lanes and we can enable an offline mode with auto-sync for you,” that shows they have experience and care about execution. Trust your gut: the vendor relationship will be critical in the months ahead, so choose partners who are responsive, forthright, and have a can-do attitude.
Negotiating Contracts and Service Level Agreements
Once you’ve zeroed in on your chosen tech solutions, the final step before full steam ahead is signing contracts. This isn’t just a procurement formality – the contract and service level agreement (SLA) are your safety net and playbook if things go wrong or requirements change. Approach this phase carefully and don’t hesitate to negotiate terms that ensure you’re protected and set up for success.
Key contract elements and SLA points to consider:
- Scope of Services: Ensure the contract explicitly includes all the components you need. For example, if your vendor demoed a special analytics module or an API integration, make sure it’s listed. Vague contracts can lead to “oh, that feature costs extra” surprises later. List deliverables like hardware units (e.g. 50 handheld scanners), software modules, and any custom development. If you expect the vendor to provide on-site support staff during the event or training sessions beforehand, write that in.
- Timeline & Deliverables: Tie the vendor to your timeline. Include milestone dates (for instance, “Test system delivered by X date; integration completed by Y date; on-site setup on Z date”). This holds both sides accountable and gives you recourse if deadlines slip significantly. You can even have penalties or discounts if major dates are missed, though not all vendors will agree; regardless, clarity here sets expectations.
- Uptime and Performance SLAs: A strong SLA will specify the target uptime (e.g. 99% or 99.9% during event hours) and possibly performance metrics (like transaction processing time, or maximum response time for support). More importantly, define remedies: what happens if the SLA isn’t met. This could be a service credit, partial refund, or in critical cases the ability to terminate the contract. For example, some ticketing providers might offer fee credits if their system goes down and disrupts your ticket sales. While money can’t fully compensate for a bad attendee experience, having these terms incentivizes the vendor to keep things stable and shows they stand behind their product.
- Support Levels and Response Time: Nail down how you’ll get support. The contract should state support availability (24/7? Business hours? On event days specifically?) and methods (phone hotline, a dedicated on-site engineer, etc.). Include response time commitments – e.g. “Critical issues will receive a response within 15 minutes and resources dedicated until resolved.” Importantly, get names and contacts for escalation: who’s your specific point of contact or account manager? Is there a senior engineer on call? During major events, many organizers even arrange a group chat directly with vendor tech support for instant communication.
- Data Ownership and Access: Clarify that you own your event data (attendee info, sales, engagement metrics, etc.) and have the right to export it. Also ensure the vendor commits to data security. If you require data deletion after the event (for privacy compliance), note that process. Additionally, include provisions for post-event data access – e.g. the vendor should allow you to retrieve all data and reports for a certain period after the event. You don’t want to lose access to crucial data because the event ended and your account was downgraded or closed.
- Payment Terms and Fees: Make sure fees are clearly broken out and agreed upon. If there are per-ticket fees or revenue shares (common in ticketing), spell out the percentage and any caps or minimums. Are there overage fees if you exceed a certain number of users or API calls? Know them upfront. Also, consider cash flow: for ticketing, when do you get payouts (some systems hold funds until after the event)? For cashless, how and when do you receive the money loaded on wristbands? Align these with your financial needs. If any aspect is negotiable – such as lower fees after X tickets sold, or an upfront deposit – put it in writing.
- Liability and Insurance: Contracts usually contain liability clauses. Try to get the vendor to accept at least some responsibility if their technology failure causes you losses. Many will limit their liability to the contract’s value or a multiple of fees, which is standard, but watch out for clauses that absolve them of all liability. Also confirm they have appropriate insurance if needed (some venues or large events require vendors to have liability insurance, cyber insurance, etc. – you might ask for a certificate if relevant). In short, protect your event’s interests: if a tech meltdown due to their negligence forces you to refund attendees or pay fines, you want the option to seek remedy.
- Cancellation and Backup Plans: We all learned during the pandemic that circumstances can change. What if your event is postponed or cancelled? Ensure the contract addresses this – can you defer the service to a later date? What refund or credit do you get if you cancel with X weeks notice? On the flip side, what is the vendor’s backup plan if they have an outage? It might not be in the contract, but ask them to provide a written contingency plan: for example, “If our cloud system fails, we will switch to offline mode and you can continue scanning; we’ll process sync later,” or “if our streaming CDN has an issue, we have a secondary CDN ready.” This might be captured in a runbook rather than contract, but it’s worth having in writing somewhere.
- Future Flexibility: If you plan to use this tech for multiple events or years, negotiate future terms now. Perhaps lock in pricing for next year if usage is similar, or get first right of refusal to use updated versions of the product. Also confirm the contract length – is it event-specific, annual, multi-year? Know how you can exit if things aren’t working (maybe an opt-out clause after the first event if they underperform). You don’t want to be stuck long-term with a vendor that doesn’t meet your needs.
In negotiations, remember that everything is negotiable to a degree, especially if your event is a significant client for the vendor. Don’t be afraid to push for terms that make you comfortable. It often helps to involve legal counsel familiar with event contracts or at least have a knowledgeable colleague review the fine print. However, maintain a collaborative tone – the goal is a partnership where both sides are clear on responsibilities and risk. A fair, detailed contract protects you and motivates the vendor to deliver excellently.
Once signed, make sure the key people on your team know the contract highlights. Your project manager and on-site leads should be aware of the promised support levels, who to call for help, and any critical limitations (for instance, if your contract says you can deploy up to 20 kiosks, don’t decide later to add five more without approval). The contract essentially becomes part of your implementation playbook – refer to it when planning timelines, support, and backup strategies.
Onboarding the Vendor and Setting Expectations
With contracts in place, it’s time to bring your vendors fully into the fold. Onboarding the vendor means sharing with them all relevant information about your event and establishing a close working relationship. Think of them as an extension of your team now (because they are, in effect, responsible for a chunk of your event’s success). Clear communication and defined workflows at this stage will pay huge dividends as the event approaches.
Start with a comprehensive kickoff meeting involving your internal team and the vendor’s implementation team. In this meeting:
- Walk through the event overview: key dates, schedule, venue layout, attendee profile, and any unique aspects. Ensure the vendor truly understands your event’s context – e.g. “We’ll have 5,000 attendees arriving all at once when gates open at 10am Saturday,” or “Our conference has 100 sessions across 3 days with multiple check-in points.” This helps them tailor their approach (and maybe surface potential concerns early).
- Review the requirements and use cases one more time, to confirm mutual understanding. You might step through a “day in the life” of your attendee with the vendor’s tech in place, validating how each step will work. For instance, “Attendee arrives at parking -> uses the event app to show a QR code -> scanned at shuttle bus -> arrives at venue -> taps RFID badge at registration kiosk -> etc.” Let the vendor ask questions and offer suggestions; they might have ideas to optimize flows that you hadn’t considered.
- Establish communication channels and project management tools. Decide how you will collaborate on tasks: Are you using a shared project management software or task list? Will weekly status emails be sent? Who is the designated project manager on the vendor side who will interface with your project manager? Exchange full contact lists including after-hours numbers for key personnel (especially for event day support). If not already done, set up that Slack/Teams channel or email thread that includes both teams.
- Go over the timeline in detail. Make sure the vendor is aware of every milestone they’re involved in and agrees it’s feasible. If their standard onboarding takes 8 weeks and you only have 6, you need to reconcile that now (maybe by allocating more resources or dropping a non-critical feature). Get a vendor-specific timeline from them if possible – many vendors have a checklist for new client implementations; compare it to your plan and merge the two.
- Address technical specifics: For example, if integration work is needed, exchange API documentation and schedule technical deep-dive meetings between your IT personnel and theirs. If hardware shipment is involved, confirm delivery dates and any setup needs (like, does a specialist need to configure it, or can your team plug and play?). If the vendor is providing staff on-site, align on travel dates, accommodation, accreditation for event access, etc.
- Reiterate the event day plan. Tell the vendor what their role during the live event will be. Are they expected to be on standby remotely? Will they have a war room? Or are they sending a technician to be physically present? Clarify check-in times, where they should be during critical moments (e.g. “We need your support online during our peak entry from 5-7pm Friday”). Some organizers even include vendors in their radio comms on event day or have them join production calls – if you plan to do that, let them know so they can supply radios or attend rehearsals.
It can be helpful to document and distribute Standard Operating Procedures (SOPs) that involve the vendor. For instance, a one-pager on “What to do if the scanning system has issues” – which includes vendor support contacts and step-by-step recovery actions – should be prepared and shared with both your team and the vendor team, so everyone has a common playbook. Often, vendors will provide you with their own support runbooks; incorporate those into your overall contingency plans (we’ll cover more on backup planning soon). Jointly creating a run-of-show for the tech components is also useful: a schedule of when systems go live, when certain checkpoints happen (e.g. “doors open – vendor verify all gate scanners connected”), and how communication flows during the live operation. Aligning expectations like this prevents finger-pointing later (“we thought the client was monitoring X” vs. “we expected vendor to handle X”). Instead, it’s clear who is doing what.
Another key part of onboarding is data preparation. If you’re migrating data or configuring systems, start exchanging data early. For example, your ticketing or registration vendor might need your event info, ticket tiers, pricing, and branding assets to configure your event in their system. Your mobile app provider might need schedules, speaker bios, and graphics a couple of months out to build the app content. Establish deadlines for content/data handover to vendors so they can meet build timelines. Similarly, plan data integration mapping with your vendors’ help: for example, mapping how ticket buyer information will flow into your email system or how RFID wristband IDs link to attendee profiles. These mappings often require vendor input to ensure field names match, etc. The sooner this is nailed down, the smoother the technical integration.
Lastly, foster a culture of partnership. Treat vendor personnel as part of your extended crew. Invite them to internal update calls where relevant, share your excitement and concerns openly, and encourage them to do the same. If you foresee a challenge (e.g. “Our audience is older and not tech-savvy, so we expect lots of questions about using the app”), let the vendor know so they can help address it (maybe they have simplified login options or extra support materials). On the flip side, ask the vendor honestly if they have any worries about your deployment – sometimes they might be hesitant to bring up issues, but by asking, you give them permission to voice it. Maybe the vendor knows typical pain points (like “actually, printing RFID wristbands on-site can be slow, we suggest pre-printing names if possible”). These insights are gold.
A successful onboarding phase ends with both you and the vendor on the same page, working in sync towards the event. You should emerge feeling like the vendor’s team is an extension of yours – you know them by name, you have direct lines of communication, and there’s mutual confidence. With that foundation laid, you’re ready to tackle the nitty-gritty of infrastructure, integration, and testing with your new partners fully engaged.
Infrastructure and Integration Planning
Network and On-Site Infrastructure Readiness
Even the most advanced event technology will fall flat if the underlying infrastructure can’t support it. A reliable, high-capacity network and power setup are the unsung heroes of successful tech implementation. As you plan for 2026 events, assume that connectivity will be as critical as electricity – devices, apps, payment systems, and streams all depend on solid internet and networking. It’s time to fortify your venue’s tech infrastructure well before attendees arrive.
Start with internet bandwidth. Consult with your venue (or ISP) to secure dedicated bandwidth for your event tech systems. Don’t rely on the public Wi-Fi network that attendees use; isolate your operational network if at all possible. For example, if you have cloud-based ticket scanners or a live stream uplink, consider a dedicated fiber line of robust capacity (e.g. 100 Mbps up/down or more, depending on needs). Many large venues now offer “event IT packages” – while costly, they often guarantee certain speeds and support. It’s worth the expense to avoid being at the mercy of random network congestion. If your event is outdoors or in a non-traditional site, you may need to bring in temporary connectivity solutions: satellite internet trucks, microwave links from a nearby building, or bonded 4G/5G routers that combine multiple cellular connections for reliability.
Wi-Fi and network hardware come next. Identify all the locations and devices that require connectivity: registration counters, entry gates, sponsor booths, cashless payment points, etc. Perform a site survey if possible – walk the venue (or festival grounds) and map out signal coverage needs. For a large indoor conference, this might mean installing additional enterprise-grade Wi-Fi access points in high-traffic areas. For an outdoor festival site, perhaps deploying a combination of wired connections (to critical locations like the main gate) and strategically placed Wi-Fi repeaters or a mesh network for vendor areas. As a rule, use wired Ethernet for anything mission-critical (scanners, point-of-sale devices, HQ operations) if you can run cables – wired is inherently more stable than wireless. Save Wi-Fi for mobile staff devices or areas where cabling is impossible.
Redundancy is crucial: plan backup connectivity. The gold standard is having two separate internet sources – e.g. primary fiber plus a secondary 5G router, or two lines from different ISPs – with automatic failover. If one goes down, the other picks up the load. This has saved many events from catastrophe. Additionally, ensure network gear has backup power (small UPS units on switches, routers, and modems) so a momentary power flicker doesn’t reset your entire network. According to event networking experts, adopting a “military mindset” helps: assume you’ll lose one communication line and plan an immediate alternative.
Don’t forget about power infrastructure itself. High-tech deployments often mean more gear plugged in: servers, LED screens, dozens of laptops or tablets charging. Work with an electrician or the venue to map out electrical needs and avoid overloading circuits. If you’re in a field or temporary venue, bring generators and distribution boxes sized to handle not just lights and sound, but also all your tech gear (ideally on separate circuits from heavy-draw equipment like audio amps). Use surge protectors and UPS backups for sensitive electronics – power surges at a festival have knocked out payment systems before. One festival’s learning was to put their network switches and base stations on a UPS; when a generator swap caused a 2-second power drop, the UPS kept the network alive and no one scanning tickets even noticed a potential crisis averted.
Finally, lay out a network topology and monitoring plan. Document which devices connect to which network (SSID or VLAN), where the network hubs are, and how data flows. For example: all ticket scanners on a secured Wi-Fi SSID “EventOps” that connects to a local server, which in turn pushes data to cloud over the fiber line. Knowing this structure helps isolate issues (if scanners at Gate 2 drop, check the access point covering that area). Set up monitoring if you have the know-how or enlist the vendor/venue IT: even a simple tool to ping devices and measure bandwidth usage in real time can alert you to problems (e.g. if bandwidth spikes to 100% usage unexpectedly, you might discover someone started a massive file upload on your network – which you could then stop). Some events utilize network management systems (like a dashboard showing AP status, connected device count, etc.). At minimum, assign a “network czar” – a person on your team or the venue’s – whose singular focus is keeping the network healthy throughout the event.
In summary, treat connectivity and infrastructure as first-class citizens in your tech rollout. Many high-profile tech failures attributed to “software” were actually network failures. The beauty is, with enough planning, network issues are largely preventable. Invest in the right hardware, partners, and contingency plans to give your shiny new event tech a rock-solid foundation. When the Wi-Fi and wires hold strong, your apps, scanners, and streams can truly shine.
Ensuring Ticketing and Access Control Sync
For any event with admissions, ticketing and access control integration is mission-critical. If attendees can’t smoothly validate tickets and enter, nothing else you’ve planned matters – the event literally can’t start properly. In recent years, access control has evolved from simple barcode scans to sophisticated systems (RFID wristbands, facial recognition, mobile QR codes, etc.), but the core requirement remains: the system at the gate must accurately know who is allowed in, and it must process them quickly. Achieving this requires tight synchronization between your ticketing platform and your entry hardware/software.
In planning the tech rollout, treat the ticketing-to-access connection as a top priority. Ensure that your ticketing vendor and access control provider (if they are different) have a proven method to work together. Ideally, you’ll use a unified system – many modern ticketing platforms like Ticket Fairy offer integrated RFID or barcode scanning solutions, providing a unified front door to your event. If that’s the case, much of the integration is handled within one ecosystem (still, test it thoroughly). If using separate systems (say you have a ticketing platform but want to use a third-party RFID gate system), you must implement a reliable data sync. This could be as simple as an API that shares ticket purchase data in real-time with the scanning system, or as complex as a custom CSV import/export on a schedule. Design this data exchange early. Define which system is the “source of truth” (usually ticketing/back office) and ensure access control devices receive all needed data (attendee ID, ticket type, access entitlements like VIP or 18+ zones, etc.). Many large festivals build an integration matrix listing what data flows where – for example, ticket scans need to update the central ticket database (to prevent duplicate entries), and VIP zone taps need to reference the list of VIP purchasers.
One best practice is to implement real-time validation if possible. In 2026, attendees expect their mobile or RFID ticket to be authenticated instantly. Systems like Ticket Fairy (and other enterprise platforms) often use cloud-based validation with fallback: when you scan a code or wristband, the scanner pings the cloud to verify it’s valid and not already used, then marks it as used. This ensures up-to-the-second accuracy (for instance, if someone refunds or transfers a ticket at the last minute, that update is in the cloud and the ticket won’t work twice). If real-time isn’t feasible due to connectivity constraints, the alternative is a locally cached database – the scanners download the full list of valid tickets beforehand. That can work, but you need procedures to reconcile data later (e.g. upload the scan data to the ticket system after the event to catch any issues). Also, if tickets can be sold or changed during the event (will-call sales, reassignments), figure out how those make it to the gate. Perhaps you schedule periodic syncs or require staff at the gate to call into HQ for edge cases. The more automation here, the better – manual check-in lists or calls should be only the last resort.
RFID/NFC access control demands special integration attention. Each wristband or badge typically has a unique chip ID that must be mapped to an attendee’s ticket in the database. This means your ticketing system either needs to print/encode the RFID tags with the right data or you need a middleware system that links them as you distribute wristbands. Common approaches include scanning the ticket’s barcode and the wristband’s RFID code together at pickup to pair them in software. Make sure you have tools and training for this pairing process if it’s part of your event – mis-paired credentials are a common failure point (e.g. someone gets a VIP wristband but it was paired to a GA ticket in error). Testing a sample of wristbands against the database ahead of time is wise. Also, plan for multi-zone access logic: if you have different levels of access (VIP areas, artist backstage, staff-only zones), program those rules into the system. For instance, wristband color or chip codes might carry flags for zones, and the gate readers must enforce those (green light for allowed, red for not allowed). During integration setup, run through scenarios: “Will the system prevent a GA attendee from entering the VIP lounge? Let’s simulate that.” It seems obvious, but don’t assume – a misconfiguration might let unauthorized access slip or, conversely, mistakenly deny someone who should be allowed (a very frustrating experience for a VIP who paid extra!).
Speed is king at the gates. Integrating ticketing with fast verification methods is crucial to avoid bottlenecks. Modern RFID can process a person in under a second, and some systems even allow “tap and go” without needing to present a phone or paper – great for high throughput, with some RFID systems reporting entry times under one second per person. Aim for that efficiency. Part of integration planning is ensuring the hardware and software are optimized: for example, configuring scanners to batch process multiple tags in range (some turnstile antennas can read several wristbands at once as people walk through). Similarly, if using barcode/QR scanning from phones, consider adding e-ticket pre-validation – some platforms generate dynamic QR codes or already validate when the ticket is opened in the app, reducing the check at the gate to a quick authenticity check. If your system supports features like offline mode, use them smartly: you might let scanners continue to admit people for a short period even if connection to the main database is lost, by trusting local data and queuing transactions to sync later. That way a momentary network blip doesn’t stop entry – but it takes careful integration to avoid double entries when sync restores. Work with your vendors to fine-tune these settings. For instance, ask: “How many offline scans can each device hold? What happens if it exceeds that?” and plan accordingly (maybe deploy additional devices per gate to share the load or restrict offline to a certain count before forcing a sync).
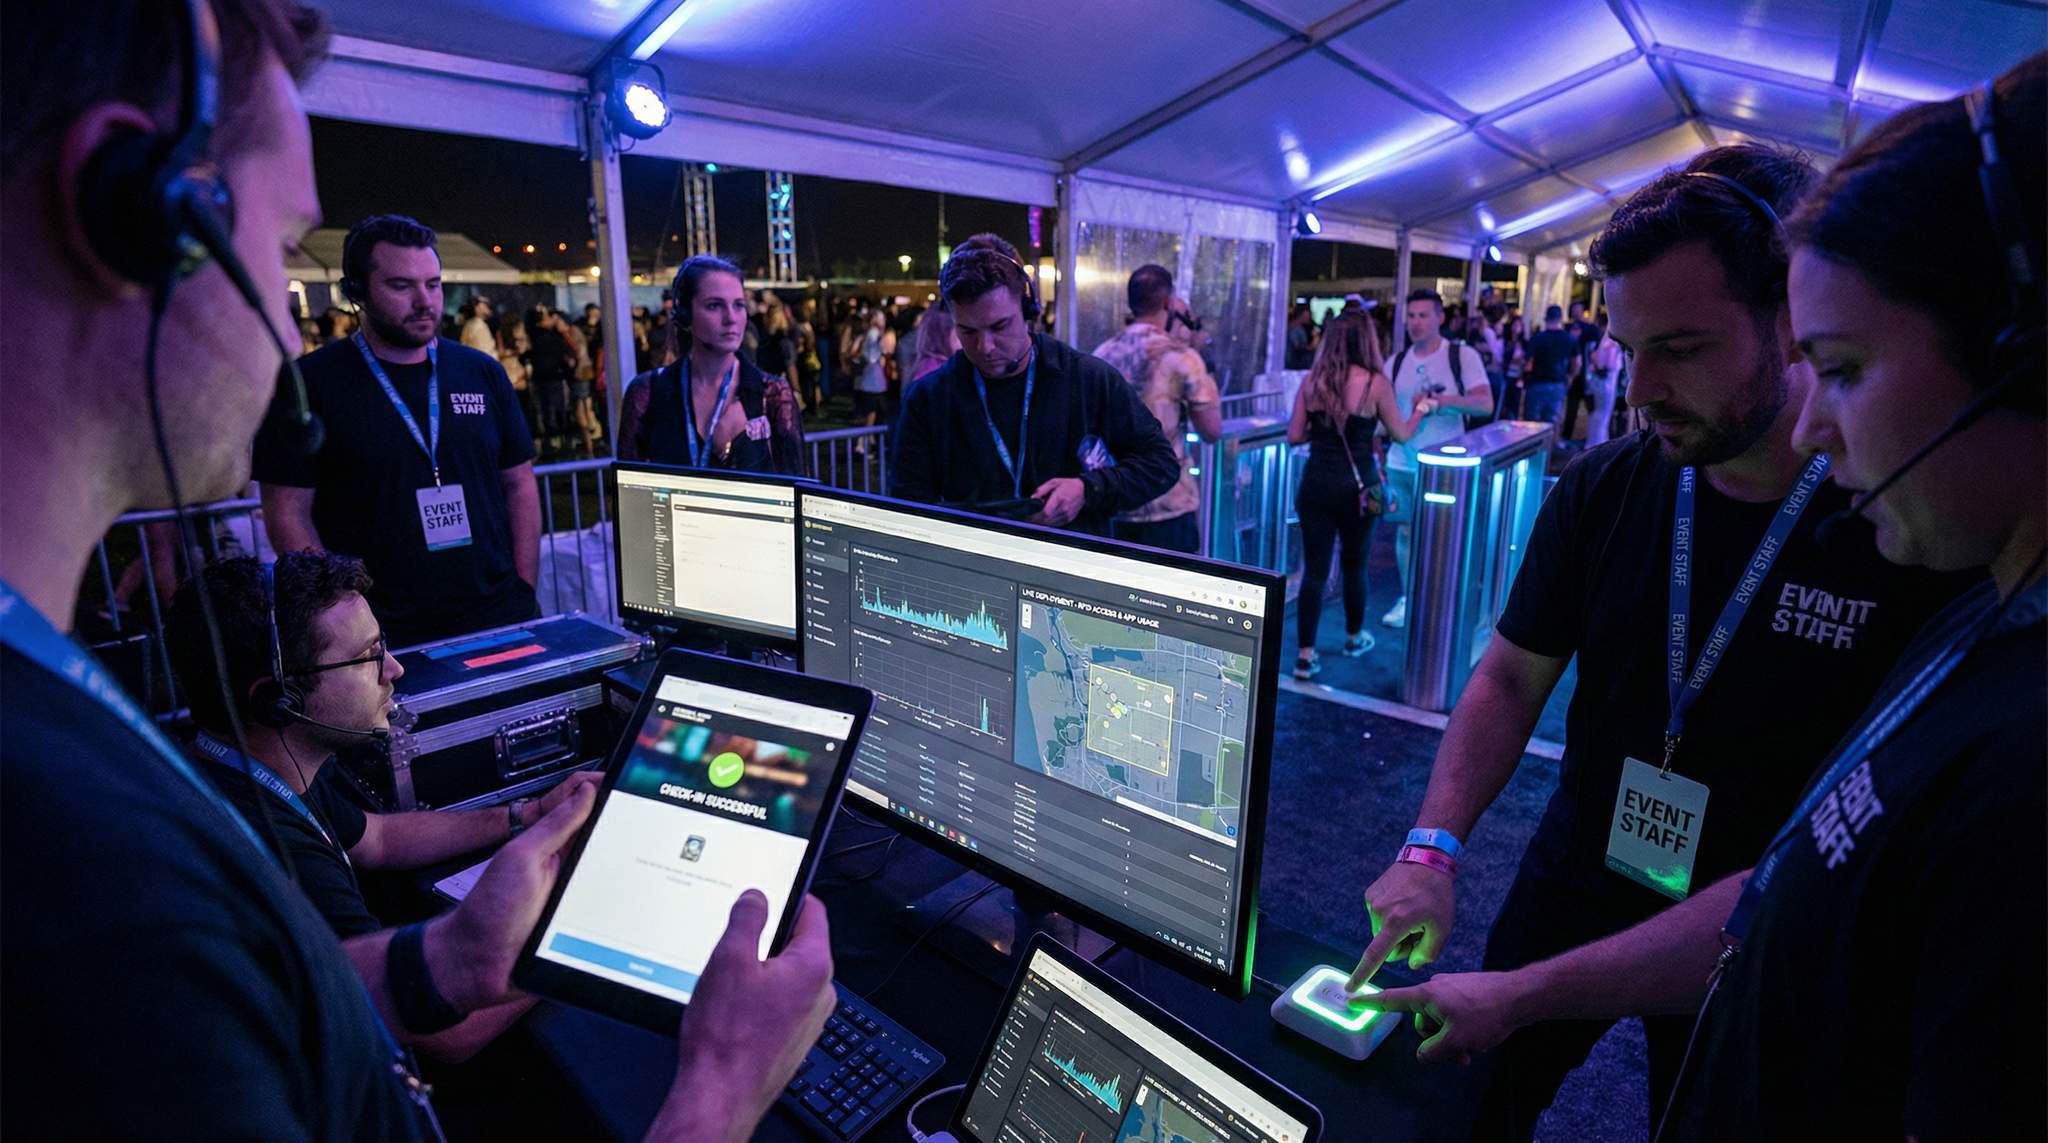
Lastly, integrate monitoring and analytics for entry. Your combined ticketing/access system should feed a dashboard showing entry counts in real time – how many have entered, at which gate, etc. This is invaluable operational data (and great for security and crowd management too). Make sure your team knows how to access and interpret this during the event. If possible, set up a centralized dashboard tracking live entry stats so you can spot if one gate’s scanner goes offline (entry count flatlines) or if a huge surge is inbound (so you can allocate more staff). Integration means not just connecting systems, but connecting data to your decision-makers in real time.
When ticketing and access control are in perfect sync, your attendees will scarcely notice the process – they sail through the gates with a quick beep or flash. It sets a positive tone for the whole event. Achieving that requires the behind-the-scenes diligence we’ve described: aligning databases, configuring devices, and rehearsing the flow. It’s absolutely worth it. As one veteran gate manager put it, “Smooth entry is 90% preparation, 10% execution.” Integrate deeply and test thoroughly, and your front door will be ready to welcome the masses without a hitch.
APIs and Data Integration Blueprint
Beyond admissions, most events juggle multiple systems – registration/ticketing, mobile apps, CRM/email marketing, surveys, lead capture, the list goes on. Integrating these systems via APIs (Application Programming Interfaces) or other data pipelines is how you unlock the full power of your tech stack. The goal is to eliminate data silos so that all your tech tools share a unified dataset and talk to each other in real time. Let’s outline how to plan a cohesive integration blueprint that keeps your event tech ecosystem connected.
First, take an inventory of all systems and the data each holds. Common systems and data include: ticketing (buyer info, ticket types, check-in status), access control (scan logs, attendee IDs), cashless payment or POS (transaction logs, balances), mobile app (user profiles, engagement activity), CRM/marketing platforms (contact info, segments, email engagement), and analytics tools or dashboards (aggregated metrics). Map out what data each system produces and what data it needs from others. This can be as simple as a spreadsheet or diagram with arrows: e.g. Ticketing -> (sends attendee list to) -> Mobile App for login; Cashless -> (sends spend data to) -> CRM for post-event analysis; Registration -> (sends session selections to) -> Event App for personalized schedules, etc. Identifying these flows is often called an integration requirements matrix – essentially a blueprint for data exchange, often utilizing a connected event tech ecosystem integration matrix.
For each integration point, decide on the method and frequency of data exchange. The gold standard in 2026 is real-time sync via APIs or webhooks. For instance, when an attendee checks in at the door, a webhook could instantly notify your CRM or email system to trigger a “Welcome” email or mark that person as “attended” for analytics. When someone fills out a survey in your event app, an API call might immediately push their responses to your central database. Real-time ensures data consistency and the ability to act on information instantly (like sending alerts if VIPs check in). However, real-time isn’t always necessary or possible for all data. Some integrations can be near-real-time or batch. Determine what needs to be instantaneous (ticket scans, payment processing) versus what can be synced periodically (maybe syncing expo lead data at end of each day). Webhooks are particularly useful for pushing events data from one system to another automatically – e.g. ticket purchase completed -> webhook to mobile app to create a user account; session feedback submitted -> webhook to analytics platform.
If your team has development resources or there are out-of-the-box connectors, leverage them to implement these API integrations. Many event tech vendors provide API documentation – share it between systems or use an integration platform (often called iPaaS – Integration Platform as a Service) like Zapier, Mulesoft, or similar if coding from scratch is too heavy. These platforms can visually map data from one API to another and handle the heavy lifting. For example, via an iPaaS tool, you could map a “new registration” trigger from your ticketing system to automatically create a new contact in Salesforce (CRM) and also register that user in your event app database, all without writing custom code. The trade-off is cost and complexity – for large-scale data and total flexibility, custom development might be warranted; for simpler tasks, middleware can save time.
Data consistency is a common challenge – decide on master fields and formats. If one system calls something “First Name” and another uses “Name_First”, or one uses phone numbers with country code and another without, you need to harmonize. This might involve transforming data during integration (e.g. splitting full names into first/last for a system that requires that, or converting time zones for a scheduling integration). Create lookup tables if necessary (like mapping ticket type codes to access levels or marketing segments). Also, plan how to handle duplicates or conflicts: if an attendee updates their email via your app, should that overwrite the email on record in the ticketing system? Usually, define which system is the “system of record” for each piece of data and have changes flow one-direction or implement a reconciliation logic.
Don’t forget testing these integrations thoroughly (we’ll cover testing in the next section, but keep it in mind as you design!). Start testing API calls in the sandbox as early as possible. For instance, simulate a batch of registrations and see if they correctly sync to the app and CRM. Check error handling – what happens if the API endpoint is down or returns an error? Build in retries or queuing if needed. A common pitfall is hitting API rate limits, especially if syncing a lot of data at once (like 50,000 ticket records to an app). If your integration might hit limits, talk to vendors about raising them or plan to throttle your sync into chunks. It’s far better to discover these constraints before the event.
One important area of integration planning is analytics and dashboards. Decide if you want a central dashboard aggregating all key metrics in real time. Many events do – showing registrations, check-ins, sales, engagement all in one place. This usually means funneling data from various systems into one analytics tool or data warehouse. For example, you might use a platform like Tableau or PowerBI (or even a vendor-specific dashboard) that pulls from ticketing (via API), from your app (CSV export or API), from social media feeds, etc. If mission-critical, set this up early and test feeds. There’s nothing like having a live “mission control” view of your event’s data, but it requires that all those data pipes are connected and verified in advance.
Finally, consider future-proofing as you plan integration. The event tech landscape evolves quickly; you may swap out a vendor next year or add a new module (say you introduce a loyalty program or a new AR activation that also generates data). Try to build your integration architecture in a modular way. Using standardized formats (e.g. JSON over REST APIs, common IDs across systems like a universal attendee ID) will make it easier to plug and play components later. If you invest in a robust integration layer or middleware now, adding another system to it later is simpler than doing one-off connections each time. Some large events go as far as creating their own “data lake” – a central database where all data flows in and out via defined APIs. That might be overkill for many, but the principle of data centralization is sound. At the very least, ensure you can export all data post-event to one place for archiving and analysis.
In summary, by meticulously planning how your systems talk to each other, you ensure that your event runs on one brain rather than disconnected parts. Integration can sound technical, but it directly affects attendee experience (like personalized touches) and operational fluidity (like everyone having up-to-date info). As the saying goes, the whole is greater than the sum of its parts – a well-integrated tech stack means your event data and technology become a cohesive whole, driving a smoother and smarter event.
Security, Compliance, and Privacy Considerations
In the rush to implement exciting new tech features, it’s easy to overlook the less glamorous side: security and privacy compliance. However, a security breach or privacy mishap can ruin an event’s reputation and carry legal consequences. In 2026, event organizers must be proactive about protecting data and complying with regulations like GDPR (in Europe) and CCPA (in California) if they handle attendee personal info or payment data. Ensuring robust security isn’t just the IT department’s job – it’s a core part of the implementation plan and a shared responsibility with your vendors.
Start by assessing what sensitive data your new technology will collect or transmit. Common sensitive data in events includes: personal identifiable information (names, emails, phone numbers, addresses), payment information (credit card numbers – though ideally you’re not storing those, just processing via a compliant gateway), and possibly demographic or health info (dietary requirements, accessibility needs), etc. Identify each system’s data elements and classify their sensitivity. For instance, a cashless payment system might handle encrypted tokenized credit card data – that’s high sensitivity and falls under PCI-DSS compliance. Your event app might collect profile photos or social media accounts for networking – not financial data but still personal, thus in GDPR scope if you have EU attendees.
Engage with your vendors about security early on. Request and review their security documentation. Many vendors will provide details like: Are their systems encrypted (in transit and at rest)? Do they undergo penetration testing? How do they isolate your event’s data from other clients? What’s their data retention policy (do they purge attendee data after a period)? Also inquire about user access controls: do their admin dashboards allow granular permissions (so you can ensure only certain staff see certain data)? For example, maybe volunteers using a ticket scanner app shouldn’t be able to access full attendee profiles – can the system restrict that? Ask vendors if they support single sign-on or 2-factor authentication for admin users, which can bolster security for your team’s logins.
Compliance with regulations is a big factor. If you operate in Europe or have EU citizen data, GDPR applies. This means you should only collect data you need, get clear consent for things like marketing communications, and allow attendees to request deletion or export of their data. Ensure your tech partners are GDPR-compliant – typically they should be able to sign a Data Processing Agreement (DPA) as data processors on your behalf. The GDPR guidelines require you to have proper consent flows (e.g. an unchecked opt-in box if collecting emails for newsletters at registration, not a pre-checked one), and to secure data adequately. Similarly, for payments, PCI-DSS compliance is mandatory if card data is involved. Usually, you achieve this by using certified payment providers or devices that tokenize data. If you’re rolling out a cashless payment system, confirm that the provider’s system is PCI Level 1 compliant (the highest standard) – they often are, but get it in writing. Also plan for after the event: e.g. securely deleting or anonymizing exported data sets when they’re no longer needed.
Consider local laws too: some states/countries have specific biometric data laws (if you were considering facial recognition for entry, for instance, places like Illinois in the US have strict rules about consent and retention for biometrics). If you use CCTV or drones for surveillance at events (which might fall under “event tech”), that has compliance aspects too. Know the landscape or consult a legal advisor for region-specific requirements. For example, in some jurisdictions scanning IDs for age verification at events requires special handling of that data.
Incorporate security measures into the design of your implementation. For instance:
- If deploying an event app that attendees log into, enforce strong passwords or social login options and ensure the app uses HTTPS for all communication. Test that the app doesn’t unintentionally expose personal data (maybe try a few operations with a proxy or ask the vendor for a security test summary).
- For on-site networks, use secure Wi-Fi (WPA2-Enterprise if possible for staff networks) and segregate public networks from operations. Also, change default passwords on any new hardware (you’d be surprised how many times default credentials on a router or IoT device cause breaches).
- Encrypt sensitive data at rest: If you must store attendee info on a laptop or USB drive on-site (like a backup attendee list), encrypt that disk. We’ve seen cases where an unencrypted laptop with attendee data got lost or stolen – that can trigger a serious data breach notification.
- Limit data access to those who need it. If you have volunteers or temporary staff operating tech, create limited accounts for them. For example, your ticket scanning app might have an “attendee info” button that shows personal details – you could decide only lead supervisors get devices logged into an account that can view that; others just see pass/fail scan results. Most systems allow role-based permissions – set those up prudently.
- Plan for incident response: despite precautions, breaches can happen (a hacked account, a malware infection on a check-in laptop, etc.). Have a basic plan: who to inform (internally and perhaps externally if required by law), how to contain the breach (disconnect affected systems, revoke credentials), and how to investigate. If a data breach must be reported to authorities under law (like GDPR’s 72-hour rule), know the process. Hopefully you won’t need it, but being prepared means you can act quickly and transparently, which is crucial in damage control.
Additionally, respect attendee privacy expectations. Be clear and honest in your communication about what data you collect and why. If you’re using an app that tracks attendee locations or engagement, disclose that in your privacy policy or terms when they sign up. For instance, if your event app uses Bluetooth beacons to track foot traffic (common at exhibitions), attendees should be informed and ideally given a choice to opt out. In 2026, many attendees are privacy-conscious; some will gladly opt in to enhanced experiences if you explain the benefit (like personalized recommendations) and how their data is used. Others may opt out, and you should allow that without penalizing their experience unduly.
One example of privacy by design: some festivals implemented RFID wristbands not just for access but to personalize experiences (like tapping to share a photo or link with sponsors). They found success by making those features opt-in and clearly explaining them. Attendees wore wristbands anyway for entry, but only those who chose to activate them with personal info enjoyed the extras like social media integration or cashless purchase tracking. Those who didn’t opt in just had an anonymous ID on their band for entry – preserving their privacy. This dual approach kept regulators and attendees satisfied.
In summary, weave security and compliance into each step of your tech implementation. It might mean a bit more work up front (policy reviews, extra testing, occasional difficult conversations with a vendor to turn on a security feature), but it is far easier than dealing with a breach or violation later. Plus, robust security is part of being a trustworthy event organizer. Attendees handing over their data and payments trust you to guard them. If you do it well, they may not even notice – and that’s a good thing. But if you slip up, it could dominate the post-event headlines for all the wrong reasons. Diligence here protects not just data, but the long-term reputation of your event brand.
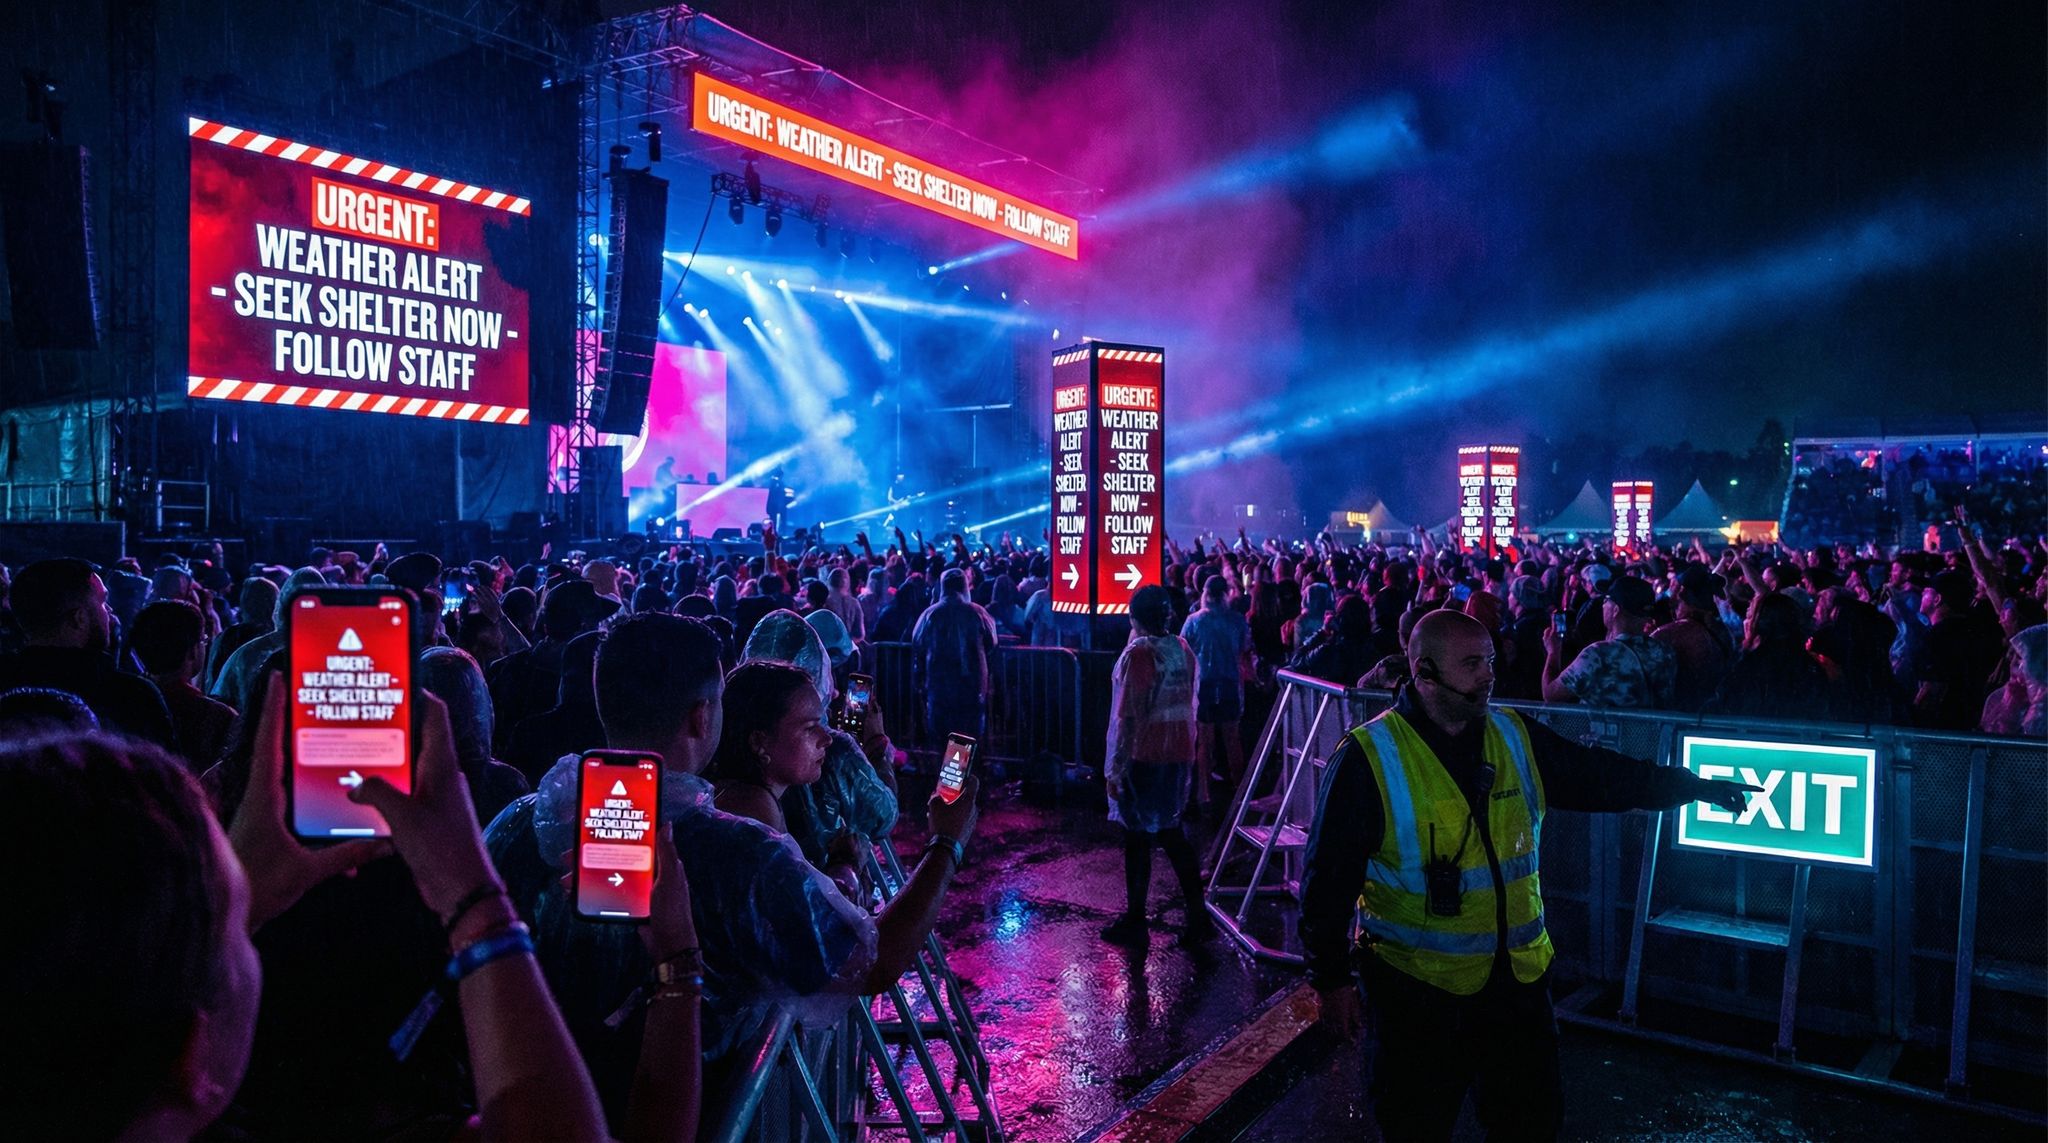
Offline Mode and Redundancy Plans
No matter how well you prepare your infrastructure and integrations, things can and will go wrong – often at the worst possible time. Networks go down, devices fail, servers crash, or a vendor’s cloud service might hiccup. That’s why a cornerstone of any event tech implementation is designing robust offline modes and redundancy plans. In essence, you need a Plan B (and C) for every mission-critical system, so that even if the tech fails, the show can go on with minimal disruption.
Identify points of failure in your tech stack and plan a backup for each. Let’s break down common ones and their redundancy solutions:
- Internet/Network failure: If your internet connection drops, how will ticket scanning, cashless payments, or live polling continue? Ensure your scanning system has an offline mode – scanners should retain a local list of valid tickets and be able to operate disconnected for some time. Many RFID or mobile ticket systems do this: they sync the attendee list to devices ahead of time. Test this mode extensively. Know how many scans or how long it can run offline before needing to reconnect (some devices might hold thousands of check-ins then require syncing). Similarly, if using an on-site database or local server, have a backup network (like a LTE router) that can kick in. For payments, consider providing a limited offline payment option – e.g. allow vendors to take card imprints or use old-school knuckle-busters if the POS system dies, then process later. It’s not ideal, but better than stopping sales entirely. Pro tip: always have a backup plan for critical event tech like ticketing and payments; something as basic as a printed list or manual credit card swiper can save the day if tech is out for 10-15 minutes.
- Power failure: Tech can’t run without power. Provide UPS (battery backup) for important stations (registration desks, network gear, media servers). If the venue power goes out or a generator fails, a UPS might give you 5-10 minutes of juice – enough to save data, switch to backup power, or at least gracefully handle the situation (e.g. finish the current transaction on a device rather than losing it). Also, have generators and fuel ready in outdoor events, and for indoor, know the building’s backup power capabilities (do the wall outlets stay live on generator or only emergency lights?). In one case, a concert’s main power tripped but a small UPS kept the ticket scanners up, allowing staff to continue scanning in a dim lobby until lights came back – avoiding a bottleneck of un-scanned attendees. That’s a simple redundancy that paid off.
- Hardware/device failure: Assume that some fraction of your devices will fail on event day – scanners might break, printers jam, tablets freeze, etc. Always have spares configured and ready. A rule many tech directors use is at least 10-20% extra devices above what is required, especially for smaller items like handhelds or iPads. Store them charged and loaded with the app or software needed. If you have custom-configured equipment (like network switches or servers), have at least one spare of each critical model on-site. For something like an LED wall, maybe you can’t duplicate the whole thing, but you can have spare control modules and extra panels to swap if one section dies. If using walkie tablets for staff, have spare batteries. Essentially, anything that could physically break, have a backup unit or a workaround plan (e.g. if badge printer fails, can you switch to hand-writing names or sending attendees to a help desk for printing?). Too often events have a single point-of-hardware-failure – like one badge printer – and when it jams, the entire registration stops. Don’t be that event.
- Software/application failure: This is trickier to mitigate, but think through it. If your event app crashes or becomes unusable, it’s not life-or-death typically, but you should have other communication channels (emails, printed schedules, PA announcements) to fill the gap. If your streaming platform fails, have a backup stream ready on a different service (even a quick YouTube live link as emergency). If your primary ticketing software goes down, do you have a copy of the attendee list in a spreadsheet that you can quickly resort to at the door (even if it means manually checking people in until the system is back)? I’ve seen teams literally pull out a printed list and highlighters to let attendees in during a 15-minute outage of the scanners – crude but effective to keep the line moving slowly rather than not at all. Prepare low-tech backups: print hard copies of essential info (will-call list, seating chart for VIP tables, the show schedule) and store them in a known location. It feels archaic until that moment you desperately need it.
- Key personnel unavailability: Redundancy isn’t only about gear – what if the one person who knows how to reboot the system is unreachable? Share knowledge and have at least two people briefed on every critical operation (like resetting the network, or exporting an attendee list, or contacting vendor support). Event day is hectic and people can get pulled away; cross-training avoids single points of human failure. For instance, ensure both the main registration lead and their assistant know admin passwords and system procedures. This also means having a list of important contacts printed: vendor support numbers, IT contacts, venue tech manager, etc., so anyone can call if needed.
Document your failover procedures clearly and rehearse them if possible. It’s great to say “we have an offline mode” or “we have spares,” but in the heat of the moment, will your staff know what to do without hesitation? Create a short “Disaster SOP” for scenarios: “If scanner system goes down: Step 1 check Wi-Fi, Step 2 switch to offline mode by clicking X, Step 3 notify tech lead, Step 4 if >15 minutes, start using printed list Y.” For each likely issue, have steps. This might overlap with vendor documentation or your earlier communications plan – combine them. Then, simulate these failures during a training or briefing. For example, in the final staff training, you can do a drill: “Oops, our scanning app is not responding – quick, what do we do?” and have the team actually try using the backup list or redundant scanner. It builds confidence and exposes any holes in the plan while you still have time to fix them.
Redundancy planning also includes communication during a failure. Decide how you’ll alert team members if something fails and when to switch to backup. Maybe you’ll use a specific radio code word (some events use codes like “Tech Stop” or similar) to indicate to all that the primary system is paused and backup processes are in effect. Without clear comms, one part of your team might still be trying to use the broken system while others are on backups – leading to chaos. So, perhaps set a condition: if system isn’t back up in 2 minutes, lead will announce to switch to manual mode. The team should trust that call and follow the predefined backup process. Once resolved, have a way to signal all is clear. Performing this smoothly can actually impress attendees – they’ll see that even though a hiccup occurred, you had it under control. As festival producers often share, being prepared and calm under technical duress keeps the audience calm too.
The ideal outcome is that your redundancy plans never need to be used – because nothing major fails. But knowing they are in place and functional provides huge peace of mind. It lets you and your team focus on delivering a great event rather than worrying “what if.” And if a failure does occur, you’ll handle it like a pro team: swiftly, methodically, and with minimal impact on the attendee experience. In live events, resilience is success. By building robust offline and backup capabilities, you make your event resilient to whatever tech gremlins might appear.
Rigorous Testing and Quality Assurance
Lab Testing and Simulations
Testing is where all your careful planning meets reality. It’s tempting to assume that once a system is set up, it will “just work” – but seasoned event technologists know that rigorous testing is the only way to reveal hidden issues before they bite you on event day. The mantra is test early, test often, and test under conditions that mimic the real event as closely as possible. First up: lab testing and simulations in a controlled environment.
Begin with functional testing of each individual system in a lab (or office) setting. Set up your ticketing platform and run through the entire workflow as an attendee: buy a ticket (even if it’s a $0 test ticket), receive the confirmation, and then try to check in with it using your scanning device or app. Does every step behave as expected? Do emails send correctly? Does the scanner app show the right attendee info? Try intentionally invalid scenarios too – a fake ticket, an already scanned ticket – to ensure the system catches errors (“duplicate scan” alerts, etc.). If issuing RFID wristbands or badges, go through the encoding process: encode one, scan it at a mock gate, and see if the backend logs it properly. Make note of any quirky behaviors. It’s much easier to troubleshoot or tweak configurations now than when a line of attendees is in front of you.
Do the same for other systems: if you have a mobile event app, have a group of team members download it and try to perform key tasks (log in, build a schedule, send a message, etc.). For a streaming platform, do a short private broadcast from your phone or a camera, and have colleagues tune in from different devices to check the feed and audio. For cashless payments, simulate loading credit onto an RFID band and making a purchase – perhaps using test cards or demo mode on the payment terminals (most providers have a test mode). The idea is to walk through the user journey and ensure everything functions at a basic level.
Next, simulate real-world event scenarios as much as you can in the lab. One effective tactic is to set up a small “mock event” internally. For example, print 20 sample tickets of various types, set up a laptop as the “door entry system,” and have 20 staff or volunteers walk by and get “checked in” with the scanners. Time how long it takes, see if any scanners crash mid-way, and ensure the data is captured. If you have multiple entry points in real life, simulate that with multiple devices. If the event will run for 8 hours straight, consider leaving the system running for an extended period in test to see if there are memory leaks or battery issues (you’d be surprised – some apps might crash after a certain number of scans or hours, or a device battery might not last as predicted). For a conference schedule, create dummy sessions and have testers “check in” to those or send in Q&A through the app, to see if moderation consoles and display screens work accordingly.
Test data flows between systems in the lab. If your integration plan says that when someone registers it should pop up in the mobile app audience list, verify that with a test user. If scanning a ticket is supposed to trigger an email or update a dashboard, simulate that and see if it happens. Essentially, you want to confirm that each of those integration points (APIs, webhooks, etc.) that you so carefully planned is actually firing and receiving data as expected. Use test data that mimics real data – e.g. include international characters in names if you’ll have international attendees (to catch encoding issues), use varying lengths of inputs, etc.
Pay close attention to edge cases during testing. Edge cases are unusual situations that might break the system: like someone buying 10 tickets under one order (does check-in app handle group check-ins?), or an attendee who loses their RFID wristband and needs it reissued (can you void the old one and activate a new one easily in the system?). Try those processes. If you find they’re cumbersome or unclear, you might need to create a workaround or at least train staff specifically on those scenarios. Another edge case: network disconnect. During your lab test, try disconnecting the Wi-Fi on a scanner and see if offline mode kicks in gracefully, then reconnect and see if it syncs properly. If a device app has a “no internet” bug, better to catch it now.
Keep a log of issues found during lab testing and ensure they get addressed. This could involve working with the vendor’s support to fix a bug or adjusting a configuration on your end. For example, if your test finds that the badge printer software crashed after 50 prints, notify the vendor and get an updated driver or procedure well before the event. Or if the mobile app’s timezone is off (all session times appear an hour off) – that’s an easy config fix once noticed, but a disaster if not caught until attendees complain. Lab testing’s purpose is to shake out these bugs when you have the leisure to react calmly, rather than under pressure.
Finally, simulate the stressful parts, at least mentally. Gather your team and do a tabletop walkthrough: “It’s 8:45am, registration opens in 15 minutes, we have a queue forming – what are we doing with the scanners at that moment?” Even role-play an issue: “It’s 9:00am and scanner #3 isn’t scanning tickets, how do we redeploy staff or escalate support?” This kind of scenario rehearsal can reveal if your team knows the system well enough. If someone says “I’m not sure how to reset the scanner app,” then you know more training is needed. The lab environment is as much for human testing as system testing.
In summary, lab testing and simulations help you catch bugs, verify features, and build team familiarity in a low-risk setting. It builds confidence – by the end of lab testing, you should feel like, “We’ve tried to break this in every way we could think of, and we know how it behaves.” Only then should you move on to the next phase of testing under more realistic loads and scales.
Performance and Load Testing for Scale
If your event is large or your technology will face heavy usage, performance testing becomes crucial. It’s one thing for a system to work with 10 users in a lab; it’s another to handle 10,000 concurrent users or transactions at the actual event. Load testing is about ensuring your infrastructure, software, and integrations can handle peak volumes without significant slowdowns or crashes. In 2026, with hybrid events and massive festivals, we often talk about systems needing to scale to millions of hits – but even a couple thousand people all doing the same action can overwhelm an unprepared system. So let’s stress-test it before it stresses you!
Identify peak load scenarios from your event timeline. Common ones: the rush at doors opening, the surge of mobile app use during a popular session or after a push notification, the spike in concurrent live stream viewers during a headline act, or the flood of drink purchases during an intermission. Understand those moments: e.g., “At 5 PM gates, we expect 500 people per minute to be scanning in” or “We anticipate up to 20,000 concurrent app users around keynote time” or “During halftime, 300 transactions per minute at concession stands.” Use historical data if you have it, or ask others/consult research for similar events. These numbers will guide your load test targets.
Now, use tools or vendor support to simulate those loads. Some vendors will help by running load tests on their platform (especially if it’s a cloud service – they might have internal ways to simulate traffic). For example, a ticketing provider might run a test by pinging their own check-in API with thousands of requests to mimic scanning volumes. If they can’t assist, you might employ generic load testing tools: for web-based systems, tools like JMeter or Locust can simulate many users hitting an endpoint. For an app, you might not be able to simulate real mobile devices easily, but you could script multiple app instances or use the back-end APIs the app uses to send volume. If it’s a network test, sometimes just connecting a bunch of devices (like ask 50 volunteers to watch the test stream simultaneously) can provide insight.
Focus on the weakest links when load testing. Often, it’s the network or database that gives out first. For instance, you might find that over 1000 scans/minute, your local Wi-Fi becomes the bottleneck rather than the scanning software – maybe the access point saturates. That tells you to upgrade APs or put scanners on wired connections. Or maybe the cloud server’s CPU spikes at a certain concurrency – you’d talk to the vendor to allocate more resources or enable autoscaling. A big lesson from events is that the first failure under load might cascade – like a slow network makes the app time out, which might cause the app to misbehave. Observing the system under heavy use helps pinpoint such chain reactions.
When performing load tests, monitor system metrics closely. Check device memory and CPU usage (you can use built-in diagnostics or dev tools). Monitor network throughput on your routers (ensure you’re not saturating it). If you have a staging environment with logs, watch for any error messages or slow query warnings. For example, maybe at high load, an API endpoint starts throwing “503 service unavailable” errors or database queries jump from 0.1s to 5s, slowing everything. Those are red flags to address.
Also, test stress scenarios – beyond expected peak, what if even more load hits? Perhaps your marketing goes viral and 50% more people show up early than you predicted – can the system cope? It’s useful to know the headroom. If expected is 500/minute, test up to 1000/minute. If it breaks at 700, you know your safety margin. Armed with that, you could either optimize further or plan operational tactics (like staggered entry times to avoid too high a peak if possible, or deploying more devices to distribute load). For mobile apps and streaming, concurrency limits are often set by infrastructure – ensure your license or plan covers the upper bound. I recall an event where the stream provider had a plan for up to 10k viewers, but 15k tried to join and the 5k got blocked – simply because the plan needed upgrading. That’s an easy fix if you anticipate it.
Another aspect is long-duration reliability (soak testing). Sometimes a system handles a quick burst but not sustained use. If your event is multi-hour or multi-day, run a test script that operates continuously for a long period. Does the memory usage keep climbing (memory leak)? Does performance degrade over time? Ensure timed jobs or caches reset properly. If you find an app slows on day 2 without a restart, you might simply schedule a daily reboot of that service as a precaution.
Involve vendors in load testing results, especially if something fails. They might have tuning parameters – e.g., raising API rate limits, enabling a more efficient data sync mode, or providing additional servers for your event window. Many cloud-based event tech systems can allocate extra instances to handle peak loads if alerted. Share your findings: “We simulated 5k concurrent check-ins and saw 10% of requests timeout.” That will prompt them to take action (no one wants their system to falter live). It’s far better to have these somewhat uncomfortable conversations pre-event than angry ones later.
One often overlooked factor: client-side performance. Not just the server – how do the devices handle high activity? If your scanning app requires downloading a big attendee list and you gave volunteers older smartphones, those might lag. Test on the actual devices you’ll use. Similarly, if the attendee mobile app is heavy, an older phone might struggle – see if it works smoothly on a mid-tier Android device, not just the latest iPhone. If not, consider if you can disable non-essential features to lighten it or at least be aware to advise attendees of requirements.
Finally, incorporate load test drills into rehearsals. If you have 100 staff with scanners, practice all scanning at once on some test mode – partly to test tech, partly to train them in that frenetic scenario. For an app, maybe simulate a scenario where everyone needs to refresh at once (perhaps by sending a test push notification and expecting all to open the app – see how it handles the flood). It also sets expectations: staff see what peak feels like and can adjust techniques (like how to position tickets for fastest scanning, etc.).
The result of thorough performance testing is confidence that your systems won’t fold under pressure. You might even discover optimizations: for instance, load testing could reveal that pre-loading certain data drastically reduces server calls, so you implement that. Or that splitting the attendee list by last name among different devices speeds things up, so you assign gates accordingly. These insights ensure that come event day, when the audience surges, your technology stands firm and responsive, maintaining the seamless experience you’ve promised.
Field Trials and Dress Rehearsals
After lab and load testing, the next best thing is to test your technology in a real-world setting that closely resembles the actual event. Think of it as a dress rehearsal, not just for your program itinerary but for your tech ecosystem. Field trials and full run-throughs can expose issues that no lab simulation can, especially factors of environment, user behavior, and the unexpected quirks of reality.
One approach is to conduct a field trial at a smaller event or a pilot event. If you have the opportunity (and resources allow), try deploying the new tech in a low-stakes context first. For example, maybe there’s a smaller conference or meetup before your big conference – use your new registration system there first. Or a partner festival where you can test your cashless payment system on one bar to see how it goes. Some event organizers even create a “friends & family” mini-event or invite staff families to act as attendees for an evening to test everything end-to-end. This pilot doesn’t have to incorporate the full scale, but it should involve actual attendees, actual staff, and a real environment (not just your office). You’d be amazed at the insights gleaned: perhaps you find that real attendees ask questions you didn’t anticipate (“How do I reset my app password? Where do I tap my wristband?”) – which could prompt you to improve your user guides or UX. Or maybe the field trial reveals logistical issues, like the placement of scanners was awkward or the Wi-Fi at the venue entrance had a dead spot right where attendees queued. These are things no amount of lab work might show.
Even if a field trial at a separate event isn’t possible, do a full tech rehearsal at your venue a day or two before opening. Set up all equipment on-site as it will be during the event: networking, printers, scanners, screens, etc. Perform a “day in the life” walkthrough with your team. For instance, walk through the entrance process at the actual gate: have a team member pretend to be an attendee, go through ticket scanning or badge printing just as in real time. Then maybe go to a session room and connect a device to the projector or stream, to simulate how your hybrid attendees will watch it. Test the sound, video, and any interactive features (like live Q&A display). If you have digital signage or live social media walls, turn them on and feed test data. Essentially, run as much of the show as possible without the real audience. Treat it seriously – have your staff follow the timelines (check-in opens at X time, etc.) and pressure test everything.
On-site testing often uncovers environmental factors. For example, lighting: scanners or QR codes might behave differently under bright sunlight or dim party lighting. I recall a festival where in bright noon sun the scanners had trouble reading phone QR codes due to glare – after the rehearsal, they provided shades or asked attendees to tilt phone screens, solving the issue proactively. Sound is another: maybe your MC’s announcements aren’t audible in the entry area where people might need cues – you could then link radios or have a runner to inform entry staff of any schedule changes. Physical layout problems can show up too: perhaps the Wi-Fi signal was great in an empty hall, but when you set up metal structures for the expo booths, it interfered with the signal – better to find out when you can still reposition an access point than on show day.
During the dress rehearsal, also test your support and escalation procedures in the field. For example, simulate calling vendor support: perhaps actually ring up your tech vendor’s hotline in the middle of rehearsal (with prior notice) to ensure the number works and they respond timely. Practice swapping to backups: maybe during rehearsal intentionally shut off the main internet and see if backup kicks in and staff notice what to do. Time how long it takes to transition to offline scanning mode and back online. These drills will make everyone more comfortable. You might consider inviting local emergency or venue officials to observe if relevant (some large events need sign-off from inspectors for things like scanning devices for crowd flow; showing them a test run builds trust that you’re prepared).
Encourage feedback from all team members and volunteers during these trials. Often, the folks on the ground will notice small details (“This handheld scanner is heavy after 30 minutes, maybe we need a table to rest it on” or “We need a light at the help desk area because it’s too dark to see the laptop screen in the evening”). Act on these if you can – such tweaks can make a difference in efficiency and comfort. Volunteers particularly might surface UX issues (“Attendees seem confused about where to tap their wristband”) that you can address with better signage or last-minute user interface adjustments if minor (some systems allow UI text changes easily – like adding an arrow or instruction on a kiosk screen if folks got confused in testing).
Where possible, involve some real end-users in the rehearsal. For example, ask a few friends or non-staff to come pretend to be attendees for check-in. They will behave more like real attendees than your staff who know everything; they might struggle to find a QR code in their email, or ask a question that a real person would. This helps train your frontline staff on what to expect and refine any instructions or messaging. If testing an app, have a few non-tech-savvy individuals try using it on-site (“Can you find the venue map on the app? Show me.”). Their experience will tell you if your wayfinding or app navigation needs last-minute clarification.
Finally, treat dress rehearsal as a confidence-building exercise as much as a test. Celebrate when things work and reassure the team that “this is why we practice.” It’s better morale if a problem arises now and you solve it – it proves to everyone that issues can be overcome. I always find that after a solid rehearsal, the team’s anxiety drops significantly. They go into the event with muscle memory and familiarity: the registration staff have already printed 50 test badges, so printing 5,000 no longer sounds daunting. The AV crew streamed a test clip successfully, so they trust the system for the keynote. That confidence often translates to smoother operations because people aren’t second-guessing the tech on show day.
In short, don’t skimp on rehearsal. It’s the bridge between theory and reality. The time invested in a field trial or full run-through can save exponential time (and embarrassment) during the event by catching last-minute issues and ensuring everyone knows their role. Just as performers rehearse to perfect their show, your technology and team should rehearse to perfect the event experience.
Edge Case Drills and Contingency Scenarios
One hallmark of a truly prepared event tech team is having plans for the “what ifs” – those edge case scenarios that are unlikely but possible, and potentially disruptive. We’ve touched on backups and redundancy; now it’s about actively drilling those edge cases so that if they occur, your team reacts swiftly and almost instinctively. Think of it like a fire drill: you hope there’s no fire, but you practice exit routes so that everyone is safe if it happens. Similarly, you practice tech failure routines or unusual situations so they don’t spiral into chaos.
List out edge case scenarios relevant to your event. Some examples:
- Double scanning / fake tickets: What if someone tries to enter with a duplicate ticket (whether by accident or fraud)? Are scanners alerting you, and how do staff handle it? Drill this: have someone present a ticket that’s already been scanned and make sure staff recognize the system’s warning and follow procedure (e.g., politely pull them aside to customer service instead of holding up the main line, and then checking ID or alternate evidence). Similarly, if a completely fake ticket is presented (maybe a Photoshopped QR code), does your system catch it? Train staff not to override a “invalid ticket” without verifying on the main system first.
- Lost credentials: An attendee loses their RFID wristband or mobile ticket email or simply shows up without it. Practice the flow for issuing a replacement or verifying identity. Ensure your team knows the lookup process in the system – by name or ID – and the security questions to ask (ID check, purchase credit card last 4 digits, etc.). Time the process; aim to do it quickly so the queue doesn’t back up. Maybe even set up a dedicated “problem resolution” station at check-in, and include that in your drill.
- Hardware swap: We know devices can fail, so run a timed drill: a check-in laptop dies – start the clock, can a staffer swap in a spare and be operational in e.g. 2 minutes? Or a scanner’s battery dies – can they grab a spare unit or battery and continue almost immediately? Practicing this makes sure spares are actually within reach and pre-configured. I once saw a practice where they had a backup laptop in a cabinet at reg; during rehearsal they mimicked the main one crashing, and found that the backup required an admin login they hadn’t prepared – that would have cost 5 minutes of scrambling, but because it was rehearsal, they logged it in beforehand for the actual event.
- Payment outages: If you’re running cashless or heavy card usage, simulate something like “credit card terminals all went down” (maybe by disconnecting them from network). Does staff know to switch to an offline mode or to start issuing IOUs? In a contingency, maybe you’d temporarily offer items for free or ask people to come back later – decide that in advance and communicate it. For example, some festivals have a policy: if cashless payment fails, small-value essential items like water might be handed out free until it’s restored, to keep attendees happy. That needs pre-approval from management; discuss these in pre-mortem meetings: “If our bar POS goes down for >10 minutes, do we allow cash or just pause sales?” That way if it happens, there’s no hesitation or argument between staff – they follow the agreed plan.
- Data discrepancies: Drill scenarios like “The attendee count on our dashboard is off” or “We suspect some people tailgated in without scanning” – how to respond? Perhaps have a manual headcount cross-check procedure or security double check wristbands. If you planned for these, it might involve sending a roving team to randomly scan wristbands inside to ensure they’re all valid. Practice that practice – have a staff try scanning a few already admitted bands to see if any slip through unscanned originally.
- VIP or artist issues: Often VIPs or artists circumvent normal processes. What if a VIP’s credentials aren’t working at a checkpoint? Staff can freeze when it’s an important person complaining. Role-play this: a team member acts as an angry VIP whose badge isn’t opening the VIP lounge door. Train staff to manage it: apologize, let them in manually while sorting it out, then investigate the technical issue after. Also, empower them to make a call (like temporarily grant access) rather than escalate to five managers while the VIP stews – but have a way to record it so security still knows what happened. These edge cases can be politically sensitive, so scenario training helps avoid embarrassment.
- Emergency integration break: Imagine one of your integrations stops working mid-event – say the mobile app stops receiving schedule updates due to an API failure. What’s your contingency? Possibly a manual workaround: announce changes on signage or a push notification via a backup method. Or if the streaming for remote attendees fails, do you have a backup platform or at least record locally to upload later? Simulate an integration break by shutting off an API or deliberately pushing a wrong update and see if your monitoring catches it. This also tests your monitoring: will someone notice if data isn’t flowing? If your check-in numbers on the dashboard freeze, is someone assigned to respond? Have a drill like “We haven’t seen new check-ins in 5 minutes on the screen, what do we do?” – maybe that triggers a call to the gate lead to confirm if scanning is ongoing or if system died.
Involve the entire team in these drills, including volunteers and third-party vendors or venue staff if they play a role. It’s important everyone knows these “exception” procedures, not just the core tech team. Use simple, clear checklists. For instance, create a quick reference card: “If Wi-Fi fails, do X. If printer jams, do Y. If main stage stream fails, do Z.” Distribute it and quiz people on it in a fun way (“Pop quiz: what do you do if…!” during training sessions). Drilling it a few times solidifies memory.
Remember also to designate a decision-maker for on-the-fly choices and ensure everyone knows who that is. In the midst of chaos, conflicting decisions are dangerous. So part of contingency drilling is chain of command: in a scenario, who has the authority to, say, open the doors and let people in for free if scanners failed completely and the crowd is growing restless? Identify that person or role ahead of time and practice how that decision would be communicated. Maybe it’s “Tech Lead informs Event Director, who gives go/no-go to temporarily open gates and wristband people manually.” And there should be a method to implement that smoothly (like have spare wristbands or a stamp ready to mark people if going manual – and yes, have some stamps or wristbands as a last-last resort and tell staff where they are stored).
As with all practice, keep a learning mindset. After running drills, debrief with the team: “What went well? What confused you? What could we improve?” You might realize you need extra signage for when plan B is active, or a quicker way to distribute backup devices. Each rehearsal of an edge case ideally tightens your response a bit more.
Ultimately, the goal is that even if something weird happens – the kind of thing that usually causes pandemonium – your team reacts calmly and effectively, almost on autopilot. The attendees might not even realize a crisis was averted because it’s handled so smoothly. It’s as much about mindset as actions: drilling contingencies gives the team confidence that, “We got this, even if the worst happens.” And that reassurance goes a long way when you’re about to open doors to thousands of eager fans or attendees.
Training Staff and Preparing Attendees
Comprehensive Staff Training Programs
Even the most advanced event technology is only as effective as the people operating it. Well-trained staff and volunteers can mean the difference between tech that enhances the attendee experience and tech that frustrates everyone. It’s imperative to invest in a comprehensive training program that gets your team comfortable and proficient with all new systems well before showtime.
Start by identifying all the roles that need training and tailor material to each. Your front-line registration crew needs to become whizzes at the check-in software or badge printing process. Your floor staff might need to know how to use a handheld scanner or assist attendees with the event app. Production team members should understand the streaming interface or show control systems. Even your customer service team (online or phone support leading up to the event) should be trained on the new technology so they can answer attendee questions about, say, the new ticketing features or how to set up an RFID top-up account. Make a list: Registration, Access Control, Info Desk, Tech Support, Stage Management, etc., and define what each group must learn.
Use a mix of training methods to cater to different learning styles. In the weeks leading up, provide documentation like how-to guides or short video tutorials for self-study. Many people appreciate hands-on practice most – so arrange live training sessions where they can actually use the equipment or software. For example, hold a workshop day where each volunteer gets to practice scanning tickets on the actual devices or a demo mode, and printing badges or wristbands. If time allows, run a mini “mock check-in” drill with them acting as attendees for each other. Repetition helps build muscle memory. As the systems expert, walk them through both normal operation and common troubleshooting (like “If you see a red error screen, that means X – here’s how to respond”). Encourage questions and create a no-judgment atmosphere; you want them to admit when they don’t understand something now, rather than freeze up later.
Create easy reference materials and cheat sheets. On event day, staff might not recall every detail from training, especially volunteers or temp staff who had only an hour or two of practice. So give them quick-reference guides: for instance, a one-pager at each check-in station listing step-by-step how to check someone in, and what to do if there’s an issue (like “Ticket not scanning? Look up by name, verify ID, then hit ‘Mark as Attended’ manually.”). Use diagrams or screenshots with arrows highlighting important buttons in the app or device. For devices, even label them physically if helpful (some events put a sticker on the back of scanners: “Wi-Fi off/on: hold button 3 sec” as a reminder). These guides act as a security blanket and ensure consistency across staff actions.
Train for customer service, not just the tech. Emphasize how to interact with attendees while using the tech. For example, at check-in, how to greet attendees and not get lost staring at a screen. If a device is slow, train staff to maintain composure and positive communication (“Thanks for your patience, our system’s just taking a moment”). Role-play tricky situations in training – like an attendee upset their ticket isn’t scanning. Staff should know how to calmly handle them (maybe escort them aside to a supervisor instead of holding up the line, and use phrases like “We’re going to sort this out for you”). The way staff handle the tech is as much part of the attendee experience as the tech performance itself. Experienced staff can even turn a tech hiccup into a positive interaction by being empathetic and efficient.
A major part of training is setting clear roles and escalation paths. Ensure everyone knows who to call or where to go if they encounter an issue they can’t solve. For instance, maybe you have roaming “Tech Support” team members in distinctive shirts – train the others to flag those folks if something breaks. If the registration lead is the go-to for any guest list problems, make sure that’s known. Actually practice escalation: in training, simulate a scenario where a volunteer’s scanner won’t connect and have them call over the radio as they should in real life: “Tech support, this is Gate 3, my scanner is down.” This not only ingrains the protocol but also tests your communication system and helps staff feel less timid about asking for help (a common issue is volunteers quietly struggling instead of alerting someone – training should break that fear by showing it’s okay and expected to escalate when needed). Make hierarchies clear: e.g. volunteers -> area supervisor -> tech lead -> event director, etc., so everyone understands the chain.
Incorporate real-world lessons and tips into your training. As someone with decades of implementations, share anecdotes: “Experienced operators do X to speed up lines, for example, scanning entry QR codes from attendee phones is easier if you angle the scanner 45 degrees under bright light – that’s a little trick we learned at last year’s festival.” Tips like these make staff feel they have insider knowledge and can do their job better. If you have data like “It takes on average 6 seconds to check in one person,” teach them that and encourage ways to improve (like prepping the next attendee’s ticket while one is printing). Also emphasize the importance of accuracy: speedy check-in is great, but not at the expense of wrong people getting in or tickets not being properly recorded.
Test your staff’s readiness towards the end of training – perhaps with a short quiz or practical test. It can be as informal as a game: split them into teams to solve a mock problem fastest, or use a Kahoot or similar for a quick quiz on procedures. This reinforces learning and highlights any last gaps. For those who struggle, consider pairing them with more confident staff on event day or giving them slightly less critical tasks if possible. Training isn’t one-and-done; be prepared to reteach or clarify on site too.
Finally, instill a sense of empowerment and trust. Let staff know you trust them to handle the tech and make good decisions. A motivated, confident staff member will outperform a hesitant one every time. Encourage them to take ownership: “This is your scanning station; we’re counting on you to make sure every attendee gets through smoothly.” When people feel responsible and capable, they rise to the occasion. Also reassure them that if anything goes wrong, management has their back and we’ll solve it as a team – that reduces anxiety about using new tools.
In essence, thorough staff training converts potential points of failure (human error) into strengths of your event. With knowledge and practice, your crew becomes an extension of the technology – making the high-tech elements feel natural and user-friendly to attendees. The time and effort invested in human training pays off in efficiency, reduced errors, and happier attendees and staff alike.
Creating Runbooks and Cheat Sheets for Troubleshooting
Even with great training, event day can throw curveballs, and staff won’t recall every solution for every problem. This is where runbooks and cheat sheets come in – they distill your contingency plans and tech procedures into quick-reference formats that staff can use on the fly. The goal is to have a predefined answer or process for any foreseeable issue, documented in a way that someone under pressure can follow.
What is a runbook? In IT, a runbook is a step-by-step guide to handling specific scenarios or operations. For events, you can create runbooks for critical systems. For example, you might have a runbook titled “Wi-Fi Outage – Ticket Scanning” that outlines exactly what to do if scanners lose connectivity. It could be like: Step 1) Switch scanners to offline mode (with instructions how). Step 2) Notify Tech Lead via radio. Step 3) Continue scanning; once Wi-Fi restores, do X to sync. Step 4) If offline mode exceeds 15 minutes, move to manual check-in or backup MiFi network per Tech Lead instructions. Having this spelled out means even if the most tech-savvy manager isn’t present, another team lead can open the runbook and act.
Prioritize runbooks for high-risk scenarios that have complex resolution steps. This usually includes things like network outages, system crashes, major device failures, or emergency evacuations (though that’s more general operations, not just tech). Also include routine but key operations like “End of Day data reconciliation” or “Starting backup generator for Wi-Fi” – tasks an operator might do rarely and thus forget steps. Write them in plain language and in chronological order. You can even include screenshots or photos if it helps (e.g., a photo of how to connect the backup 4G router to the network switch). Keep runbooks short – if one is more than a page or two, break it into sub-scenarios for clarity.
Cheat sheets are more abbreviated than runbooks – quick reminders for frontline staff. We touched on cheat sheets for normal operations (like check-in steps). Here, think of cheat sheets for troubleshooting common minor issues. For instance, a small card at each kiosk that says: “Printer jam? 1) Open cover, remove jam, 2) Press green reset, 3) If error persists, call Lead at ext. 101.” Or a FAQ-style sheet behind the help desk listing answers to likely attendee questions about the tech (“How do I connect to the app Wi-Fi? How to top up RFID cashless balance? What if I lost my badge?” with answers). These help desk cheat sheets ensure consistent information is given out and reduce the cognitive load on staff who might be dealing with a line of impatient attendees.
Place cheat sheets strategically. Tape them to the back of devices if appropriate (some events stick a small laminated card on the back of an iPad with the 5 most useful admin PINs or steps to reopen the app if it crashes). Give volunteers a lanyard card with key info (maybe one side event schedule, other side emergency contacts and tech tips like radio channel numbers or shortcodes for help). At the production desk, have a sheet listing all key login URLs, passwords (if not sensitive), and contact numbers (e.g., “Ticket system admin URL, username, password; Vendor support hotline; Internet provider support number; etc.”). In a crisis, looking up a phone number wastes time, so it should be right there. However, treat sensitive info carefully – maybe not all volunteers should have the Wi-Fi admin password, but your tech leads should, so their cheat sheet is more detailed.
Make these materials highly visible and accessible. Use bold headings, color coding (maybe red text for critical fail steps not to miss). Ideally, test them: during a rehearsal, have someone use only the runbook to solve a simulated issue and see if the instructions were clear. If they stumble, refine the language. Avoid jargon the average staff might not know – e.g., say “power cycle (turn it off and on again)” rather than just “power cycle the router”. The heat of the moment is no time for ambiguous instructions.
Don’t limit cheat sheets to just functional tasks – include any key reminders. For instance, a short list of “Do’s and Don’ts” for staff using tech: “Do keep your device charged (swap battery at 20%). Don’t leave your station unattended. Do verify identity before reissuing credentials,” etc. Or a bullet list for social media team: “If stream dies, post message X on Twitter immediately to inform online viewers.” These are those in-the-moment directives people might otherwise forget or hesitate on.
Distribute and brief the team on these aids. Hand them out during final training or as part of their check-in packet when they arrive on event day. Walk through one example: “Here’s a cheat sheet card – let’s go over the printer jam steps so you know where to find it.” Encourage them to actually keep it in their pocket or taped near their workstation. Sometimes people misplace papers; if it’s a crucial runbook, maybe keep a master binder at HQ and at each major station if needed, so there are multiple copies around. I’ve taped instructions to walls in back-of-house areas or inside equipment cases where only staff would look.
One clever approach is to use digital runbooks if your staff have devices and connectivity – e.g., a Google Doc or an internal webpage with all these instructions. That way if you update something on the fly (say the workaround process changed), everyone sees the latest. Some events use team collaboration apps (like Slack or Microsoft Teams) to pin troubleshooting guides or even chatbots – e.g., staff can type “help wifi” in Slack and get the runbook steps. But always have analog backup for the runbooks too – because if your network is down, an online runbook ironically might not be reachable!
Finally, treat runbooks and cheat sheets as living documents. After the event (or during, if something new pops up and you handle it), update them with any new wisdom. If a unique error occurred and you solved it, jot it down so next time you can include that scenario. Seasoned event tech teams amass quite a playbook over the years, covering both common and bizarre incidents. Over time, you might rarely need to create from scratch, just refine. And new team members will appreciate the accumulated knowledge at their fingertips, continuing the tradition of preparedness.
Attendee Communication and Education
Rolling out new technology isn’t just a learning curve for your staff – it’s also new for your attendees. A smooth tech implementation considers the attendee’s journey: how they discover, learn about, and use the new tools you’re introducing. The better you educate and set expectations for attendees beforehand, the more likely they’ll embrace the tech and the fewer support issues you’ll face on-site. Here’s how to bring your audience up to speed and even enlist their help in making the tech rollout a success.
Start communication early. As soon as attendees register or buy tickets, begin drip-feeding them information about the new tech features they’ll encounter. Use your marketing channels (email, social media, your website) to highlight “What’s New” or “Tech Tips for the Event”. For example, if you’re introducing a new mobile event app, send a “Coming Soon: Your Event at Your Fingertips” email a few weeks out explaining the benefits (“personalized schedule, real-time updates, interactive maps”) and telling them when/how to download it. If RFID wristbands are replacing paper tickets, let attendees know well in advance with instructions (“You’ll receive a wristband by mail – don’t put it on until event day, it must stay on once worn!” or “Pick up your wristband at the venue, and here’s how to use it for entry and payments”). Clear, upbeat messaging can build excitement rather than anxiety about changes.
Provide simple how-to guides for attendees. Create FAQ pages or short video tutorials demonstrating the new tech. People love visuals – a 60-second video showing “How to use your RFID wristband at the festival” or “5 Cool Things You Can Do in Our Event App” can go a long way. If you have an older or less tech-savvy demographic, consider very step-by-step content (“First, download the app from this link; Next, create your profile by entering your email; etc.”). You can host live “tech orientation” webinars or social media live Q&As for bigger events – invite attendees to tune in and ask anything about the event tech. This personal touch can reassure those who are hesitant. It’s also an opportunity to dispel myths or concerns (for instance, some might worry “Is my data safe on this wristband?” – you can clarify it’s encrypted and only holds an ID). The key is to frame tech as something that improves their experience: make it about convenience, speed, and fun, rather than “we’re forcing you to do this new thing.”
Leverage confirmation emails and event reminders. These are almost certain to be read. For example, in the final confirmation email or ticket email, include a section on preparing for the event technologically: “Before you arrive: Download our app [link], add your ticket to your phone’s wallet, and review the RFID cashless setup guide [link].” Provide any necessary credentials or instructions upfront. If the app requires the same email as ticket purchase, tell them. If they should bring a fully charged phone or a credit card to link with their wristband, tell them that. Setting expectations avoids frustration on-site (“What do you mean I needed to do X beforehand? I didn’t know!”). Also, if certain tech is optional but recommended, encourage it: e.g. “While our app isn’t required for entry, 90% of attendees use it to get the most out of the event – don’t miss out on real-time alerts and exclusive content!” This drives adoption.
Incentivize engagement with the tech for those who might be on the fence. A little perk works wonders: for instance, “Download the app and log in by X date to get early access to the schedule or a free drink coupon waiting for you in the app.” Or “Use your RFID wristband for payments and enjoy a 5% discount at all merch stands.” These rewards can be advertised beforehand to motivate attendees to set things up. Gamification can help too: maybe have a leaderboard or raffle for app users or for those who complete their profile. The idea is to make using the tech rewarding and fun, not a chore.
Simplify onboarding at the event. Despite pre-event comms, some portion of attendees will show up unprepared – didn’t download the app, didn’t see the how-to email, etc. Plan for catching them up quickly on-site. At registration or entry, have signage: “Download the Event App here” with a QR code to the app store, or “How to activate your cashless wristband” with a short URL or QR code. Staff at info booths should be briefed to assist with common setups (like helping someone find and add their ticket to Apple Wallet, or showing how to enable push notifications). Perhaps have a “Tech Help” desk specifically – some events do this for RFID or app support. Even roving “tech ambassadors” with “Ask me about the App” on their shirts can proactively help in first hours. People might be shy to ask, so make help visible and approachable.
Also, use event-day communications to continue educating. For instance, send a push notification or SMS as the event opens: “Welcome! Tip: Use your wristband at all vendors – just tap and go for quicker service.” Or “Remember, session reviews can be submitted in the app – share your feedback and win prizes.” Use digital screens or MC announcements to highlight tech features: “Don’t forget to check the live map in our app for shortest bathroom lines!” These not only promote usage but also reduce load on staff for answering questions. If someone hears “the app has the schedule” repeatedly, they might finally open it instead of asking staff “when is the next session?” for the tenth time.
Be transparent about known issues or limitations, if any, to manage expectations. If, say, your streaming has a 30-second delay, maybe mention that to virtual attendees so they’re not surprised. If the wristband must be snug on wrist to read correctly, mention that (someone might wear it over a sleeve and think it’s not working). Transparency builds trust – attendees are generally forgiving if they feel informed and that you’re not hiding problems. Conversely, if something fails unexpectedly, inform attendees quickly and honestly via announcements or messages: e.g., “Our payment system is currently offline – please bear with us, we’re resolving it. You can still use cash at stands for now.” Attendees appreciate being kept in the loop, and it prevents frustration or rumors.
Finally, collect attendee feedback on the tech during and after the event. Encourage them to rate their experience or report issues perhaps via a survey in the app or an email. This not only makes them feel heard, but you’ll gather valuable insight to improve next time. Maybe many will say “It was great, but I wish we had known X” – which next time you’ll make sure to communicate. Or “The app was confusing at first” – maybe more pre-event tutorials needed. Use this feedback to refine both the tech and your communication strategy for it.
In sum, an attendee who is well-prepared and educated about your new tech will likely have a smoother, more enjoyable experience, and that positivity will reflect on the event as a whole. By investing effort in attendee communication and education, you essentially extend your training ethos to your audience – turning them from potential tech skeptics into empowered users of the systems you’ve put in place. When both staff and attendees are on the same page tech-wise, the technology fades into the background and the focus can remain on the fantastic event content and community.
Pre-Event Setup and Final Checks
Early Vendor On-Site Setup and Testing
As the event draws near, one of the most critical phases is the on-site setup of all your technology. Getting vendors and systems in place early gives you a valuable time buffer to iron out kinks in the actual venue environment. The mantra here is: don’t leave anything tech-related until the last minute. If doors open Friday morning, you aim to have all tech installed and running by Thursday (or earlier) for a test run.
Coordinate with your vendors to schedule load-in and setup times well in advance. For a large festival or conference, it’s not unusual to have certain tech vendors start installation days, even a week, before. For example, if you’re deploying a site-wide RFID access control with gates and antennas, those might need to be physically mounted and wired a few days out. If you’re setting up a dedicated network, get the internet lines installed and network gear configured at least 1-2 days early. Push vendors to meet these timelines – sometimes you may need to negotiate early access with the venue or pay for an extra day, but it’s often worth it to avoid a morning-of scramble. Clearly communicate these schedules with the venue and other contractors to avoid conflicts (you don’t want your Wi-Fi team laying cables at the same time the decor team is laying carpet over them!). A well-planned production schedule with timeslots for each vendor is key to calm setup.
Once vendors have installed their hardware, conduct a full tech systems test on-site. We talked about doing a dress rehearsal, and this is part of that – but even before a formal run-through, do iterative testing as each major system comes online. For instance, after the network is up, do a connectivity test: walk around with devices to check Wi-Fi coverage in all necessary areas (are the access points reaching the far corners? any dead zones on the floor?). If issues, adjust placement or add repeaters now. When the registration area is fully built, test the badge printers and scanners in that actual space: sometimes differences in lighting or interference pop up (e.g., neon lights messing with scanner sensors might be discovered). Roll a test print at each printer, scan a test ticket at each gate – verify everything is recognized by the backend. Essentially, perform all the critical operations in situ: ticket scanning at gates, RFID tap at a payment point, a test notification through the venue PA if you have integration, etc. If you’ve set up LED walls or live stream encoders, do a quick dry run with content (like play a test video or show a countdown on the screens) to confirm display and sound.
Bring in the vendor technicians to be present during these early tests. It’s much easier to fix issues with the actual experts on-site rather than trying to troubleshoot over phone or email. Often, vendor techs will catch something you might not – “This antenna is too close to that metal truss, it might cause reflections, let’s move it 2 feet.” Or “The server rack fans are overheating in this closet, we need better ventilation.” These are real examples of on-site adjustments only apparent in context. Aim to have all vendors certify their portion is working as intended. A pro tip: use a checklist or sign-off sheet for each vendor – e.g., Networking vendor signs off that all APs are online and we achieved X Mbps throughput everywhere, Ticketing vendor signs off that scanning devices sync properly, etc. It holds them accountable and gives you confidence.
Stagger your final tests with any content rehearsals or production cues. For example, if Thursday evening the stage is used for a soundcheck, perhaps test your streaming setup during that time too (with or without the actual stream running). Or while expo booths are being set up, test that the app’s exhibitor listings correspond to actual booth positions. Work around each other cooperatively; the event production schedule might allow a slot specifically for tech testing (e.g. “Thursday 3-5 PM: Full system test – all other setup quiet”). Use that to, say, scan a bunch of dummy attendees through all gates at once, or simulate a heavy load on Wi-Fi. It’s wise to test during a “noisy” environment too, not only in silence – so you know, for example, if radio comms can be heard in the bustle or if interference arises.
Ensure you perform end-to-end data flow check on-site. For instance, simulate an attendee buying a ticket (maybe with a test credit card or free code) from the on-site network, then picking up their badge, scanning into a session, then receiving a push message – basically a day-in-the-life scenario using the actual live integrations on the venue infrastructure. Check each step: Did the purchase reflect in the reg system? Did the badge print correctly? Did the session check-in show on the dashboard? Did the push send and the device on local Wi-Fi receive it? This holistic test can reveal integration or network config issues that unit tests might miss (like a firewall rule on venue Wi-Fi blocking a critical port needed for real-time updates – I’ve seen that happen, and catching it early meant we could get the venue IT to open it day before instead of panicking day of).
If something’s not working to spec, don’t rest until it’s resolved or a workaround is in place. It’s common to discover a bug on-site that didn’t appear in lab testing (because environment matters). For example, maybe the card readers have trouble under the tent because of heat or dust – you might relocate them or provide covers. Or the app’s indoor navigation feature is unstable because the venue’s Bluetooth beacons aren’t placed ideally – if you can’t fix that in time, decide to disable that feature and communicate accordingly, rather than let attendees be frustrated. Early setup gives you at least some window to adjust, whether by fixing, replacing hardware (hence why spares on-site ahead of time is huge), or adapting plans. It’s far better to know a day early that “Feature X isn’t feasible here” and inform staff and users, than to have it fail live unexpectedly.
By the end of early on-site setup and testing, aim to have a fully operational venue tech-wise at least 12-24 hours before opening. That creates a buffer for any final fine-tuning and also lets your team rest (don’t underestimate giving the tech crew a good night’s sleep knowing everything’s functional, rather than pulling an all-nighter!). One large expo I worked on had everything up by the evening prior, so we invited some event organizers and partners to do a quick walkthrough and try things – a fresh pair of eyes noticed a small signage issue and a missing app content item, which we easily corrected that night. Because we weren’t rushing to finish setup, we could catch polish items too.
In summary, early vendor on-site setup and thorough testing are your insurance policy. They transform the venue from an empty shell into a smart, connected environment and give you confidence that when the first attendees walk in, the tech will hum along in the background, already vetted in the real world. It’s the culmination of all your planning and labors: seeing everything finally work together on location. And that is both a relief and a proud moment for any event tech implementation team.
Full System Integration Test On-Site (Dress Rehearsal)
With all components in place and individually tested, it’s time for the full integration test on-site – essentially a final dress rehearsal involving the entire system and ideally the full event team. This is the moment to simulate the event as closely as possible, finding any last issues when stakes are still low. You’ve done lab tests and smaller field tests, but now you operate everything concurrently and end-to-end, in the actual venue setting, to ensure all systems interplay smoothly.
Coordinate a comprehensive run-through, ideally the day or evening before the event (or earlier that morning if absolutely necessary, but earlier is better to allow fixes). It’s great to combine this with a wider event rehearsal if one is planned – for example, many conferences have an “all staff walkthrough” or “venue dry run” where everyone practices their roles. Piggyback your tech test onto that so that as registration staff practice a mock check-in, you capture those scans in the system, and as stage managers do a mic check, you test the stream, etc. If there isn’t already a structured rehearsal, organize one specifically for tech and key process flows.
Simulate attendee journeys from start to finish. Some suggestions:
- Arrival and entry: Have a group of staff/volunteers act as attendees arriving at the gate or reg desk. Ensure they carry the varied types of credentials your attendees will (printout tickets, mobile QR codes, RFID badges, etc.) to test them all. Run them through as if it’s opening time. Time the check-in process, see if any bottlenecks arise. Are scanners reading quickly? Did any ticket format fail? Did the printers keep up with speed? This is also a last chance to tweak line layout or add more equipment if needed. For example, if the practice queue of 20 “attendees” took 10 minutes, you can extrapolate and maybe realize you need another check-in station active to handle the expected 2000 in an hour, and you have time to arrange that extra station.
- In-event activities: Once “attendees” are inside (again, using staff to play the role), have them roam and use various tech points. If there’s an RFID-controlled VIP lounge, send some testers there to tap in. If the mobile app has features like session check-in or live polling, do a fake session where testers open the app, check in to the session, answer a poll, etc. Meanwhile, your team monitors the systems: are those check-ins registering on the dashboard? Did the poll results appear on the moderator panel? This synchrony test ensures connectivity and data flow hold up under simultaneous usage, not just isolated tests.
- Transactions and interactions: If you have cashless payments or any e-commerce (like scanning badges to collect lead data in an expo), run through those too. E.g., have a volunteer pretend to buy a drink at a concession using an RFID wristband – does the transaction go through and deduct balance? If a receipt or confirmation is expected (maybe via email or app), check that it sends. If an exhibitor scans a badge for lead info, verify that the data logs properly (maybe even see if that exhibitor portal updated). These are the touches attendees and sponsors will have; better to fine-tune them now.
- Content and production tech: Simulate a live portion – maybe during a stage rehearsal, push it through your streaming service to another room or a test web page. Check video, audio sync, captioning if used, and switching between sources. If your app or site is supposed to display a schedule or live content, make sure it updates to show what’s happening. In one test, we realized the schedule in the app was still showing “Day 0 setup” instead of flipping to “Day 1 Sessions” automatically – a timezone misconfiguration we fixed last minute.
Remember to also test your redundancies during the full run (though carefully): For instance, briefly unplug a main network cable to see if backup kicks in, or turn off one scanner to see if staff notice and re-route as planned. However, use caution – don’t create an outage that could risk harming equipment or data. But maybe simulate it conceptually: announce “Network down drill!” and have staff follow the offline mode procedure for a minute, then restore. You want to validate that your contingency plans are practical under what feels like event conditions.
Engage the entire team in observation and feedback during this exercise. Encourage staff to speak up if something seems off or inconvenient. Sometimes an operational tweak arises: e.g., volunteers might say “We need an extra person at reg just to guide people to the shortest line, some got confused.” That’s not a tech issue per se, but directly affects throughput – and you can implement it now that it’s noticed. Tech and operations are intertwined. Another example: maybe security noticed that scanning every person’s digital COVID certificate (just an example scenario) slows entry too much; maybe they suggest verifying those in a separate queue ahead to keep lines moving. These kinds of holistic adjustments often surface in a full rehearsal where everyone sees the bigger picture, whereas individual tests might not reveal them.
Document any issues that arise and assign someone to fix or adjust. Even at this late stage, you can often solve minor configuration problems or at least plan a workaround. For example, if you discover during the integration test that the badge printer sometimes skips a badge when two people with very long names check in back-to-back (some odd bug), you might decide to pre-print those particular known badges to avoid it, and log the bug for a software patch post-event. Or if half the test attendees ignored your app and asked humans for directions, maybe you reposition signage or push a notification “Use the app’s map for easiest navigation” at event start. They’re often small tweaks, but lots of small improvements sum up to a noticeably smoother experience.
After the rehearsal, debrief as a team right away while it’s fresh. Gather leads from each area – registration, production, IT, etc. – and quickly run through what went right and what needs attention. Make a quick checklist for overnight changes so nothing is forgotten. Ideally, by this point, there are no show-stoppers, just optimizations. If a critical flaw appears (say, the scanning system crashed when trying offline mode), you still have a bit of time to coordinate with the vendor or implement a band-aid (like partition scanning duties differently or even printing a backup list as a just-in-case measure). It’s far better to confront these scenarios a day ahead than morning-of.
A full integration test on-site isn’t always easy to schedule; sometimes with tight event schedules you get only a small window. But whatever you can simulate, do it – even an hour of role-playing can reveal insights. Consider it a final exam for your entire tech ecosystem. When everything works end-to-end in rehearsal, you gain a huge confidence boost. You can head into opening day knowing that attendees will experience a seamless journey, because you essentially gave the event a test drive and fine-tuned it. And if anything did pop up, you’ve addressed it proactively rather than reactively. It’s the best way to ensure that on the real day, the only surprises are the delightful kind for your attendees, not unwelcome tech glitches.
Backup Systems On Standby and Final Contingency Check
By now, you’ve tested and retested your primary systems. The final step before showtime is to double-check all your backup systems and contingency measures are in place, powered, and ready to activate at a moment’s notice. This is your safety net check – you hope you won’t need the backups, but you want absolute assurance they’re there.
Do a walkthrough specifically focusing on backups. For example:
- Visit each critical station (registration, entry gates, tech table, etc.) and visually confirm backup devices are physically there and charged. If you planned spare laptops for check-in, are they under the table, plugged in, logged out but ready? If extra handheld scanners are on standby, are they fully charged and within reach of staff? Too often a backup is prepared but left in a box in a distant office – make sure they’re accessible in the environment. A good practice is to have a marked bin or bag at each area labeled “Backup Equipment” with the items and perhaps a sheet listing contents.
- Check power backups like generators or UPS units. If you have a generator for critical gear, do a quick test run of it (briefly) or at least ensure it has fuel and battery to start. Confirm UPS battery indicators show full charge. Also, remind staff how long each UPS can last and what’s plugged into it (so they know which devices will stay on if main power drops). If any UPS was inadvertently left unplugged (so not actually charging) – catch that now!
- Ensure your redundant network is active and configured. If you have a secondary internet line or 4G failover, simulate a switchover if possible or at least confirm the device sees the backup connection. Check that critical systems are pointed at a redundant DNS or server if you set one. For instance, maybe you have two servers load-balancing – kill one and see everything still works (you can do this quietly by disconnecting its network and seeing if the other handles traffic alone, then restore it). If you’ve arranged an alternate Wi-Fi SSID for emergency use, confirm it’s visible and test connect, but maybe keep it locked/unused unless needed.
- Review your manual backups. Is the printed attendee list or digital spreadsheet updated to the latest registrations? If you plan to use that in worst-case scenario, print/download a fresh copy now (and perhaps again in the morning if any overnight sales). Put a copy at multiple locations (registration lead, event director, etc.). If using paper backup tickets or wristbands for entry if scanners fail, distribute those to gate supervisors with instructions in sealed envelopes, etc. (and clearly mark them as “use only if instructed” to avoid confusion). Having those physically distributed means if radios/instructions fail during chaos, the people on the ground have the tools.
- Confirm communication backups. If radios fail, do you have a phone tree? Ensure everyone has at least one other team member’s phone number if radio network goes down (I’ve seen an entire radio system fail due to frequency interference – knowing key cellphone numbers saved the day). And do you have phone chargers around? Provide some battery packs or plug strips so dead phones don’t isolate someone. If you’re using any messaging apps (WhatsApp, Slack) for internal comms, check that they’re all logged in and off mute on devices. In final checks, maybe send a test message on your chosen backup channel (“All staff text group test: reply OK if received”) to gauge reach.
- Reiterate the emergency plan with the team. Gather area leads and quickly recount what happens for worst-case outages: “If ticket scanning completely goes down, we’ll pause entry for 2 minutes while we grab printed lists, then start manual check-in. If credit card processing fails, switch to offline mode and log transactions.” Ensure that each lead has what they need for those steps (lists, forms, etc.). This is like a pilot’s pre-flight safety brief: you hope not to need the oxygen mask, but you still point it out. Doing this refresher makes sure no one forgot the plan after all the excitement of setup. It also mentally primes them to react correctly if alarms ring.
Take a moment to run a final diagnostic on all systems too – ensure no one tinkering during setup accidentally disabled something. Check dashboards: is every device still online? Did any camera or scanner drop off the network overnight? Often after a lot of testing and patching, someone might forget to re-enable a link or might leave a test mode on. Verify settings: e.g., the ticketing system is back in live mode (not in yesterday’s test event), the app is pointing to the live data, and any maintenance modes are off. In one event, final morning check revealed the payment system was left in “training” mode which would have not charged credit cards – we switched it right before gates, potentially saving a big revenue fiasco.
Also, finish any resets necessary after testing. If you used a bunch of test tickets or loaded dummy data into systems during rehearsal, purge or mark those as test so they don’t interfere with live data. For example, you don’t want yesterday’s test check-ins counting as if 50 people already entered. Clear those logs (or have a filter to ignore pre-event data). If you gave test RFID bands to staff testers, collect them so they don’t accidentally use them for real access if not intended. Essentially, tidy the data and environment to a clean start state, with backups at hand, and systems armed.
At this stage, it’s also wise to ensure that all stakeholders are informed of backup plans. If you have sponsors or VIPs who need to know anything special (“If scanning lines are long, VIPs will be ushered through this separate door with a manual checklist”), remind your VIP team or those sponsors of that process, so they aren’t caught off guard. Similarly, if the venue or security team needs to help in an outage (like opening more gates or providing flashlights if lights fail), do a final sync with them about how that will work.
With backups confirmed and contingencies communicated, you can breathe easier. You’ve done everything possible to mitigate risks. Many times, because you did all this, nothing bad happens – Murphy’s Law often strikes when you ignore precautions. But even if some glitch does occur, you and your team will be ready to correct course swiftly.
In those last moments before opening, it’s a good practice to have a quick team huddle – focus on positivity: remind everyone of their training, that backups are set so no need to panic, and that the ultimate goal is to give attendees a great experience, not stress about the tech. The groundwork you laid means they can focus on hospitality and execution. Then, as the first attendees trickle in, you essentially flip the switch from preparation to operation, with confidence that if any part of the tech puzzle falters, another piece is right there to keep the picture intact.
Live Event Execution and Monitoring
Real-Time Monitoring and Support Team
When the event is live, it’s game time for your tech systems – but it’s no time to sit back. Real-time monitoring is vital to catch and resolve issues before they impact the attendee experience. Think of your team like air traffic controllers during the event, keeping an eye on all the tech “dials” and coordinating responses as needed. Simultaneously, having a dedicated support crew ready to jump on problems will keep things running smoothly. Here’s how to manage active monitoring and support once the doors are open.
Firstly, set up a central command center (if scale warrants) or at least a virtual one. This could be a physical table with multiple system dashboards displayed on screens – for ticket sales, entry counts, network status, stream health, etc. – or it could be a couple of laptops managed by one or two key tech leads. For larger events, a few team members in a quiet room with all the monitoring tools can rapidly communicate out to field staff when needed. Decide what metrics and feeds are critical: e.g., number of people processed at each gate (to detect if Gate 4 suddenly shows zero people for 5 minutes – indicating a likely scanner problem), volume of cashless transactions per minute (if it drops to near zero at peak time, something’s off), server and network alerts (CPU, memory, error rates, connectivity of devices), and any social media or attendee feedback channels (you might watch Twitter or your event hashtag to catch complaints like “App isn’t working” quickly). Many modern event systems include realtime dashboards – use them! For instance, centralized live dashboards can show attendance and tech metrics in one place, so keep that up on screen.
Assign specific people to monitor specific systems. One person might watch the registration system and entry flows while another monitors the streaming and A/V feeds, etc. Alternatively, one person monitors and another coordinates the response with field teams. The key is someone is always watching – not relying on people in the field to report issues first (though they should too). This team should have direct lines to all tech vendors too in case something needs escalation (you likely arranged vendor support availability; ensure those contacts are handy). For example, if the monitoring lead sees check-in latency spiking, they might immediately call the ticketing vendor’s hotline to check if a known issue or to allocate more resources, even before front-line staff realize a slowdown.
Implement a communication protocol for the support team. Often a group chat or radio channel is dedicated to tech issues. The monitoring team can quickly blast, “All scanners at Gate 4 down, tech support en route” so everyone relevant knows. Ensure the support team (either roving tech staff or vendor techs on-site) respond promptly. They might have a rotation or zones – e.g., one support person covers exhibit hall, another covers main stage, etc., ready to move. If any staff themselves notice something – say an entry volunteer finds a scanner acting weird – they should know to alert via the designated channel. Encourage a culture of quickly flagging anomalies, even if they turn out minor. It’s better to check on a false alarm than miss a real one. Over-communication is fine.
Leverage automated alerts where possible. If your systems allow setting thresholds (like network dropping below X throughput, or database error rate above Y, etc.), configure those and tie them to audible alarms or SMS to the support lead. Many tools (like network monitors or server monitors) can send push/email alerts – route those to something the team sees immediately. A ping on your phone that “Payment server not responding” might beat waiting to notice in a dashboard. The faster you know, the faster you can act.
During the event, have the support team do regular status check-ins even if no major issues. For instance, every hour have the monitoring lead do a quick roundtable (over radio or in person) with key area managers: “Registration, any issues? Streaming, all good? Wi-Fi, stable?” This proactivity sometimes draws out smaller issues they hadn’t reported yet, or just reassures everyone that tech is being looked after. It also keeps the support folks alert. In long events, attention can drift – scheduling breaks for them is important too, so they don’t burn out by hour six and miss something. If possible, rotate monitoring duties among a couple of people so eyes stay fresh.
Document issues and solutions in real-time as well. The support team should log any incident: time, what happened, how resolved. This not only helps for post-event analysis, but during the event, patterns might emerge. Perhaps every time a certain room fills up, the Wi-Fi blips – a pattern log could hint at capacity issues and you might, in the moment, offload usage by redirecting some users or opening another AP if available. Or if 3 scanners have needed reboot, maybe push a proactive reboot to all others during a break to prevent further incidents. A log also ensures shift changes or replacements are up to speed: “FYI, we already fixed X at reg – if it recurs, we have spare printer ready.”
A good monitoring team is empowered to act quickly. They shouldn’t need to ask higher-ups for permission to, say, restart a service or call in a backup. Those guidelines should be pre-set: for critical outages, do what it takes to restore and inform event leadership as you do it. The event director will thank you later for handling things decisively rather than waiting to ask “should we try a reboot?” while minutes pass. Of course, keep key stakeholders informed as appropriate (especially if an issue has attendee-facing impact), but that can often be done in parallel to the fix if you’ve trained and authorized your tech lead to do so.
Finally, remember to keep support team morale and focus up. It’s easy during live ops to fall into a reactive mode only. Encourage sharing of good news too: “Over 10,000 check-ins so far with no slowdowns!” or “Livestream running smoothly, 5k viewers steady.” It reminds everyone their effort is working and keeps stress in check. The support team might also proactively optimize during lulls (like clearing some logs or adjusting a setting now that they see real usage patterns). That can further ensure success. But caution them against any risky changes mid-event (no software updates or reboots unless absolutely needed!). Stability is king once things are rolling well.
Real-time monitoring and a crack support squad are your event’s tech guardian angels. Attendees might never know they exist – which is a good thing, because it means everything just works. But you’ll know, and your colleagues will know, that behind the scenes this vigilant team is catching issues before they escalate and keeping the tech train on the rails. In the end, it results in an event that feels effortless for the audience, even though you’re all working hard to make it so.
Troubleshooting SOPs During the Event
Even with the best preparation and monitoring, issues can still pop up during an event. What separates a minor hiccup from a major incident is often how quickly and effectively the staff responds. That’s where having clear troubleshooting Standard Operating Procedures (SOPs) comes in. In the heat of the moment, staff should almost reflexively know, “If X happens, I do Y,” as established in your training and runbooks. Let’s talk about executing those SOPs and maintaining order when troubleshooting under pressure.
Firstly, when something goes wrong, stay calm and follow the script. Your team has practiced and has cheat sheets – they should trust those. For example, if a badge printer jams with a long line forming, the reg staff shouldn’t panic. They recall (or see on the cheat sheet) the SOP: pause the line politely, follow jam-clearing steps, print a test, and resume. If it fails, escalate to the support lead as per procedure. Emphasize to staff that speed is important, but accuracy and clarity are more important. Rushing a fix can sometimes worsen it (like loading paper incorrectly in haste causes another jam). Better to take 30 seconds to do it right than have 3 minutes of repeated issues. Good SOPs are designed to be efficient, so following them usually is the quickest route to resolution anyway.
Communication during troubleshooting is key – both internally and to attendees if needed. For internal comms, whoever discovers the issue should quickly signal it as per your plan (e.g., a floor volunteer’s scanner isn’t scanning tickets – they radio “Tech support to Gate B, scanner issue”). If they solve it themselves immediately (say a simple restart fixed it), they should still update (“Gate B scanner back online after restart, issue resolved”) so the support team and command center aren’t still scrambling or wondering. If an issue will visibly impact attendees (like a delay or outage), instruct staff on what to say to attendees. You may have even prepared talking points in your contingency comm plan. For instance, “Our payment system is having a hiccup; we’re switching to cash for now. Thank you for your patience – you’ll still get the same great service.” Frontline staff should focus on apologies and assurances, not technical details. Meanwhile, perhaps an emcee or signage can convey a broader message if needed (“We’re experiencing technical difficulties with the streaming, please stand by” – the classic line). The goal is to inform without alarming and to set expectations (“we’ll be back shortly” or “please use alternate method”). Attendees appreciate being kept in the loop rather than left confused.
Use triage principles for multiple simultaneous issues. If you have several things going on, prioritize by impact. Your monitoring will help: if the streaming is down but sessions are continuing for in-person folk, and simultaneously the mobile app schedule isn’t updating – likely the stream problem affects thousands watching remotely, whereas app refresh can wait. So throw resources at the stream first. The support lead might delegate: “Team A focus on stream server, Team B look into app – but stream is priority.” Within a single issue, sometimes a workaround allows you to defer full troubleshooting: e.g., scanners on one gate fail, you direct attendees to another gate (workaround) which buys you time to troubleshoot the broken ones without pressure. Train the team to resolve externally first, then fix internally when possible – meaning keep the event running via backups or reroutes, then calmly diagnose the root cause behind the scenes.
When diagnosing, apply the checklists you’ve set out: eliminate simple causes (power, cables, user error) before deep-diving. Often during live trouble, the cause is something basic – a plug pulled, an option inadvertently disabled – because these things slip in live chaos. We had an instance where a whole row of payment terminals went down; SOP led us to find an unnoticed tripped circuit breaker. Once reset, all terminals were fine. Basic checklist: Is it plugged? Is it on? Did you try reboot? – It’s almost a joke, but truly, those solve a huge chunk of incidents. Only after those, escalate to vendor or advanced steps. A well-structured troubleshooting SOP ensures that, say, by the time you consider reloading a software config mid-event, you’ve ruled out everything less risky.
Know when to escalate or switch to contingency. Your SOPs should include time thresholds: ex: “If network not restored in 2 minutes, switch scanners to offline mode and use printed list for new entries.” The staff should be empowered to make that call (or the designated incident manager). Indecision is costly – if an outage is clearly not fixing in 30 seconds and you have a line building, better to execute Plan B quickly. It might degrade ideal operations (manual check-in is slower) but it’s usually better than a complete stop. And you can always revert to Plan A once fixed. Ensure everyone is alert for the cue: if the backup plan is announced (“Alright, switching to manual now”), each person should know their role in that (some grab the lists, others inform the attendees, etc., per training). It should appear nearly seamless to onlookers – for example, lights flicker and screens go out (power blip), but within seconds staff or generators bring emergency lights and you start up spare projectors, continuing the session albeit a bit MacGyver-style. Attendees often applaud when they see a crew recover well from a glitch – it can become a moment of human resilience rather than a negative, if handled with poise.
After an issue, once solved, do a quick post-mortem internally and communicate resolution. For instance, “Okay, what happened with that projector? Ah, it overheated. We’ve swapped it and have a fan on the spare.” Share that with relevant team so they know it’s fixed and if there’s anything to do differently (maybe now they’ll check other projectors’ ventilation too). Also, be sure to let the monitoring center or event leadership know when major issues are resolved: “Cashless payments fully restored at 3:20 PM; 10-minute outage, working normally now.” They might communicate to attendees or at least can breathe easier and focus on other things. And if any backlog was created (like a queue or a slight schedule delay), coordinate how to catch up. E.g., you lost 5 minutes of a panel due to tech delay, maybe shorten Q&A or push coffee break 5 min. Work with production to adjust timeline if necessary – small adjustments can still end things on time.
In essence, troubleshooting SOPs enable your team to react methodically and confidently. They’ve been the safety net built throughout planning; during the event, they become the playbook everyone follows. Combined with a supportive, communicative atmosphere, even when things go wrong, you’ll handle it in stride. Attendees might not even notice half the issues because they’re resolved so quickly or gracefully. And for the ones they do notice, a professional response often impresses them more than a flawless event with no challenges. It showcases your team’s competence and dedication, which ultimately reinforces the trust and credibility of your event (and by extension, the tech you implemented). After all, if an event technology hiccup happens and nobody freaks out, did it really happen? It just becomes another moment in a well-orchestrated show, managed and overcome.
Communication with Attendees During Tech Issues
Transparency and timely communication with attendees are crucial, especially when technology hiccups affect their experience. How you communicate during an issue can make the difference between attendees leaving frustrated or feeling understanding and even supportive. Let’s explore strategies for managing attendee comms when things don’t go perfectly, while maintaining trust and keeping the event on track.
First, acknowledge the issue promptly. If a noticeable tech failure occurs – say the event app goes down, or registration lines stall due to scanner problems – don’t leave attendees in the dark. Use available channels to inform them you’re aware and on it. This could be a public announcement (“Ladies and gentlemen, we’re experiencing a brief technical difficulty with [describe in simple terms]. Our team is addressing it, and we expect to resume shortly.”), a message on display screens, a push notification (if your app works or via SMS if you gathered mobile numbers for alerts), or staff verbally informing people in queues or crowds. The key is to be transparent without oversharing too much technical detail. Attendees appreciate honesty: e.g., “The ticket scanning system is running slower than expected” is enough; no need to explain it’s because some server CPU maxed out – that will just confuse or alarm them more. Simplicity and clarity are your friends.
Apologize for the inconvenience sincerely, but positively. A little empathy goes a long way: “We apologize for this delay and appreciate your patience while we resolve the problem.” Make sure frontline staff echo that sentiment when speaking one-on-one to attendees. People tend to be more forgiving when you own up, rather than if you act like nothing’s wrong or blame external factors. That said, avoid language that might incite panic or big concern. For example, don’t say “critical failure” or “we have no idea when this will be fixed” – even if internally you’re uncertain, externally you project confidence. Better to say, “We’re working quickly to fix this and should be back very soon.” Giving a rough time estimate can help manage expectations (but be careful not to over-promise). If you think it’s a 10-minute issue, maybe tell them “within 15 minutes” to give buffer. If you truly have no idea, at least commit to providing an update soon: “We’ll update you in 10 minutes on our progress.” Then make sure you do update, even if the update is “Still working on it, thanks for bearing with us.” Attendees relax more when they know they’re not forgotten.
Offer alternatives or workarounds to attendees when possible. If the primary tech is failing, what can they do instead in the meantime? For example, if your mobile app’s schedule is down, direct people to a printed schedule board or handouts (you had those as backup hopefully!). If cashless payment readers went offline, announce that vendors are temporarily accepting cash or offline credit card imprinter slips, so they can still get food or drink. If the stream to remote viewers died, quickly post a notice, and if you have a backup feed (even a lower-quality one), share that link. People are very solution-oriented; they appreciate being told what they can do, not just what they can’t. Even in worst cases, like an entire session delay, suggest an alternative: “Feel free to take an early coffee break while we sort this out; we’ll extend the session later to make up time.” It shows you care about their experience despite the tech issue.
Maintain a calm and positive tone in all communications. Avoid blame or making excuses in public. Don’t bad-mouth a vendor (“the Wi-Fi provider failed us”) – it might be true, but it doesn’t solve attendees’ problem and just sounds unprofessional. Internally you can sort out blame later, but externally it’s all about reassurance and focusing forward. Also, highlight the silver lining or next steps: “The good news is our team has identified the issue and we’re rebooting the system now – things should be back momentarily!” This keeps attendees hopeful. If the tech is fixed, definitely announce that too: “Great news – our payment system is back online! Thank you for hanging in there with us.” Maybe even throw in a bit of appreciation reward if feasible (“Grab a complimentary drink voucher at the info desk as a thank-you for your patience” – small compensations can turn a sour memory into a sweet one; obviously depends on scale and severity). Even just a warm thank you can suffice. People understand that glitches happen; what they remember is how you made them feel during and after that glitch.
Use multiple channels to ensure the message reaches everyone. Some won’t hear a PA announcement, others might not check the app or email. So cover your bases: in-venue audio, screens, event app push, SMS, email, and staff announcements via megaphone or going around. For remote attendees, a message on the platform or social media could be necessary (if stream viewers are left hanging, tweet or post “We’re temporarily offline due to tech issues – working to return ASAP”). After the fact, if it was a significant outage, a follow-up email acknowledging it and perhaps summarizing any remedy (“We experienced a 20-minute outage of X – all is resolved now and we’ve taken steps to ensure it doesn’t recur”) can reinforce trust. It’s akin to post-event PR – showing that you care and fixed it can actually boost your credibility.
One thing: keep communications concise. Attendees are already a bit inconvenienced; they don’t want to read a novel about it on the spot. A short explanation and guidance is enough. Save detailed root cause for a post-event blog or debrief if needed. During the event, brevity and clarity rule.
Enlist your social media/community management team if you have one to watch chatter. They can reply individually to concerns (“Hi John, yes we’re aware the app is down – team is on it, thanks for your patience!”) while you handle broad announcements. This one-to-one attention often impresses people; they feel heard and personally attended to. Just ensure the messaging is consistent with your official lines.
In summary, open and empathetic communication with attendees during tech issues turns an otherwise negative situation into a moment of human connection. Attendees often mirror the tone you set – if you’re calm, apologetic but confident, they will tend to stay calm and understanding. Many might actually feel a bit invested in rooting for you to get it fixed (we’ve seen applause break out when a failed microphone is restored, etc., partly because the audience was kept informed and felt part of the journey). Conversely, if you ignored them or were dismissive, they’d feel frustration or anger. So it’s worth crafting those messages carefully and training your staff in this aspect of crisis communication (something many event pros are doing as a standard now, especially in high-density Wi-Fi environments). At the end of the day, technology is there to serve the event, and when it falters, it’s the human touch in response that will define attendees’ memory of the incident.
Vendor Coordination and On-Call Escalation
In the thick of an event, when a serious tech issue arises that your team can’t immediately solve, you’ll likely need to escalate to vendor support quickly. This is where all the pre-event coordination with vendors – the SLAs, the on-call agreements, the relationships – pays off. Smooth vendor coordination can drastically reduce downtime. Here’s how to manage vendors and escalation effectively during live operations.
Firstly, ensure that every relevant vendor is on standby and aware of the event schedule. Ideally, you’ve told them: “Our event runs from X to Y, so please have support ready during those hours.” Top-tier vendors often have event-specific support, sometimes even a chat group open with you throughout the day. If so, use that channel at the first sign of trouble. If not, have their dedicated emergency number or contact list at hand (posted at your command center or in the runbook). The moment a vendor’s system shows an issue in monitoring, have someone initiate contact with them, even if your team is still trying basic fixes. It can’t hurt to raise the flag early; you can always say “hold off, we solved it” if you do before they intervene. But if it’s bigger, you’ve already queued up their assistance. For instance, you notice ticket scans lagging by ~5 seconds each (should be instant) – shoot a message or call to ticketing vendor: “Seeing slow check-ins, please investigate server.” They might see on their end a spike or error and can reboot a server or re-balance load within minutes, whereas if you waited 30 minutes thinking it’s on your side, it might persist and worsen the line situation.
When communicating with vendors under time pressure, be concise and precise. Provide any error messages, relevant device IDs, or user examples. Instead of “scanners not working”, say “Handheld scanners at Gate B failing to sync, error code 504 on screen, started at 10:05am after scanning ~200 tickets. Our local network is okay.” This gives them leads to check. Many times, a vendor support engineer can fix something remotely if they know where to look (maybe a stuck process, or a config mismatch). Also, tell them urgency and impact: “This is stopping entry for hundreds of people.” That helps them prioritize (they might have multiple support calls at once). Because you established relationship earlier, they’ll likely put you at high priority, but it never hurts to convey the severity calmly (“high severity, live event down situation”). If you have multiple vendors involved in an integration and it’s unclear where the problem lies (like ticketing vs. scanning app vs. network), consider doing a quick joint call if possible. We sometimes have a Slack channel with multiple vendor reps – you can @here “urgent: scans failing, network seems fine, need help isolating cause” and both the scanning hardware vendor and software vendor see it and collaborate in real-time, saving the back-and-forth of you relaying between them.
Leverage any on-site vendor technicians fully. If you have vendor staff present (e.g., a streaming technician, or RFID team), integrate them into your support procedures. They should have radios or be on the tech channel. If something relevant to their system happens, loop them in immediately. For example, if the RFID payment system hiccups, your on-site vendor might need to run to the server closet or begin offline mode procedures at their end – give them clearance to do what they need, and assist them with any facility access or additional hands. It’s a partnership in the moment: treat them as part of your team, not an outsider waiting for permission. Conversely, sometimes they may notice issues before you – if an on-site vendor sees something, encourage them to speak up and not hide it. The worst is a vendor noticing a small anomaly but staying silent to not alarm you, then it blows up; better they say “We see a warning on our reader – it might be nothing, but we’re watching it” so you’re all in the loop.
Keep leadership informed about escalations as needed. If you’ve had to call vendor support and it’s a major function (e.g., ticketing), let the event director or operations lead know “We’re escalating to vendor, about (say) 10 min estimated to fix.” They might decide to temporarily stop something or to announce a delay if needed. Keeping them in the loop ensures they don’t get blindsided if attendees or higher-ups start asking what’s going on. They can also help manage any fallout, like authorizing those free drink coupons if needed or pushing schedule by 10 minutes to accommodate the fix. A brief heads-up is sufficient: they likely don’t need all technical details, just impact and expectation (“Ticket scanning slow, vendor patching now, hopefully resolved shortly – lines a bit backed up but moving.”). That way they can field questions or make informed decisions at the macro level while you work the micro level.
Respect hierarchy but bypass bureaucracy in crises. That means, normally you follow chain of command to escalate, but in an emergency you might call the CEO of a vendor if that’s what it takes and you have that relationship. Most likely not needed, but have those contacts ready as a last resort. Sometimes big companies on after-hours support might have a junior person who isn’t grasping urgency – escalate to their manager or your account exec directly if response is too slow. You have a short window at events: escalate faster and louder if needed. Vendors would rather get a wakeup call at 6 am than have a client’s event fail and lose trust. Use the escalation ladder you hopefully set in SLA: e.g., after 5 min no response on support line, call your account manager’s cell. After 10 more, call the department head, etc. It rarely comes to that because good vendors jump when you call in an event scenario – but be prepared to be the squeaky wheel if you must.
Document vendor actions and outcomes too. Note what fix they applied. This can go into your post-event review to determine if any longer-term changes are needed or if you need to negotiate something. For instance, if the ticketing vendor had to increase server capacity mid-event, maybe next time you’ll insist on that level from start. Or if a scanning software bug caused an outage and they patched it on the fly, you’ll want assurance of a permanent fix. Having that detail means you can follow up after with them for improvements and possibly get service credits if they failed SLA. But during the event, focus on the fix, not blame.
Finally, show appreciation to vendors who helped resolve issues in real-time. A quick thank you message after the event or even on the spot keeps relationships strong. They are your allies and felt the pressure too. A vendor who feels appreciated will go even further next time to ensure success. We had cases where a vendor rep literally stayed up all night monitoring just to be sure nothing else went wrong after a hiccup; that kind of dedication comes from partnership and mutual respect fostered throughout the process, including how you coordinate under stress.
In summary, effective vendor coordination and escalation is about speed, clarity, and teamwork. It’s one area where all the pre-work on integration, contracts, and relationships truly bears fruit. When every minute counts, you want the best minds from your vendors working with you, not waiting in a queue or misunderstanding the problem. Achieve that, and even serious issues can often be mitigated or solved in the shadows, while your attendees remain blissfully engaged in the event with minimal disturbance.
Post-Event Review and Continuous Improvement
Post-Mortem Analysis and Knowledge Capture
After the event concludes (and you’ve hopefully had a chance to rest), one of the most valuable things you can do is a post-mortem analysis of the technology implementation. This is where you turn the lived experience – successes and failures – into lessons and concrete improvements for the future. A post-mortem isn’t about blame; it’s about understanding what happened and capturing knowledge while it’s fresh.
Gather the team for a debrief session ideally within a week (so memories are still sharp, but immediate exhaustion has worn off). Invite all key players: tech leads, vendor reps (if feasible), operations heads, and even some front-line staff or volunteers who had significant interactions. Having multiple perspectives is crucial; a network engineer might not know that a volunteer discovered a clever workaround on the fly for a minor issue – which could be institutionalized next time. Encourage an open, no-fault discussion. You can set a tone by saying “We’re here to learn, not to point fingers.” Everyone should feel safe sharing honest observations, even if it’s “We under-estimated queue lengths” or “The new scanner UI confused some of our staff.” Those admissions fuel progress.
Review each major phase and component systematically. Often, people structure this as “What went well, what didn’t, and why?” For instance, start with ticketing: Did online sales/delivery run smoothly? How was check-in experience? If lines were short and scanning was flawless, note what contributed (like maybe the self-serve kiosks reduced load by 40% – a stat to replicate or celebrate). If there were bottlenecks, dig into when, where, and what cause: e.g., “Line buildup at VIP gate at 10 AM – root cause: 2 out of 4 scanners had connectivity issues, took 5 min to switch offline.” Then consider: why the connectivity drop – was it network overload, or device setting? Could we prevent that (maybe ensure all scanners on 5GHz Wi-Fi next time)? Document these thoughts. Do this for each subsystem: mobile app adoption and issues, RFID payments performance, Wi-Fi reliability, streaming quality, etc. Use logs and data you collected: check your monitoring logs and incident reports – they offer objective insight (e.g., error rates spiked at X time on server – cross-reference with what humans observed then). If you had a meeting or chat log of issues during the event, review that to ensure no item is missed in discussion (“At 2:30 PM day 1 we saw multiple people complaining about map in app, what was that about? Oh, the map server had a hiccup, vendor restarted it in 3 minutes – okay, noted.”). It’s easy to forget small blips that didn’t escalate, but they’re worth discussing too, because next time they might if not addressed.
Assess the effectiveness of your contingency plans as part of analysis. Did backups and fail-safes actually work when called upon? For example, if you had an internet outage but failover kicked in seamlessly and few noticed – that’s a success story; note how well the redundancy worked and if any fine-tuning needed (maybe failover took 30 seconds, which is fine, but perhaps could be instant next time with a different config). If something went wrong that you didn’t anticipate a contingency for, highlight that as a gap to fill. Maybe you never expected a certain integration to glitch – now you know to have a backup or monitoring for it. For example, “Our integration between lead capture and CRM failed silently – we only realized post-event some leads didn’t sync. We need an alert if sync fails, or an automated retry.” This is critical to catch in post-mortem so it doesn’t repeat.
Capture quantitative results too to compare against goals. How many people used the app (and is that what you aimed for)? What was average entry time or queue length vs expected? How many transactions were processed cashless and at what rate – did system capacity meet demands? And ROI-related metrics: e.g., did the cashless system yield higher spend per head as hoped? Did the streaming reach match what scaling you prepared for? If some tech feature was meant to drive engagement (e.g., live polling usage), see the stats on how many participated. If uptake was low, discuss why: was it poorly promoted, or too clunky? Post-event attendee feedback (surveys, social media, direct comments) is gold here – incorporate it. If surveys show attendees loved feature A but hated feature B, or many didn’t realize something was available, you have marching orders for next time in terms of communication or design changes.
Document in a report or knowledge base everything you learned. A good practice is to produce a “Post-Event Tech Report” that covers each system, incidents that occurred, how resolved, and recommendations. If you gather logs, attach them; if you have charts of usage vs. capacity, include those for visual reference. Also note any vendor performance issues or exemplary support: this helps for holding vendors accountable or praising them. For instance, “Vendor X’s on-call engineer resolved the stream issue in 5 min, very responsive – keep them for next year. Vendor Y’s equipment had three failures; discuss improvements or consider alternatives.” Be factual and fair. That report is extremely useful if the event is recurring – next year’s team (even if it’s you again) can review it during planning to avoid past pitfalls. If it’s a one-off, it still adds to organizational knowledge (maybe someone else in the organization will do a similar event). Many organizations keep a “runbook” that is updated each event cycle; post-mortem results feed into that for continuous refinement.
Conduct a vendor debrief as well, either within this analysis or separately. Many tech vendors welcome a quick call or email recap: what worked, what didn’t from their product. It helps them improve too. If a software patch was applied mid-event, follow up to ensure a permanent fix is in their roadmap. If you had to deviate from normal usage (like using offline mode more than expected), maybe they can optimize that feature. Partnership approach yields better products. And of course, settle any SLA matters calmly – if there were breaches, you likely negotiated some credit or remedy in contract, but at post-mortem you confirm and claim those as needed (e.g., “We had 1h downtime which per SLA, means X% refund – work with vendor on that, but maintain goodwill if you plan to continue using them). The analysis documentation is evidence for those discussions.
Finally, make improvements actionable. It’s not enough to say “We should have more kiosks” – put that in next event’s plan: “Recommendation: add 2 more kiosks at reg to handle peak based on this year’s throughput.” Or “Improve user guide for app, as 30% of surveyed attendees didn’t know feature X existed.” Assign someone to own each improvement (even if it’s “the next planning team, i.e., yourself next year”). If the timeline was too tight, note “start vendor integration testing 2 weeks earlier in future.” If staff training had gaps (maybe volunteers struggled with a certain device until midday), plan more training or a different UI next time and log that. Essentially, your post-mortem findings should directly influence the next iteration of implementation strategy.
In sum, post-mortem analysis is where your implementation playbook evolves. Every event will teach you something new – capturing that ensures you’re constantly leveling up your expertise and the success of future technology rollouts. It’s a moment to celebrate what went great (don’t forget that – acknowledging wins keeps morale and confidence high!) and a moment to critically, but constructively, examine what could be better. Done right, it closes the loop on this event and seeds success for the next, truly embodying continuous improvement.
Data Analytics of Tech Performance and ROI
Once the event is wrapped, one of the most compelling parts of the post-event process is diving into the data analytics to see how the technology performed in quantifiable terms and what value it delivered. This not only helps justify the investment (ROI), but also uncovers user behaviors and system capacities that can guide future decisions.
Begin by aggregating all the relevant data from your tech systems. This might include:
- Operational metrics: e.g., number of tickets scanned per hour (and peak throughput), average check-in time, number of support tickets or help desk queries, network bandwidth usage peaks, stream viewer counts per session, mobile app active users and engagement metrics (like # of posts, messages, etc.), cashless transactions count and volume, etc. These numbers will tell the story of demand and usage. Compare them to what you planned for. Did your infrastructure operate below capacity (great, room to grow or maybe over-provisioned) or hit any limits? For instance, if Wi-Fi logs show 8,000 concurrent devices and you planned for 10,000, you’re within limits; but if you see spikes to 12,000, then wow, either more people came or they had more devices – you either got lucky nothing crashed or maybe something did and that correlates with a slowdown observed at that time. Document these findings.
- Performance metrics: like average response times for app or website, error rates, system uptimes vs downtime minutes, etc. If you had a KPI of 99.9% uptime for critical systems, calculate what you achieved (e.g., 2 minutes downtime out of 2 days is 99.9X% vs. 30 mins downtime is lower). If any performance issue occurred, correlate it with cause (like “30 minutes downtime due to ISP outage” – external cause, or “5 minutes slower response due to server CPU maxing out when 5k concurrent users on app” – internal scaling cause). Knowing this helps either adjust SLAs or infra next time.
- Attendee usage data: This is key for ROI and success measurement. For example, if you introduced a new event app, what percentage of attendees downloaded and used it? And of those, how many engaged deeply (like favorited sessions, networked with others)? If only 20% used it, maybe marketing or features need boosting next time. If 80% did, huge win – and what did that yield (maybe less printed programs needed, or more session feedback collected than ever)? Did the cashless system increase spend per person? You can compare average spend vs last year if available. Did RFID reduce queue times at entry? If you have data like last year average entry wait was 10 min and this year 4 min, that’s a quantifiable success to trumpet. The more you can tie tech to outcomes (faster entry, higher revenue, higher satisfaction scores if surveyed, etc.), the better you can evaluate if it was worth it and what to continue or change. Also look for unintended outcomes: maybe data shows people moved through expo more evenly because of your real-time crowd heatmap feature – great insight if so!
- Cost vs. benefit analysis: On ROI, compare the costs you incurred (maybe license fees, equipment rentals, staff hours) to either direct revenue (like did your streaming bring X new ticket revenue or sponsorship because of online reach?), or cost savings (e.g., using kiosks saved on 5 staff members you otherwise would have hired), or intangible benefits like attendee satisfaction (surveys or social sentiment analysis can quantify that somewhat with scores or percentage of positive comments, etc.). In some cases, ROI might be literally revenue (like more sales via upsells on app notifications), in others productivity (less overtime, fewer errors). Try to quantify where possible. If something appears to have low ROI, decide if it’s a long-term investment (sometimes first-year costly but scales later) or if perhaps you’d reallocate budget next time. For instance, if fancy AR activation cost a lot and data shows only 50 people used it, maybe that money yields more value elsewhere. Conversely, if a modest investment in an analytics dashboard let you quickly adapt concession stock and you sold out food exactly without waste – that might have saved money equal to multiple times the dashboard cost.
Visualize the data for easier digestion. Create charts for a report: like a timeline of check-in counts, a heat map of app usage over days, pie charts of payment methods usage, etc. These help stakeholders see the impact. Include anecdotal evidence as supplements (like notable quotes from attendees or staff: “That new scanning system was seamless – best entry experience we’ve had,” one attendee commented). Hard numbers plus human feedback give a full picture.
Use the analytics to identify outliers or anomalies as well. If one part of a system underperformed relative to others (e.g., one Wi-Fi AP had double the users because it was in the main stage hall, and it got saturated while others underused), that’s a clue to reposition APs next time or add one in that hall. If one session’s stream had drop-offs – was it content or tech issue? Check if maybe stream quality dropped at that time (tech issue) or it might just be an unpopular topic (non-tech). The more granular your data, the more you can glean. But also be careful not to drown in data – focus on actionable insights and main goals.
Share the results with all stakeholders – celebrate successes and face failures with data. For instance, show your team and bosses: “We achieved a 50% reduction in waiting times and processed 20% more people with same staffing, thanks to the tech. However, the app engagement was only 30% when our goal was 50%, we have recommendations to improve that.” This transparency builds trust. Also share relevant pieces with vendors – e.g., let ticketing vendor know the throughput their system handled (“8 scans/sec at peak – well done!”) or what issues analytic revealed (“We saw an unusual error pattern at midday, sending logs for your review”). It helps them help you better next time, and they can brag about the success metrics too (unless it’s a negative – then approach as seeking improvement, not publicly shaming them). If ROI is clearly positive, that’s ammunition for future budget – you can argue for continuing or expanding tech because you have proof it adds value. If ROI is disappointing, have a plan or explanation – maybe it’s a multi-year strategy, or lessons learned to optimize going forward so stakeholders don’t think it was wasted money.
Finally, integrate these analytics findings into your continuous improvement loop. They shouldn’t just sit in a report; they should lead to decisions. Maybe data shows most support tickets were about one feature – so you’ll redesign that UI or add tooltips. Or analytics show certain hours underutilized the network – perhaps you can throttle down in those times to save cost on usage-based billing, etc. If the event repeats, set new targets based on this data (“Next year we aim for 90% app adoption” now that we know baseline is 80, etc.). If not, these insights can often apply to other events or the business generally (like understanding attendee behavior patterns – valuable beyond just the tech implementation aspect).
In essence, data analytics of tech performance and ROI turns the subjective feel of how things went into objective, quantifiable outcomes. It validates what went well and shines light on what didn’t, often revealing nuances that were invisible during the bustle of the event. Merging those insights with the qualitative post-mortem gives you the full 360-view of your implementation’s effectiveness, and most importantly, guides you on how to do even better next time. As the saying goes, “If you can measure it, you can improve it” – and you’ve measured a lot, so improvement is bound to follow.
Continuous Improvement and Future Planning
The end of one event’s tech implementation is really just the beginning of improving for the next. With all the data, feedback, and lessons compiled, the final step is to feed those insights back into your planning cycle – making continuous improvement a deliberate process. This ensures that each time you roll out technology at an event, you’re building on a stronger foundation and not repeating past mistakes.
Start by updating your standard operating procedures, playbooks, and documentation with everything learned. This could mean revising the master implementation checklist you use, adding new steps based on hiccups encountered. For instance, if you learned that “We should always have a dedicated support chat with vendors open during the event,” make that a line item in your future vendor coordination plans. If a particular backup plan was missing and you devised it on the fly, formalize it: write it into the runbook. Essentially, institutionalize the fixes so they’re not reliant on memory. This also benefits any new team members down the line – they get the accrued wisdom in the documentation.
Consider if any additional training or skills are needed for the team. Did troubleshooting reveal gaps in knowledge? Maybe your team had trouble diagnosing a network issue quickly because they lacked some networking expertise. That might inform hiring (e.g., have a dedicated network engineer on event day next time) or training (send a couple of staff for deeper network training, or cross-train more volunteers on tech basics if they’ll be helping). Continuous improvement isn’t only systems, but people too. The same goes for vendors: if a vendor’s tech was consistently troublesome, maybe plan to bring them in for a more thorough pre-event workshop or certification for your team, or consider alternative solutions if they can’t meet improvements.
Reflect on strategic changes for future events. Sometimes a post-event analysis can lead to bigger shifts, like deciding to switch platform providers, or perhaps consolidating tech. For example, if juggling separate apps for different functions caused integration pains, you might explore an all-in-one solution moving forward (weighing pros/cons). Or if an ambitious emerging tech like AR didn’t pan out ROI-wise, maybe you shelve it until the underlying tech matures or your audience is more ready – focusing instead on perfecting core services that delivered more value. Alternatively, maybe the new stuff was fantastic and the insight is to double down (like expanding cashless to all merch vendors since the pilot at food was a hit). Use the results to inform these bigger decisions, which will feature in your next planning cycle’s early phase (like vendor selection or feature scope definitions). Essentially, close the loop between results and planning – your initial objectives vs. outcomes, and adjust objectives next time accordingly.
You should also plan to re-test and validate fixes well before the next event. If a bug was found and vendor issued a patch after the event, incorporate that patched system into a sandbox test or smaller event to ensure it truly is fixed. Don’t wait until next big event to find out. Similarly, if you intended to add new infrastructure (like more Wi-Fi APs in that hall), maybe test that at a smaller gathering or during venue downtime with load simulators to see that it resolves the previous issue. Making improvement is great; verifying improvement is essential. A continuous improvement mindset treats each event as an iteration – so test the iteration’s changes whenever possible in between or at least thoroughly in pre-event testing for the next one.
Share insights across the organization or industry if appropriate. If your event is within a larger company with multiple events, present a summary to others – so a colleague doing a conference in another city can learn from you (and vice versa). This prevents siloed learning. In the events industry, folks often share non-competitive lessons at conferences or online forums, helping others learn from event failures to bounce back stronger. Obviously, be mindful of NDA or proprietary info, but generally sharing “We learned X about RFID usage at festivals” helps uplift industry standards. Plus, you might get feedback or solutions from peers that feed your improvement. Continuous improvement isn’t always solitary – it can be collaborative across events and organizations.
Update ROI expectations and business cases for next time using the data. If you proved certain tech yields ROI, it’ll be easier to get budget for it next year (maybe even to expand it). If something didn’t yield, decide if its future is promising enough to try again differently or cut it. For example, say the mobile app didn’t get as much use but you believe it’s because of marketing – you might argue to keep it but set aside budget and tactics to promote it better (thus expecting better ROI next time). Or you might conclude to drop a tool and allocate budget to another area that provenly works. Be sure to communicate these decisions to stakeholders so they understand changes are evidence-driven. Continuous improvement sometimes means making tough calls to pivot away from an earlier strategy; having clear reasoning and data helps bring everyone on board.
Finally, keep a bit of a forward-looking radar. Continuous improvement isn’t just about reacting to what happened, but also anticipating future needs. The event landscape evolves quickly – maybe new tech on the horizon (AI chatbots for attendee support? VR experiences?) could address some pain points identified, or offer new opportunities for engagement. Use the downtime post-event to research and trial things in a low-stakes way. Perhaps do a pilot at a small event or internal test of a new platform that claims to fix what went wrong (like an analytics tool to catch what you missed). By next event, you can come with not only fixes but innovations. In other words, improvement is not only fixing past issues but elevating the experience further.
As you incorporate this continuous improvement cycle event after event, the technology implementation process becomes more refined, more predictable, and more successful. Over years, this could mean you handle events an order of magnitude larger or more complex with the same ease you handled simpler ones before. It’s like compounding interest – each improvement builds on the last. And importantly, it fosters a culture in your team (and with your vendors) that values learning and excellence. Team members know that issues won’t be swept under the rug – they’ll be addressed and solved, which makes them more confident and proactive in future. Vendors see you as a partner who will push them to be better too. When the next event comes around, you essentially pull out your updated playbook and likely face fewer unknowns and a higher chance of delivering a stellar, glitch-free experience. And if new unknowns come (they always do), you’re ready with the mindset and process to tackle those as another cycle of improvement. In sum, continuous improvement turns each event into a stepping stone to an even better one, ensuring that your event tech implementations remain cutting-edge and reliable in equal measure.