Small events might not have mega-festival budgets, but they can still deliver high-tech experiences in 2026. With smart planning and creative use of affordable tools, even a 200-person gathering can leverage technology once reserved for large events. This guide explores cost-effective solutions across ticketing, check-in, attendee engagement, streaming, and more. Event organisers around the world – from community theatres to emerging-market festivals – are proving that you don’t need to break the bank to wow attendees. By prioritising essentials and embracing clever hacks, any event can feel cutting-edge on a shoestring budget.
Focus on Essentials: Prioritise Impact Over Flash
Identify the Must-Have Tech First
For small events, less is more when it comes to technology. Instead of chasing every buzzworthy gadget, focus on the core tools that solve real problems for your event. Seasoned producers stress that tech should address pain points – like speeding up entry or streamlining schedules – rather than introduce new headaches just because it’s trendy. As noted in guides on scaling event technology from small gatherings, tech should solve problems. At a 500-person meetup, the essentials might be as simple as:
- An online ticketing system for easy pre-event sales
- A check-in app or printed guest list for smooth entry
- The venue’s existing Wi-Fi or one dedicated router for your team
- A modest AV setup (basic sound and projector or screen)
Keeping the tech stack lean ensures you get maximum impact from minimal tools. This avoids the common mistake of over-engineering a small event with flashy systems that aren’t truly needed, a core principle of scaling event technology for different sizes. Always ask: “How will this technology improve the attendee experience or our operations?” If a tool doesn’t have a clear, positive answer, it’s safe to skip it.
Leverage All-in-One and Built-In Solutions
On a tight budget, all-in-one platforms can be a lifesaver. Many venues offer built-in services – from sound systems to ticket scanning – included in the rental or at a low cost. Use them! For instance, if your venue has an existing PA system or Wi-Fi network, coordinate to utilise those instead of renting your own. Small events often thrive with simple, consolidated tools, allowing organizers to choose the right tools without overwhelm. An online ticketing platform that also handles registration, basic email confirmations, and on-site check-in means fewer separate services to pay for and manage.
Go Cashless With RFID Technology
Enable contactless payments, faster entry, and real-time spending analytics with RFID wristbands and NFC-enabled ticketing for your events.
Take advantage of technology people already have. Instead of developing a custom event app, lean on mobile-friendly websites or social media event pages that attendees can access on their own phones. Rather than expensive dedicated voting devices for Q&As or polls, use a free web-based polling service that attendees can open in their browser. By piggybacking on ubiquitous tech (smartphones, public platforms, venue tech), you save money and reduce complexity.
Skip the Gimmicks and Nice-to-Haves (For Now)
When budgets are limited, it’s critical to distinguish game-changers from gimmicks. A dazzling new AR activation or AI chatbot might sound impressive, but ask whether it’s mission-critical for a small event. Often, basic tech yields the best ROI at this scale. For example, a simple live-stream to Facebook might engage a remote audience more effectively than an expensive VR experience that only a few use.
Ready to Sell Tickets?
Create professional event pages with built-in payment processing, marketing tools, and real-time analytics.
Experts advise resisting “shiny object syndrome” in favour of tech that directly boosts operations or attendee satisfaction, helping you select the right tools without overwhelm. In other words, prioritise tech that fixes problems (like long lines or attendee feedback collection) over tech that’s just for show. This doesn’t mean you can’t be innovative – but innovation should have a purpose. If you do try something experimental, do it inexpensively: use a free trial, a beta program, or open-source version before investing serious money. By focusing on must-haves first and nice-to-haves second, you ensure limited funds go to technology that truly makes a difference.
Budget-Friendly Ticketing and Registration Solutions
Choosing Low-Cost Ticketing Platforms
Ticketing is the first tech interaction your attendees have, and plenty of affordable ticketing solutions cater to small events. Look for platforms with no upfront fees and low per-ticket charges. Many self-service ticketing tools allow organisers to pass service fees to buyers, meaning you can often start selling tickets with zero out-of-pocket cost. For instance, Ticket Fairy’s platform enables events to launch without setup fees or subscriptions, instead taking a modest fee per ticket – a model ideal for small events with tight cash flow. The goal is a reliable online ticketing system that’s easy for attendees to use and doesn’t siphon a big chunk of your revenue. A straightforward, mobile-friendly checkout is key, since many ticket buyers will purchase on their phones, necessitating a straightforward online ticket purchase flow. Avoid overly complex registration processes; every extra field or step can deter sign-ups.
For venue managers and independent promoters, finding cost-effective ticketing tools for small venues is essential to maintaining profitability. The right system acts as an extension of your team, automating tasks that would otherwise require paid staff. When evaluating how to optimize events with Ticket Fairy or similar platforms, look closely at built-in marketing features. Systems that offer automated referral tracking, targeted email campaigns, and seamless social media integrations allow you to maximize your reach without purchasing separate marketing software.
For operators managing premium experiences or high-ticket event services with limited software options in 2026, finding a unified system is even more critical. Instead of juggling separate CRM databases and payment gateways for VIP table service or exclusive backstage passes, modern budget-friendly platforms consolidate these high-value transactions into one dashboard. This ensures that even boutique gatherings can offer a white-glove purchasing experience without the overhead of enterprise-level software.
Smooth Entry With Mobile Check-In
Scan tickets and manage entry with our mobile check-in app. Supports photo ID verification, real-time capacity tracking, and multi-gate coordination.
When evaluating the best value for money ticketing services in 2026, organizers must look beyond just the base transaction fee. True value comes from platforms that bundle essential growth tools—like built-in affiliate tracking, automated email marketing, and robust audience analytics—without requiring expensive third-party subscriptions. A system that charges a slightly higher percentage but eliminates the need for separate CRM and marketing software ultimately delivers a much stronger return on investment for independent promoters.
For non-profits and charity organizers planning ahead, identifying the best budget-friendly ticketing systems for fundraisers in 2025 and 2026 is crucial. These specialized platforms often offer reduced processing rates for registered charities or allow donors to cover the ticketing fees entirely. When evaluating options for a gala or community charity run, prioritize systems that integrate donation tiers directly into the checkout flow, ensuring you maximize revenue without paying premium software subscriptions.
Grow Your Events
Leverage referral marketing, social sharing incentives, and audience insights to sell more tickets.
For independent promoters mapping out their festival seasons, identifying the best low-fee ticketing platforms for music festivals in 2025 and 2026 is a top priority. Multi-day outdoor events require robust access control, tiered pricing, and seamless cashless integrations, which traditionally come with hefty enterprise price tags. However, modern budget-friendly systems now offer these festival-grade features without the massive upfront costs. By choosing a self-service platform that allows you to pass minimal processing fees to the buyer, festival organizers can secure advanced ticketing infrastructure while keeping their operational budget intact for talent and production.
When comparing options, pay attention to fee structures and any limits on features. Some platforms charge a flat fee per ticket, others a percentage – calculate which is lower at your expected price point. Also note who covers credit card processing fees. Transparency matters: surprise add-on fees at checkout can annoy buyers and even lead to abandoned carts, highlighting the hidden costs of event technology. According to industry analysis, extra fees popping up at checkout can directly cut into final sales, a key factor when budgeting beyond initial vendor quotes. Choose a platform that makes pricing clear, and decide if you, the organiser, will absorb fees or pass them on. Many events simply build the fee into the ticket price or have attendees pay it, which protects your budget (but keep fees reasonable to maintain goodwill).
From an attendee perspective, buyers are actively seeking trusted ways to save money on event tickets in 2026. As a promoter, you can support this by selecting popular platforms known for keeping consumer fees low across concerts, sports, and theater events. By absorbing some of the processing costs or utilizing dynamic pricing and early-bird promo codes, organizers can offer genuine savings. This transparent approach builds loyalty and reduces cart abandonment, proving that a fair pricing strategy benefits both the operator’s bottom line and the fan’s wallet.
Ticketing Tech Tip: If your event is free or very small, you might not need a formal ticketing platform at all. For community meetups or invite-only seminars, you could use a free RSVP tool (like Google Forms or Eventbrite’s free tier) just to collect attendee info. However, for any event where you’ll verify entries at the door, a proper ticket with a QR code is invaluable for efficiency. Fortunately, even free ticketing tiers will usually provide e-tickets and a basic scanning app.
No Hidden Fees, Just Honest Pricing
One all-inclusive fee covers the platform, payment processing, support, and every feature. Free events are always free. No setup costs, no surprises.
DIY Registration Hacks for Zero Cost
For organisers truly pinching pennies, there are creative DIY approaches to handle registration and ticketing:
- Free RSVP Platforms – Leverage platforms that offer free ticketing for free events. Some ticketing services charge nothing if your ticket price is $0. This could work for charity events or meetups where you just need headcount management without transactions.
- Google Forms + Spreadsheet – It’s not fancy, but a Google Form can capture attendee names and details for free. You’ll have a spreadsheet of responses that staff can use at check-in. To make it feel more official, you can email respondents a simple PDF “ticket” or confirmation (manually or via an add-on). Caveat: This requires more manual effort and won’t have security against duplicate entries, but for a small community event it can suffice.
- Promo Codes and Early-Bird – If you do use a standard platform but want to reduce costs for attendees, take advantage of built-in promo code features instead of using a separate discount tool. It’s an easy way to incentivise sales without extra plugins.
Remember that a clean registration process reflects on your event’s professionalism. So even if you go DIY, make sure confirmation emails are clear and guests know what to expect. Always have a support contact (even if it’s just your email) in case attendees have issues registering.
Minimising Fees and Avoiding Hidden Costs
Small events can have their slim profits eaten up by unexpected tech expenses. It’s crucial to read the fine print on any ticketing or registration service. Beyond the headline fees, watch out for add-on charges like:
- Payment processing fees: Typically ~2.5–3.5% for credit card transactions, which significantly impacts revenue per ticket sold. Sometimes a ticketing vendor’s “service fee” doesn’t include this, meaning you pay it on top. For example, a platform might advertise “$1 per ticket sold,” but in reality you pay $1 + 3% credit card fees per ticket, adding up to significant hidden costs of event technology.
- Payout timing: Will you receive ticket revenue before the event or only after? Delayed payouts can affect cash flow for small organisers. Some budget platforms hold funds until after the event, whereas others (like Ticket Fairy) offer rolling payouts which help with upfront costs.
- Hardware or app costs: If your ticketing solution requires proprietary scanners or paid apps, factor that in. Many modern systems let you use a smartphone app for scanning at no cost – which is ideal for a tight budget. But a few might charge for renting scanners or printers on-site, such as payment terminals or RFID wristbands.
- Support and setup fees: Does the provider charge for onboarding or customer support? Budget-friendly platforms typically include basic support free, but enterprise systems might not. If you anticipate needing help, ensure you won’t be nickel-and-dimed.
By proactively asking about all potential fees (and getting them in writing), you can avoid nasty surprises. Experienced event technologists advise building a small contingency (5–10%) into your budget for tech, covering unforeseen expenses, protecting your budget from surprise receipts. Also plan for things like last-minute extra ticket scans or a spike in payment processing if you sell out, covering unforeseen expenses like transaction fees and service charges. With a smart choice of ticketing platform and careful planning, even a tiny event can handle registration professionally without undermining the budget.
Comparison: Premium vs. Budget Ticketing Approaches
| Ticketing Need | Big-Budget Approach | Budget-Friendly Approach |
|---|---|---|
| Platform Fees | Annual contract or high per-ticket fees for a full-featured enterprise system. | No upfront cost; small percentage per ticket on a self-service platform. |
| Feature Set | Custom branded app, complex seating allocations, CRM integrations. | Basic event page, standard ticket types, built-in analytics and emails. |
| Hardware | Dedicated ticket scanners or kiosks for entry. | Use smartphone scanning apps or printed QR codes for entry. |
| Support | Dedicated account manager (cost built in). | Standard support (often free via email/chat) during business hours. |
| On-Sale Capacity | Handles millions of users (for major on-sales). | Capable of a few hundred concurrent buyers – sufficient for small events. |
Small events rarely need the bells and whistles of major ticketing systems. A cost-effective solution with core features will usually cover everything for a 100–1000 person event. The key is to ensure it’s reliable and user-friendly, so you project a professional image without paying enterprise prices.
Data-Driven Event Marketing
Track ticket sales, demographics, marketing ROI, and social reach in real time. Exportable reports give you the insights to make smarter decisions.
Streamlined Check-In and Access Control on a Shoestring
Digital Check-In with Minimal Hardware
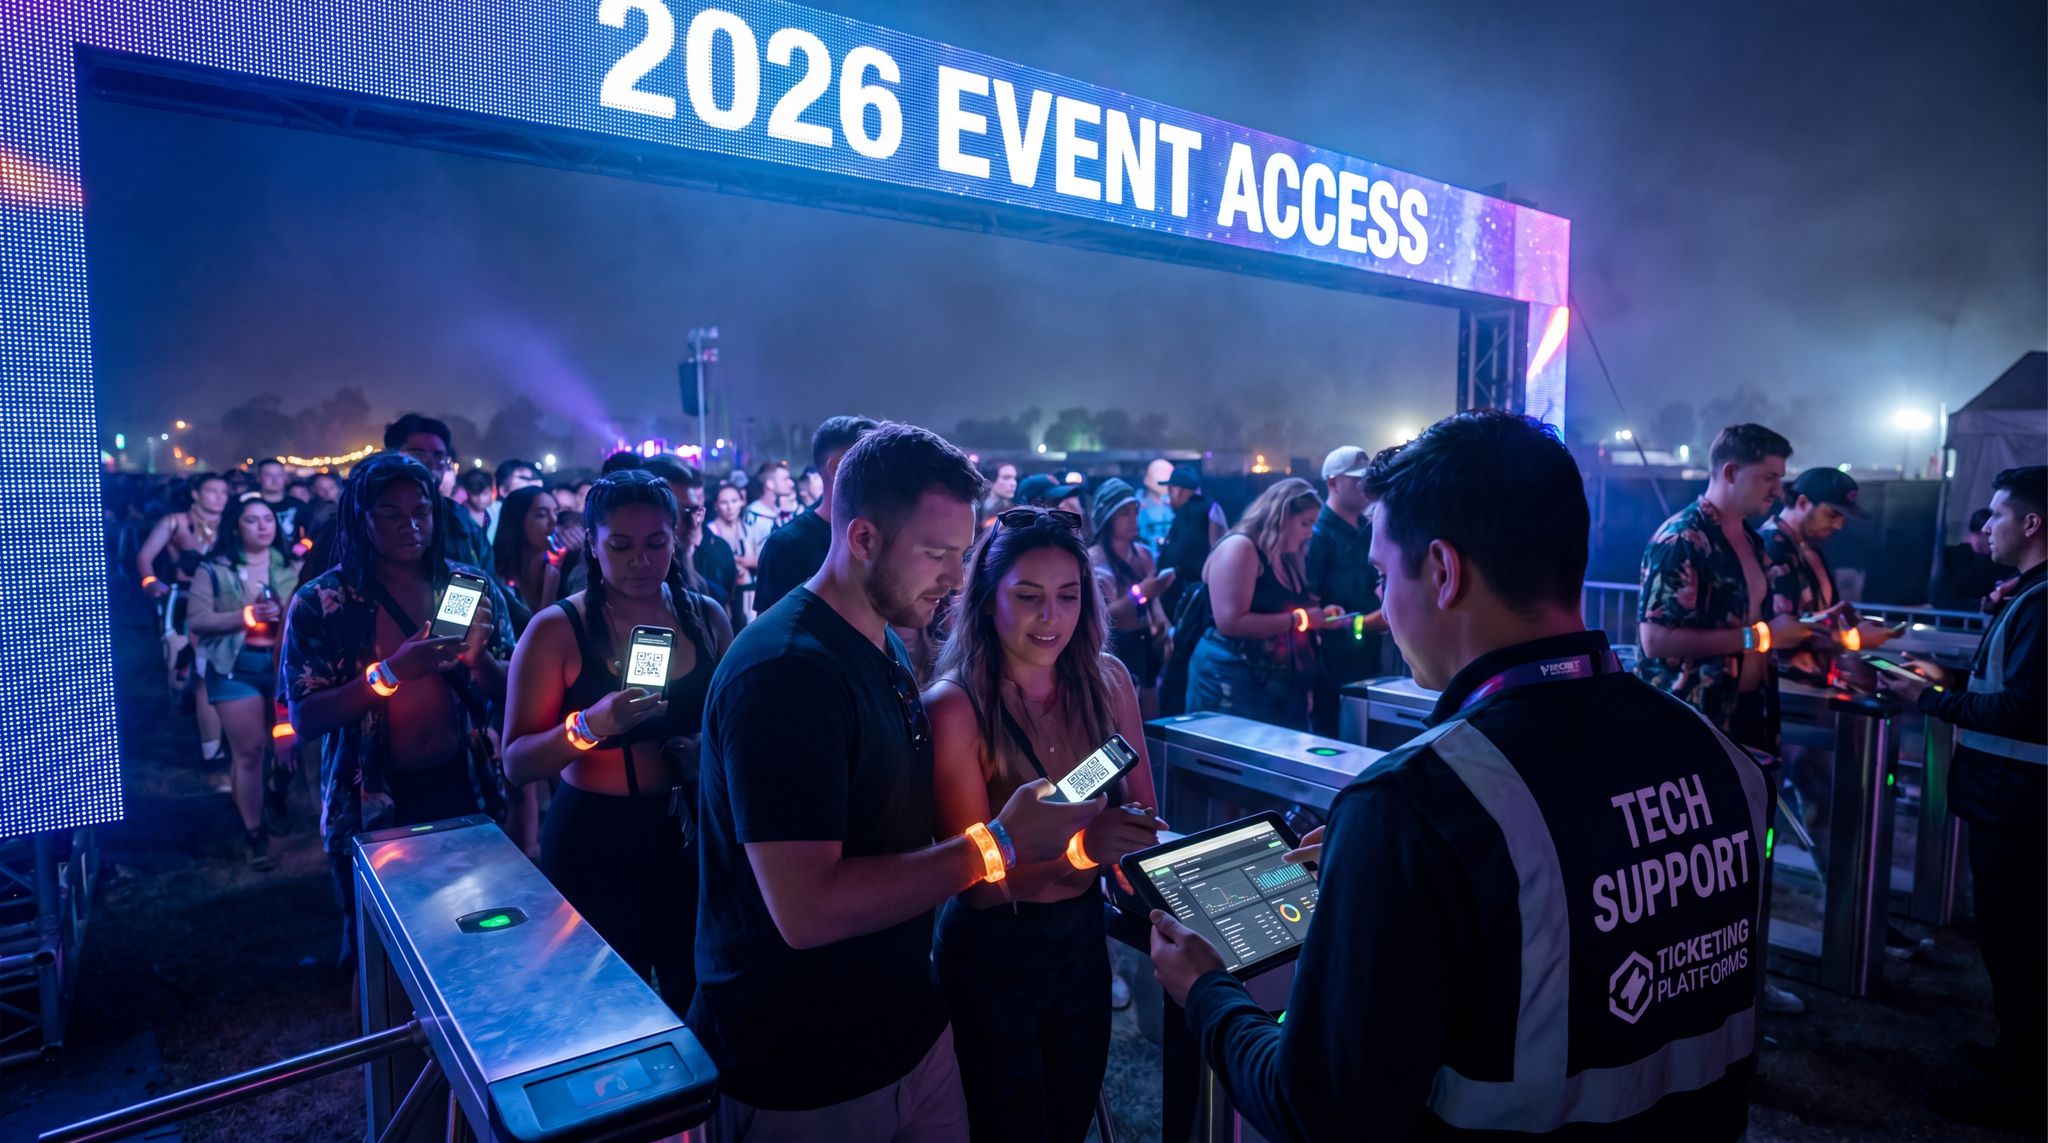
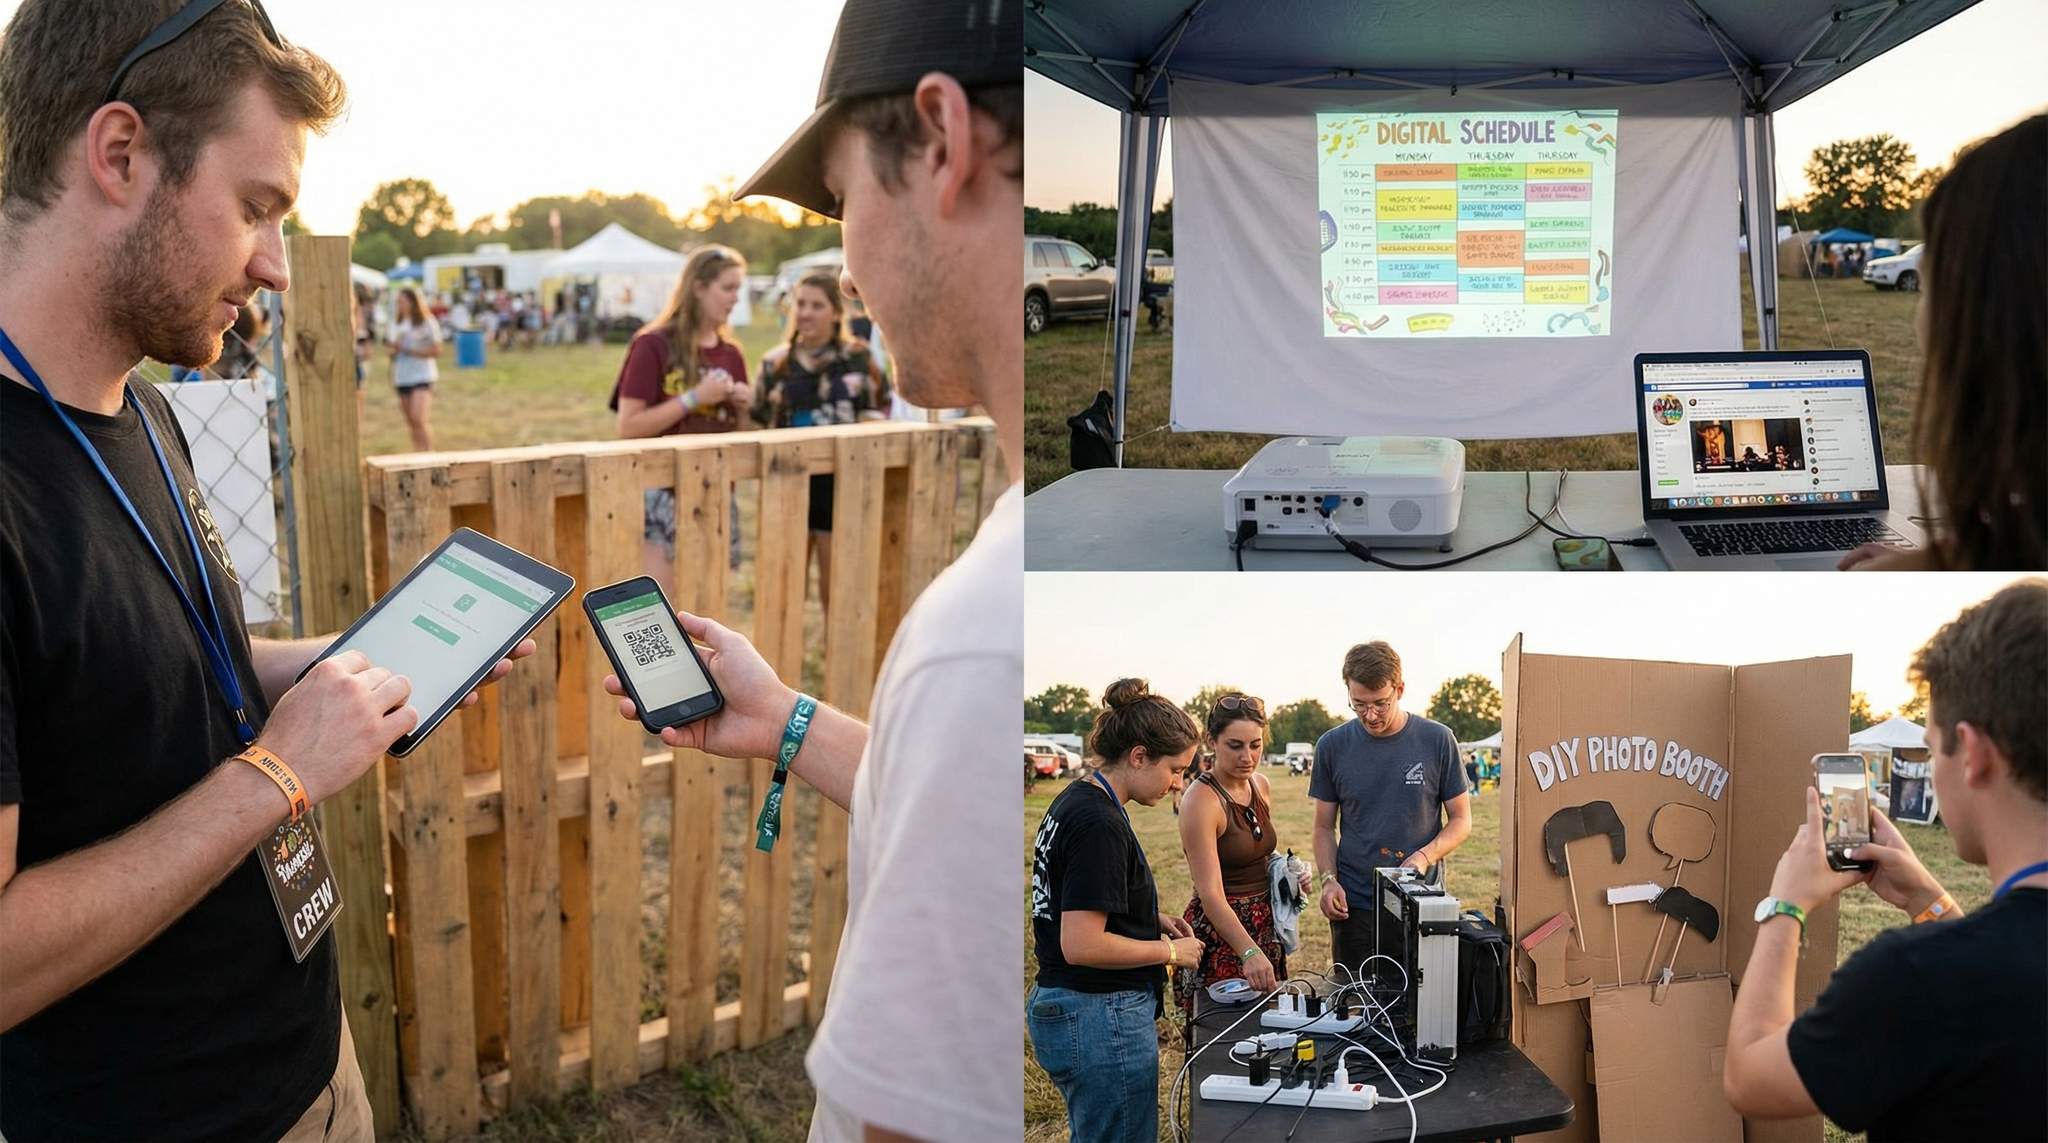
Elaborate gate setups and expensive scanning equipment are overkill for intimate events. You can manage attendee entry with just a couple of staff using smartphone scanning apps or tablets. Most ticketing platforms (even free ones) provide a companion check-in app that turns a phone’s camera into a QR scanner. At a 500-person gathering, often one or two entry points and a minimal crew can handle the crowd, even in low lighting or off cracked phone screens. In very small or informal events, even a printed attendee list on a clipboard can work as a backup (though it will be slower and lacks real-time tracking). The primary goal is to avoid bottlenecks at the door.
If guests tend to arrive all at once (for example, 10 minutes before a show starts), prepare by opening doors early or having an extra volunteer ready to help scan tickets. Technology at this level should be straightforward: a basic barcode/QR code scanner or the ticketing app on an iPad is usually enough, provided you test the scanner before attendees arrive. Always test your check-in devices before attendees arrive – make sure your phone or tablet can read the digital tickets (even off cracked phone screens or in low light). Testing avoids last-minute fumbling when the line starts forming.
Importantly, have a backup plan. Small events typically don’t need fancy RFID turnstiles or automated gates; those add cost and complexity with little benefit for a small crowd, so it is wise to have a backup plan in case of tech failure. However, you should plan for tech hiccups. If the scanning app crashes or your internet connection drops, how will you continue admitting people? The solution is usually simple: keep an offline copy of the guest list or all QR codes. Many modern check-in apps offer an offline mode that stores ticket data on the device – enable this in advance and ensure it’s up to date before doors open, ensuring entry remains smooth and quick regardless of connectivity. This way, even if Wi-Fi goes down, your team can keep scanning tickets and the data will sync later.
When to Stick to Paper (and When Not To)
On a tight budget, you might be tempted to skip digital solutions entirely and go analog. There are scenarios where a paper list or physical tickets can work fine – and others where they’ll cause headaches:
- Ultra-Small Events: If you have under 50 guests (say a private workshop or dinner), manually checking names off a list is manageable. Just double-check spelling and have a pen ready. No tech needed.
- Older Demographic or Limited Tech Access: If your attendees aren’t smartphone users or you’re in an area with limited internet, printed tickets or wristbands given in advance might be simpler for everyone. For example, a community event in a rural town might hand out paper tickets at local shops to avoid online booking confusion.
- Backup for Glitches: Even if you go digital, have a printed list as an emergency backup. If devices fail, you can at least verify people by name. This safety net costs almost nothing to prepare.
When should you avoid paper? If you have hundreds of attendees arriving in a short window, checking against a paper list will be painfully slow. Long queues make for frustrated guests and delayed show starts. Also, paper provides no easy analytics – you won’t quickly know how many people are inside, or who hasn’t shown up, without manually counting. Hybrid approach is common: use scanners primarily, with a paper list only as contingency or for VIPs who forget their ticket.
One more consideration: name changes and transfers. If someone registers under one name but another person shows up, a digital system usually catches that (since the QR code is what matters). But on a paper list, staff might not catch a swapped ticket unless they check IDs meticulously. Digital check-in adds a layer of security and fraud prevention that’s harder to maintain with physical lists.
Smart Promo Codes & Presale Access
Create percentage or flat-rate discount codes with usage limits, date ranges, and ticket type restrictions. Plus unlock codes for private presales.
Low-Cost Badge and Wristband Options
If your small event uses badges or wristbands (common for conferences or multi-day festivals), you can still keep costs low. You may not afford on-site badge printers or fancy RFID bands, but consider these budget-conscious approaches:
- Print-at-Home Badges: For a conference with 200 people, email attendees a PDF badge to print and bring. Provide plastic sleeves and lanyards at check-in (these cost only a few cents each when bought in bulk). It shifts printing cost to attendees or their companies, and many will comply. Just have a few extras on hand for those who forget.
- DIY Badge Printing: If you want nicer badges, you can use a standard office printer and perforated name badge paper. Design a simple template with name and affiliation. It’s labor-intensive but cheap – toner and paper are your main costs. Enlist volunteers to help tear and sort badges alphabetically.
- Tyvek Wristbands with Pre-Printed Codes: For a small festival or party, you can purchase Tyvek wristbands (the paper-like plastic ones) that are serial numbered or even QR coded. They cost maybe $0.10 each in bulk. Attendees get a durable wristband at entry, and staff can mark or scan it for re-entry. While not as high-tech as RFID, it’s a fraction of the price and still prevents pass-backs or duplicates.
- Reusable Wristbands or Badges: If you run events regularly, invest in a set of generic reusable badges or silicone wristbands and just change the inserts or colours per event. For example, a small regional festival might use the same hard plastic wristbands every year with a different colour sticker – avoiding buying new bands each time.
Also, don’t underestimate the power of a uniform token for entry, even if it’s low-tech. A custom wristband or badge, even a simple one, makes your event look more official and helps staff identify who belongs. It’s an area where spending a few extra dollars (literally, a pack of 100 wristbands might be $20) can pay off in smoother operations.
Pro Tip: If you dream of using RFID or smart badges but can’t afford it, see if a local vendor or university is looking for a trial. In some cases, tech providers might sponsor your event with free gear to showcase their product – especially if your crowd fits their target market. This could let you experiment with advanced access control at minimal cost (just be sure you have the technical support needed to actually run it). Otherwise, rest assured that a well-managed QR code system can comfortably handle entry for events in the low thousands of attendees without issue, even if Wi-Fi drops or glitches occur.
Engaging Attendees with Low-Cost Tools
Budget-Friendly Event App Alternatives
A fancy bespoke mobile event app can easily cost tens of thousands to develop – well beyond most small event budgets. The good news is you don’t need a custom app to keep attendees informed and engaged. Leverage platforms and tech your audience already uses:
- Mobile-Friendly Website or Schedule: Design a simple responsive webpage with your event agenda, speaker info, and maps. Tools like Squarespace, Wix, or even a Google Site can host your schedule for free or low cost. QR codes around the venue can direct attendees to this info hub. It’s not as slick as a native app, but it works on any device via browser.
- Social Media Event Pages: If your attendees are on Facebook or LinkedIn, create an event page or group there. You can post updates, have discussions, and let people see who else is attending. It’s free and requires no installation, tapping into platforms people already check daily. Tip: Make a closed group for registered attendees to build community (this works great for conferences and fan events alike).
- Messaging Apps and Chat Groups: For smaller, tight-knit events, consider using WhatsApp, Telegram, or Discord to create a group chat or channel. This can serve as a real-time bulletin board and networking space. For example, a 100-person tech meetup might use a Telegram group where organisers share announcements and attendees chat and network. It’s informal but highly engaging.
There are also freemium event apps that give you basic functionality at no cost. Dozens of mobile event app platforms offer free tiers, as seen in G2’s list of free mobile event apps – typically limiting the number of users or features. For instance, you might get to list your agenda and send push notifications to a few hundred users for free, but need to pay if you have more attendees or want advanced branding. It’s worth exploring these if you really want an app-like experience. Just keep expectations realistic: free tiers often come with the app vendor’s branding or ads, and might lack customisation. Still, they can deliver interactive maps, live polls, or photo streams without you building anything from scratch.
Interactive Experiences That Won’t Break the Bank
You can spark attendee interaction and excitement with creative use of inexpensive tech. Here are some ideas for high-impact engagement on a budget:
Grow Your Social Following With Every Sale
Require social media follows, shares, or playlist adds to unlock presale access or special pricing. Turn every ticket purchase into audience growth.
- Live Polls and Q&A: Rather than expensive ARS (audience response systems), use free or cheap online polling tools. Slido, Mentimeter, or Poll Everywhere have free plans for basic poll questions or Q&A upvotes. Display results on the projector for added drama. Attendees just use their phones to vote via a link or code.
- Social Media Walls: Set up a laptop and a TV screen (perhaps the venue has one) to display a live social media feed. Using a tool like Walls.io’s free version or a simple Twitter search for your hashtag, you can rotate attendee posts and photos in real time. It’s a fun way to encourage people to post about your event (and free marketing for you!).
- Augmented Reality Filters: Creating a custom AR experience from scratch is costly, but piggybacking on existing platforms isn’t. For instance, design a Snapchat or Instagram AR filter for your event – basic filter creation is often free or low-cost. Attendees can use the filter to add themed effects to their photos, and you get your logo or theme shared in their stories.
- Gamification on Paper: High-tech scavenger hunts or RFID-based games are trendy, but you can do a simple version with just paper and creativity. Provide a checklist of things to find or do at the event (with a small prize for completion) to encourage exploration and interaction. No app needed – just a printed sheet or a section in the program.
- Photo Booth / Selfie Station: Instead of renting a digital photo booth, set up a cool backdrop and some props, and simply provide a hashtag for people to use when posting their pictures. Many will do it on their own if the setting is right. You can later collect these photos from social media. If budget allows, a ring light and a tablet on a stand running a free photo booth app is a DIY solution that still costs far less than a professional booth.
The key is to facilitate participation and fun with what you have. Even low-tech solutions – like a big chalkboard wall for people to write messages or a “business card exchange” bulletin board – can drive engagement at virtually no cost. Remember, attendees ultimately care about the experience, not how much you spent on the software behind it.
Community Building on Social Platforms
One often overlooked “technology” for events is the free infrastructure of social media and online communities. When you can’t afford a bespoke networking app or a fancy community platform, go where people already are:
- Facebook/LinkedIn Groups: As mentioned, creating a private group for your event attendees costs nothing and can live on after the event. For professional conferences or industry meetups, a LinkedIn group might be ideal for post-event discussions and sharing slides. For festivals or fan events, a Facebook group can keep the community engaged year-round.
- Reddit or Forums: If your event is interest-specific (like a genre convention or a hobbyist gathering), consider starting a subreddit or forum thread for it. These platforms are free and often passionate communities already exist. By hosting an “official” thread, you consolidate information and give attendees a place to connect.
- Email Newsletters: Good old email is still a reliable tech. Use a free service like Mailchimp (free for small lists up to a couple thousand) to send updates leading up to the event. A well-timed “Here’s everything you need to know” email before event day, and a “Thanks for coming – give us feedback” email after, can boost engagement and make attendees feel looked-after without any app at all.
- Influencer Collaboration: If you can’t afford robust content creation, leverage your attendees or local influencers. Create an official hashtag and encourage attendees to share their experiences. Maybe offer a small prize for the best photo or recap. User-generated content is free and often more authentic, building engagement naturally.
It’s worth noting that adoption of any tech, even free, requires a bit of attendee guidance. Educate and encourage your audience to use whatever channels you set up. If you created a Telegram group, mention it during the event and in emails so people join. If you have a hashtag, display it prominently and maybe seed it with a couple of posts before expecting others to join. Low-budget tech initiatives can fall flat if attendees aren’t aware or convinced to use them, highlighting the need for boosting attendee adoption of event tech. In fact, historically only about half of attendees end up using an event’s dedicated app or tech feature, meaning the audience often sticks to old habits, so small events want to ensure any tool they introduce is easy and clearly beneficial. By sticking to familiar platforms and making participation fun, you’ll maximize uptake and get the most value from your engagement efforts.
Maximizing Networking Value on a Tight Budget
Many promoters face a common dilemma: their budget for event tech is not huge, but networking is very important to the overall attendee experience. When evaluating what event platforms give the best value for money in these scenarios, prioritize systems that offer built-in community features without requiring enterprise-level add-ons. Platforms like Brella or the free tiers of Whova and Webex Events provide excellent matchmaking and attendee messaging capabilities. By focusing your limited spend on tools specifically designed to connect professionals or fans, you ensure that relationship-building remains a central, high-value component of your gathering, even without a massive software budget.
Audio-Visual Production Value on a Budget
Right-Sizing Your Sound and Lighting
Audio-visual production can be one of the priciest areas of event tech, but small events can achieve great results with modest equipment. The trick is to right-size: use gear that is appropriate for your venue’s size and acoustics, and don’t overpay for capacity or features you won’t use. For example, a local band night for 150 people in a small hall doesn’t need a touring-grade line array sound system – a couple of quality powered speakers on stands (often rentable from a music shop for a few hundred bucks a night) will do the job. Many small venues already have a basic PA; see if you can tap into that first.
If your event is in an unusual space or you’re struggling with sound clarity, consider some DIY acoustic fixes instead of more speakers. Simple measures like hanging thick drapes or placing portable sound absorption panels can improve audio quality in echoey rooms at low cost. As highlighted in guidance on achieving good sound in any venue, even DIY solutions like rugs or foam can make a difference in a small room’s acoustics without expensive installations. Remember, clear sound is more important than loud sound. It’s better to have a smaller system that’s tuned well than a big one used improperly – not only is it cheaper, it avoids blasting your audience with distortion.
For lighting, focus on impact with simplicity. A basic stage wash (a few LED par lights) can elevate the atmosphere dramatically and is quite affordable now. LED lighting technology has advanced so much that prices have dropped significantly – small LED PAR cans or light bars are inexpensive to rent or buy, use little power, and don’t get hot (safer in small venues). You can even purchase a few DJ lights for the cost of renting high-end fixtures once. Many are sound-activated or come with preset programs, meaning you don’t need a lighting technician to run a fun show. Pro tip: If you have smart LED bulbs at home (like Philips Hue or similar), bring them to the venue for easy accent lighting – control them with your phone to set event-themed colours.
Affordable Visuals and Presentation Tech
Don’t have the budget for massive LED walls or elaborate projection mapping? You can still wow attendees with clever but affordable visual setups:
- Projectors and Screens: A mid-range projector can be rented economically and can display slides, videos, or ambient visuals on a wall or pop-up screen. If the venue has a blank light-coloured wall, that can serve as a projection surface (saving the cost of a screen). You can even stitch together multiple standard projectors for a larger image if you have them available. While not as bright as LED panels, projectors in a dimmed environment are very effective for small stages or indoor events.
- TV Displays: Check if you or your team members have large TV screens that can be repurposed. A 50-inch TV on a tall stand can function as digital signage or a makeshift “video wall” for a small crowd. Many venues or co-working spaces also have portable TVs they might lend if asked. Just feed it with a laptop or media player with your content.
- DIY Projection Mapping: If you’re tech-savvy or have a volunteer who is, try free software like Lightform or MapMap for basic projection mapping. You could project visuals onto a decor piece or backdrop to create an illusion of 3D effects. Keep it simple – perhaps mapping images onto a flat wall section or a large prop. It won’t be as sophisticated as pro systems, but can still add a unique touch at virtually no cost (assuming you have a projector and a laptop).
- LED Wall Alternatives: In 2026, LED panels are more affordable than ever, with esports arenas deploying stadium screens, but still not exactly cheap for small events. Instead, simulate a video wall by aligning multiple monitors or renting a few LED panels just for a centerpiece. Some event producers have gotten creative by using LED strip lights or addressable LED pixel strings to create low-res graphics and effects as a backdrop – a very budget-friendly DIY approach to get that “digital wall” vibe.
- Content over Equipment: Remember that engaging content can make up for modest display tech. A single screen showing a dynamic slideshow or well-produced video can captivate an audience better than three giant screens showing boring content. Invest time in creating or sourcing good visuals. For example, if you’re running a music night, you can find free VJ loops and graphics online to play behind the performers using one projector – instant ambiance upgrade for free.
By being resourceful, small events can deliver impressive visuals without a Hollywood budget. One organiser of a small arts festival shared that instead of renting a $10,000 LED video wall, they rented two high-lumen projectors for 1/10th the cost and projected colorful art onto the venue’s exterior walls at night – creating an immersive environment that attendees loved. Think outside the box: sometimes the venue’s architecture or natural surroundings can become your canvas at no cost.
Cutting Costs on AV Crew and Equipment
Hiring professional AV crews and technicians might be beyond a small event’s means. To save money, consider a hybrid approach:
- Pros for Planning, Amateurs for Execution: If you can, consult with a professional audiovisual technician during your planning phase (some will do an hour consult for a small fee or even free as goodwill). Get their advice on equipment needed and setup. Then, have a capable volunteer or staff member execute on event day following that guidance. It’s like having a blueprint from a pro, but not paying for full-time crew.
- Student Partnerships: Reach out to local colleges or trade schools that teach event production, sound engineering, or film. Often students are eager for real-world experience. You might get a small team to run your sound or cameras for free or a nominal stipend, especially if you offer them a shout-out or internship credit. Just ensure you meet them beforehand and align on the plan – and be patient with a learning curve.
- Minimal Crew, Multitask Setup: In a small event, one person can often manage sound and slides if set up correctly. For instance, a single tech operator with a simple audio mixer and a laptop can cue background music, adjust mic volumes, and advance presentation slides for a panel discussion. It’s a lot for one person, but doable with practice, eliminating the need for separate audio and graphics personnel. Simplify cues and use automation where possible (e.g., a playlist that fades music automatically when you press pause to start a talk).
- Rent, Don’t Buy (Unless Reusable): Renting equipment is usually the way to go, but occasionally buying something cheap can save money across multiple events. If you host regular gatherings, owning a basic projector or a set of mics could pay off after a few uses, rather than renting each time. Do the math: a decent wireless microphone might cost $150 – the same as renting two times. Just be sure you have someone who knows how to operate and maintain it. For anything expensive or complex (lighting consoles, high-end mixers), rent and get it delivered pre-configured if possible, to save on onsite labour.
- Soundchecks and Rehearsals: One “cost” that organisers sometimes overlook is the cost of errors. A nasty audio feedback or a blank screen at a crucial moment can ruin the attendee experience you worked so hard to create. Mitigate this with thorough testing. Do a soundcheck with all speakers or performers, test all videos on the projector beforehand, and have spare cables/batteries. These are free or very cheap precautions that protect the quality of your event. As the saying goes, an ounce of prevention is worth a pound of cure – you don’t want to be scrambling (or having to issue refunds) due to an avoidable tech failure.
Ultimately, small events succeed with AV by focusing on fundamentals: clear sound, visible visuals, and reliable execution. You may not have the biggest speakers or fanciest effects, but if people can hear the presentation, see what they need to see, and feel a bit of atmosphere – you’ve done it right. Many intimate events actually benefit from the “charm” of a simpler setup; it can feel more personal and authentic than an over-produced show. And importantly, you’ll have kept within budget, demonstrating that prudent choices and a bit of creativity can deliver a professional result.
Hybrid & Streaming on Limited Resources
Simple Live Streaming Options for Small Events
The pandemic thrust even small events into the world of live streaming and hybrid formats. By 2026, audiences expect at least some online access to events. The good news is you can live stream without a Hollywood production team. Here are accessible ways to broadcast your event:
- Social Media Live: The easiest method is using built-in live streaming on platforms like Facebook, YouTube, or Instagram. With a single smartphone or a basic camcorder hooked to a laptop, you can go live to the world for free. For example, a local council meeting or a small concert can be streamed via Facebook Live – you just prop up a phone on a tripod and hit “Go Live.” YouTube is great for longer sessions like conferences or workshops; schedule a livestream and share the link with remote attendees.
- Webinar and Meeting Tools: If interaction with virtual attendees is needed (e.g., a small panel taking questions from online viewers), consider Zoom, Microsoft Teams or similar. These are low-cost (and sometimes free for short sessions) and nearly everyone knows how to use them now. You can set a laptop at the back of the room with a decent webcam and mic, and remote guests can watch and even ask questions via chat. It’s not glamorous, but it’s effective.
- OBS and Free Production Software: Open Broadcaster Software (OBS) is a free tool that lets you mix video sources, add graphics, and stream to multiple platforms. With a bit of learning, you can produce a more polished stream – like switching between a camera feed and slides, or overlaying a logo – without expensive hardware. There are plenty of tutorials online, and it’s widely used by budget-conscious streamers.
Keep in mind bandwidth: ensure the venue’s internet upload speed is sufficient (ideally at least 5 Mbps upload for a stable HD stream). If Wi-Fi is shaky, use a wired connection or even a 4G/5G mobile hotspot if coverage is good – just mind data costs. Always test in advance by doing a private stream to yourself to check audio and video quality.
Reaching Remote Audiences Cheaply
Hybrid events don’t have to double your expenses. Focus on core content delivery to remote attendees, rather than replicating every aspect of the in-person experience. A few cost-effective tactics:
- Single-Camera Coverage: Instead of a multi-camera professional shoot, start with one good camera angle that captures the action (a wide shot of the stage or the panel). If you have a volunteer, they can pan or zoom a bit to follow the speaker. This single feed can be surprisingly engaging if the content is good. As you grow, you can add more cameras, but one is a fine beginning.
- Leverage Existing AV Feed: If you have a projector or PA for the live audience, tap into that feed for the stream. For example, use the audio from your soundboard (many mixers have a USB or auxiliary out) so the stream gets clean sound. Or capture the presentation by screen-sharing the presenter’s slides via Zoom while also pointing a camera at them. Repurposing the on-site setup saves from having separate gear for streaming.
- Moderate Interaction: To keep costs down, you might not have a dedicated team to handle online Q&A or chat. Instead, assign one moderator (maybe someone from your staff who’s remote themselves) to watch the questions and feed a few to the speakers at appropriate times. You can also simplify by taking questions via Twitter or email for remote viewers, which doesn’t require special software integration.
- Freemium Streaming Platforms: There are platforms purpose-built for events (like Hopin or Brella), but they can be pricey. If your needs are simple, stick to general platforms. However, if you anticipate a sizable online audience willing to pay, sometimes the platform’s cost can be offset by selling virtual tickets. Consider low-cost ticketing for the stream (e.g., a private YouTube link given to those who buy access) rather than investing in an all-in-one hybrid event platform for a small crowd.
One benefit of hybrid events is potential increased reach and ROI. Done right, you extend your audience beyond those who can attend in person, which can boost your brand and revenue. In fact, industry trends show nearly 70% of organisers see hybrid events as a permanent fixture of the landscape going forward, allowing fans around the world to participate – it’s not just a pandemic fad. Small organisations are using hybrid models to engage global communities without huge costs. For example, a local seminar series might stream their talks and end up building an international following over time, creating new sponsorship opportunities that fund the in-person event. In short, think of streaming not as an expense, but as an investment in growing your event’s footprint.
Recording and Repurposing Content
If live streaming is too daunting or isn’t within budget, you can still capture the benefits of hybrid by recording your event for later use. Recording is often simpler and cheaper than live streaming, since you don’t need a constant internet connection or live operators.
Options for recording on a budget:
- Camcorder or DSLR: Set up one camera on a tripod and hit record for the key sessions or performances. Ensure you have enough storage (and battery or power supply). Even a modern smartphone with a good camera can record HD video reliably for an hour or more – just test and free up space. Use an external microphone if possible for better sound (a lapel mic on the presenter or a recorder by the stage speakers).
- Screen Capture for Slides: If it’s a presentation-heavy event, consider recording the slides with audio directly. Tools like Zoom can record a meeting even if no one else is there – you could have the presenter run a Zoom session just to record their screen and voice as they present live. Later, you sync this with any video footage of them on stage, or just use the slides with audio as a standalone video. It’s not Hollywood quality, but it preserves the informational content.
- Audience-Sourced Media: Encourage attendees to take photos and short videos, and share them with you (perhaps offer an incentive for the best pics). You can compile these into a post-event highlight reel. It’s a low-cost way to not only get content, but also see the event from the attendees’ perspective – which is great marketing material.
Once you have recordings, repurpose them. Upload full sessions or highlights to YouTube (even if you charged for the live event, releasing content afterward can be a marketing tool for your next event). Chop content into small social media snippets. Or create a simple “recap” video to send to attendees and sponsors, showcasing the value of the event. This extends the life of your event and provides promotional ammo – all for the cost of a camera and some editing time. Plenty of free editing software (like iMovie, DaVinci Resolve, or OpenShot) can handle basic cutting and titling.
One caution: always get permission from speakers or performers if you plan to record and share their content. Most will be fine with it (free exposure for them), but it’s polite and sometimes legally necessary. Include a note in your speaker agreements or ask via email. It’s a small step that can save you headaches later.
In summary, while a fully produced hybrid experience might be beyond a tiny event’s budget, there are scaled-down approaches that can deliver a lot of the benefit. Whether through a no-frills livestream or simply recording for on-demand viewing, technology today makes it possible for a local event to reach far beyond the venue walls at very low cost. And that can ultimately increase your event’s impact and return, making the extra effort worthwhile.
Data & Analytics on a Dime
Using Built-In Analytics and Free Tools
Just because your event is small doesn’t mean you can’t harness data like the big players. Many event tech solutions come with built-in analytics that cost nothing extra – make sure to take advantage of them. For instance, your ticketing platform will likely have reports on ticket sales by type, time of purchase, and attendee geography. Dive into those dashboards to glean insights such as “Which marketing push sold the most tickets?” or “What was our peak sales day?” This is essentially free business intelligence. Similarly, if you use a mailing tool for invitations, check the open and click-through rates; if you use social media for promo, review the engagement stats. These numbers help you understand what worked and inform your strategy for future events.
If you have a website or dedicated event page, install Google Analytics (which is free) to track visits, referral sources, and conversion rates. This can show, for example, that 60% of your ticket buyers came via the link you posted on a community Facebook page. That’s useful to know – and you might not have guessed it without the data.
Furthermore, for promoters expanding into international or bilingual markets, leveraging platform-specific features is a massive advantage. If you are exploring how to optimize events with Ticket Fairy (or cómo optimizar eventos con Ticket Fairy for Spanish-speaking teams), start by utilizing their multilingual checkout flows and localized marketing analytics. Tailoring the purchase journey to the attendee’s native language reduces cart abandonment and builds immediate trust, which is especially valuable for destination festivals or culturally diverse community events.
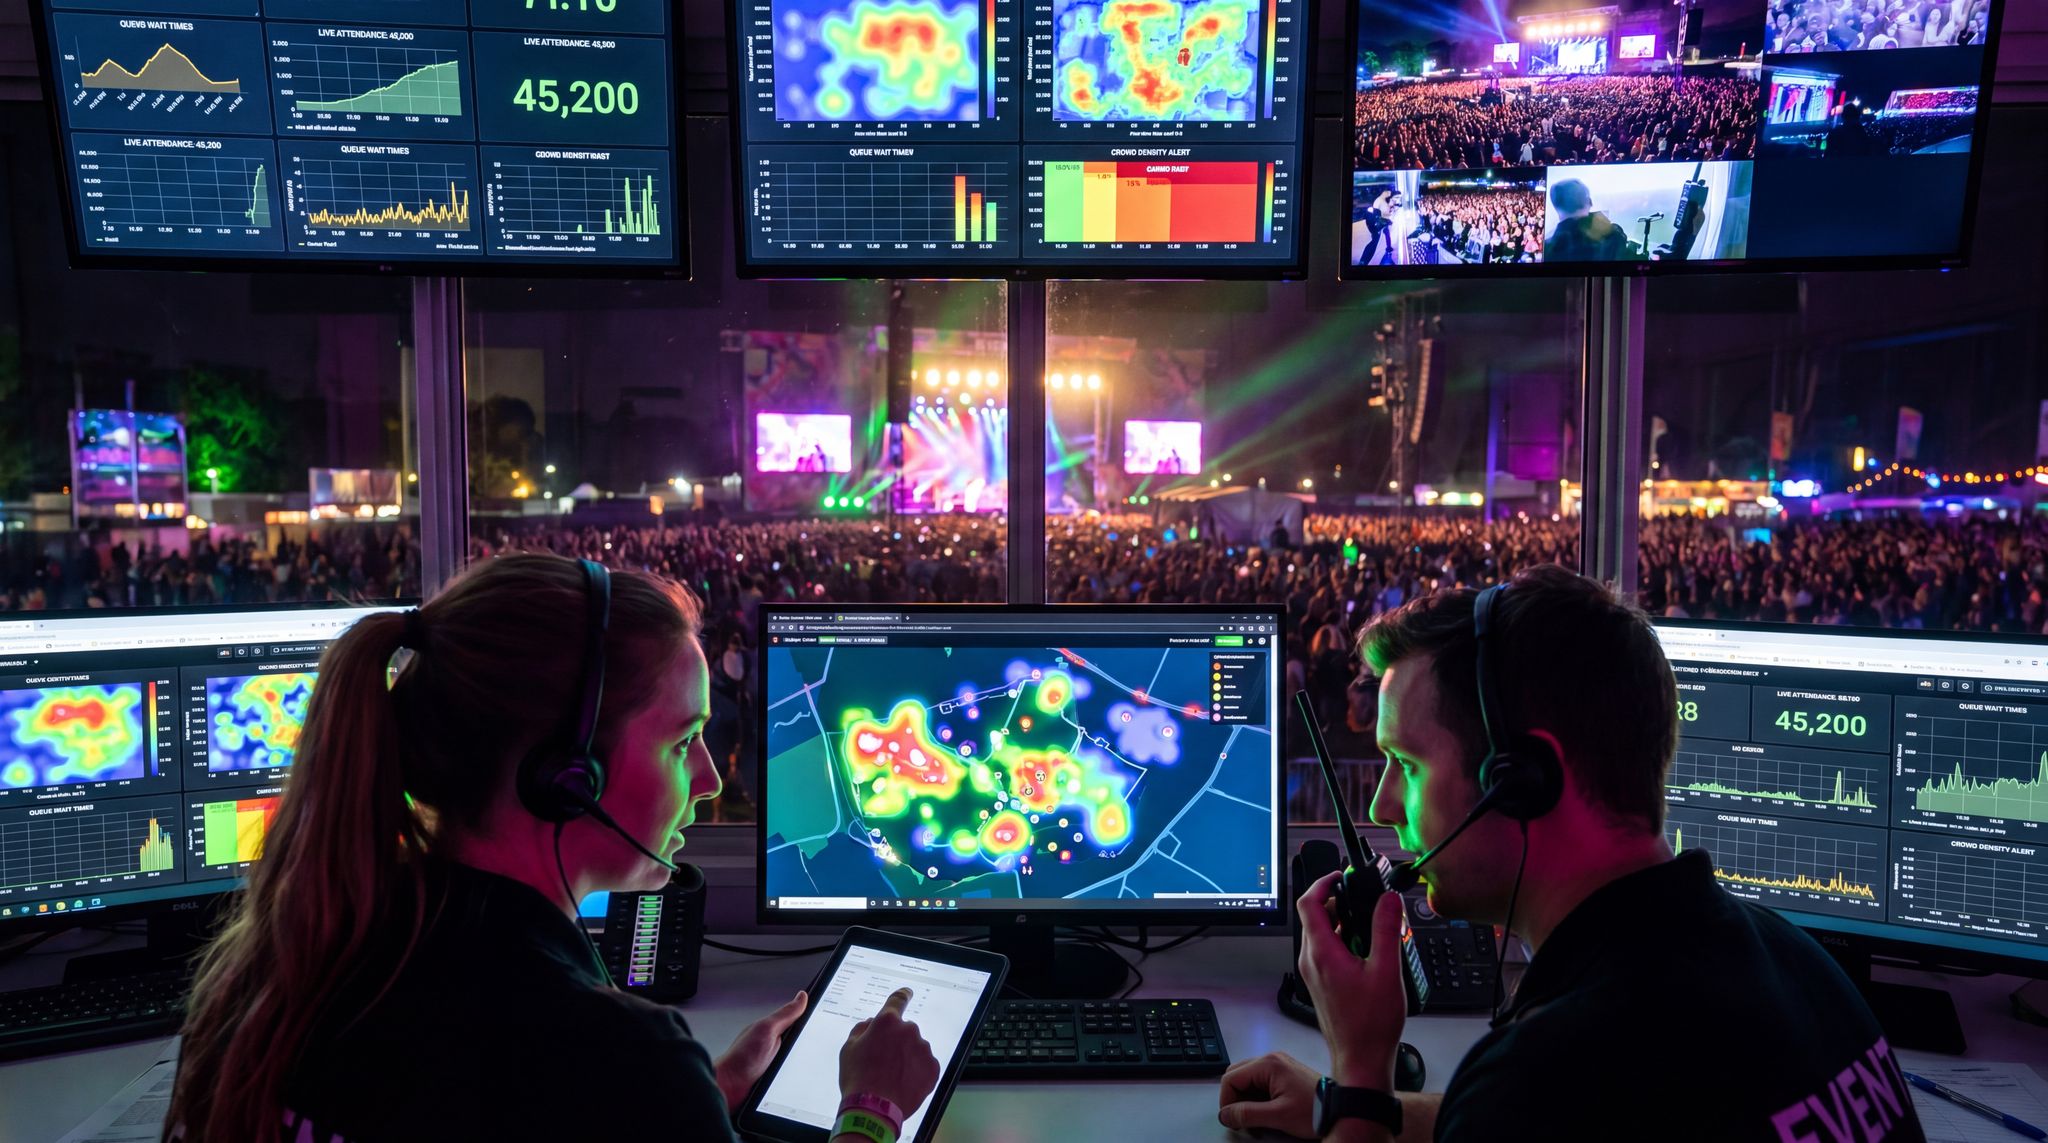
For on-site data at the event itself, you can keep it simple. A basic headcount of attendees vs. tickets sold is already an important metric (did everyone show up? Was there attrition?). Many venues have a clicker or turnstile count you can request, or your check-in app will tell you how many checked in. You don’t need fancy IoT foot traffic sensors for a small event – manual counts or the check-in tally works fine. Also, use free survey tools like Google Forms or SurveyMonkey’s free tier to send a post-event feedback survey. Even a few responses can highlight areas to improve or strengths to tout. One pro tip: keep your survey short and consider an incentive (like a chance to win a $20 gift card) to boost responses.
Measuring ROI Without Expensive Systems
When budgets are tight, proving the return on investment (ROI) of any tech spend is critical. Larger events might deploy costly analytics platforms to measure this, but you can do a solid ROI evaluation with basic tools and common sense:
- Set a Few Key Metrics: Determine what success looks like for your event technology. For example, if you introduced a mobile check-in app, you might measure average entry wait time or % of tickets scanned vs. attendees. If you added a social media wall, track the number of hashtag mentions. Pick 3-5 metrics that align with your goals.
- Use Before/After Comparisons: If you ran a similar event before without the tech, compare stats. Perhaps last year’s door entry took 30 minutes and this year with scanning it took 15 – that’s a 50% improvement in throughput, which you can translate into a better attendee experience (and less staff cost). Or if you didn’t use an event page before and this time you did, compare ticket sales patterns or final attendance.
- Quantify Time Savings: Time is money, especially for small teams. There’s evidence that using event technology can save organisers significant time – one study noted 89% of businesses using event tech save around 200 hours per year, according to event marketing software statistics. Even at a small scale, if an online registration saves you 10 hours of manually compiling RSVPs, assign a reasonable hourly rate to your time and count that as money saved. Did a cashless payment app mean you didn’t have to count cash for two hours post-event? That’s saved labour too.
- Gather Qualitative Feedback: Numbers don’t tell the whole story. Ask your team and attendees for their thoughts on the tech. Did volunteers find the scanning app easy? Did attendees appreciate the digital schedule? A few compelling quotes (“The new check-in system was so fast – I was inside in under 2 minutes!”) can be powerful when justifying the cost to stakeholders, even if they’re not hard numbers.
- Calculate Revenue Uplifts: Some technologies can boost earnings. For example, going cashless or adding card payments can increase attendee spending (attendees tend to spend more when not limited by cash on hand – in fact, events using RFID cashless systems have reported up to 30% higher revenue per guest, demonstrating why cashless payments are the future). If you did something like that, look at your average spend per person now vs. before. Even tech as simple as a mobile POS can speed up service and lead to more sales in a night.
By assembling these data points, you create your own “ROI report” essentially for free. This not only helps justify the tech expenses you had, but guides you on what to keep, drop, or improve next time. Perhaps you’ll find the engagement from that free hashtag wall was outstanding – evidence to continue it and maybe allocate more resources to it. Conversely, if the mobile app you paid for was barely used, the data will flag that as an area to reconsider. Embracing a data mindset, even at a small scale, is a habit that will pay dividends as your events grow. You’ll be able to make savvy decisions rooted in evidence, not just gut feeling.
Evaluating Financial Tracking and Budgeting Platforms
As festivals and boutique gatherings scale, relying on static spreadsheets can lead to costly oversight. When searching for the ideal financial tracking solution, organizers should look beyond basic expense logging. The most effective platforms in 2026 offer dynamic forecasting, allowing promoters to model different attendance scenarios and adjust marketing spends on the fly. Whether you are comparing premium suites or exploring robust free tiers, prioritize software that integrates directly with your ticketing gateway. This ensures that revenue data flows automatically into your ledger, providing a real-time picture of profitability and helping you make data-driven decisions without the need for a dedicated accounting team.
Staying GDPR and Privacy Compliant for Free
A quick note on data: collecting attendee information, even via free tools, comes with responsibility. If you’re handling personal data (names, emails, etc.), be mindful of privacy laws like GDPR (in Europe) or similar regulations elsewhere. The good news is being compliant doesn’t necessarily cost money – it just requires good practices:
- Use Reputable Tools: Big platforms like Google Forms or Mailchimp are already compliant with major regulations and have settings to help with consent and opt-outs. Using them is safer than a custom solution from a compliance standpoint.
- Get Consent: If you’re adding people to a mailing list, make sure they knowingly opt in. A simple unchecked box on your sign-up form saying “I want to receive notifications about future events” is usually enough. Don’t auto-subscribe people who gave their email to buy a ticket unless you disclosed that in terms.
- Secure Your Data: Use password protection on spreadsheets or accounts that contain attendee data. Limit access to only those who need it. It’s free to practice basic cybersecurity hygiene – strong passwords, not sharing logins, etc. – and it keeps data safe.
- Only Collect What You Need: An easy way to reduce privacy risk (and also make registration faster) is to avoid asking for excessive personal details. For a small public event, you might only need name and email. The less you have, the less you have to protect.
Being responsible with data builds trust with your attendees, which is invaluable. Plus, it saves you from potential legal issues that could definitely break your budget. Many affordable event tech platforms tout their compliance (for instance, Ticket Fairy’s systems are PCI-DSS compliant for payments and GDPR-ready out of the box, offering secure uptime and 24/7 support – a reassurance that using such a platform covers those bases for you). Take advantage of that so you can focus on running a great event.
Creative Cost-Saving Hacks and Partnerships
Sponsors and In-Kind Support for Tech
When funds are low, look externally for help. Sponsorships aren’t just for cash – they can also come as in-kind support that provides tech resources you need. For example, a local IT company or AV supplier might sponsor your event by providing a couple of projectors, a Wi-Fi hotspot, or some tablets for check-in in exchange for branding and shout-outs. This can be a win-win: you save on rental costs and the sponsor demonstrates their product or goodwill to your audience. When pitching in-kind sponsorship, be specific about what you need (“We’re looking for a sponsor for our event app” or “for our stage sound system”). Often, smaller tech vendors are happy to help community events for the exposure.
Also, tap into partnerships with venues or organizations. If you’re holding an event at a hotel or co-working space, see if they have any permanent tech installations you can use – many have screens, sound systems, or even live streaming facilities available. Some cities have nonprofit event spaces or tech libraries that lend out equipment to organisers at low or no cost. Do a bit of research in your region: you might find the convention bureau or local arts council has gear or grants accessible to help events upgrade their tech cheaply.
When thinking sponsors, don’t forget big tech firms often have local outreach. An example: a small startup conference got their badge printing sponsored by a printing company, who not only provided the printer and materials but also a staff member to run it, in return for a booth at the event. The organisers saved money and the sponsor got to demo their printing tech to potential business customers. Look for these creative alignments – if your audience is valuable to a company, they might cover a cost that you would struggle to pay otherwise.
Sharing and Borrowing Equipment
Take a community mindset with event tech. If you know other event organisers in your city, consider pooling resources. Perhaps the theatre group has light stands you can borrow, and in return you lend them your sound mixer next time. Building a network of trust can dramatically cut equipment costs for everyone involved. Some regions even have event organiser meetups or Facebook groups where people swap tips and occasionally gear – join those and don’t be shy to ask if anyone has a projector or cables you could use. Just be sure to take good care of anything you borrow and return it promptly with a thank-you.
Another approach is scheduling wisely. If you’re renting, say, AV gear for a weekend, see if another event can use it after you (and chip in on the rental). Many rental companies charge per day, but a weekend rate might cover Friday to Monday. Two events could share that cost if one is Saturday and the other Sunday, for example. It requires coordination, but both save money. Alternatively, negotiate with rental vendors for multi-event deals. If you know you’ll do this event again or have other events in a few months, the vendor might give you a discount in exchange for a longer-term relationship.
Lastly, don’t overlook public resources. Schools, libraries, and community centers often have basic event tech (projectors, PA systems) that they rent out cheap or loan to community groups. For instance, a public library might have a “meeting kit” with a microphone and speaker you can borrow with a library card. All it takes is asking.
Volunteers and Student Technologists
Human resources can be just as valuable as equipment. If hiring professional tech staff is too expensive, explore volunteer options:
- Recruit Tech-Savvy Volunteers: In your event registration, you can have a volunteer sign-up and specifically ask for those with AV or IT experience. You’d be surprised how many hobbyists know how to run a soundboard or livestream. Even if they’re not professionals, a committed volunteer can manage a lot of tech tasks if given clear direction. Just be sure to express lots of gratitude – they’re saving you a paid position, after all.
- Trade Pass for Help: Offer a free ticket or other perks to attendees who can assist with tech. For example, a small conference might waive the fee for a few attendees who agree to be on “tech duty” – one might manage the slide laptop for all speakers, another handles the lights, etc. They still get to participate in most of the event and you get help. It’s crucial to brief them well and maybe have a short rehearsal to build their confidence.
- University/College Collaboration: As previously mentioned, contacting educational institutions is a great strategy. Film and audio students often need projects for credit or portfolio. You could essentially serve as a practice event for them. While you might worry about entrusting students, remember they typically have faculty overseeing them and a strong motivation to do well (as it affects their grade/reputation). It’s important to set expectations and maybe assign less critical tasks to less experienced folks, but many student crews have successfully run entire small festivals and theatre shows.
- Mentorship Programs: Some cities have programs where veteran event pros mentor community events or non-profits. If you can tap into that, you may find a seasoned sound engineer willing to supervise your volunteer crew for free or low cost, which combines the best of both worlds – professional guidance with volunteer labour.
One thing to keep in mind: whether volunteer or paid, feed your crew! A slice of pizza and a thank-you can go a long way to keeping volunteer techs happy when they’re giving their time. Budget a little for crew refreshments – it’s money very well spent in goodwill and performance.
Free and Open-Source Software Solutions
Just because a software solution exists commercially doesn’t mean you need to pay for it. There’s a wealth of open-source and free software that can handle many event tech needs:
- Ticketing/Registration: If you’re techy and adventurous, tools like Pretix (open-source ticketing) let you self-host a ticket shop with advanced features. This can eliminate per-ticket fees, though you’ll need to manage web hosting and security yourself. It’s a trade-off of time vs money. For most small events, leveraging a free tier of a hosted platform is easier, but it’s good to know open-source options are out there if you want full control.
- Event Management: Tools like Odoo have open-source event management modules, and there are free project management tools (Trello, Asana free versions) to coordinate schedules, tasks, and vendor contacts. You don’t need to buy expensive “event management software” for basic planning – a well-organised Google Sheet or Airtable can serve as your budget tracker, run-of-show, and inventory list at no cost.
- Budgeting Alternatives: If you find yourself disappointed with basic task boards and are looking for Trello alternatives to handle complex financial tracking, consider dedicated financial templates within Airtable or Notion. While searching for the best event budget management software 2026 has to offer, remember that many top-tier platforms provide free versions perfectly suited for small-scale operations. These tools allow producers to track vendor quotes, monitor real-time ticket revenue, and forecast expenses without hefty monthly subscriptions.
- Streaming and Media: As mentioned, OBS for streaming is free and very powerful. For audio recording or editing, Audacity is a free open-source app. For video editing, DaVinci Resolve has a free edition with pro capabilities. Instead of paying for Adobe Creative Cloud to make speaker name slides or simple graphics, try Canva’s free tier or open-source GIMP/Inkscape for image editing. They have a learning curve but zero cost.
- Design Collaboration: Many organizers leverage Canva’s collaborative features to streamline their design workflow. By utilizing a free team invite link, you can bring volunteers or co-promoters into your workspace to co-create promotional assets, ensuring brand consistency across all your marketing channels without needing premium software licenses.
- Interactive Tech: If you’re into coding, you can build custom interactive experiences cheaply using platforms like Arduino or Raspberry Pi. These mini-computers let you create DIY tech like an LED visualiser, a simple RFID check-in station, or an interactive art piece at a fraction of the price of commercial systems (plus lots of fun if you enjoy tinkering). There’s a large maker community with tutorials for event-related projects – from DIY photobooths to custom lighting controllers.
- Integrations: Instead of buying an expensive integration service, see if Zapier or IFTTT (which have free plans for low-volume use) can connect your tools. For instance, automatically add new ticket purchasers to a Google Sheet or Slack channel. This saves manual work and doesn’t cost a penny until you scale up volumes.
Staying with free software does mean you need some comfort with technology setup, and support is usually community-based (forums, etc.) rather than guaranteed. But for many small events, the trade-off is acceptable. Plus, you often get more flexibility – you’re not locked into a vendor’s way of doing things. Just be sure to test everything thoroughly; open-source tools can be as reliable as commercial ones, but only if configured correctly. When in doubt, start simple and only use what you truly need to avoid unnecessary complications.
Tech Solutions: Low-Budget vs High-End Comparison
| Aspect | Budget-Friendly Solution | High-End Solution (for context) |
|---|---|---|
| Ticketing | Self-serve platform with no setup fee; pass fees to attendee (e.g., Ticket Fairy’s basic tier). | Enterprise ticketing system with hefty licensing and custom integrations. |
| Check-In & Access | QR codes scanned via smartphone app; paper backup list. | RFID wristbands, turnstiles, and full access control system with live monitoring. |
| Attendee Engagement | Facebook/LinkedIn groups, free event page, WhatsApp chat for networking. | Dedicated event app with AI matchmaking and interactive maps. |
| Payments | Mobile card readers (Square, SumUp) or local mobile money for cashless sales. | RFID cashless payment system with on-site top-up stations and integrated analytics. |
| AV – Sound & Lights | Two powered speakers, small mixer; a few LED par lights (rented or borrowed). | Professional line-array sound system; intelligent moving lights with control desk. |
| Visuals | Single projector or TV screens for presentations; DIY decor. | Large LED video wall, multi-camera IMAG (image magnification) for live video. |
| Streaming | Stream via phone to YouTube/FB; Zoom for remote viewers. | Multi-camera live broadcast with production crew and custom platform. |
| Data & Analytics | Built-in ticketing reports; Google Analytics; Excel tracking. | Full data warehouse integration, real-time KPI dashboards across all systems. |
As the table shows, the budget-friendly route covers the fundamentals in each area. Yes, the high-end solutions bring more features and scale, but they come with costs a small event can rarely justify. The trick is picking the right low-cost tools and executing them well. A great small event isn’t one that has all the fancy tech – it’s one that uses appropriate tech smartly to deliver a fantastic experience for attendees and a smooth operation for organisers. With the affordable and even free options available in 2026, that goal is more achievable than ever for events of any size.
Frequently Asked Questions About Budget Event Tech
What are the most cost-effective ticketing tools for small venues?
The most cost-effective ticketing tools for small venues are self-service platforms that charge no upfront fees or monthly subscriptions. Platforms like Ticket Fairy allow venue operators to pass minimal per-ticket fees to the buyer, resulting in zero out-of-pocket costs while still providing robust access control and data analytics.
How can organizers optimize events with Ticket Fairy?
Organizers can optimize events with Ticket Fairy by utilizing its built-in marketing automation, referral reward systems, and detailed demographic analytics. These features help promoters increase ticket sales and understand their audience better without needing to invest in separate, expensive marketing software.
What is the best event budget management software in 2026?
For small events, the best event budget management software in 2026 often isn’t a specialized, expensive platform, but rather highly customizable tools like Airtable, Notion, or advanced Google Sheets templates. These provide the flexibility to track vendor expenses, project revenue, and manage cash flow for free or at a very low cost.
How can promoters manage high-ticket event services with limited software options?
Promoters handling premium VIP packages or high-ticket event services don’t need bloated enterprise software. By leveraging cost-effective ticketing tools for small venues that include built-in CRM and payment installment features, organizers can deliver a seamless, white-glove purchasing experience while keeping overhead low.
What are the best Trello alternatives for festival project management?
If your team has outgrown basic Kanban boards, alternatives like Asana, Monday.com, or specialized event management templates in Airtable offer more robust timeline views and financial tracking. These platforms allow promoters to link vendor contracts directly to task deadlines, ensuring that complex production schedules stay on track and within budget.
How can small event teams collaborate on design without premium software?
Small teams can leverage collaborative design platforms by utilizing a free team invite link to bring volunteers and co-promoters into a shared workspace. This allows multiple users to edit promotional assets, social media graphics, and site maps simultaneously, maintaining brand consistency without requiring individual paid licenses for every contributor.
What event platforms give the best value for money when networking is a priority but the budget is small?
When networking is a top priority but funds are limited, the best value-for-money event platforms are those offering robust matchmaking and messaging on their free or entry-level tiers. Tools like the free versions of Whova, Brella, or even dedicated Slack and Discord workspaces provide excellent attendee connection features. Instead of paying for comprehensive enterprise apps, organizers should focus their tech spend specifically on these community-building tools to maximize networking ROI.
What are the best budget-friendly ticketing systems for fundraisers in 2025 and 2026?
For charity events and non-profits, the most cost-effective platforms offer specialized discount rates or allow donors to absorb processing fees at checkout. Systems that integrate donation collection directly into the ticket purchase flow without requiring expensive monthly subscriptions are ideal for maximizing fundraising revenue.
What defines the best value for money ticketing services in 2026?
In 2026, the best value for money ticketing services are those that combine low or zero upfront costs with comprehensive built-in features. Rather than just offering basic checkout functionality, top-tier budget platforms include marketing automation, detailed analytics, and seamless access control, allowing promoters to consolidate their tech stack and reduce overall software expenses.
What are the best low-fee ticketing platforms for music festivals in 2025 and 2026?
For the upcoming 2025 and 2026 festival seasons, the most effective low-cost ticketing solutions are self-service platforms that offer enterprise-level features—like tiered pricing, cashless integrations, and robust access control—without hefty upfront contracts. Platforms like Ticket Fairy allow independent music festival promoters to pass minimal service fees to attendees, ensuring organizers get top-tier technology while preserving their budget for talent and production.