When planning an event or live tour, selecting the right venue involves much more than aesthetics, location, or capacity. In today’s live events landscape (as of 2026), technical capabilities – specifically sound, lighting, and power – can make or break a show. Tour managers and event organizers know that a venue’s infrastructure needs to support their production flawlessly. Poor audio or inadequate lighting isn’t just an annoyance; it undermines the experience and even credibility of an event. In fact, studies show that bad sound can cause audiences to perceive a 19% drop in credibility of a presenter or performance. On the flip side, great acoustics and lighting elevate the ambiance and audience engagement.
Beyond the AV systems, unique venue features like architectural design (for example, exposed brick walls in a historic hall) can add charm to the ambiance – but they may also affect acoustics. On-site amenities such as food and beverage options contribute to attendee satisfaction too. The key is understanding how to properly assess all these aspects in advance. By doing a thorough technical evaluation of any venue, you ensure your production runs smoothly, meets professional standards, and creates a memorable (for the right reasons!) experience for your audience.
In this guide, we break down what to look for when evaluating a venue’s technical setup, the critical questions to ask, and how to ensure the infrastructure aligns with your production needs. We’ll also cover how to integrate these findings into your event planning process, from initial venue selection to final load-out.
Introduction to Event Planning
Selecting the right event venue is one of the most consequential decisions an event planner or tour manager faces. The venue sets the stage (literally) for everything that follows. A perfect event venue should align with your event’s objectives and theme while offering excellent sound quality, proper lighting, and sufficient space to accommodate all attendees comfortably. This means looking past surface details and digging into technical specs.
Free Tool: Size Your Festival Site
Zoned capacity planning for arena, campsite, parking and entry lanes — against UK Purple Guide and NFPA density standards. Finds your bottleneck zone.
Event planning is a multifaceted process that demands meticulous attention to detail. Among those details, venue selection stands out because of its ripple effect on attendee experience. A concert in a space with muddy acoustics or insufficient room capacity will fall flat no matter how great the performer is. A corporate presentation in a dimly lit hall with a flickering projector risks losing audience focus. That’s why an event planner must consider factors such as venue size, capacity, layout, and technical provisions from the get-go. Is there a raised stage or enough ceiling height for your lighting rig? Does the venue provide high-speed internet and modern AV equipment for presentations? Each event type – be it a music concert, a corporate awards ceremony, or a private gala – has unique needs in terms of audio-visual support and ambiance.
Another consideration is attendee comfort and convenience. This includes basics like seating and sightlines as well as amenities like diverse food and beverage options. Modern audiences also expect accommodations for dietary restrictions and accessibility needs. An otherwise perfect hall might still fall short if it lacks enough restrooms or parking, or if it’s hard to reach via public transit. The venue’s location, accessibility, and even the availability of parking or nearby train stations directly impact the overall experience and turnout. Furthermore, the event date plays a role: you have to coordinate venue availability with when your target audience is free, which can influence engagement and satisfaction.
Ready to Sell Tickets?
Create professional event pages with built-in payment processing, marketing tools, and real-time analytics.
Planning with these factors in mind helps ensure you choose a space that ticks all the boxes. For instance, touring artists often need venues that align with their technical riders (we’ll cover riders in detail later). Corporate events might prioritize venues with built-in projectors, reliable Wi-Fi, and breakout rooms for workshops. Festivals and large concerts might seek out unique outdoor venues or stadiums that can handle large crowds and heavy production. If you’re new to balancing these considerations, you may find resources like our comprehensive event planning tips and guides useful, covering everything from logistics to programming. And for an on-the-ground perspective of managing event logistics, check out our guide on managing on-ground music event logistics, which offers additional insights on running a tight ship at event time.
By taking all these key factors into account – technical capabilities, capacity, amenities, and logistics – event planners can zero in on the perfect venue that meets their needs and provides a memorable experience for attendees.
Why Technical Evaluation Matters
Every successful event hinges on its production quality. You can book a great performer or plan a fantastic program, but if attendees can’t hear the music or the stage lights malfunction, the event will be remembered for the wrong reasons. Poor audio, inadequate lighting, or power failures can lead to delays, frustrated audiences, and even reputational damage for organizers. In the live events industry, first impressions are often audiovisual – dim screens or muffled sound can immediately set a negative tone. This is why technical evaluation of a venue is just as important as negotiating the rental fee or planning the marketing campaign.
A comprehensive technical evaluation achieves several goals:
– Identify Compatibility with Your Production: Ensure the venue’s installed systems (or available infrastructure) are compatible with your touring gear or planned rentals. For example, a DJ touring with a custom audio setup or a band carrying their own monitor console needs to know the venue can interface with those systems.
– Prevent Technical Failures and Downtime: Uncover any limitations that could cause glitches or breakdowns. Finding out on show day that the house PA is underpowered or that there aren’t enough electrical circuits can be disastrous. A thorough advance check can reveal such issues in time to mitigate them (e.g. by bringing extra equipment or generators).
– Streamline Setup and Breakdown: Knowing the venue’s loading docks, stage access, and rigging points helps you plan an efficient load-in/out. This is critical on tight touring schedules. For instance, major arena tours like Taylor Swift’s 2024 Eras Tour reportedly required about 90 semi-trucks of gear to move between shows. At that scale, matching venues with adequate loading facilities and careful scheduling is non-negotiable. Even if your event isn’t that massive, mid-size tours today carry substantial production that demands careful venue vetting.
– Meet Expectations of Artists, Clients, and Audience: Professional artists often have technical riders – documents listing their requirements for sound, lights, staging, etc. A venue that can’t meet those specs could impact the performance quality or even violate contract terms. Likewise, corporate clients expect their videos to play crisply on screens and their speakers to be heard clearly. And audiences in 2026 have high expectations; they’ve seen top-tier productions and won’t easily tolerate subpar AV experiences.
– Ensure Safety and Compliance: Power systems, rigging, and sound levels all have safety dimensions. An overloaded circuit isn’t just a technical issue – it’s a fire hazard. Excessive volume can violate local ordinances or damage hearing. Proper evaluation helps you stay compliant with regulations and venue rules (like not exceeding occupancy or noise limits), avoiding fines or shutdowns. According to the UK’s Health and Safety Executive, organizers must ensure all electrical installations and equipment are safe so as not to risk injury.
Smooth Entry With Mobile Check-In
Scan tickets and manage entry with our mobile check-in app. Supports photo ID verification, real-time capacity tracking, and multi-gate coordination.
Developing a standardized venue evaluation framework is one of the highest-ROI activities a touring production or event agency can undertake. Rather than treating each site visit as a blank slate, a formalized venue evaluation process ensures consistency across your entire team. By using a uniform scoring matrix for power, rigging, and acoustics, production managers can objectively compare multiple sites and avoid costly oversights.
In short, technical evaluation is about risk management and quality control. It’s far better to spend extra time upfront verifying capabilities than to scramble during an event to solve preventable problems. A classic adage in production is that “power is like oxygen: you don’t notice it until it’s gone.” The same goes for sound and lighting – when they’re done right, they’re invisible in their perfection, but when something’s wrong, everyone notices immediately. Successful producers treat these elements as foundational. For example, festival organizers now widely acknowledge that infrastructure essentials like power and sanitation can make or break an event’s reputation. No attendee is going to rave about the venue’s power distribution on social media, but if the stage goes dark or the sound cuts out mid-show, you can bet they’ll be talking about it.
Grow Your Events
Leverage referral marketing, social sharing incentives, and audience insights to sell more tickets.
Pro Tip: If possible, attend another event at the venue before committing to it. Experience the sound, lighting, and overall flow from an audience perspective. Notice if music in the back sounds clear, if the stage is well-lit from all angles, and how quickly any technical issues are resolved. This firsthand perspective can reveal quirks (good or bad) that an empty site visit or a tech spec sheet might not show. It’s a small time investment that can provide invaluable insight into how the venue actually performs under real event conditions.
1. Evaluating Sound Systems
When it comes to live events, sound is king. Audio quality directly impacts whether your audience enjoys the event, and it’s often the top source of complaints if done poorly. As an organizer or touring crew, you should walk into a venue knowing exactly what the sound setup entails and whether it meets your show’s needs.
Key Sound System Components to Assess
When evaluating a venue’s audio capabilities, examine the following components in detail:
– Front-of-House (FOH) PA System: This is the main speaker system that projects sound to the audience. Find out if the venue uses a line-array system (common in larger venues and theaters for broad, even coverage) or point-source speakers (often in smaller clubs). Check the coverage pattern (will it hit balconies, all corners of the room?) and power output (is it powerful enough for the crowd size?). Ask for the make and model of the speakers and amplifiers. A top-tier venue might boast a renowned system like d&b audiotechnik J-Series or L-Acoustics K2 arrays, whereas a smaller venue might have an older JBL or EV rig. Knowing the brand and model will let your audio engineer predict performance and compatibility. For example, New York’s iconic Radio City Music Hall recently installed a cutting-edge beamforming sound system to deliver controlled and crystal-clear audio to every seat, showing how far some venues go for sound perfection. Not every venue will have the latest tech, but you want to ensure the FOH system is modern enough to provide clear, undistorted sound at the necessary volume.
– Monitor System (Stage Monitors/IEMs): These are the speakers or in-ear systems that allow performers to hear themselves and the mix. Determine if the venue provides floor wedge monitors and how many mixes, or if they have support for in-ear monitor (IEM) setups. Musicians are increasingly using IEMs for better control and hearing protection – if your artists require IEM, does the venue have a wireless IEM system or will you need to bring one? If wedge monitors are used, check their quality and power; underpowered wedges can lead to performers straining to hear and causing stage volume wars. A well-equipped venue might have side-fills or drum fills (extra speakers for the sides of stage or drummer) for larger stages.
– Mixing Consoles: Inspect what mixing consoles are in-house for both FOH and monitors. Key factors are the brand/model, channel count, and digital vs. analog. Many venues have moved to digital consoles (like the Allen & Heath dLive, Avid VENUE, Yamaha Rivage or CL series, etc.) which allow instant recall of settings and onboard effects. Make sure the console can handle your input needs (e.g., a band needing 32 channels of inputs and several monitor aux sends). If your touring crew brings their own console, ensure there’s a plan for where and how to patch it in. (Often, touring productions will advance a “console swap,” meaning the house console is moved aside for the guest console, so confirm there’s space and sufficient cabling.) If the venue console is older or unfamiliar, consider bringing an engineer who knows it, or ask if the venue can provide a tech to assist.
– Outboard Gear and Plugins: In the era of digital consoles, much outboard processing (like EQs, compressors, reverb units) might be done via internal plugins. Still, some venues might have external effects processors, graphic EQs for monitors, or other rack gear. Ask if they have any specialty gear, such as feedback suppressors, delay units for filling out delay stacks, or even newer tech like audio networking capabilities (Dante or AVB networks) if you plan to do multi-track recording or run audio to different zones.
– Microphones and DI Boxes: Most venues will have an inventory of microphones – at least the basics (SM58s for vocals, SM57s or instrument mics, some drum mics, etc.) and DI (Direct Input) boxes for instruments and tracks. Request a mic inventory list if available. If your production has special mic needs (say a wireless headset mic for a presenter or a vintage ribbon mic for a specific instrument), see if the venue stock covers it or if you need to bring/rent extras. Check the condition of the wireless systems if any – and ask if there have been RF interference issues in the venue (especially important in cities where spectrum is crowded). Frequency coordination can be crucial, particularly if you have multiple wireless channels for mics and IEMs.
– Acoustic Treatment of the Space: The venue’s physical acoustics play a huge role in sound quality. Examine whether the room has acoustic treatments like panels, bass traps, or diffusers on walls and ceilings. Venues with excellent acoustics (like purpose-built concert halls or well-treated clubs) will allow your sound system to shine, with minimal echo, balanced tone, and clear intelligibility. Poorly treated spaces – think empty warehouses or all-glass atriums – might introduce echoes, slapback delay, or muddy reverb that no amount of speaker tweaking can fully overcome. If the venue is known for tricky acoustics, you might need to adjust your mix approach (e.g., using more directional speakers, adding additional fills, or even bringing temporary baffle panels). The interplay of sound between distinct spaces in the venue is another consideration: for example, is there a lobby or bar area with an audio feed needed, or will loud music on the main stage bleed into a secondary room? Understanding the acoustic environment helps in planning.
– Noise Restrictions: Always inquire about local noise ordinances or any venue-imposed decibel (dB) limits. Especially for outdoor venues or those in residential areas, there might be a strict sound curfew (e.g. 10 PM), or a maximum SPL that you cannot exceed (measured at the front of house or at the property line). Some cities require events to stay under, say, 85 dBA after a certain hour to avoid disturbing neighbors. Indoors, venues themselves might have policies to protect their space (and audience hearing). Know these limits in advance so you can plan the set times and volume accordingly. Modern sound level monitoring tools can be used during the show to ensure compliance. If a venue has dB meters installed that cut off power when limits are exceeded (yes, some places do this automatically!), you want to know beforehand. Also, if the venue is part of a complex or close to another stage (like in multi-stage festivals or adjacent theater spaces), consider potential sound bleed issues.
Specialized performances require even deeper acoustic scrutiny. For instance, evaluating venue acoustics for live film music—where a full symphony orchestra performs synchronously with a cinematic projection—demands a space with a highly controlled reverberation time. The room must support the sweeping dynamics of acoustic instruments without muddying the dialogue or sound effects playing through the cinema PA. In these hybrid scenarios, organizers often need to consult with acousticians to balance live orchestral resonance against amplified cinematic audio.
Data-Driven Event Marketing
Track ticket sales, demographics, marketing ROI, and social reach in real time. Exportable reports give you the insights to make smarter decisions.
Exploring music event technology trends for 2025 is a great read for insight into where live sound technology is headed – from immersive audio to AI-driven sound optimization. Staying aware of these trends can help when discussing a venue’s systems; you’ll know if they’re keeping up with the times.
Questions to Ask the Venue (Sound)
When coordinating with the venue’s management or technical director about sound, use a checklist of targeted questions:
– “What is the make and model of the main PA system?” – This yields insight into quality and coverage. A specific answer like “We have Meyer Sound Leopard line arrays with 700-HP subs” is a good sign (detailed and high-end), whereas vague answers may require a site visit.
– “How many and what type of stage monitors do you provide? Is there support for in-ear monitors?” – Ensure performers can get the foldback they need. If the band relies on in-ears and the venue doesn’t have a system, you’ll plan to bring yours.
– “Is there an in-house sound engineer available, and will they run FOH/monitors or can they assist our crew?” – Some venues include an engineer with the rental, which can be very helpful as they know the room. Other times you’re expected to bring your own. Clarify the arrangement and whether it incurs extra cost.
– “Is the FOH mix position in an optimal location?” – Believe it or not, some venues jam the mixing console in a corner or under a low balcony, which is far from ideal. You want FOH centered and far enough back to hear what the audience hears. If it’s not, you may need to negotiate a temporary FOH spot in the crowd or plan extra referencing.
– “What’s the SPL limit or any noise restrictions we should be aware of?” – Get the hard numbers on volume limits and curfews. If the venue says “We have a strict 95 dB(A) at FOH limit,” you’ll know to tailor your soundcheck and show dynamics to avoid breaches (and potential fines or sound cuts).
– “How is the venue’s acoustic treatment? Have there been issues with echo or dead spots in the past?” – This question might prompt the venue to mention known quirks, like “The balcony can get a bit of bass buildup, but we’ve installed bass traps,” or “We usually warn engineers that there’s a slapback from the back wall.” It shows you’re savvy and allows them to share solutions or workarounds.
Tips for Organizers (Sound)
- Request the Venue’s Tech Specs Sheet: Always ask the venue to send their technical specifications sheet or production advance pack. This typically includes details on the sound system (models, power ratings), a stage plot, monitor mixes, console info, etc. Scrutinize this well ahead of time. It’s your blueprint for planning. If anything is unclear or missing (or if the spec sheet seems outdated), follow up with questions. A venue that provides a comprehensive, up-to-date spec sheet is demonstrating professionalism and will likely be easier to work with.
- Advance a Full Sound Check Plan: Don’t just plan for a quick line check. Whenever possible, schedule a full sound check with the complete setup prior to doors opening. This may mean arranging for the band or DJ to arrive earlier, but it’s invaluable. During sound check, walk the venue (every level, corner, and seating section) to spot any coverage holes or weird resonances. This is the time to adjust speaker angles or tweak EQ, not when the audience is already there.
- Assess Load-in Logistics for Audio Gear: If you’re bringing significant audio equipment (say you’re touring with your own monitors, microphones, or even a full PA), evaluate how it gets in and out. Are there convenient loading bays? Any freight elevators, and what are their dimensions/weight limits? For venues above ground level, narrow stairs or small elevators can become a major time sink. Also consider where you can store cases or spares during the show – is there a backstage storage area or will everything have to go back to the truck? Efficient load-in/load-out not only saves time but also protects your gear and crew from unnecessary strain.
- Plan for Acoustics: If the venue’s acoustics are challenging, plan for mitigations. This could mean bringing portable acoustic treatment (e.g., baffles or sound absorption panels) to place behind drums or on reflective surfaces, or it might mean using the audio console’s tools like carefully tuned reverb and delay to “fill out” a dead room or tame a live one. Sometimes simply reorienting a few speaker angles can avoid a nasty reflection. Local crew might have insight here – don’t hesitate to ask the in-house techs what tricks work well in that space.
- Conduct a Rigorous Venue Sound Test During the Site Visit: Don’t wait until load-in day to hear the room. Schedule a dedicated venue sound test during your initial walkthrough. Bring a familiar reference track—ideally an uncompressed audio file you know intimately—and play it through the house PA at show volume. Walk the entire floor, including the back corners, under balconies, and VIP sections, to identify dead zones, harsh reflections, or rattling fixtures. A proper acoustic evaluation at this stage allows your audio engineer to specify necessary fill speakers or acoustic dampening well before the event.
Warning: Local noise ordinances can sneak up on you. Don’t assume every venue allows you to crank the volume to 11. Some towns and cities enforce strict decibel limits or curfews. For example, an outdoor venue in a residential zone might have a 10 PM curfew or a max of 85 dB at the property line after dark. Always verify these restrictions during planning. If you ignore them, you risk the sound being cut off mid-show or even authorities shutting down the event. It’s happened before – even world-famous festivals have been forced to end sets early due to noise limits. Plan set times and encores with any curfew in mind, and consider having a decibel meter on hand during the show to monitor levels in real time.
2. Evaluating Lighting Capabilities
Lighting is essential for creating atmosphere, highlighting the action on stage, and reinforcing the event’s theme or mood. Great lighting design can transform a venue from plain to magical, while poor lighting can leave a performance looking flat or make it hard for attendees to see the action. When evaluating a venue, you need to know what lighting gear and support is available, and whether it aligns with your show’s vision.
Core Lighting System Elements
Here are the core elements to assess in a venue’s lighting setup:
– Lighting Console (Controller): The console is the brain of the lighting system. Common professional consoles include brands like MA Lighting (grandMA series), Avolites, ETC, Chamsys, and High End Systems. Ask which console the venue has and its model. An advanced console can run complex shows with ease; for example, an MA Lighting console is industry-standard for large productions due to its robust programming capabilities. Ensure the console has enough universes of DMX or supports networked lighting protocols (Art-Net/sACN) for your needs (especially if you plan to add a lot of your own fixtures). If you’re touring with a lighting designer/operator, check if they are familiar with that console or if they will bring their own control board. Modern consoles often allow you to load your show file – but only if it’s the same make/model or compatible software version, so compatibility matters. Having a cutting-edge console with time-coded programming or MIDI triggers can also be a factor if your show is musically synchronized.
– House Lighting Fixtures: Inventory what stage lighting fixtures are permanently installed or provided in-house. Key types include LED PAR cans, moving head fixtures (spot, wash, beam types), strobe lights, blinder lights, Fresnels or profile spots for front lighting, and possibly followspots. Many venues now have LED-based fixtures which offer rich colors and lower power draw (more on power later), but some older venues might still have traditional incandescent PARs or ellipsoidals that require dimmers. The presence of modern intelligent lights (like Martin MAC series, Clay Paky, Robe, etc.) indicates the venue can support dynamic looks. Count how many of each type and their positions (truss, grid, stands). Are there LED screens or walls as part of the venue’s setup? Are there any special effects like fog machines or lasers installed? Match the venue’s fixtures against your show’s needs. If your production requires, say, a dozen moving lights but the venue only has four, you might arrange to bring additional lights. Conversely, if the venue has an impressive rig, you can plan to utilize it fully and save on renting gear.
– DMX Infrastructure: The backbone that connects console to fixtures. Ensure the venue has a reliable DMX network or nodes throughout the stage and ceiling. Ask how many DMX universes the house system runs and whether it’s a modern infrastructure (some venues might use DMX over Ethernet systems, etc.). If you’re augmenting with extra lights, confirm there are spare DMX outputs or network nodes where you can patch in. Also inquire if the system supports RDM (Remote Device Management) which can help identify and configure fixtures remotely – a nice modern perk. A solid DMX infrastructure will minimize latency and avoid signal issues that could otherwise cause lights to misbehave.
– Rigging and Trussing: This refers to the physical support for hanging lights (and potentially video walls, decor, etc.). Are there fixed trusses or lighting grids? What about rigging points in the ceiling or beams where you can hang additional equipment? It’s critical to know the load-bearing capacity of these points or trusses – for safety and to ensure you’re allowed to hang your gear. For example, a venue might say “our downstage truss can hold 2,000 lbs and has motors for lowering,” or in smaller venues, “we only allow lightweight LED fixtures on our rafters, no motorized truss.” Check if the venue has any in-built hoists or chain motors. If you need to fly an LED wall or heavier lighting, ask if it’s possible and if they have the hardware. Also confirm the height of the rig – a high trim height (distance from floor to truss) allows more dramatic lighting angles and effects. If rigging isn’t adequate, you might have to make do with ground-supported lighting stands (which affects sightlines and coverage) or bring in your own truss structure (possible outdoors or in bare spaces, but with added cost and complexity).
– House Lights and Control: Can the venue’s house lights (the general lighting over the audience seating or venue floor) be controlled from the lighting console or a separate system? During a show, you might want to blackout the house or dim them for ambiance, and bring them up for intermission or safety. Some venues have fully integrated house lights that the LD (Lighting Director) can manipulate, while others might just have simple on/off switches not tied into the stage control. It’s a good detail to know – especially for events that require dramatic blackouts or coordinated light cues involving the whole space.
– Power Distribution for Lighting: Stage lighting can draw significant power. Does the venue have dimmers (for traditional lights) or power distribution units for lighting circuits? Often venues will provide several dedicated circuits for lighting separate from audio (to avoid buzz and interference). Check if the venue has “clean” power for lights and enough amperage. For example, a venue might offer a couple of 400A three-phase power disconnects for production use, one intended for audio and one for lighting/video. If the house lighting rig is LED, power requirements might be lower than older rigs, but you still must ensure your additional lights can be powered. It’s wise to get a power schematic or at least a description: e.g., “We have a 200A company switch stage left for lighting, plus wall outlets on 4 separate 20A circuits around the stage.” Lighting often needs distribution boxes (“distros”) and appropriate cables (e.g., Socapex multi-cables or CEEForm connectors in some regions). Confirm what the venue can supply versus what you need to bring.
When you evaluate possible concert visuals—such as projection mapping, laser arrays, or LED volumes—the venue’s atmospheric conditions and ambient light bleed become critical factors. A comprehensive venue evaluation must account for how HVAC airflow might disrupt haze distribution, which directly impacts the visibility of high-end visual effects.
Go Cashless With RFID Technology
Enable contactless payments, faster entry, and real-time spending analytics with RFID wristbands and NFC-enabled ticketing for your events.
Questions to Ask the Venue (Lighting)
Speak with the venue about lighting using questions like these:
– “What lighting fixtures come with the venue rental, and what are their specs?” – Let them enumerate the moving lights, PARs, LEDs, followspots, etc. You want to know quantity, model, and lamp type if applicable. This helps determine if the house rig is sufficient or if you’ll supplement it.
– “Is the lighting rig customizable and can we re-focus or re-gel lights during load-in?” – Some venues allow you to adjust their lights (point them differently, change colors/gobos on conventional fixtures) as long as you restore them after; others might have a fixed setup for all events. Knowing this tells you how much creativity you can apply on-site. Most will be flexible within reason, but always ask.
– “Do you have a patch list or lighting plot we can review in advance?” – A lighting plot is a diagram showing where each fixture is hung and how they’re circuited/DMX addressed. Getting this ahead of time is a huge help to your lighting designer, who can plan cues around what’s available. A patch list details which channel controls which light, etc. The venue might have Vectorworks or PDF diagrams ready to send you – the mark of a well-organized technical team.
– “Is there a house lighting technician who will be on hand for our setup and show?” – Many venues include a lighting tech who knows the system, which can save time. If so, find out if they will run the board during the show or just assist your LD. If you need an operator and don’t have your own LD, ask if the venue tech can operate lights to your cue sheet (often an extra fee). Their expertise is also invaluable for troubleshooting if something misbehaves.
– “Can we rig additional lighting fixtures or elements (like LED walls, mirror balls, etc.)? If so, where and are there spare dimmers or power outlets?” – This covers adding to the rig. If you plan to bring special effects – say, UV lights for an immersive art performance or a custom neon sign backdrop – you need to know where you can hang or place them and how to power/control them. The venue might restrict certain areas (e.g., no hanging anything in front of fire exits or on historical chandeliers!). Also confirm if they have safety equipment (cable picks, safety bonds, etc.) or if you must supply those.
Tips for Organizers (Lighting)
- Request the Lighting Plot in Advance: Just as with audio, an advance exchange of tech information is crucial for lighting. Getting the venue’s lighting plot and patch info beforehand allows your lighting team to pre-program as much as possible. They can prepare a show file offline using that fixture list – meaning when you arrive, it’s more about tweaking than building from scratch. This is especially important for tours where the lighting looks need to be consistent across different venues; your LD can adapt the show file to each venue’s rig if they know what’s there ahead of time.
- Verify Weight Loads and Safety: If you’ll be hanging anything additional (lights, scenic elements, etc.), insist on documentation like truss load capacity charts or engineer’s certificates for the venue’s rigging points. Safety can’t be compromised – an overloaded truss is a catastrophic risk. The venue should also have recent inspection certificates for motors or trussing if they provide them. Additionally, check that all fixtures provided have safety cables, and that the venue adheres to appropriate regulations (for example, many locales require secondary safety bonds on all overhead fixtures). It’s your right to ask these questions. A professional venue won’t mind at all – they’ll likely be impressed that you care to double-check.
- Plan Time for Focus and Programming: On your production schedule, build in adequate time for the hang and focus of any touring lighting package you bring, as well as programming time on the console. If you’re only using the house rig, you still might need time to re-focus some lights to hit your stage marks or to change colors (gels) on conventional lamps. Allot time for a dark-room focus (meaning after sunset or with the venue dark) if possible for best accuracy. Rushing through lighting focus often results in missed cues or performers stepping out of the light during the show. If running short on time, prioritize key lighting (like front light for performers) then eye-candy effects.
- Coordinate Lighting with Other Elements: Ensure that lighting plans are coordinated with other technical elements. For example, if you have projection or LED video walls, avoid using lighting that will wash out the screens (you might need lower intensity or different angles/colors). Similarly, check that smoke or haze machines (which greatly enhance lighting beams) are allowed by the venue (some have fire alarm considerations). If they are, confirm the venue’s policy – do they have a fire marshal who needs to disable alarms or be present during haze usage? Aligning lighting with staging (e.g., no lights where they will blind the audience at floor level unless intentionally) and with audio (e.g., moving lights’ fans or strobe noise shouldn’t interfere with quiet parts) is part of a holistic approach.
3. Evaluating Power Availability
Power is the unsung hero of events – when it’s properly planned, nobody notices it, but when it’s not, your event can literally go dark. All the cutting-edge sound and lighting gear in the world is useless if you can’t deliver stable electricity to it. Evaluating a venue’s power availability is absolutely critical, both for operational needs and safety.
Critical Power Considerations
When assessing power at a venue, keep the following in mind:
– Power Supply Type and Capacity: Determine what kind of electrical service the venue provides. Many larger venues will offer three-phase power (commonly used for heavy electrical loads, like large lighting rigs or big sound systems) at a certain voltage – for instance, 208V or 400V three-phase depending on country, often with high amperage capacity. Smaller venues might only have standard single-phase wall outlets (e.g., 120V 15A circuits in the US or 230V 13A in UK per outlet). The key is to identify the total power available and how it’s delivered. A venue might say, “We have a 200A three-phase disconnect for production located backstage,” or “We have two 63A three-phase feeds dedicated for show power.” If the event is outdoors or in a non-traditional space, you might be bringing in generators – in which case, evaluate where those can be placed and how fuel will be managed. For venues with in-house power, confirm if connections are via Cam-Lok, CEE form connectors, or direct wire, and whether you need a certified electrician to tie in (often yes for higher amperages).
– Amperage and Load Calculation: Once you know what power sources are present, compare it to your production’s total power draw. Calculate the approximate amperage your sound, lighting, video, and other equipment will require at full load. For example, a concert with moderate production might draw 100-150 amps per phase for the lighting and 50 amps per phase for audio; a massive festival stage could draw several hundred amps per leg. It’s wise to do this math during pre-production – list out the wattage of all major gear (amps × volts = watts for each item, then sum, converting to amps on the provided voltage). Always build in headroom; you never want to run a power service at 100% load for sustained periods. A good safety margin is to design for only ~80% of the provided capacity. If your estimate shows you’re close to the limit, plan to reduce equipment or arrange additional power sources.
– Dedicated Circuits (Power Distribution): Professional production practice is to separate sensitive equipment by circuit to prevent interference and overloads. Audio equipment (especially amplifiers, mixers, instruments) should be on its own clean circuit(s) whenever possible, isolated from heavy lighting dimmers or other noisy loads. Likewise, lighting (especially if using older dimmer packs) should be on separate circuits from video and audio to avoid humming or flicker issues. Check if the venue has multiple “company switches” or distribution panels that allow this separation. If not, you might bring a power distro that splits one big feed into isolated breaker-controlled circuits for audio, lighting, backline, etc. Ask the venue, “Do you have separate power feeds for sound and lighting?” Many venues do – e.g., one 100A feed for audio on stage right, another 200A feed for lighting stage left, etc. If all they offer is a single tie-in point, then coordinate your distribution accordingly.
– Backup Power / Generators: In some cases, especially outdoor shows or remote locations, the venue’s grid power might be non-existent or insufficient. Portable generators then come into play. If the venue mentions you’ll need generators (or if you suspect the grid isn’t reliable), plan for the correct size and quantity. Generators should be rated for the total load plus some headroom, and ideally you use good quality, well-maintained units (rented from a reliable supplier) with voltage regulation. You may also consider redundant generators in critical shows (one running as primary, another synced as backup in case one fails, or at least a spare on standby). If the venue does have grid power, ask about any history of outages or if they have a backup generator for emergency lighting at least. Some indoor venues have backup power for life-safety systems but not for show tech – meaning if the grid fails, you lose sound/lights but emergency lights kick in. Knowing this helps you plan contingencies (e.g., having a UPS on the FOH console to save the mix settings, or even renting a small generator as a fallback for critical elements if you’re in an area prone to blackouts).
– Power Distribution Equipment: Evaluate what power distro gear the venue provides. This could include distro racks, cabling (feeder cables, breakouts), outlet strips on stage, etc. Are the connectors compatible with your equipment? (Different countries and venues use various standards – e.g., NEMA connectors, CEE form “ceeform” sockets, 110V vs 240V splits, etc.) If the venue’s main disconnect is a bare lug panel, you’ll need appropriate tails and likely an electrician to tie in. If the venue gives you, say, a 32A “cee” connector, ensure you have an adapter to your system. Also ask if they supply extension cords and cable ramps to cover them, or if that’s on you. Long cable runs may be needed to get power to front-of-house or to delay towers at a festival, for example.
– Grounding and Safety: Proper grounding is vital for both safety and audio quality. Confirm that the venue’s power is properly grounded and if there are any special instructions (some older theaters might have quirks, like a separated technical ground). All equipment racks should be bonded to ground to avoid hums and shocks. You might inquire if the venue had any issues with grounding loops in the past. Additionally, ask if they have surge protection or if you should bring your own power conditioners. Particularly for sensitive gear like digital mixers, LED walls, or computers, you want to protect against voltage spikes. In outdoor or tented venues, ensure all generator grounds are properly set (driven into earth) and that GFCI protection is used where required (especially for any power near public areas or outdoors in damp conditions). Safety also means cable management – make sure there’s a plan to tape down or ramp any cables to prevent trips and protect from liquids. Remember: electricity is dangerous if mishandled. It’s worth consulting a professional electrician as part of your evaluation (many production teams do a site visit with an electrician to verify power delivery and hookup plan). As one more safety note, confirm if the venue requires an in-house electrician to make the connections. Many union venues, for example, will insist on their certified electrician to tie in your power and to be present during load-in/out.
When auditing entertainment venue electrical systems, it is crucial to look beyond the immediate tie-in points and understand the facility’s overall power architecture. Modern live event spaces often feature isolated technical grounds and dedicated transformers that separate heavy mechanical loads (like HVAC and elevators) from sensitive production circuits. Verifying this separation prevents high-draw facility equipment from introducing voltage sags or ground loop noise into your audio and video feeds.
Questions to Ask the Venue (Power)
When discussing power with the venue, here are key questions:
– “What is the total power available on-site for production, and in what form?” – You want to hear specifics like “We have a 200A three-phase 208V service for your use, plus standard wall outlets” or “We can provide up to 2x 63A feeds at 400V”. Specifics matter – if they just say “we have plenty of power” that’s not enough; get numbers.
– “Are there separate power feeds or circuits dedicated to sound, lighting, etc.?” – If they say yes, note the separation (e.g., “Yes, sound can tie into the panel on stage right which is isolated from the lighting dimmers on stage left”). If no separate feeds, plan to isolate via your own distro as needed.
– “Is shore power available for buses or production trucks?” – If you’re doing a tour or a festival setup where production vehicles (like broadcast trucks, nightliner buses, etc.) might need to plug in, this is a good question. Shore power refers to electrical hookups for vehicles to avoid running generators. Some larger venues have them outside (e.g., a 60A outlet for a tour bus to have HVAC and lights without idling the engine). It might not apply to smaller events, but it’s worth asking if relevant to your event.
– “Are there any power usage restrictions or time-of-day limits?” – Occasionally, venues or local utilities might have rules like not turning on all systems until a certain time or limitations on power draw during peak grid hours (rare, but for instance a fairground on an island might ask vendors to stagger generator use). Also, if using the venue’s electricity, clarify if they charge extra for power beyond normal use – some venues meter electricity for large events as an extra cost.
– “Will a venue electrician or engineer be required to make connections, and is there a fee?” – This is both a technical and budget question. If the answer is yes (common in convention centers, arenas, union venues), arrange for that person to be on site when you need them and know the labor rate or if it’s included. Also, ask if that electrician needs any lead time for scheduling.
– “Do you have backup power or guidelines for outages?” – It can be useful to know if the venue has a standby generator for emergency lights or if, in case of a grid outage, they have any ability to keep the show going. Their answer might be, “We have an emergency generator that will keep exit lights and minimal lighting on, but not the show equipment.” This at least tells you what to expect. If the show must go on no matter what (e.g., a televised event), you’d then plan for renting backup generators and UPS systems accordingly.
Tips for Organizers (Power)
- Consult with a Qualified Electrician: When in doubt, bring in a licensed electrician or professional production power technician to assess the venue’s power with you. They can interpret the power specs correctly and ensure your plan is safe. Many production companies have a “dimmer beach” or power tech who travels for exactly this purpose – making sure power distro is done right. If you’re not comfortable with high-voltage ties, don’t attempt it yourself. The electrician can also use tools (like multimeters) on-site to verify voltages, phase rotation (for three-phase systems), etc., during load-in.
- Use a Detailed Power Advance Sheet: Create a power advance document listing every piece of gear and its wattage/current draw, broken down by category (audio, lighting, video, backline, etc.). Also mark which items will plug in where (on what circuit or power distro channel). Share this with the venue’s ops team in advance. This not only shows professionalism, it helps them verify that their infrastructure can support your needs. It also serves as a checklist on show day – you’ll know exactly how to lay out power and can ensure critical gear isn’t all on one circuit.
- Plan an On-site Technical Inspection: If the venue is particularly important or technically challenging (say it’s an old theater with questionable wiring, or a brand-new venue you’ve never been to), schedule an on-site visit specifically to inspect power and other tech systems. This might be during the booking phase or a few weeks out. During this visit, locate all power outlets, panels, and breakers you’ll use. Make sure nothing has changed since the spec sheet (e.g., sometimes venues upgrade or modify systems – a new HVAC might draw from what was once “extra” power). Also identify cable run routes (how you’ll run feeder cables or extension cords) so you can bring appropriate lengths and ramp covers.
- Plan for Power Contingencies: Despite best efforts, things happen – a breaker might trip or a generator might struggle. Have a contingency: e.g., keep some critical gear on UPS (Uninterruptible Power Supply) units, so that if power blinks, your mixing console, lighting console, and other electronics don’t shut off (preventing a lengthy reboot mid-show). Another example: if you’re pushing the limits of venue power, maybe have a couple of non-essential lighting fixtures you could turn off if needed to reduce load (rather than everything going down). In outdoor events, have extra fuel and someone designated to fuel generators on a schedule. Essentially, adopt a “what if” mindset for power – what if the primary feed fails? What if one phase of the generator goes out? Thinking these through in advance can save your event if an issue arises. As noted in our guide to technical planning for concert venues, robust planning for sound, lighting and power is at the heart of flawless productions.
Our technical event planning guide for concert venues is another useful resource that delves into power planning and other production logistics in concert settings, complementing what we’ve discussed here.
Free Tool: When Should You Announce?
Pick your event date and genre — the free planner outputs a recommended announce, presale, on-sale and reminder schedule anchored to how your audience actually buys.
4. Venue Size and Capacity
The size and capacity of a venue are fundamental factors that influence not just how many tickets you can sell, but the comfort, safety, and atmosphere of the event. A venue that’s too small will feel overcrowded and may become unsafe or just unpleasant. Conversely, a venue too large for your event can sap energy – a half-empty room makes even a great show feel less exciting and can be a financial waste if you’re paying for unused space.
Event planners should carefully evaluate a venue’s stated capacity and consider how that aligns with the expected attendance and the nature of the event. Keep in mind:
– Real vs. Stated Capacity: A room might be rated for 500 people by fire code, but that may not account for a stage you add, camera platforms, or banquet tables. If your event has a lot of production gear or seating areas, the usable capacity might drop. Always clarify if the stated capacity is for a standing general admission concert (usually the max number) versus a seated arrangement. When you do a site visit, imagine an audience in there – will they all have a decent sightline? Enough space to dance or move? For seated events, what’s the optimal seating layout and count?
– Audience Comfort and Experience: The goal is to match venue size to event type for an optimal atmosphere. A packed house can be thrilling, but not if it’s over-packed to the point of long lines, overcrowded exitways, or no room to breathe. On the other hand, having some “elbow room” is good – casual networking or VIP areas are tough if everyone is shoulder-to-shoulder. For conferences or corporate events, a slightly larger space accommodating lounge areas or sponsor booths might be needed beyond just fitting chairs for attendees. Consider ceiling height too – a high ceiling can give a spacious feel even in a smaller floor area, and can improve acoustics. Low ceilings can make a room feel tight and also impact sound (bass frequencies, for instance).
– Layout and Flexibility: Look at the layout: is it a single open hall, or multiple rooms? A dynamic venue with multiple spaces (e.g., a main hall plus side rooms or an outdoor patio) can enhance the experience by providing breakout areas, quieter zones for conversation, or secondary entertainment. It adds versatility – for example, a music festival might want a small stage in the lobby for acoustic acts while the main stage resets, or a conference might need breakout rooms for workshops. Check if dividing walls exist to section the space for smaller sub-events. Also assess the shape of the space (long and narrow, wide and shallow, etc.) as that affects sound distribution and sightlines. Pillars or columns are another aspect – they can obstruct views and even sound, so note their placement.
– Event Type Considerations: Different event types have different ideal capacities/venues. A corporate gala with round tables might require a ballroom setting for 300 people, whereas the same room could hold 600 standing for a concert. A wedding might prefer a venue that doesn’t feel empty if only 100 guests attend, so a cozy setting with smaller rooms might work better than a giant hall. Private concerts or fan club shows often intentionally choose smaller venues to create intimacy, even if the artist could fill a larger one. Always align the venue choice with the vibe you want – intimate and exclusive, or massive and communal. Also consider demographics: are your attendees likely to all show up at once (concert) or trickle in and out (trade show)? That affects how entryways and space are used at peak times.
– Safety and Regulations: From a safety perspective, never push beyond capacity. Ensure there’s a buffer. If you expect 1,000 attendees, don’t book a 1,000 cap venue – aim higher to account for staff, press, and unplanned extras, or just to give that buffer for comfort. Pay attention to egress (exit routes); a bigger crowd in a space means more time to evacuate in an emergency. The venue capacity is usually tied to the number and width of exits, so don’t add obstructions. This is part of technical evaluation too: a venue might have the sound and lights you need, but if it’s unsound from a crowd safety standpoint, it’s not a good choice. (We all recall cautionary tales of events that tragically became unsafe due to overcrowding – part of trustworthiness in event planning is not letting that happen.)
In essence, selecting the right size venue is about balance. You want a space that can comfortably accommodate your audience and production, but still feel full of energy. Consider the audience-performer interaction too: a moderate-sized venue can create a personal connection where an artist can see and engage with faces in the crowd, whereas in a stadium the dynamic is different (giant screens and big gestures come into play). Think about what suits your event’s goals. One rule of thumb many planners use is: choose the smallest venue that can comfortably hold your event – this tends to maximize atmosphere and often is cost-effective, but ensure “comfortably” truly means people aren’t cramped.
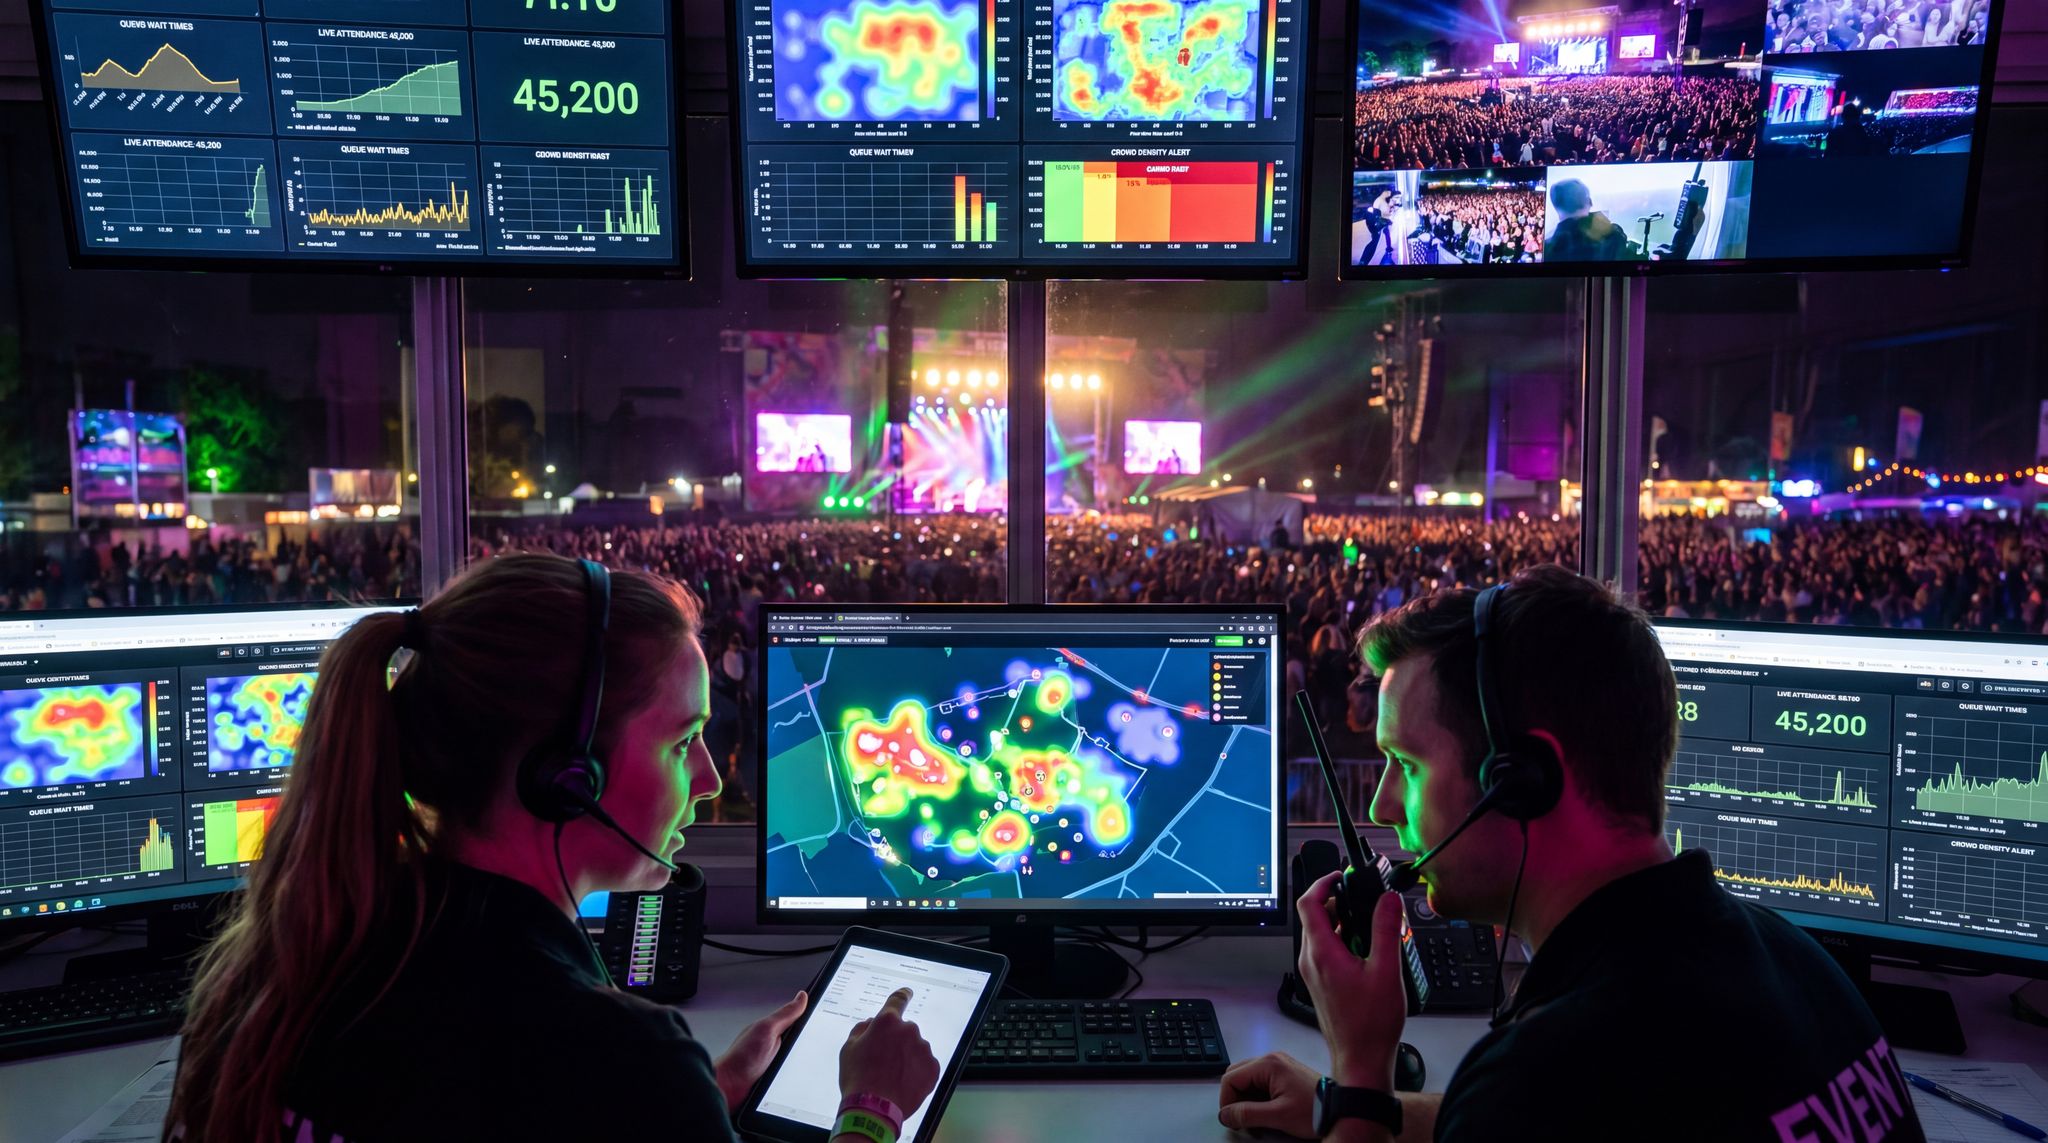
For larger or open-air sites, modern venue evaluation increasingly relies on data-driven tools. Utilizing outdoor venue occupancy analytics can provide real-time insights into crowd density, flow bottlenecks, and peak utilization areas. By deploying camera-based or Wi-Fi tracking analytics, organizers can monitor whether specific zones are approaching unsafe capacities and dynamically redirect foot traffic or adjust security deployments. This level of operational intelligence is becoming a standard requirement for large-scale festival site planning.
Venue Amenities and Additional Technical Features
Beyond the core sound, lighting, and power, a venue’s amenities and built-in features can significantly enhance or limit your event’s potential. Amenities can range from in-house AV gear to the quality of backstage facilities or the availability of on-site catering. When evaluating a venue, take a holistic look at these extras – they often intersect with technical needs. For example, a venue boasting a high-speed internet connection might enable live streaming of your event, or a venue with an in-house LED video wall can save you the cost of renting one.
Assessing Built-in AV Equipment and Acoustics
Some venues come turnkey with a lot of audiovisual equipment ready to use, which can be a big advantage:
– Audio-Visual (AV) Equipment: Does the venue provide projectors, LED screens, or display monitors? This is especially relevant for conferences, award ceremonies, or events with visual content. A quality projector and screen setup (with proper brightness for the room’s size and lighting conditions) or large LED panels can greatly enhance presentations or sponsor visibility. Check the resolution and aspect ratio – for instance, if you have videos in 16:9 HD, the projector should support that without letterboxing. Also verify if they have a video switcher or control system if you plan to switch between multiple sources (like slides, live camera feed, video playback). If the venue has an LED video wall backdrop on stage, get its specifications (pixel pitch, dimensions, how it connects to your content system). Using built-in screens can save cost, but ensure they are up to the quality needed.
– Built-in Lighting & Effects: We discussed stage lighting, but some venues have extra lighting amenities – for example, architectural lighting that can change colors of the room, or intelligent lighting that doubles as decor (like LED strips on walls). Modern event spaces might also have effects like LED pixel tubes, “party” lights for dance floor sections, etc., that you can tap into. Ask if they have special effect machines (haze/fog, CO2 jets, confetti cannons, etc.) available in-house. If so, you’ll need to coordinate their use (and refills) but it could add wow-factor without outsourcing.
– Acoustics and Sound Reinforcement: We touched on acoustics in the sound section, but it’s worth reiterating as an amenity: some venues are designed for sound. A concert hall might have a tuned acoustic design that makes even unamplified orchestras sound great; a club might have custom-built bass traps to support thumping DJs without rattling the neighborhood. On the flip side, some venues might offer portable acoustic panels or curtains that can be adjusted to modify the reverb in the room (e.g., covering reflective windows or hard walls when needed). If you know the venue has adjustable acoustics, that’s a fantastic feature – it’s like tuning the room itself as part of your production. Low-tech check: if the venue has heavy curtains or drapes, find out if they can be opened or closed to affect sound and light as needed.
– High-Speed Internet and Connectivity: In 2026, many events incorporate live streaming, social media walls, or interactive audience apps – all of which demand reliable internet. Check if the venue has dedicated high-speed internet lines, and whether it’s Wi-Fi, wired, or both. For a tech-heavy event you might need a dedicated wired line (often venues can provide a VLAN or a dedicated bandwidth if arranged). Ask about the upload speed if you’re streaming out, and the Wi-Fi capacity if hundreds or thousands of attendees will be online. Some venues may charge extra for premium bandwidth, so get details. Also, consider phone signal boosters or DAS (Distributed Antenna Systems) in large venues – if it’s a concrete stadium, do people get cell service inside? Lack of connectivity can frustrate guests and vendors (e.g., if point-of-sale systems can’t connect). This may not be a deal-breaker for choosing a venue, but it’s part of technical prep (you might bring in a temporary Wi-Fi or tell attendees in advance if signal is bad, etc.).
– Streaming and Broadcast Capabilities: If your event might involve broadcasting, see if the venue has a built-in control room or fiber lines for broadcast trucks. Some modern venues tout their live-stream readiness with multiple camera points, a video director booth, and direct fiber to web uplink. While this is more common in convention centers and arenas, even some mid-size venues have started adding these to attract business. Having those capabilities in-house means you can do things like multi-camera IMAG (image magnification on big screens) or live-stream the event more easily. If these don’t exist, you’d be looking at bringing in an outside vendor to set it up.
Interactive Seating for Every Venue
Let fans pick their perfect seat with interactive venue maps. Supports reserved seating, section-based pricing, and real-time availability.
For organizers wondering how to choose an event venue with built-in AV equipment and a stage, the secret lies in treating the site visit as a rigorous technical audit rather than a casual walkthrough. A comprehensive guide to evaluating AV equipment starts with requesting the maintenance logs and testing the gear under load. Don’t just look at the projector; ask to see it fired up with your specific media format. When you evaluate possible concert visuals, such as in-house LED volumes or projection mapping systems, check the pixel pitch, refresh rates, and processing latency. High-end visuals require robust media servers and seamless integration with the lighting console. If the venue’s built-in stage and AV package meet these technical thresholds, you can significantly reduce your external rental costs while maintaining top-tier production value.
Ultimately, evaluate how these AV amenities either meet your needs or reduce your costs. If a venue saves you from renting tons of screens or speakers, factor that into its value when comparing venues.
Additional Features Impacting Technical Capabilities
Consider other venue features that, while not strictly “AV equipment,” will impact your technical planning and the event’s execution:
– Breakout Rooms and Multi-Room Audio: If a venue has multiple rooms (as part of its capacity or amenity), think about whether you need audio or video feeds between them. For example, a conference might have a main hall and side breakout rooms – do you need a PA in the lobby for announcements or overflow viewing? If the venue already has an integrated system (like speakers throughout a ballroom complex or the ability to patch audio to different rooms), it’s a big plus. Some venues even have simultaneous translation booths or assistive listening systems – relevant for international conferences or accessible events.
– Comfort and Climate Control: This might not seem technical, but production gear and attendee comfort both depend on climate. An overcrowded room can get hot – does the venue have robust HVAC (air conditioning/heating) that can handle a full house plus tons of stage lights (which can throw off heat)? Gear like projectors also needs a well-ventilated space. While checking the tech, also ask, “How’s the ventilation and AC when the room is full?” Veteran venues will know and may say, “We bring in extra fans” or “We have a brand new AC system as of 2025.” It’s part of ensuring the tech doesn’t falter (some lighting instruments can shut down if overheating, for example) and the crowd stays comfortable, which is part of the overall experience. This also hints at power – big HVAC draws power, but presumably separate from your production power.
– Seating and Staging Options: Does the venue have modular staging or risers you can use? If you need a stage and the venue has a built-in one or platforms, that saves a lot of hassle. Check the stage dimensions and weight capacity (especially if you have heavy set pieces or a dance troupe jumping around – the stage must hold up). If the venue is a flat floor, can they provide staging, or would you rent a stage? Also, if it’s a venue that can do seated or GA, ask if they have in-house seating (chairs, tables) and if those are included or available for rent. From a technical perspective, seating affects layout for audio coverage and lighting focus – e.g., if they have tiered seating or cabaret tables, you adjust your production accordingly.
– Back-of-House Facilities: A strong production approach also considers the experience of performers and crew. What’s backstage? Are there green rooms, dressing rooms, production offices, loading docks, storage space for cases? A venue with a couple of dressing rooms equipped with mirrors, lights, restrooms can keep artists happy and thus shows on time. A production office with internet can be command central for your team. If you have a complex show, space for crew to prep gear or a tuning room for musicians is valuable. While these might not be public-facing, they reflect on the venue’s suitability. For example, an otherwise great hall without any backstage area means your crew might be stacking road cases in a hallway due to lack of storage – inconvenient and potentially unsafe. Know these limits in advance so you can adapt (maybe you’ll need a production truck outside as “backstage” storage in such a case).
– On-Site Services: Lastly, think about services the venue offers that intersect with tech: in-house catering or bar (impacts schedule and power if they use electrical catering gear), security personnel (you might need them to help enforce tech areas, e.g., keeping attendees out of the sound/light console zone), clean-up crew (less technical, but post-event cleaning can affect how and when you load out gear). Some venues provide an on-site event manager or coordinator who becomes your point person – having a knowledgeable venue rep by your side during the event is a boon, as they can quickly call maintenance if a circuit trips or get the air turned up if needed. All these amenities and features, while not raw equipment, form part of the venue’s capability to support a smooth technical execution.
To maximize success, choose a venue that not only has the right capacity and tech infrastructure but also the added features that make your life easier. A place with built-in modern tech, flexible spaces, and supportive staff can often save you money and headaches, even if its base rental cost is higher than a bare-bones alternative.
When weighing these factors, it may help to directly compare venues on key criteria. For example, let’s say you have two venue options for a 1000-person concert: one is a modern theater, and the other is a converted warehouse. You might tabulate their features like so:
| Venue Type & Size | Sound Setup (PA, acoustics) | Lighting Setup (rig, capabilities) | Power & Infrastructure |
|---|---|---|---|
| Modern Theater (capacity 1200) | Professionally installed line-array PA; excellent acoustics with acoustic panels. Comes with in-house sound engineer. | Full lighting rig with LED movers, console (MA Lighting) – pre-hung and customizable. Followspots in balcony. | 400A 3-phase dedicated for prod; separate audio & lighting feeds. Back-up generator for emergencies; proper backstage power distro. |
| Converted Warehouse (capacity 1500) | Minimal built-in PA (might need rental supplement); acoustics are boomy (concrete walls, need extensive damping with drapes). No in-house engineer (bring your own). | Basic PAR cans and a few LED fixtures fixed in place. No pro console (just a small controller) – likely need to bring/rent lighting gear for a full show. | A few 50A circuits – limited power, likely need generator for larger production. No separate circuits (all on one panel). Need cable ramps for running power across crowd. |
In the above comparison, the theater clearly offers more robust built-in tech, which might justify a higher rental if it saves on bringing extra equipment. The warehouse has raw capacity but needs significantly more production overlay. Such a table you’d create for internal decision-making can highlight which venue is truly a better fit technically (and financially after considering rentals). In some cases, the decision is a trade-off: perhaps the warehouse fits the desired “aesthetic” better or is available on your date whereas the theater is not. At least with a full technical evaluation, you go into that choice with eyes open and a plan to address shortcomings.
Venue Comparison and Final Selection
After evaluating multiple venues on all the criteria above – sound, lighting, power, size, amenities – it’s time to compare and select the best fit. This stage is about weighing technical capabilities against other factors like cost, location, and availability. No venue is perfect on every front, so identify which compromises you’re willing to make and which are deal-breakers.
Create a Venue Scorecard: One method is to create a scorecard or spreadsheet listing each factor and scoring each venue. For instance, rate sound system quality, lighting rig, power capacity, location convenience, venue staff cooperation, etc., on a numeric scale. This can make a sometimes subjective process a bit more objective. Include notes for context (e.g., “Venue A: Sound = 8/10 (great PA but low dB limit of 95dB), Lighting = 9/10, Power = 10/10; Venue B: Sound = 6/10 (would need external subs), Lighting = 5/10 (very basic), Power = 6/10 (just enough with generator)”). This summary lets you see the strengths and weaknesses side by side.
Implementing a rigorous venue evaluation protocol also streamlines future planning. Once you have a documented baseline for how a specific space handles heavy production loads, your team can bypass redundant checks on return visits. This historical data becomes an invaluable asset for scaling operations and training new production staff.
Factor in Costs and Logistics: An often deciding factor is budget. A venue with extensive in-house tech might charge higher rent or tech fees, but you save on not bringing in certain rentals or extra crew. Add up those hidden savings or costs. For example, if Venue X is $2,000 more to rent but includes all lighting and an engineer, whereas Venue Y is cheaper but you’d spend $3,000 hiring lights and crew, the true cost favors Venue X. Also, consider logistics like availability of dates (the best venue isn’t an option if it’s booked on your event date!) and penalties or restrictions (some venues might have strict union labor rules or require using their catering/bar which could affect your plans). Technical evaluation should inform your negotiation too: if you know a venue’s weakness (say their projector is old), you might negotiate that you’ll bring your own and maybe ask for a discount or extra setup time at no charge.
Check References and Past Events: Look at what events similar to yours have been at that venue. If it’s a music venue, which artists played there recently? Did they have production comparable to yours? Many venues list past events on their website or social media, and you can often find reviews or even reach out to fellow producers. If you find out, for instance, that another festival tried the warehouse venue and had power issues, that’s a red flag to take seriously (or ensure you solve it differently). In fact, online reviews and case studies regarding venue planning can be very telling – producers often share war stories about venues. Use those insights to double-check claims. The guide to mastering festival venue site planning offers perspective on how top festival producers assess and transform venues, which can inspire your approach even for non-festival events.
Finally, make your decision and proceed confidently knowing that you’ve done your due diligence. Because you examined the technical capabilities thoroughly, you should feel assured that the chosen venue can meet your event’s demands, or that you have a plan to supplement any deficiencies. Document your requirements clearly in any contracts or advance paperwork. For example, if the venue agreed to provide additional monitors or to allow early load-in for extra setup time, get that in writing. Good communication and documentation at this stage prevent surprises later.
The next steps after selection are advancing the event with the venue and integrating your technical requirements into the production plan – which we’ll cover next.
5. Venue Advance and Technical Rider Integration
Once a venue is selected, the work isn’t over. In fact, the crucial phase of advancing the show begins – aligning your production’s technical needs with the venue’s specifics in detail. This is where your earlier evaluation gets put into action. Two key tools in this phase are the technical advance checklist and the technical rider (for tours or artists) that you share with the venue.
Create a Technical Advance Checklist
A technical advance checklist is essentially a comprehensive to-do list and info packet that ensures nothing falls through the cracks. Here’s how to build and use one:
– Line-by-Line Equipment & Needs Walkthrough: Outline every major aspect of your production and how it will interface with the venue. This includes staging (stage size, risers, barricades), audio (number of inputs, stage layout for monitors, microphone stands, etc.), lighting (fixtures you bring, how they integrate with house lights), video (if any screens or content playback, detail the sources and connections), special effects (like pyro or confetti, which often require special permission), and crew needs (how many hands you need for load-in, etc.). Under each, list the plan and who’s responsible. For example: “Drum kit: venue to provide drum riser 8’x8’, we provide drum set; need 4 XLR inputs for drums; mic stands – venue to supply 3 tall booms.” You basically script the setup.
– Incorporate Venue Specifics (Location, Accessibility): Your checklist should highlight key venue considerations such as location-based needs. If the venue is on the 3rd floor of a building, note “Freight elevator dimensions ___, must reserve elevator with venue at 9am.” If loading is through a narrow door, note “Mixing console (on wheels) fits through 32” door – OK.” This also includes accessibility for attendees: if the venue has no ADA ramp to stage and you have a speaker in a wheelchair, plan a solution now. Any restraints like “Loading dock only available after 5pm” should be in the schedule bullet points.
– Stage Layouts, Diagrams & Photos: Include stage plots, lighting plots, and even seating charts if applicable in your advance packet. Visual aids prevent misunderstandings. If you have custom stage props or set pieces, include photos/dimensions so the venue can foresee any issues getting them in or onto the stage. Diagram out where FOH position will be, and where followspot ops will be (and ensure those positions exist physically). If pyro or drones are in use, mark clear zones as required by safety codes. Also, it’s helpful to have a venue schematic (many venues can provide this) for backstage and front-of-house so your team knows the lay of the land.
– Schedule Coordination: Work out a detailed production schedule in collaboration with the venue. This will have load-in start time, soundcheck times, doors open, curfew, and load-out times. Remember to schedule in buffers for unforeseen delays – events often get behind if you don’t. Coordinate with the venue on when their staff (technicians, security, cleaners) will be present. For instance, if your checklist says “Soundcheck at 4pm”, make sure the venue’s sound tech is called by 3:30. If the venue has multiple events in a day, ensure your schedule is compatible. List when catering will be delivered (if providing crew food), when crew breaks are, etc. A run-of-show, starting from load-in to load-out, shared ahead of time aligns everyone.
– Local Crew and Responsibilities: Note which tasks will be handled by local crew versus your touring crew. For example, will the venue’s personnel help unload trucks? (Many will, but sometimes at an extra labor cost or union rules apply.) Who will operate spotlights – your team or venue staff? If union labor is mandatory for certain positions (common in big city theaters or arenas), outline how many stagehands, riggers, loaders you’ll need and confirm with venue. It’s also wise to have one person from your team assigned as the point-of-contact for venue staff to avoid confusion (this could be a production manager or stage manager). Mark that on the checklist: “Communication: All tech communications go through [Name], who will liaise with venue production manager.”
– Contingencies and Extra Requests: The advance is the time to address “what ifs.” For instance, if your show is outdoors, what’s the rain plan with the venue? If an artist arrives late, can soundcheck be cut short? Include emergency contacts for both sides (venue manager cell, your production lead cell). If you need an on-site box office or special merch setup, note it and confirm location and power for it. Essentially, anything out of the ordinary should be written down and agreed on. A thorough advance checklist is often shared via email and possibly in a shared document so both you and the venue can refer to it and update it as needed leading up to the event.
By conducting a technical advance call or site visit using this checklist, you reconcile your needs with reality. When the day comes, everyone is on the same page and you’re not scrambling to, say, find an extra power cable or rearrange seating last-minute – because you anticipated it weeks prior.
Customize and Communicate Your Technical Rider
If you’re managing a tour or working with artists, you’ll be familiar with the technical rider – a document that details an artist’s requirements from the venue. From the venue evaluation stage, you likely already looked at whether the rider can be met. Now, it’s about customizing it and communicating any adjustments.
- Make the Rider a Two-Way Document: While the artist’s tech rider lists their “ideal” scenario, each venue stop often involves tweaking that rider to fit the venue. Don’t shy away from marking up the rider per venue. A good format is to send an updated version for that show to the venue, highlighting any alternate configurations or agreed changes. For example, if the standard rider requests a Midas PRO X console but the venue only has a Yamaha CL5, the updated advance doc should clearly state “FOH Console: Yamaha CL5 (venue’s console) will be used in lieu of Midas – [Artist Engineer Approved].” This way, come show day, nobody is insisting on something that was already settled.
- Highlight Non-Negotiables: Ensure any non-negotiable items from the artist or production are clearly emphasized. If the band absolutely must have 4 monitor mixes with reverb on vocals, or if the presenter needs a confidence monitor on stage for slides, put that in bold. These are the items you perhaps chose the venue for or arranged from a vendor specifically. Making them clear in communications ensures the venue knows where not to cut corners. Non-negotiables could also include things like a requirement for soundcheck length (e.g., “Minimum 1-hour soundcheck required – artist will not perform without it”). It could be certain security measures (like “No crowd control barricade = show cannot proceed” for big artists). By flagging these, you give the venue a chance early to say if something is impossible, and you can find solutions.
- Be Flexible and Provide Options: Conversely, show flexibility in areas that are adaptable. The tour rider might have, say, a preference for specific moving lights, but maybe the venue’s are fine. Indicate in the advance: “Lighting: House rig acceptable – our LD will adapt show file to venue’s fixtures (list of fixtures attached).” If the stage is slightly smaller than ideal, mention how you’ll adapt the set or placements. This demonstrates professionalism and makes the collaboration smoother. Venue teams appreciate when incoming productions have done their homework and aren’t asking for the moon when they know the limitations. For example, “Due to stage depth 20’ (vs. our usual 24’), we will reduce downstage riser from 8’x8’ to 8’x6’ to fit – please provide 8’x6’ if possible.” You’ve solved the issue proactively.
- Document Everything and Share Widely: Once you and the venue have agreed on the technical plan (via emails or calls), consolidate that into a final event sheet or production brief that both teams have. This could be a multi-page document combining schedule, input lists, stage plots, staffing, and contact info. Send it out a week or two ahead and ask key personnel to confirm. It might feel redundant, but having that single source-of-truth document is a lifesaver if any disputes or confusion arise. It’s not uncommon, for example, for a detail to slip through – say the venue thought you were bringing your own mic stands but you assumed they’d provide. If it’s in the doc, there’s no ambiguity.
To sum up, advancing the venue and integrating the tech rider is about adapting and ensuring alignment. You’re tailoring the ideal plan to the real-world venue conditions while fiercely protecting the most important aspects of the production. By the time you load in, there should be no major surprises – and if there are (life happens!), you’ve built a good rapport with the venue so you can solve them as partners.
6. Common Red Flags and How to Avoid Them
Even with careful evaluation and advance work, some issues only surface when you’re on site – or worse, when the audience is already filing in. Here are some common red flags that a venue might not meet expectations, and advice on how to avoid or mitigate them:
- Outdated or Incomplete Tech Specs: If the venue’s technical specification document (or website info) seems outdated – for instance, mentioning gear that’s no longer made or a configuration that doesn’t match what you see on site – that’s a red flag. It could indicate the venue management isn’t technically savvy or hasn’t maintained their systems. Avoidance: Always verify specs with a conversation or a site visit. If you only have a PDF from 5 years ago, ask “Is this still current? Have there been any upgrades or changes?” Some venues might have upgraded to all LED lighting last year but not updated the sheet, or conversely, they might have removed some gear. The walkthrough (in-person or virtual) is crucial – literally, walking through the venue with the tech sheet and checking each item can catch discrepancies. If something is incomplete or unclear, insist the venue updates you. It’s in their interest too to avoid showtime snafus.
- Lack of On-site Technical Support: When a venue offers great equipment but no staff to run or troubleshoot it, that can be problematic. For instance, a venue might brag about their sound system, but if there’s no in-house sound engineer and your team isn’t familiar with that particular console, you could waste precious time figuring it out or correcting issues. Avoidance: If a venue does not include a qualified tech crew, strongly consider hiring one for the night – either through the venue (they often can recommend freelancers) or bringing someone with you. Budget for this in advance so it’s not a surprise cost. Also, probe the venue’s staff skill level: sometimes a junior “venue manager” might be the only person around, who knows how to reset a breaker but not much else. If that’s the case, make sure your team has all the expertise needed (bring an extra audio tech if needed, for example). During advance, ask scenario questions: “If a lighting fixture goes down during the show, is there a house electrician who can assist?” Their answer will tell you a lot.
- Insufficient Load-in Access: Red flag signs include: no loading dock (meaning you have to use a passenger elevator or carry equipment up stairs), narrow doorways that obviously can’t fit large cases or staging, or restrictive load-in times (like only a 30-minute window to drop gear on a busy street). Avoidance: Plan a site recce (reconnaissance) specifically for load-in logistics. Measure doorways if needed. There have been nightmare stories where a band’s 96-channel mixing console couldn’t fit through a theater’s historic door, so they had to mix from the hallway – don’t let that be you. If no freight elevator exists and you’re above ground floor, hire extra stagehands to schlep gear up stairs (and schedule the time for it) – and consider lighter/smaller equipment if possible for that show. If street loading is the only way, arrange permits or traffic management if needed so you’re not rushed. Knowing these challenges, you can either adapt (smaller truck, different load-in order, etc.) or, if it’s too severe, choose a different venue.
- Poor Acoustics or Sightlines: Some venues just inherently have bad sound due to shape or materials (like a glossy tile ballroom with zero soundproofing) or have obstructed views due to columns or low ceilings. That’s a red flag if your event experience heavily relies on clear sound and visibility. Avoidance: If you really love the venue for other reasons (location, vibe), you might bring in solutions: portable acoustic treatments (there are companies that provide freestanding absorption panels or even drapery you can hang to dampen a room). For sightlines, maybe you raise the stage or add IMAG screens so people can see the action even if a pillar blocks their view. Communicate with attendees in problematic areas (like label “obstructed view” on tickets or reduce price for those seats if ticketed). However, if these issues are too severe and can’t be remedied, it’s better to pass on the venue in the planning stage than to deal with unhappy attendees later. Again, checking reviews from previous events is smart: if you see multiple comments “sound was echoey” or “couldn’t see the stage,” pay heed.
- Equipment Failures or Maintenance Issues: A venue might have good gear on paper, but if it’s poorly maintained (blown speakers, dim projector bulbs, glitchy lighting fixtures), that’s a red flag. You might catch hints of this if, say, during site visit a speaker grill is rattling or the house lights flicker. Avoidance: Ask the venue when their equipment was last serviced or if they have spare units. A professional venue will have a maintenance schedule and spares ready. You can even request a test during advance – for example, “Can we do a quick system test when I visit?” Step on stage, play something through the system, and see how it sounds. For lighting, you could ask them to turn everything on or do a demo look. Use your ears and eyes. If you detect issues, address them: “That stage left high-mid speaker sounds distorted – is it functioning correctly?” It puts them on notice that you noticed. In some cases, you may decide to bypass faulty gear (e.g., rent your own projector if theirs is dim, or bring a couple of your own mics if theirs look ancient). Documenting any concerns in advance emails also covers you, so later they can’t claim ignorance.
- Surprise Costs or Rule Restrictions: Sometimes not obvious until later are things like exorbitant power charges (e.g., the venue charges extra for every 20A circuit you use, or demands you use their AV vendor at high cost) – these can be red flags that complicate your tech planning or blow the budget. Or restrictions such as “no confetti allowed” or “haze machine will trigger fire alarm and is not allowed” can throw a wrench in your planned show. Avoidance: Read the contract and fine print carefully; many venues include an addendum about approved/prohibited effects and additional services charges. Always ask explicitly: “We plan to use haze – is that okay and will alarms be off? Any fee for fire marshal?” or “We need to tie in power – is there a charge or required electrician fee for that?” Surprises in these areas can sometimes be negotiated if caught early (e.g., maybe you can split the cost of an electrician or agree on using battery-operated LED candles instead of haze for atmosphere if haze is a no-go). The critical thing is no assumptions – if something is important to your event, verify it.
- Negative Past Event Feedback: You touched on this earlier, but it’s worth stating plainly: if you find consistent negative feedback about a venue’s technical capability or staff, don’t ignore it. Issues like “sound was constantly cutting out at XYZ venue” or “venue staff were uncooperative with our crew” are red flags. While one-off comments can be flukes, patterns matter. Avoidance: Use those insights to grill the venue (tactfully). “I’ve heard that there were some sound cut-out issues in the past at your venue – has that been resolved?” A good venue will explain (“Yes, that happened once due to a power issue which we’ve since fixed with a new distro.”). A sketchy one might dodge or downplay. You can gauge a lot from how they respond to tough questions.
- Transportation and Accessibility Issues: A venue might be technically great but hard to access for attendees (far out of town, limited parking, or poor public transit links). If people arrive late or stressed, that affects the event vibe. Also, lack of accessibility for those with disabilities is a major red flag in terms of inclusivity and compliance. Avoidance: Plan solutions, such as shuttles from key locations if transit is an issue, clear signage and communication about parking, etc. For ADA concerns, if a venue isn’t accessible (e.g., no elevator to a second-floor hall), either arrange temporary provisions (some places can rent wheelchair lifts, or you make a ground-floor viewing area with video feed if needed) or honestly, choose a different venue. Modern events should strive to be accessible – it’s part of trustworthiness and professional ethics. If you do use a challenging venue, communicate clearly with ticket buyers about any limitations so nobody feels blindsided.
By acknowledging these potential red flags early and taking proactive steps, you maintain control over the event’s outcome. Murphy’s Law says anything that can go wrong might go wrong, but with vigilant planning you’ll have addressed the most likely culprits in advance. And if something does slip through, you’ll at least have contingency plans to activate.
To bring it all together: a venue’s technical capabilities and overall suitability can directly impact the success of your event or tour. By aligning venue selection with your event’s objectives, thoroughly evaluating the sound, lighting, and power infrastructure (as well as capacity and amenities), asking the right questions, and conducting diligent advance planning, you set yourself up for a smooth, professional execution. Remember that the goal isn’t just to avoid disaster – it’s to create the optimal conditions for a fantastic show. When the technical side is well-handled, the performers can perform their best, and the audience can fully immerse in the experience.
Additionally, don’t underestimate how the right venue can enhance the magic. A well-chosen venue can amplify the connection between artist and audience – think of that perfect club show where the acoustics made the vocals soar and the lights felt like part of the music. Those are the nights people talk about for years. The technical groundwork you lay is what allows those memorable interactions to happen.
Before we wrap up, here are some top tips and final thoughts to ensure venue evaluation translates into event success:
Final Pro Tips:
– Always advance the venue 2–4 weeks in advance of your event date. Early communication leaves time to address surprises (like replacing a broken projector or securing more crew). Last-minute advances lead to last-minute problems.
– Document everything in a shared production schedule or run-of-show sheet, as well as an email thread. When every detail (from load-in times to who provides gaffer tape) is written down, you create accountability and clarity. Distribute this document to all key team members and the venue.
– Build strong communication lines with the venue’s technical director or production manager. Establish a rapport – if they know you’re cooperative and organized, they’re likely to go the extra mile for you. Have a primary contact at the venue and make sure you can reach them (and vice versa) at any time on event day. Some productions set up a group chat for real-time comms with venue and crew.
– Negotiate smartly and fairly: If during evaluation you found the venue lacking in some area, you can negotiate – perhaps they cover the cost of a generator rental, or throw in extra staffing hours. However, be fair: venues have costs too, and maintaining goodwill can get you future perks. Aim for a win-win – you both want a successful event.
– Stay adaptable on-site: Despite all prep, stay light on your feet during the event. If a minor tech issue arises, solve it calmly – your preparation means it’s likely minor. Audiences are surprisingly forgiving of a brief hiccup if the rest is great. And your thorough prep means you won’t be firefighting multiple issues at once.
With the right venue evaluation and planning, you’ll walk into show day confident in the technical setup and ready to focus on delivering an amazing event. When the lights are perfectly tuned, the sound is crystal clear, and the power hums along without a hitch, you’ll know that all those extra questions and checks were worth it. Now the spotlight can truly shine where it belongs – on the performance and the audience experience, which is the ultimate goal of all this work.
For more insights on venues and event production, explore the Ticket Fairy Blog’s dedicated venues section which is packed with case studies and expert tips. You might also find these articles useful as you continue refining your venue selection and event planning strategies:
– Implementing effective ticketing strategies for concert venues – because selling out the right venue is both an art and a science.
– Selecting the right venues for touring artists – a deeper dive into venue selection factors, complementing what we discussed here, especially useful if you manage tours.
– Technical event planning for concert venues – reinforcing many of the technical aspects we covered, with additional concert-specific context.
Frequently Asked Questions
Why is technical evaluation important for event venues?
Technical evaluation prevents critical failures like power outages or poor audio that can damage an event’s credibility. It ensures compatibility between touring gear and house infrastructure, streamlines load-in logistics, and guarantees safety compliance. Proper assessment mitigates risks, ensuring production quality meets the high expectations of modern audiences.
What should I check when evaluating a venue’s sound system?
Assess the Front-of-House (FOH) PA system type, coverage pattern, and power output to ensure clear audio. Verify the availability of monitor systems, the make of mixing consoles, and the room’s acoustic treatments. Additionally, confirm any local noise ordinances or decibel limits that might restrict volume levels.
How do I determine if a venue has enough power for my event?
Identify if the venue provides three-phase power or standard single-phase outlets and compare the total available amperage against your production’s calculated load. Ensure there are dedicated circuits to separate audio from lighting to prevent interference, and inquire about backup generators or contingency plans for power outages.
What lighting details should be requested in a technical advance?
Request the venue’s lighting plot and patch list to allow designers to pre-program show files offline. Verify the inventory of fixtures, such as moving heads or LED PARs, and check the DMX infrastructure. It is also critical to confirm rigging point load capacities and safety certifications.
What is a technical advance checklist used for?
A technical advance checklist is a comprehensive document outlining every production aspect, including staging, audio inputs, and crew requirements. It incorporates venue specifics like load-in logistics and schedule coordination. This tool ensures alignment between the touring crew and venue staff before arrival, preventing on-site surprises.
What are common red flags when selecting an event venue?
Warning signs include outdated technical specification sheets, a lack of on-site technical support staff, and restrictive load-in access like narrow doorways or no freight elevators. Consistent negative feedback regarding sound quality or equipment maintenance issues in past reviews also indicates potential risks for your production.
How do I choose an event venue with built-in AV equipment and a stage?
Choosing a venue with pre-installed audiovisual gear requires a hands-on technical audit. Use a structured guide to evaluating AV equipment: request maintenance records, test the PA system at show volume, and verify the resolution and latency of any built-in screens or concert visuals. Ensure the existing stage dimensions, weight load capacities, and power distribution align perfectly with your production rider before signing the contract.
How do you conduct an effective venue sound test before booking?
An effective venue sound test involves playing a high-quality, familiar reference track through the house PA system at expected show volumes during your site visit. Walk the entire audience area to identify acoustic anomalies like dead spots, slapback echo, or bass buildup under balconies. This early acoustic evaluation helps production managers determine if additional fill speakers, acoustic treatments, or a different PA configuration will be required to meet the event’s audio standards.
What are the key components of entertainment venue electrical systems?
Modern entertainment venue electrical systems consist of dedicated three-phase power services, isolated technical grounds, and specialized distribution panels (company switches) designed specifically for production use. Evaluating these setups involves verifying the separation of heavy facility loads—like HVAC—from sensitive audio and lighting circuits to prevent voltage drops and electrical noise during a show.
How do I evaluate the tech and AV capabilities of a conference venue before hiring it?
To properly assess a conference facility, start by requesting their comprehensive AV specification sheet and maintenance logs. Schedule a dedicated site visit to test the built-in projectors, LED walls, and PA systems under realistic conditions. Verify the bandwidth of their dedicated internet lines for live streaming, check the availability of breakout room audio patching, and ensure the power distribution can handle your specific stage setup without relying on shared facility circuits.