
Tapahtuman määrittäminen
Create an event
Choose a proven event setup or start from scratch, add the details buyers need, set your sales options and prepare the tickets that will go on sale.
- Kenelle
- Creating a new event and preparing it for ticket sales
- Kestää
- 15 minuuttia
- Select Create Event
- Choose a starting setup
- Answer the template questions
- Select Use this template
- Enter the event name and brand
- Set the dates and times
- Choose the event types
- Add the venue, age limit, description and poster
- Select Next Step
- Set the sales window and buyer options
- Review the ticket types
- Select Create Event
Ennen aloitusta
- You're an owner or admin for the brand running the event.
- You know the event name, date, venue and the currency buyers will use.
- You have a poster or event image ready, if you want the event page to use one now.
- You know the price and quantity for the main ticket type. A template uses those answers to prepare the other ticket types without copying another event's prices.
-
Select Create Event
Select Create Event from the dashboard. The template gallery opens before the event details.
Huomautus: Choose the brand that will own the event when you enter the event details. That brand controls who can work on it and where its sales and customer information appear.
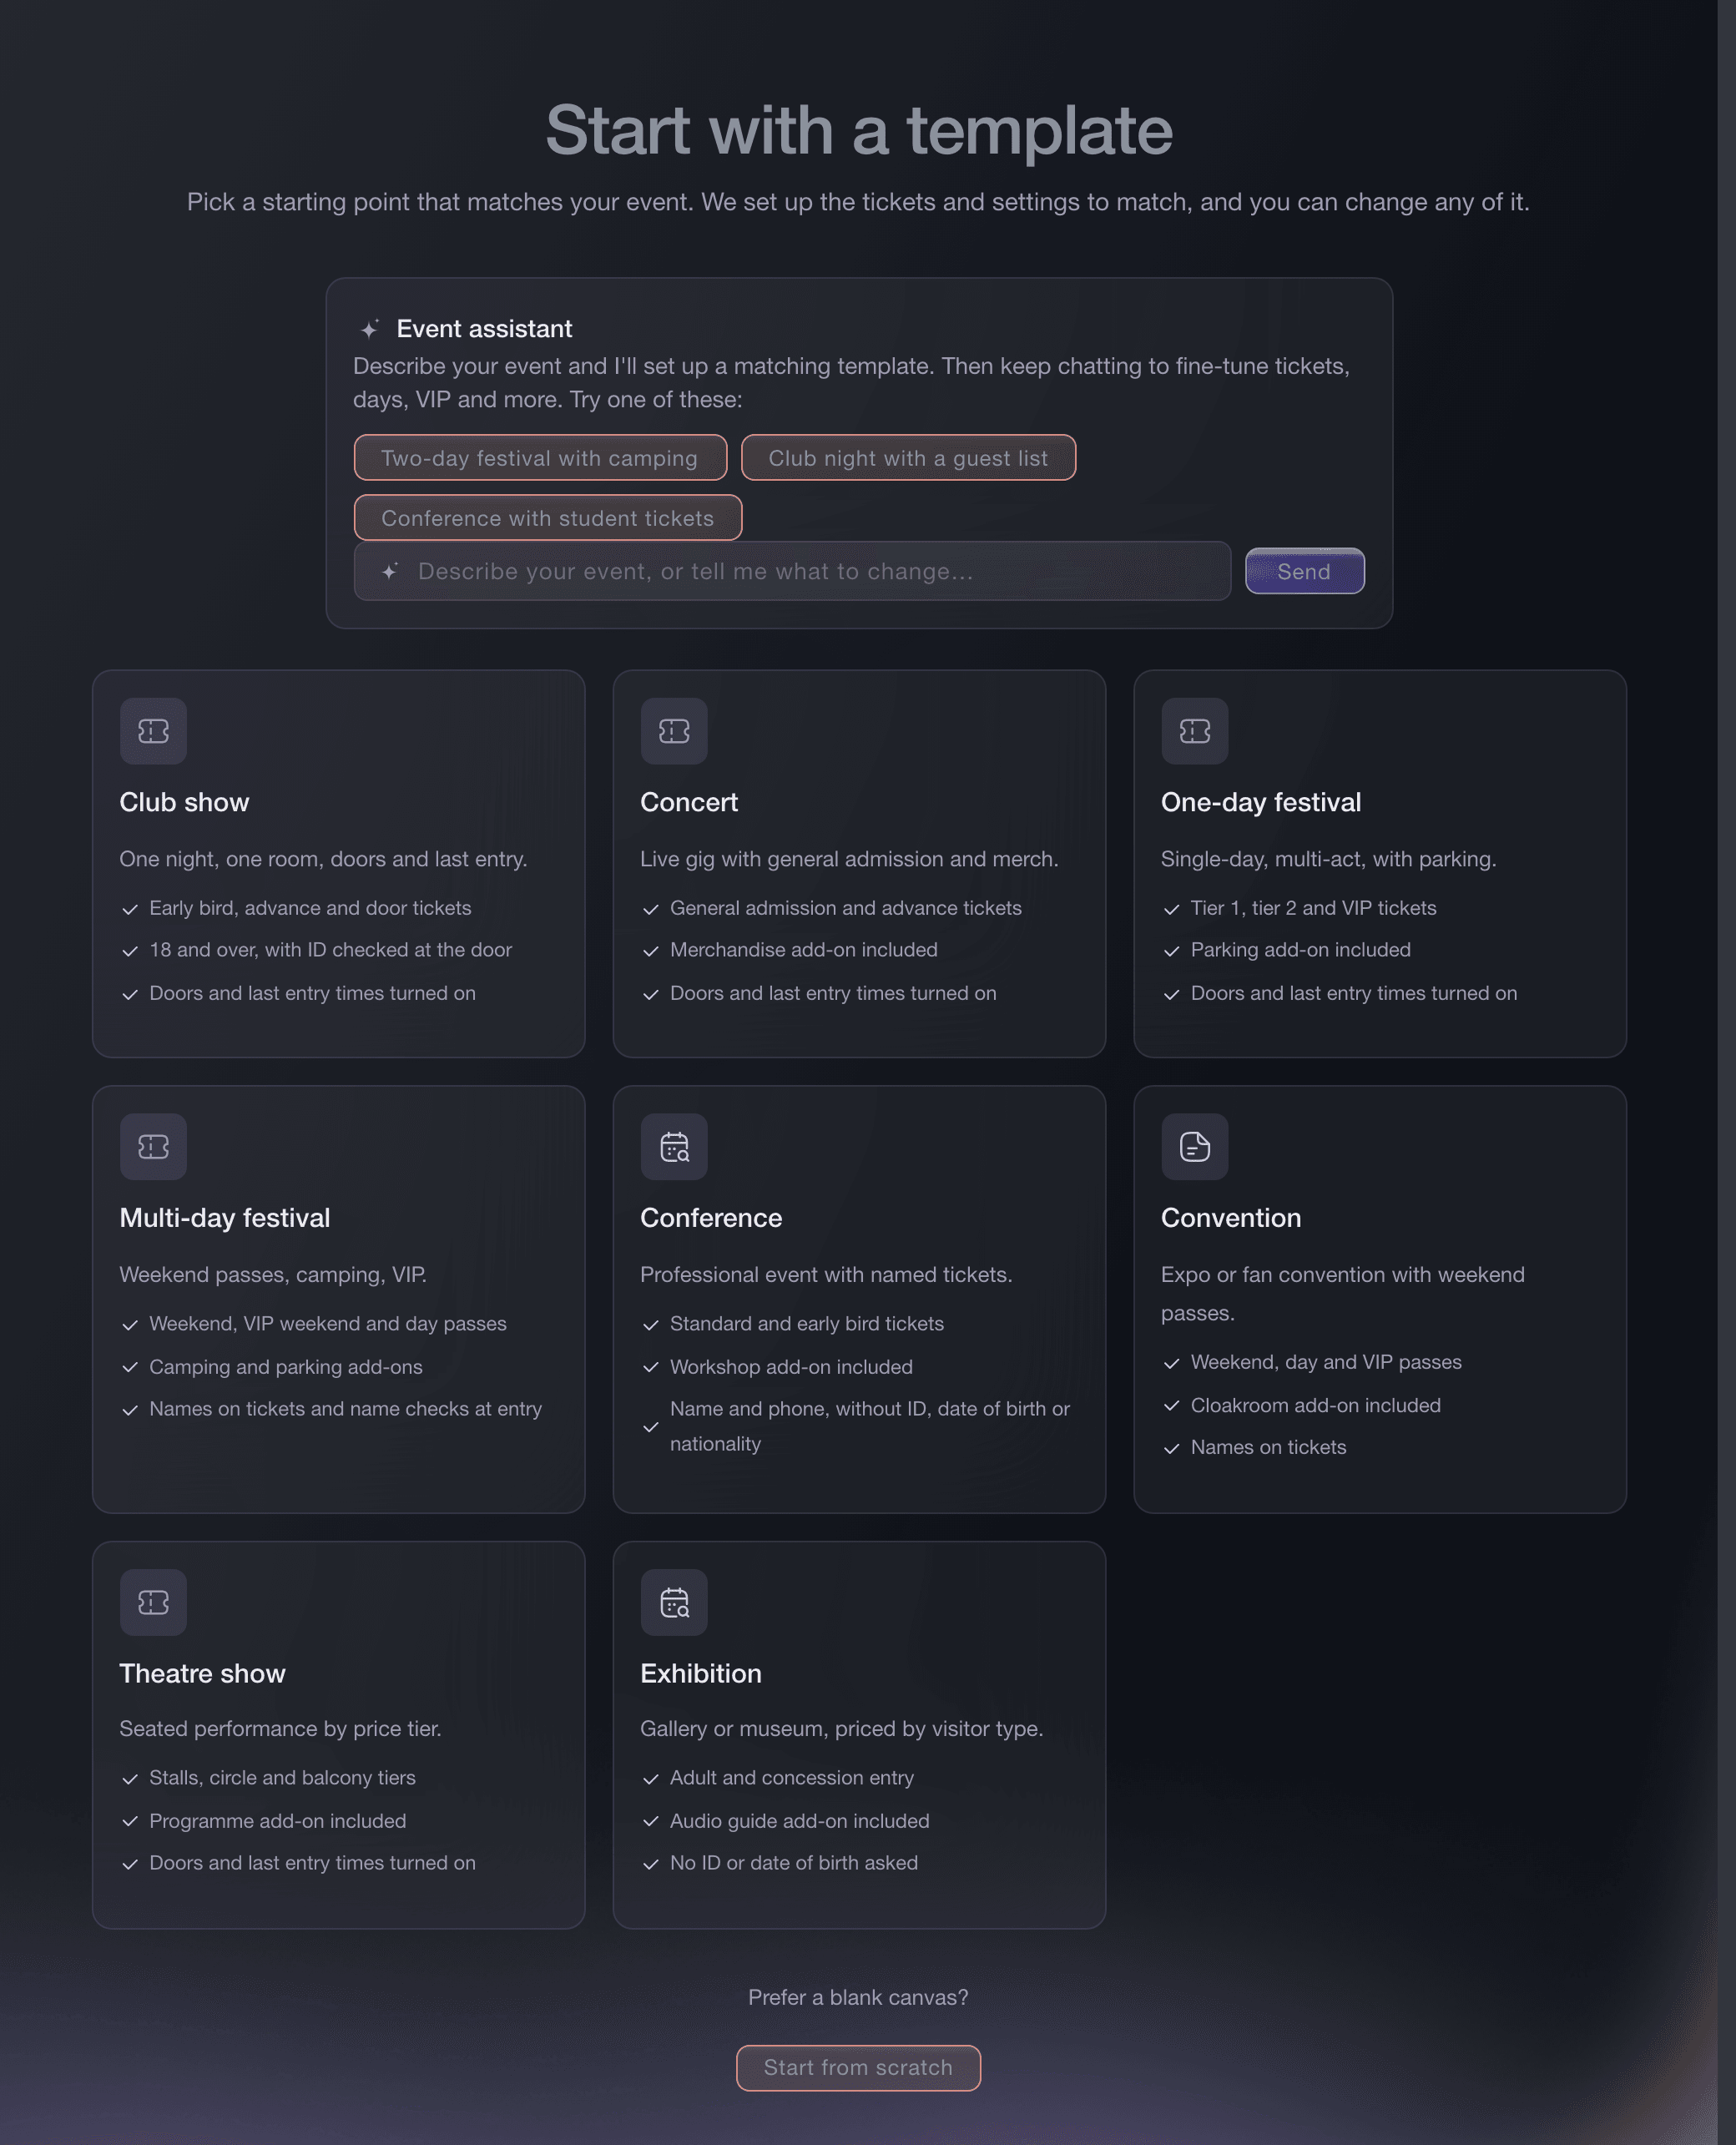
Create Event, template gallery. -
Choose a starting setup
Describe your event to the Event assistant, choose a built-in or organiser-shared template, or select Start from scratch. The built-in gallery includes club shows, concerts, one-day and multi-day festivals, conferences, conventions, theatre shows and exhibitions.
Huomautus: A template prepares ticket types, add-ons and useful defaults, and you can change every part before the event goes on sale. Start from scratch when none of the setups matches the way you plan to sell tickets.
-
Answer the template questions
Enter the answers the chosen template asks for, such as the standard ticket price, capacity, number of days, VIP tickets, guest-list places, camping or parking.
Huomautus: A template gives you a proven combination of ticket types and add-ons without copying another organiser's prices. Ticket Fairy calculates the other starting prices and quantities from your standard price and capacity, and you can change each one later.
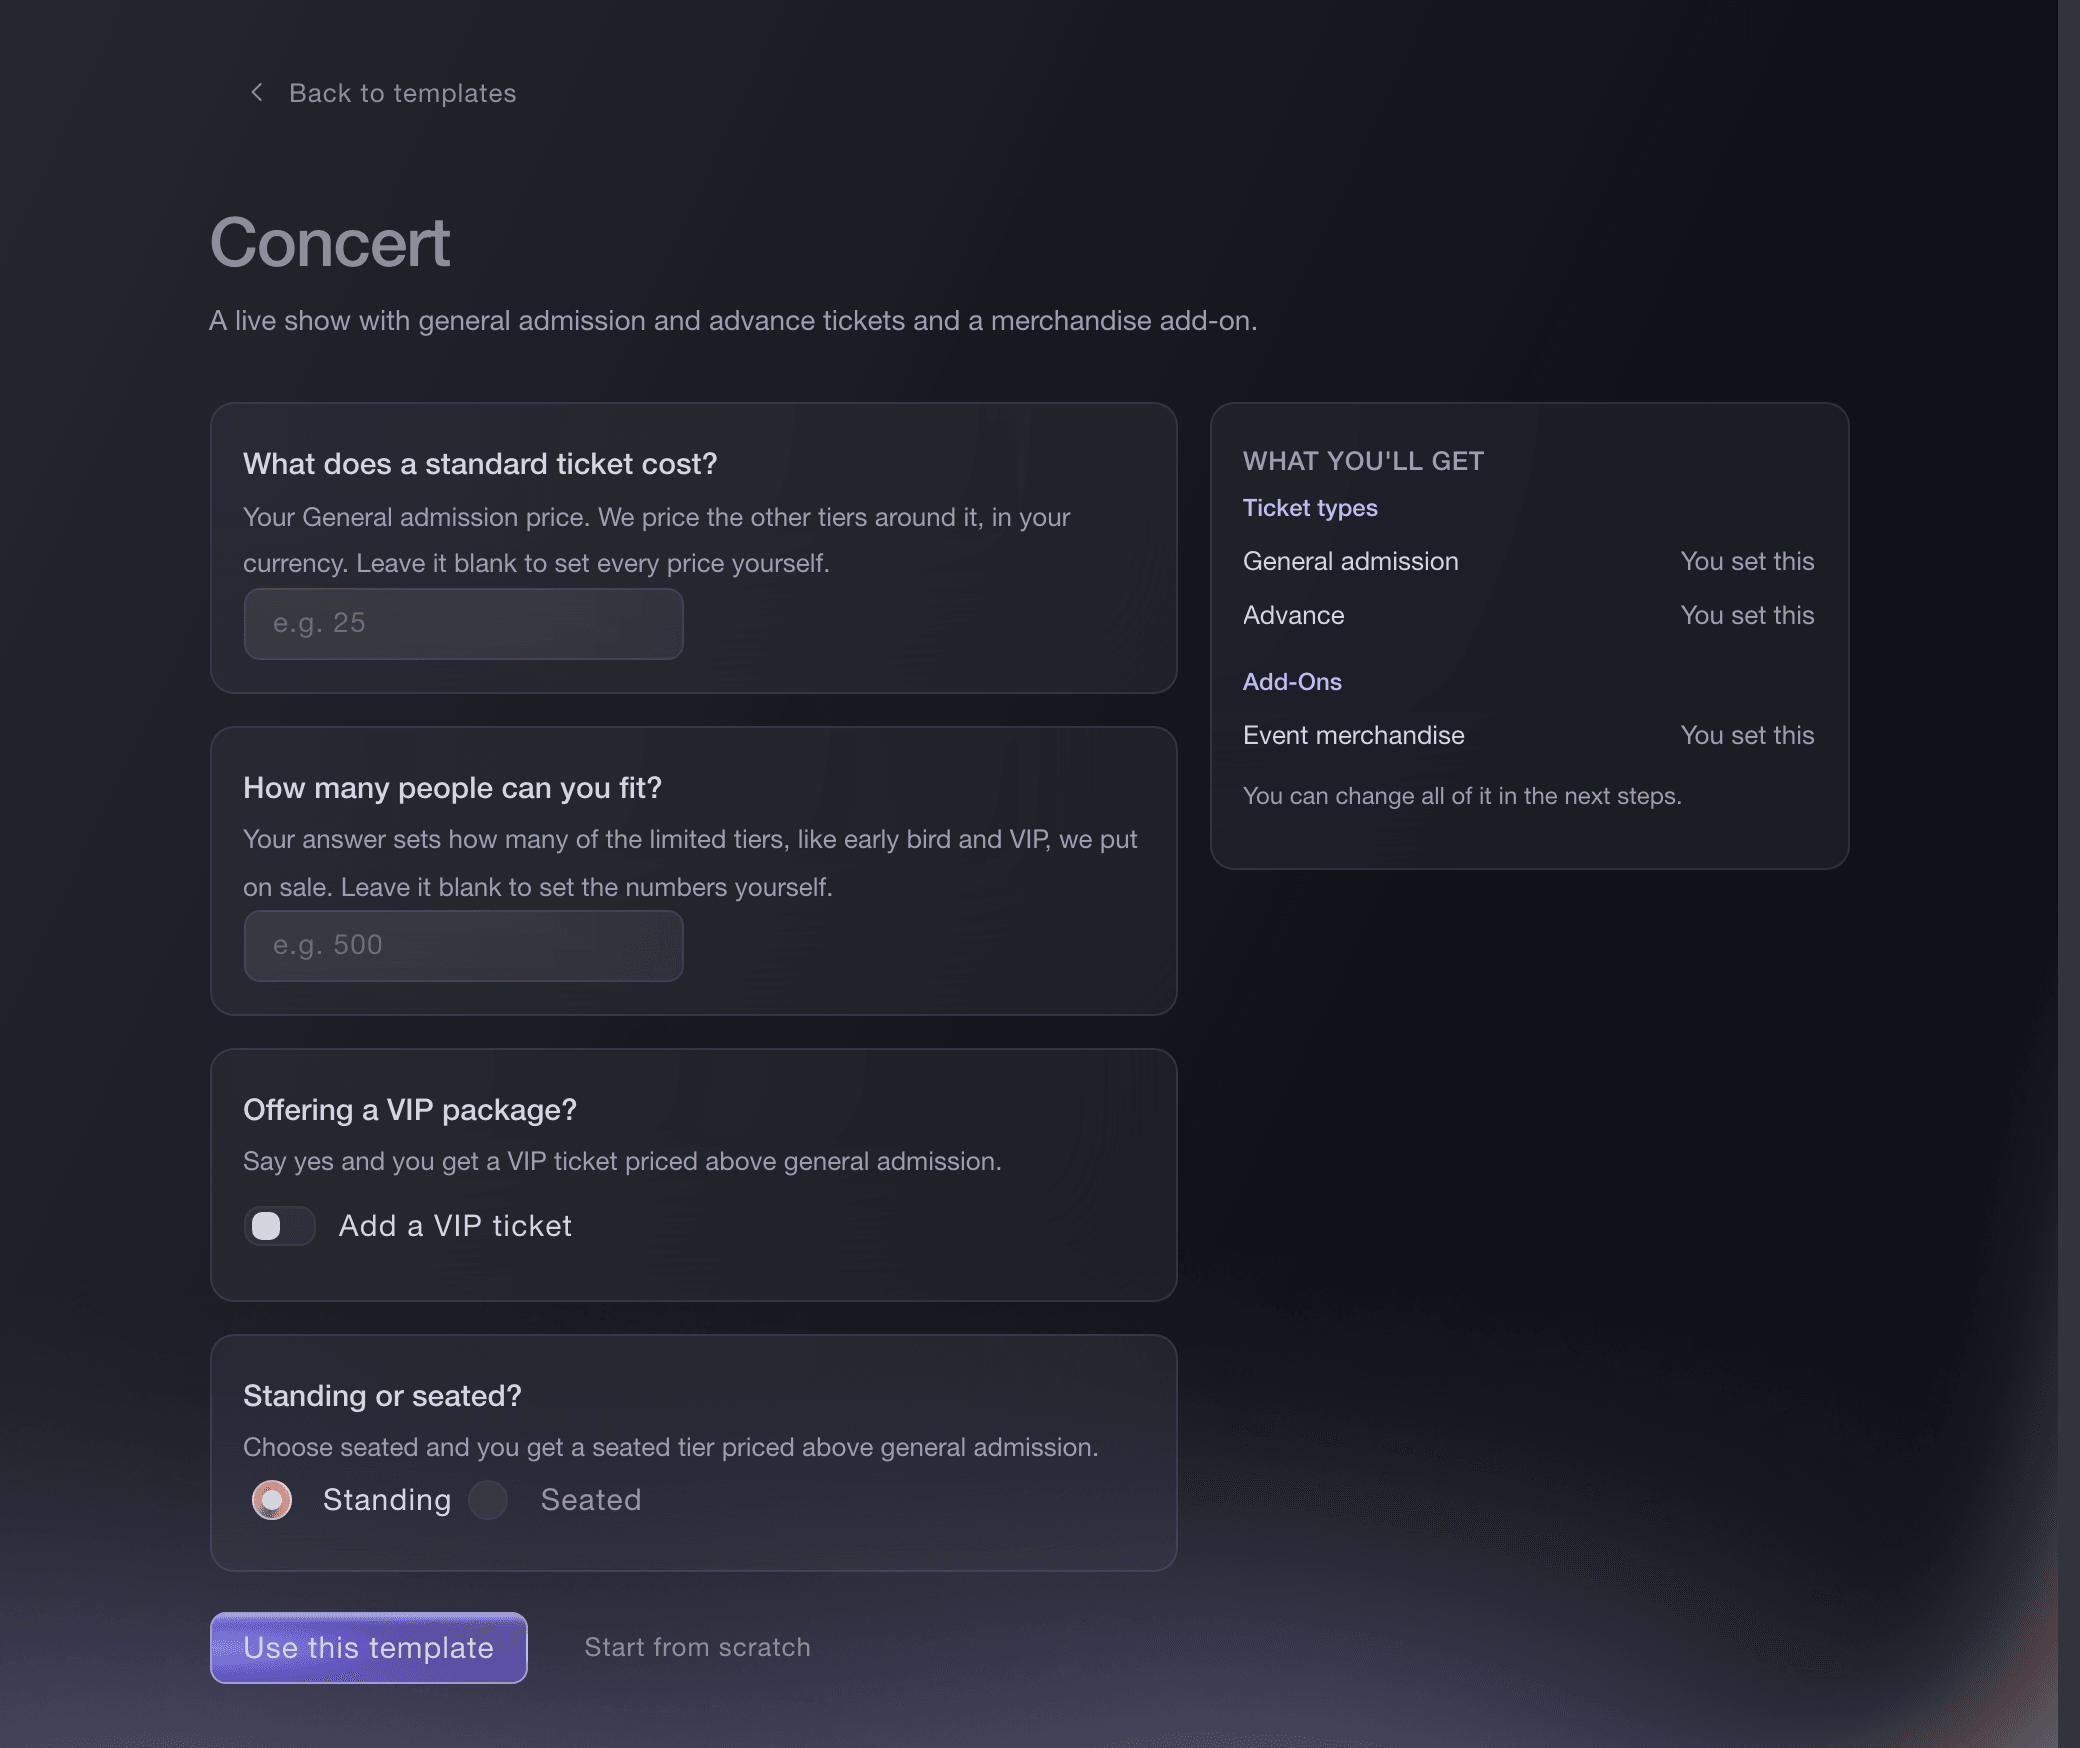
Create Event, Concert template. -
Select Use this template
Review the ticket types and add-ons in the preview, then select Use this template.
-
Enter the event name and brand
Enter the event name and choose its brand.
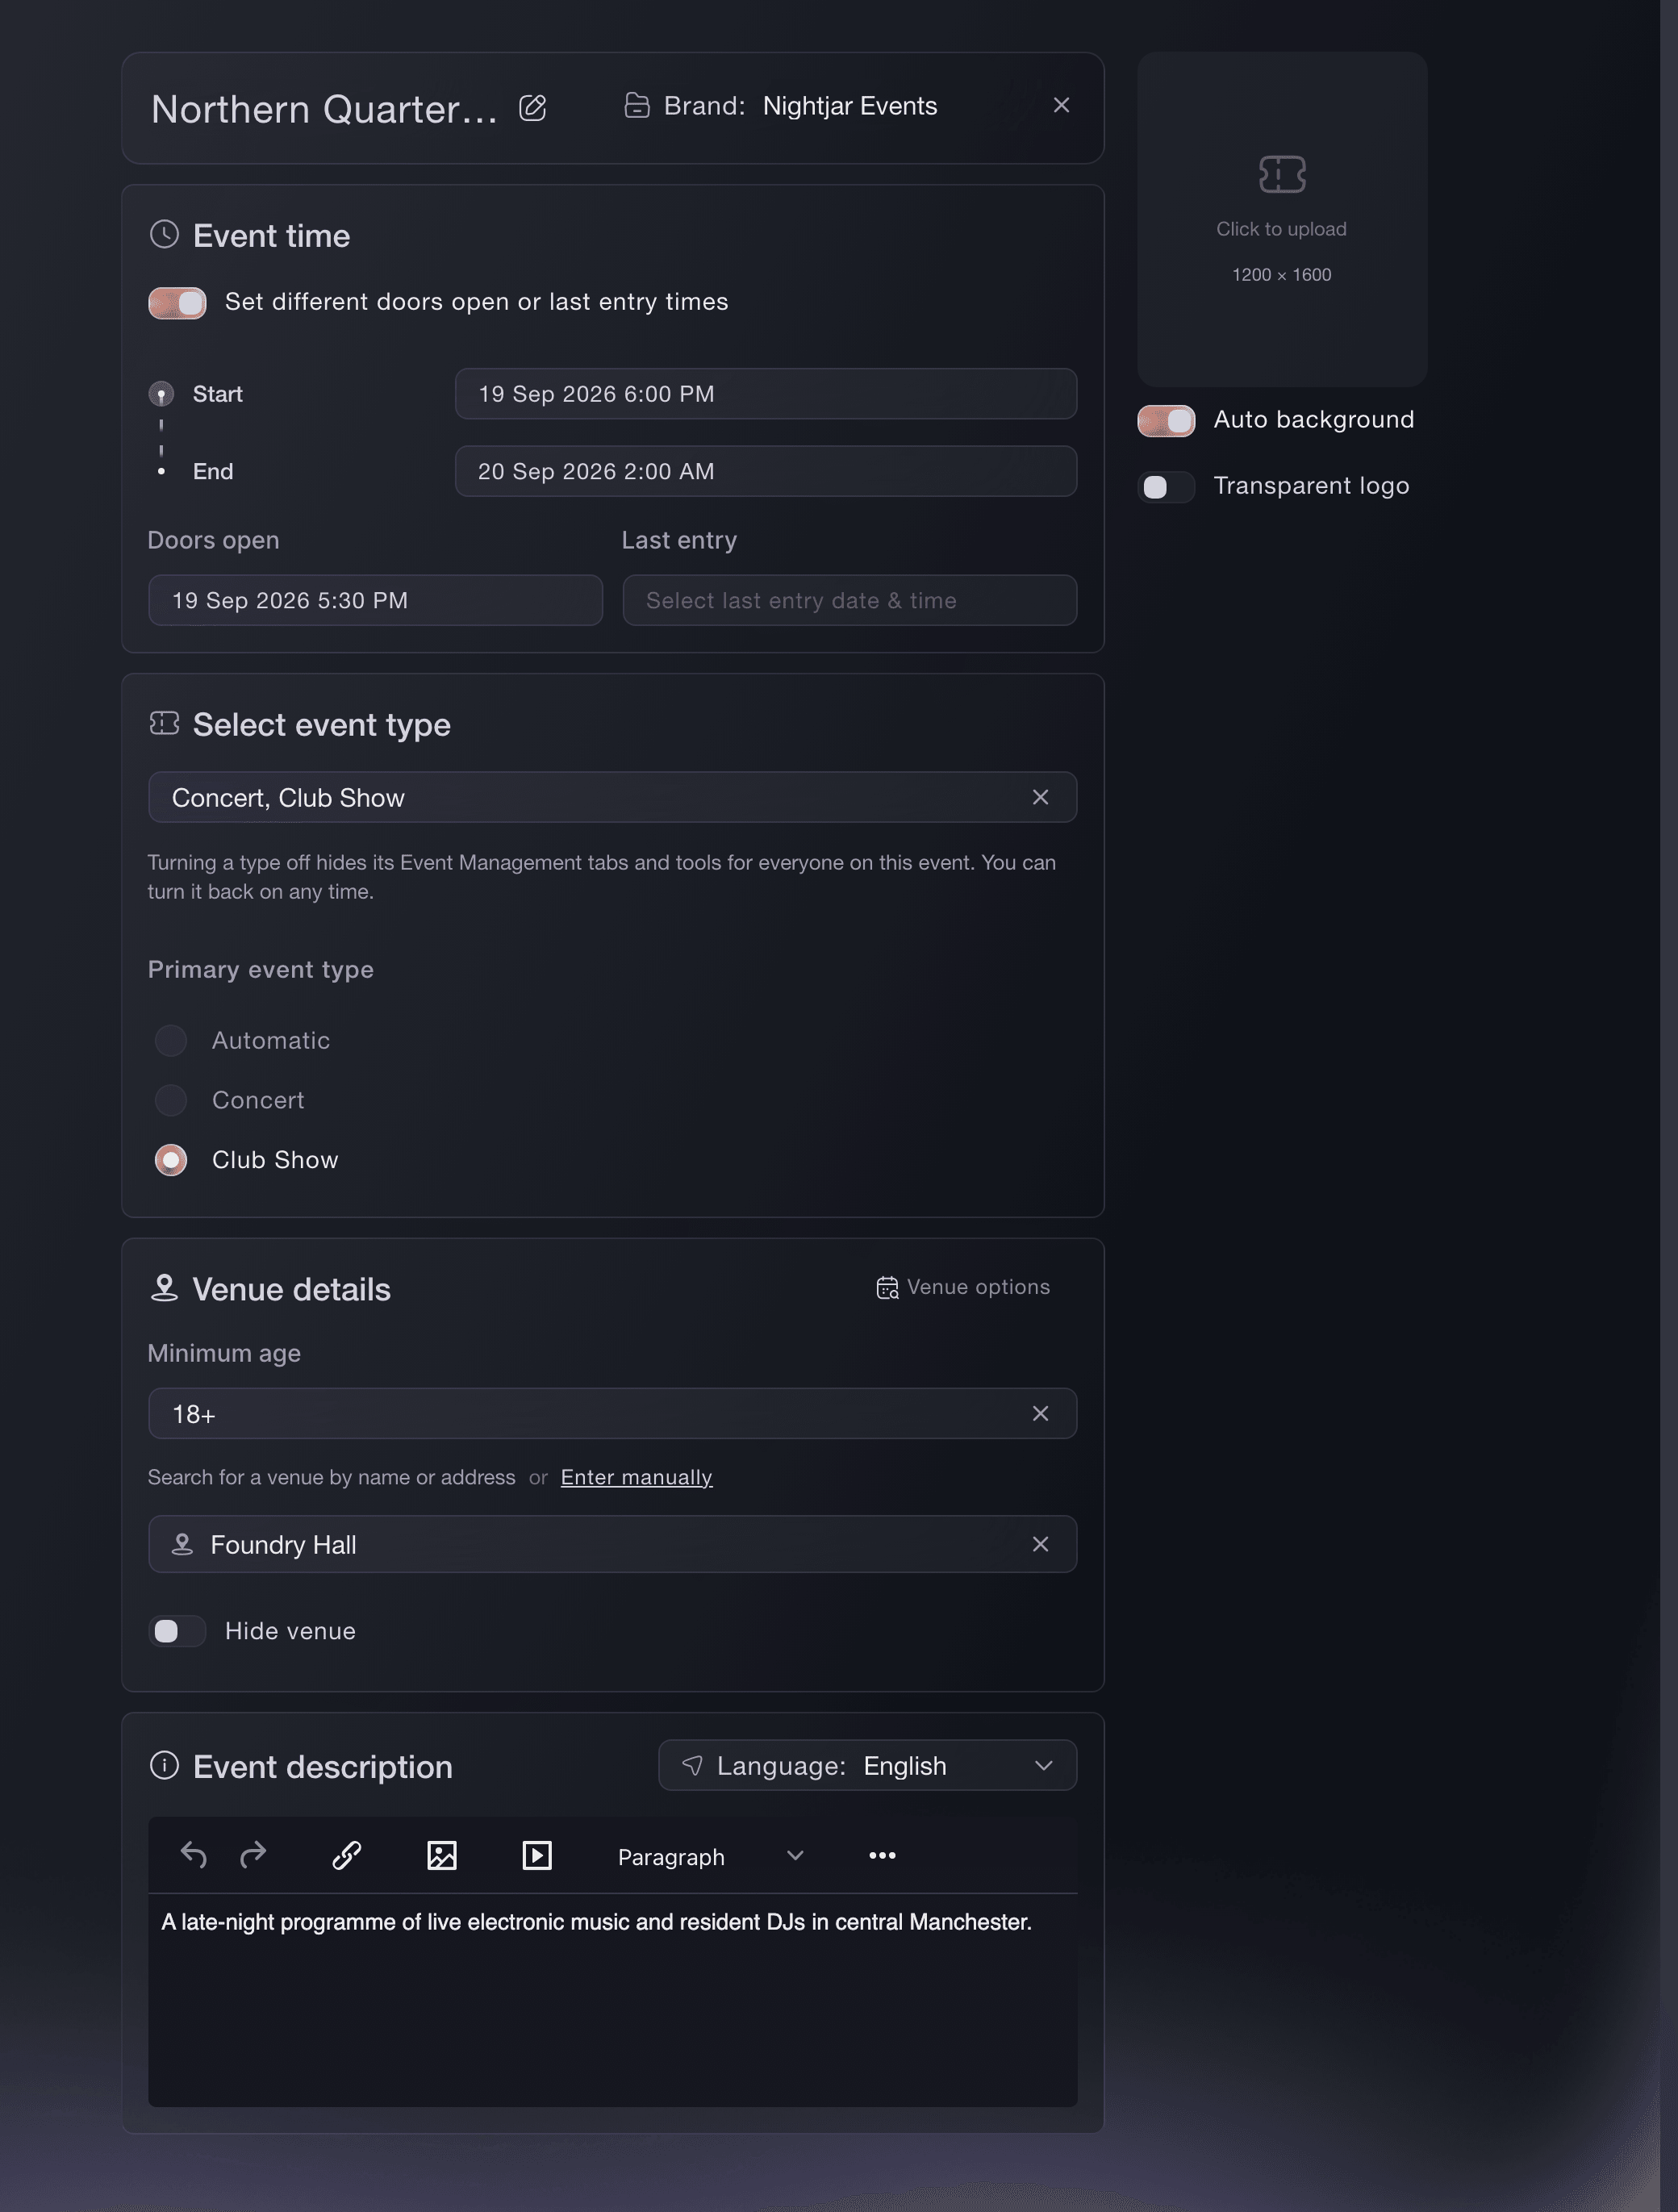
Create Event, Event details. -
Set the dates and times
Set the start and end, then turn on separate doors-open or last-entry times if the venue uses them.
-
Choose the event types
Choose every event type that applies, and select a primary type if the event fits more than one.
-
Add the venue, age limit, description and poster
Search for the venue, choose the minimum age, add the event description and upload the poster.
Huomautus: Choose Enter manually when the venue search cannot find the right address. Turn on Hide venue when buyers should receive the location later, then set the date on which it is revealed.
-
Select Next Step
Select Next Step. Ticket Fairy saves a draft automatically.
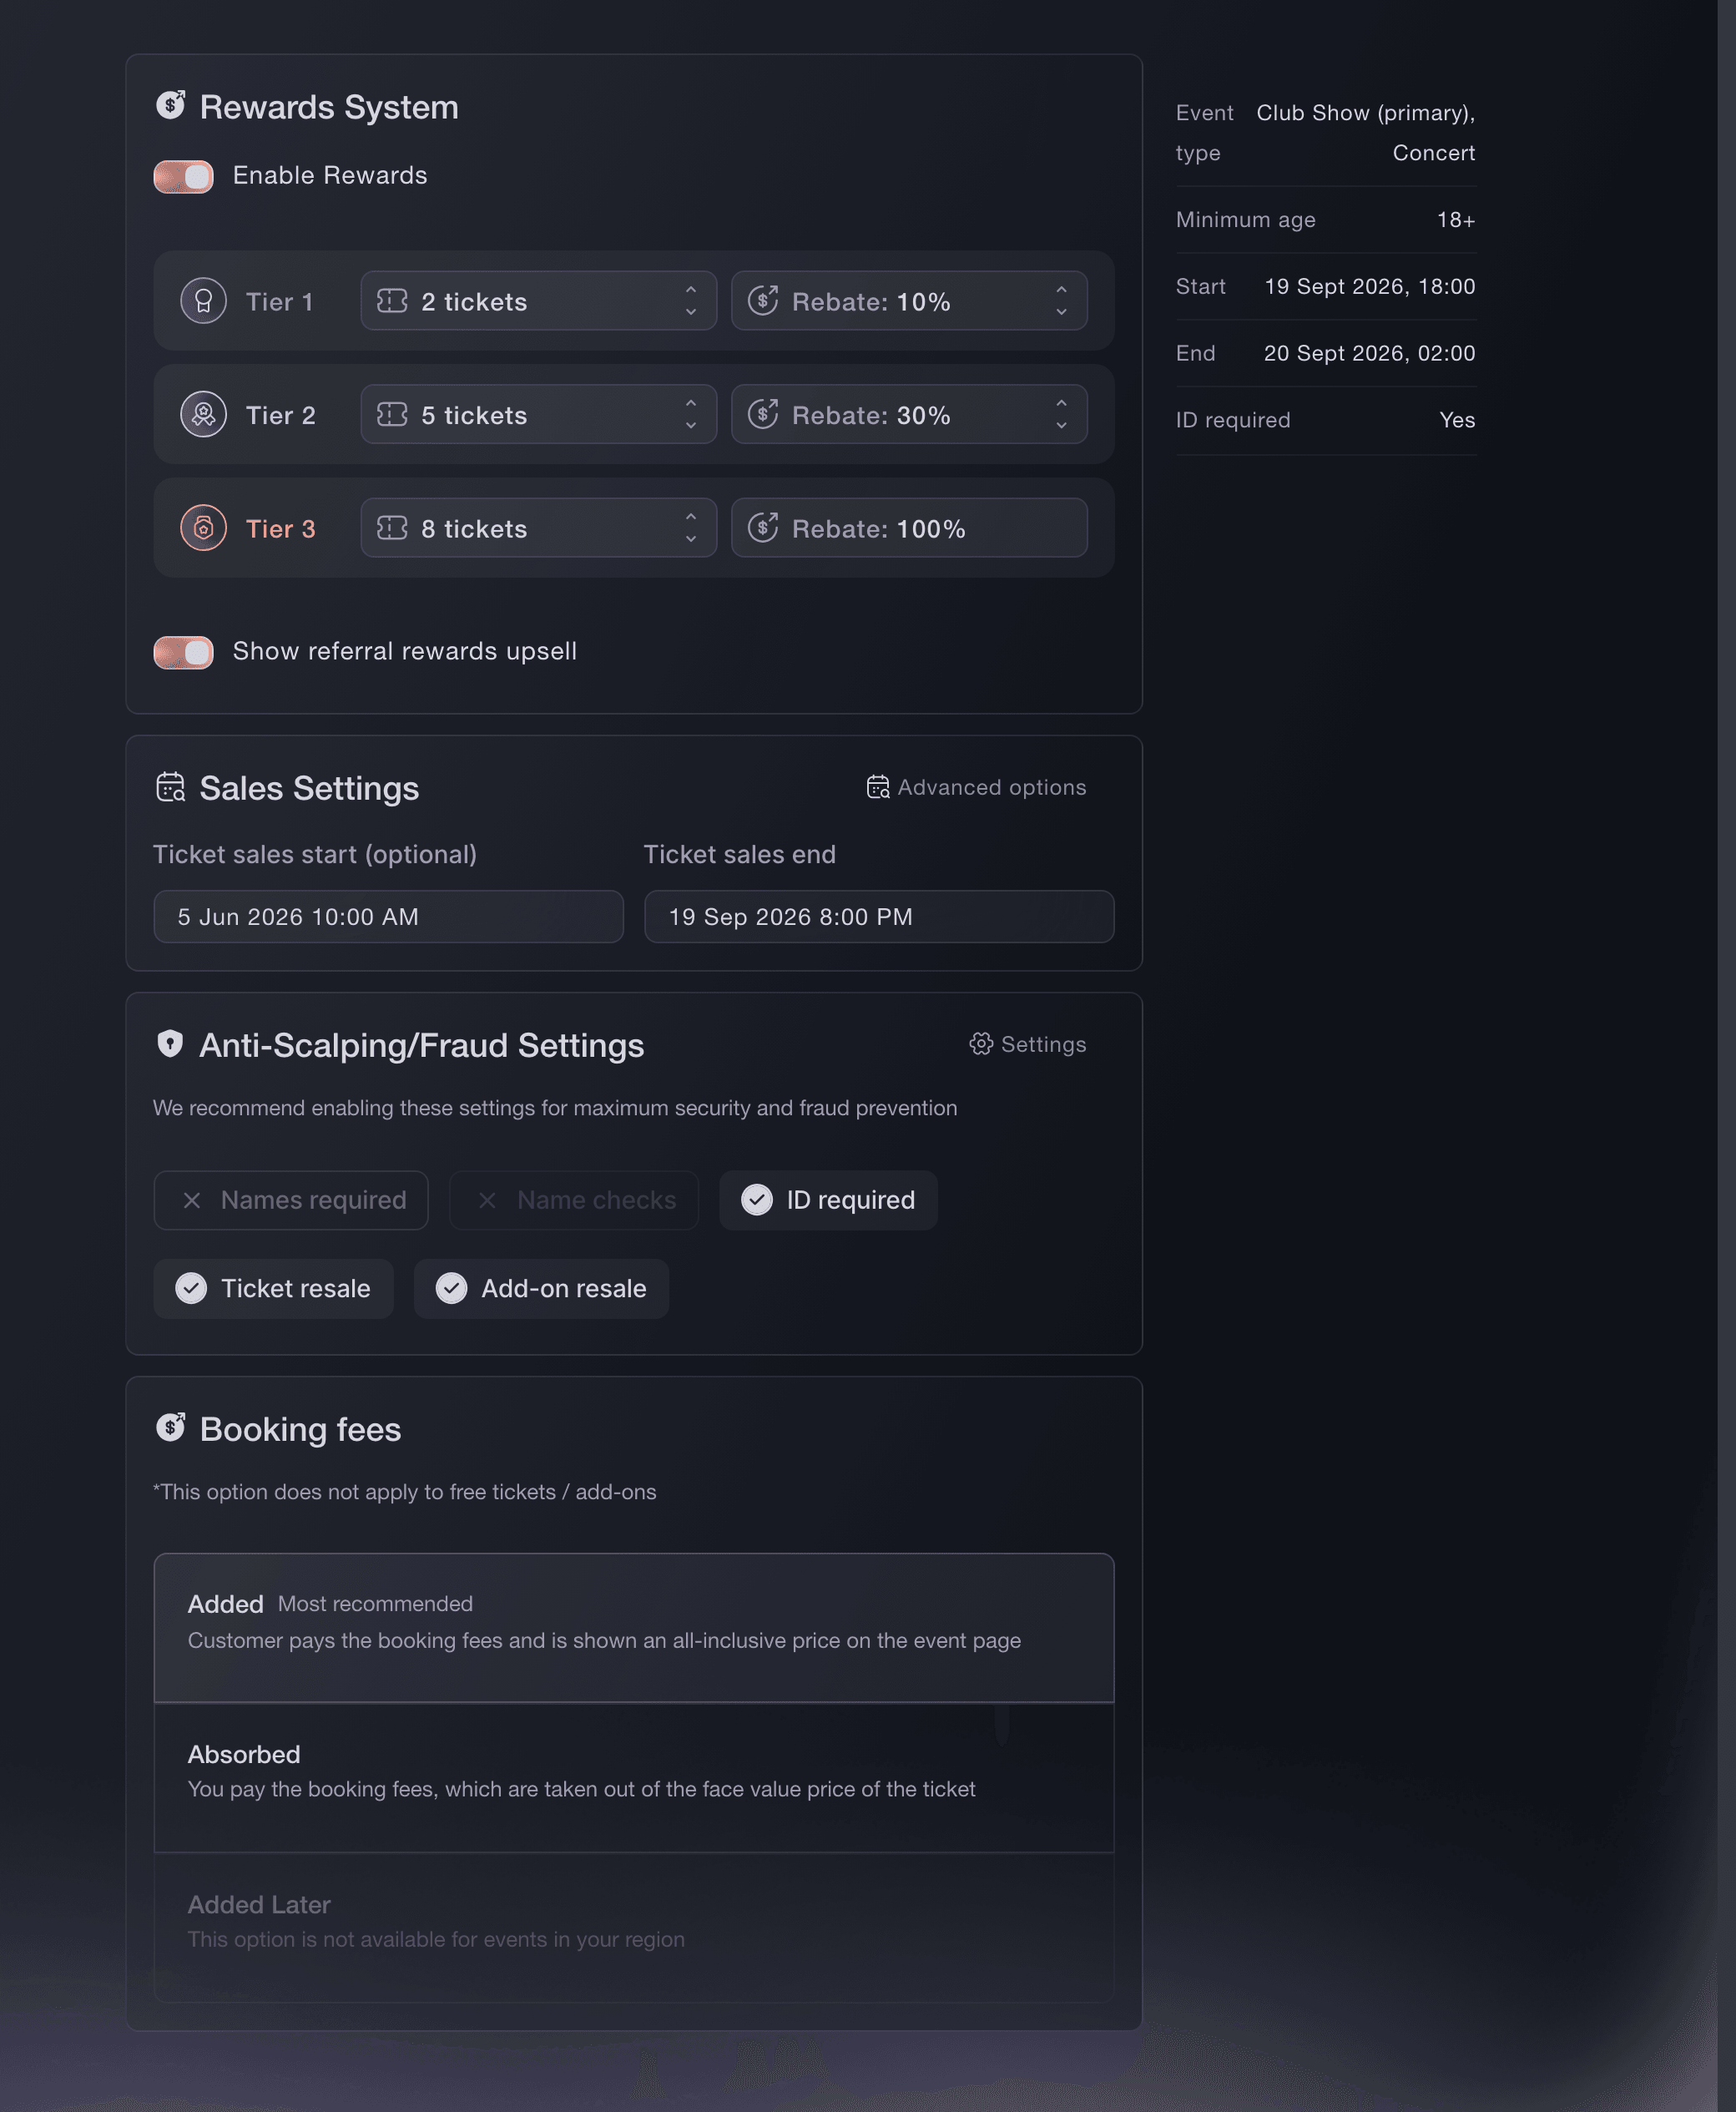
Create Event, Sales Settings. -
Set the sales window and buyer options
Set when ticket sales open and close, then choose the attendee-name, ID and resale options that suit the event and whether buyers pay the booking fee or you absorb it.
Huomautus: You can turn on referral rewards here too, with their ticket and rebate targets. Use Advanced options for the waiting list, order approval, nationality, phone number, date of birth and extra ticket PDF text.
-
Review the ticket types
Open the Ticket types step and complete any row marked Price needed, Allocation needed, Stock needed or Booking terms needed.
Huomautus: Add a ticket type if the event has none; Ticket Fairy asks before continuing when there are no ticket types or when a template row still needs information. The Set up ticket types guide, under Related guides, covers the complete ticket form.
-
Select Create Event
Select Create Event. The event is published, and tickets become available at the sales start you chose.
Huomautus: Choose Save as Draft when you want to finish the event page, tickets or team before publishing it.



Tai anna sen hoitua puolestasi
Fai can recommend built-in and organiser-shared templates, ask for the details and prices that belong to your event, and prepare the event with its ticket types and add-ons. She shows you the complete setup and asks before creating it. MCP and the CLI can create an event directly from the details you provide.
Hallintapaneelissasi, Fain kanssa
Create an event for <EVENT DESCRIPTION>. Compare the built-in and organiser-shared templates, recommend the closest setup, ask me for every missing detail and price, then show me the event, ticket types, add-ons and sales settings before creating it
Omasta avustajastasi, MCP:n kautta
Yhdistä avustajasi MCP-palvelimeemme ja pyydä sitä:
Kopioitu MCP-määritys sisältää --read-only-valinnan. Poista --read-only vain, kun haluat avustajan tekevän muutoksia. Tavalliset muutokset suoritetaan pyynnöstä; tuhoavat toiminnot pyytävät hyväksyntäsi yhteensopivassa asiakkaassa. Jos asiakkaasi ei voi kysyä, tee muutos hallintapaneelissa.
Pick the brand and event details from this request: <BRAND>, <EVENT NAME>, <VENUE>, <START> to <END>. Ask me for anything missing, show me the complete event and then create it as a draft
Päätteeltä
Asenna CLI osoitteesta CLI-sivultamme, kirjaudu komennolla ticketfairy auth login ja valitse brändi, jonka parissa työskentelet, komennolla ticketfairy brand use <BRAND_ID>. ticketfairy brand list ja ticketfairy event list näyttävät muiden komentojen käyttämät tunnisteet.
Set your active brand first. Running the command without event details in an interactive terminal opens a guided setup. The command creates the event from the details you enter; add --draft when you want to keep it off sale while you finish the setup.
A guided event setup in your terminal
ticketfairy event create --interactive
A draft from the main event details
ticketfairy event create --name "<EVENT NAME>" --start <START> --end <END> --venue-search "<VENUE AND CITY>" --currency <CURRENCY> --draft
A complete event from a JSON or YAML file
ticketfairy event create --from-file event.json
Return to a saved draft
Open Events, find the draft and open it. Its event details, sales settings and ticket types stay as you left them, ready to complete before you create the event.
Huomautus: A saved draft keeps the work already completed, including the template it started from and any ticket types or add-ons that were created successfully.
Fai can find the draft, show you what still needs attention and continue the setup after you approve each change. MCP and the CLI can inspect the saved event. The dashboard is the clearest place to review the whole setup.
Hallintapaneelissasi, Fain kanssa
Find my draft event called <EVENT NAME>, show me its event details, ticket types, add-ons and sales settings, then ask what I want to finish before making any changes
Omasta avustajastasi, MCP:n kautta
Kopioitu MCP-määritys sisältää --read-only-valinnan. Poista --read-only vain, kun haluat avustajan tekevän muutoksia. Tavalliset muutokset suoritetaan pyynnöstä; tuhoavat toiminnot pyytävät hyväksyntäsi yhteensopivassa asiakkaassa. Jos asiakkaasi ei voi kysyä, tee muutos hallintapaneelissa.
Find my draft event called <EVENT NAME>, show me its current details and tell me which required event fields are still missing
Päätteeltä
List drafts to find the event ID, then open its current details. Use the dashboard or the event update command to finish it.
Your events and their statuses
ticketfairy event list
The current details for the draft
ticketfairy event get <EVENT_ID>
Use the classic event form
Select Use Classic Editor on the Event details step when you need the established full-page event form. Everything you complete and save there works the same way.
Huomautus: The classic form creates the same event. Use the guided setup for the common path and the classic form when your team already knows that layout.
Open the classic editor in the dashboard. Fai, MCP and the CLI can edit event data, but they cannot open this editor.
Kysymyksiä joita sinulla voi olla
- Do I have to use a template?
- No. Select Start from scratch for a blank event. A template saves time when its tickets and settings are close to what you need, and every prepared value remains editable.
- Does a template copy another organiser's ticket prices?
- No. You enter the standard ticket price and capacity for your event. Ticket Fairy uses those answers to calculate the starting prices and quantities for the template's other ticket types.
- When does the event become public?
- Selecting Create Event publishes the event. Tickets become available at the sales start you chose. Select Save as Draft when the event should remain private while you finish the setup.
- Can I change a template setup after choosing it?
- Yes. Change the event details, sales settings, ticket types and add-ons before the event goes on sale. The template remains a record of where the event started, not a live link to the event.
- What if the venue search finds several places with the same name?
- Choose the result with the correct full address. If none is right, choose Enter manually and enter the venue name and address yourself.
- Can I create an event without tickets?
- Yes. Ticket Fairy asks you to confirm first because buyers will have nothing to purchase. For a ticketed event, create at least one priced or free ticket type with an allocation before putting it on sale.
Aiheeseen liittyvät oppaat
Tee tämä omassa tapahtumassasi
Luo tili, rakenna tapahtumasi ja seuraa vaiheita omassa hallintapaneelissasi. Sinun ei tarvitse varata myyntipuhelua.