
Vault und Capital
Invoice sponsors and partners for your event from Vault
Sponsors, food traders and partner venues pay for their part of your event by invoice, not at a ticket checkout. You can raise those invoices from your brand's Vault, and your team can see which ones are still unpaid.
Raise an invoice from your brand's Vault for a sponsor, a trader or a partner venue at your event, finalise it and send them its link, then mark it paid or void it if plans change.
- Für
- Invoicing the sponsors, traders and venues behind your events
- Dauer
- 10 Minuten
- Open Invoices
- Invoice status and payment
- Select the Customers tab
- Select New Customer
- Choose a person or a company
- Enter the customer's details
- Save the customer
- Select New Invoice
- Choose the customer
- Choose the currency
- Choose how your customer pays
- Choose a due date
- Enter a memo
- Create the draft
- Open the draft's details
- Select Add item
- Choose the product
- Choose the price
- Enter the quantity
- Add the line item
- Select Finalize
- Confirm the invoice
- Send your customer the invoice's link
- Check the invoice in the list
Bevor Sie anfangen
- You're an owner or admin on the brand, and Vault is switched on for it. Ask Ticket Fairy support to switch Vault on for your brand if Vault isn't in your brand's menu.
- Your Vault account has finished onboarding. Invoices appears in the Vault menu once the account is active.
-
Open Invoices
Pick the brand, open Vault, then select Invoices.
Hinweis: The Invoices tab lists the brand's invoices with the customer, amount, status, payment and due date of each.
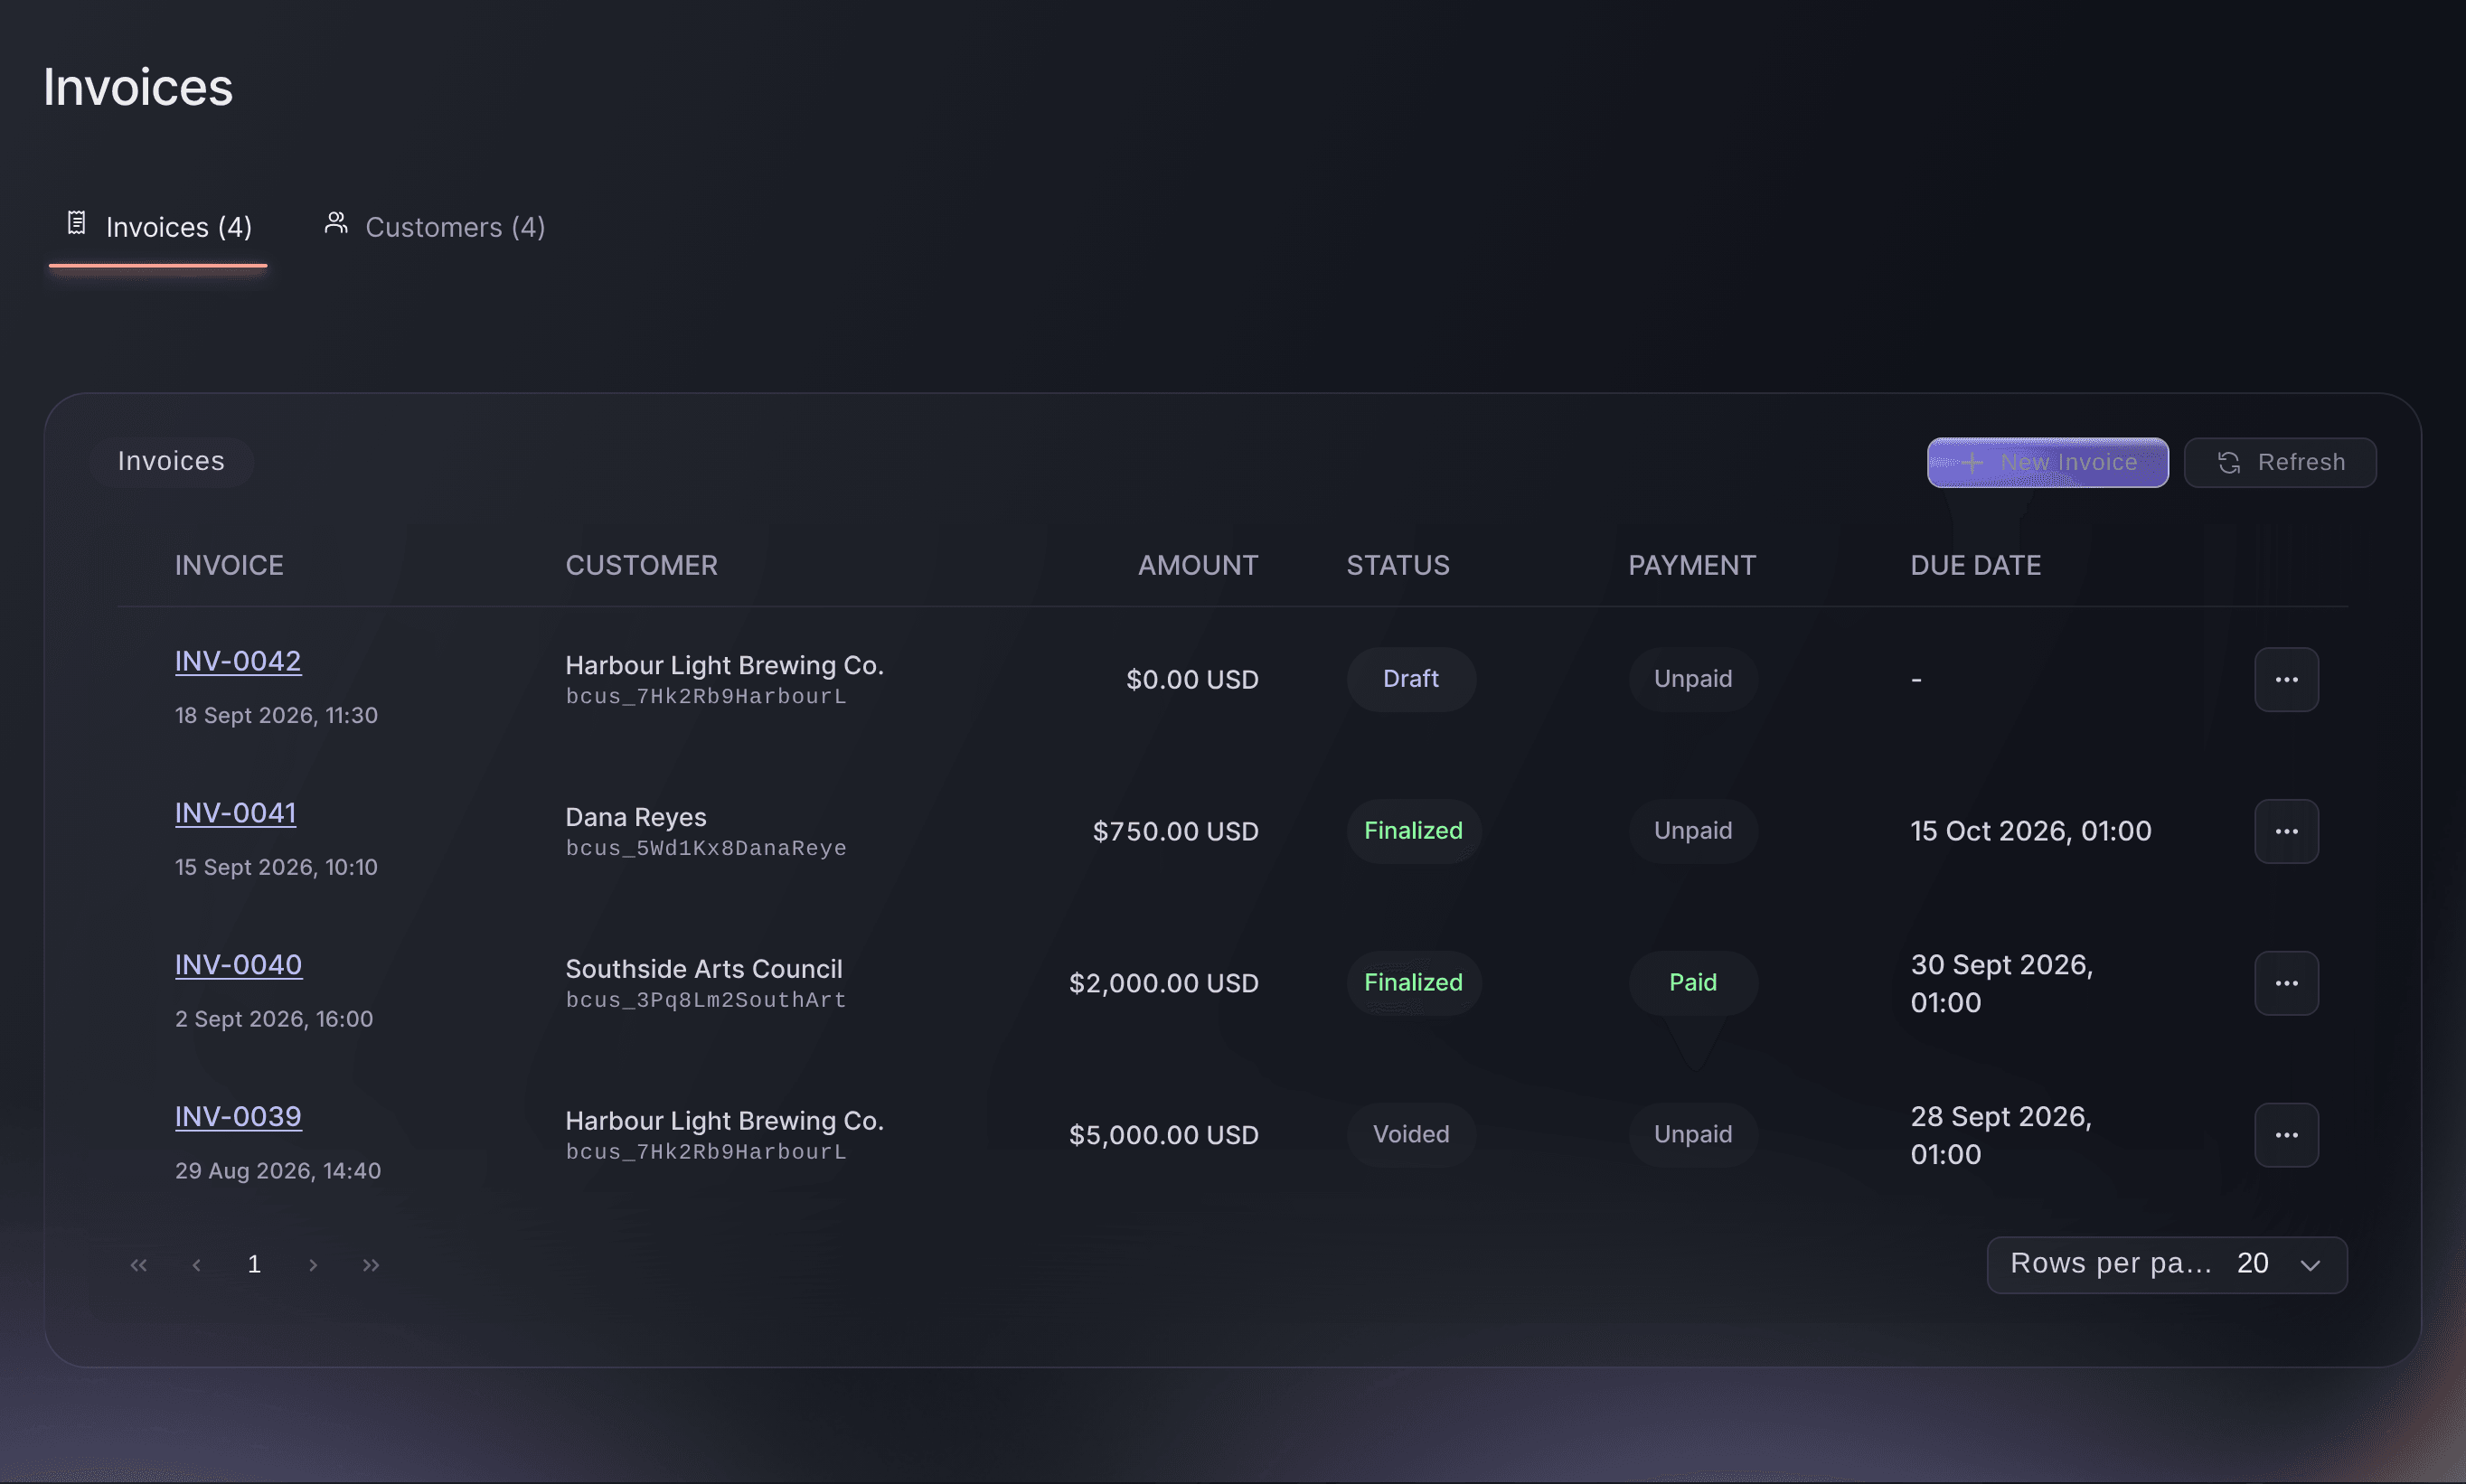
Vault, Invoices.

Invoice status and payment
Each invoice carries a status, which says where it is in its life, and a payment label, which says whether it has been paid.
-
Select the Customers tab
Optional: If you haven't invoiced this customer from Vault before, select the Customers tab.
Hinweis: Customers lists the people and companies the brand bills. Each invoice goes to one of them.
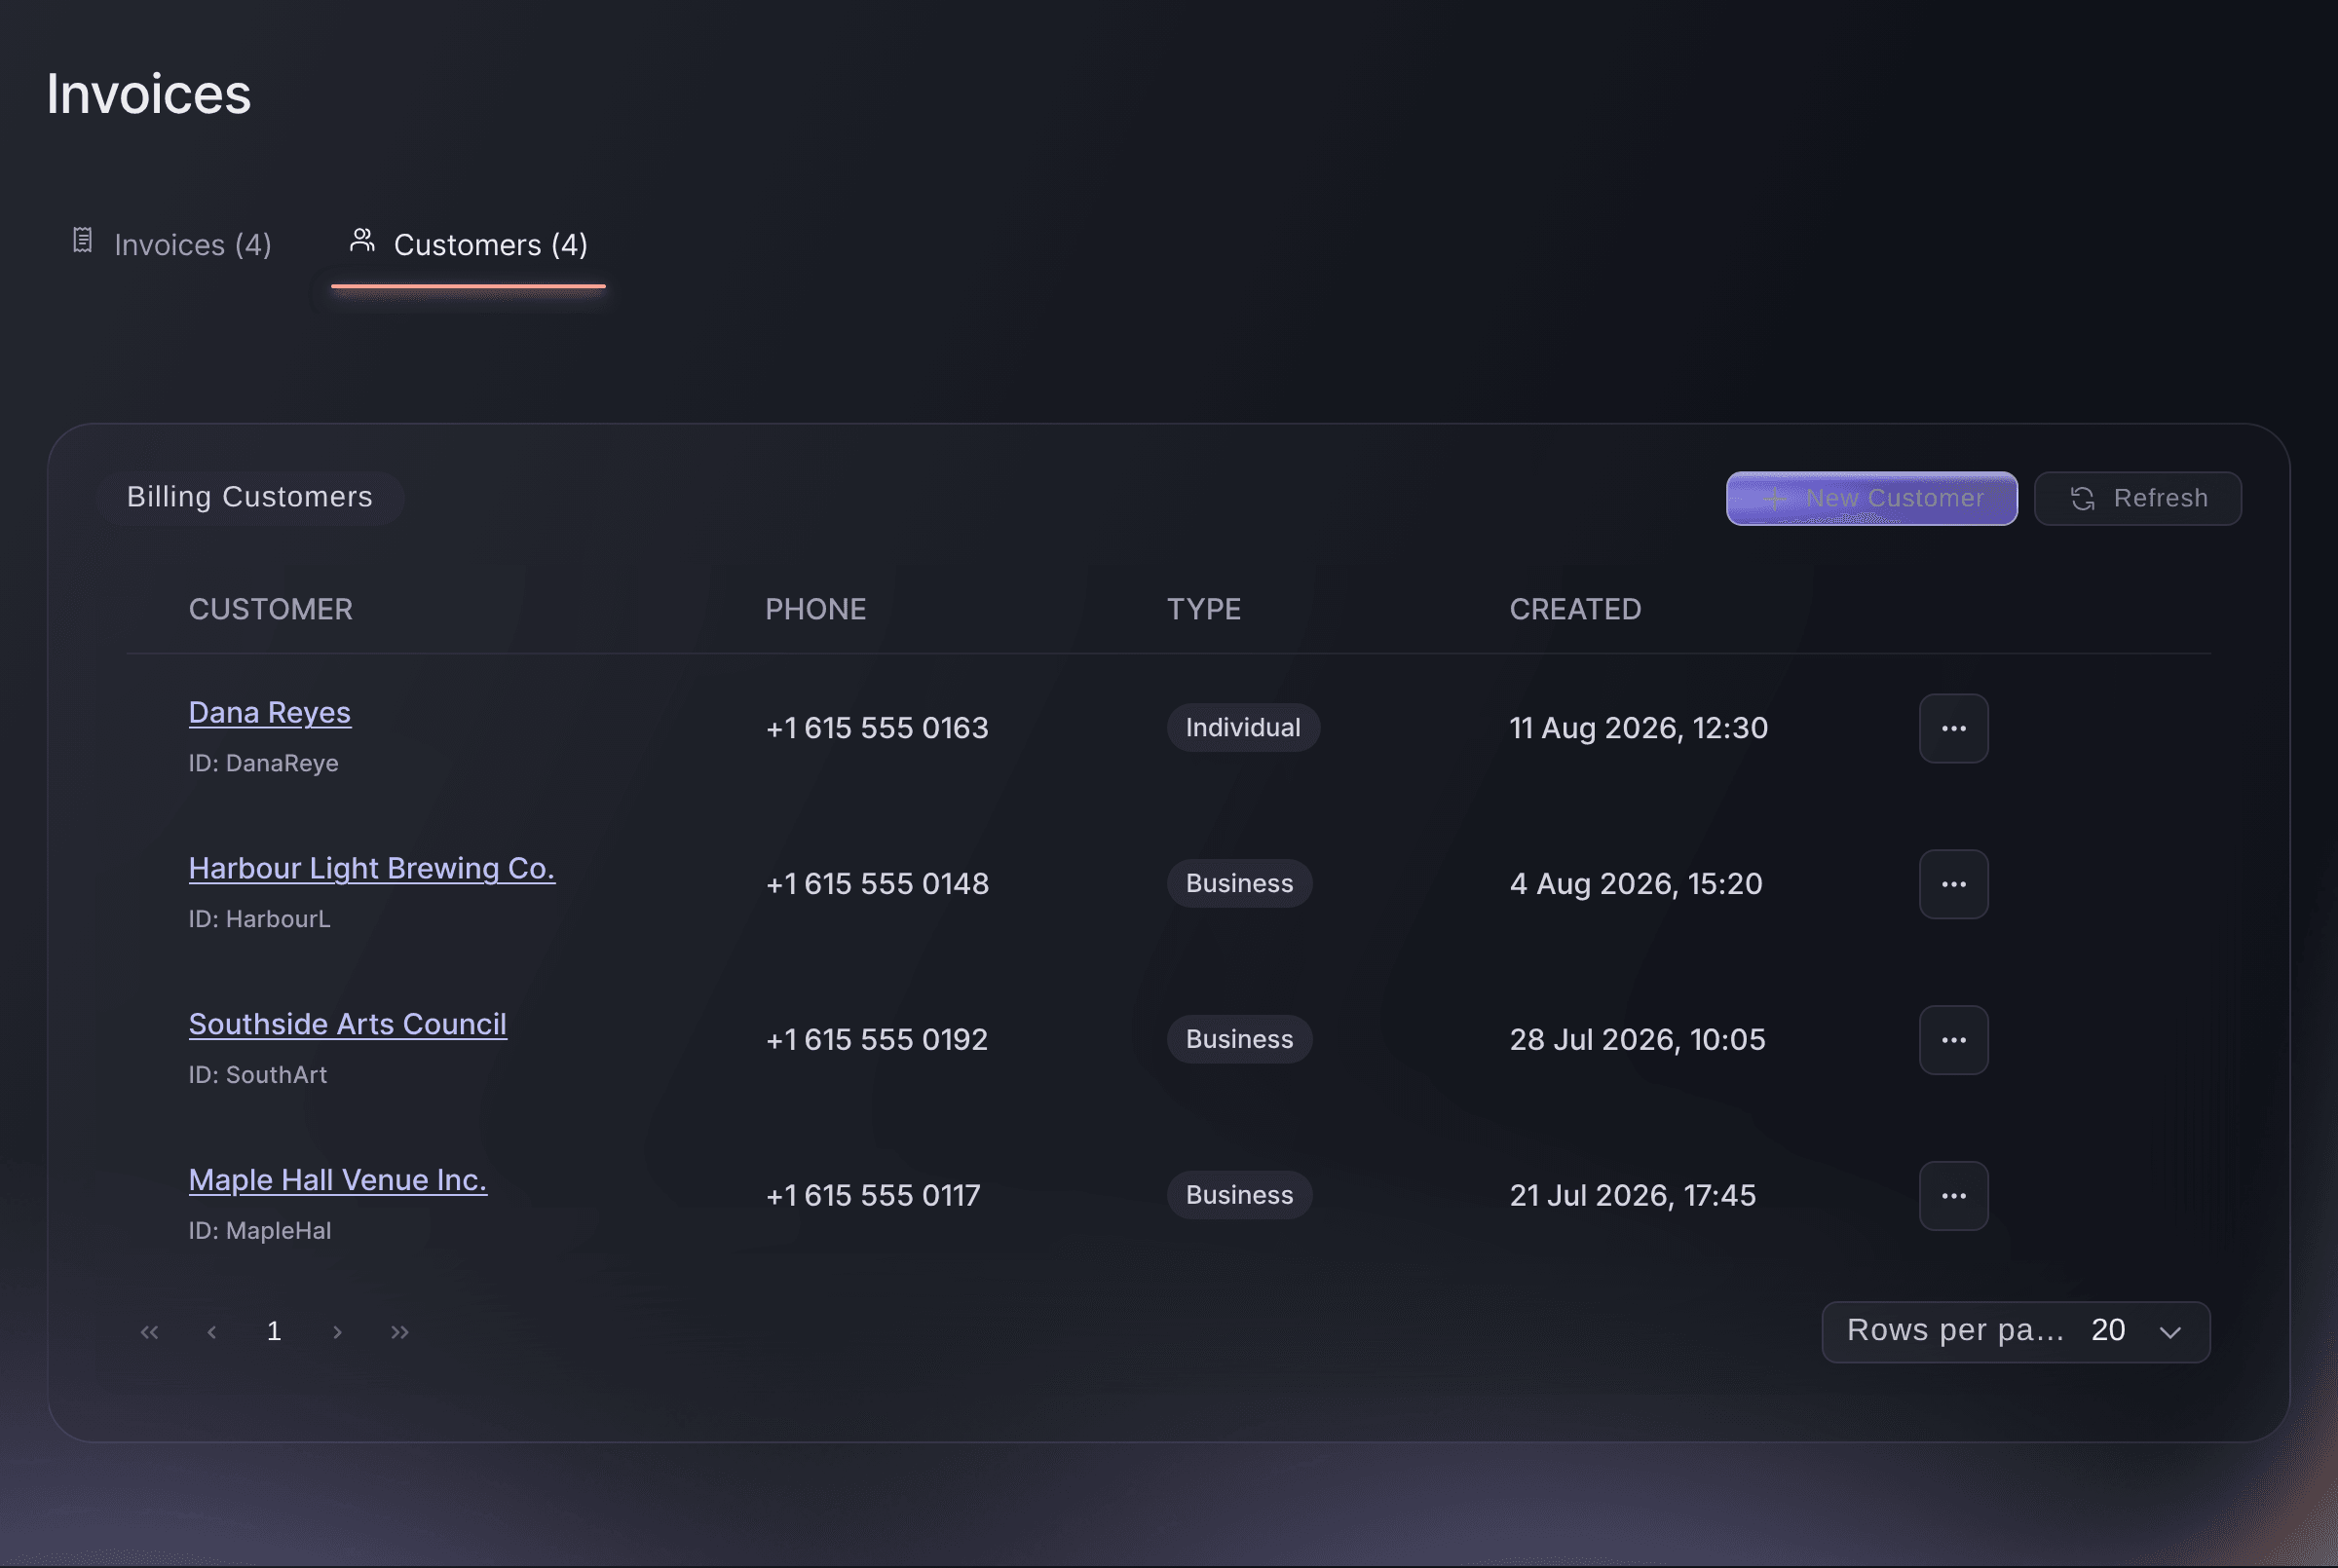
Vault, Invoices, Customers tab. -
Select New Customer
Select New Customer. The Create Billing Customer dialog opens.
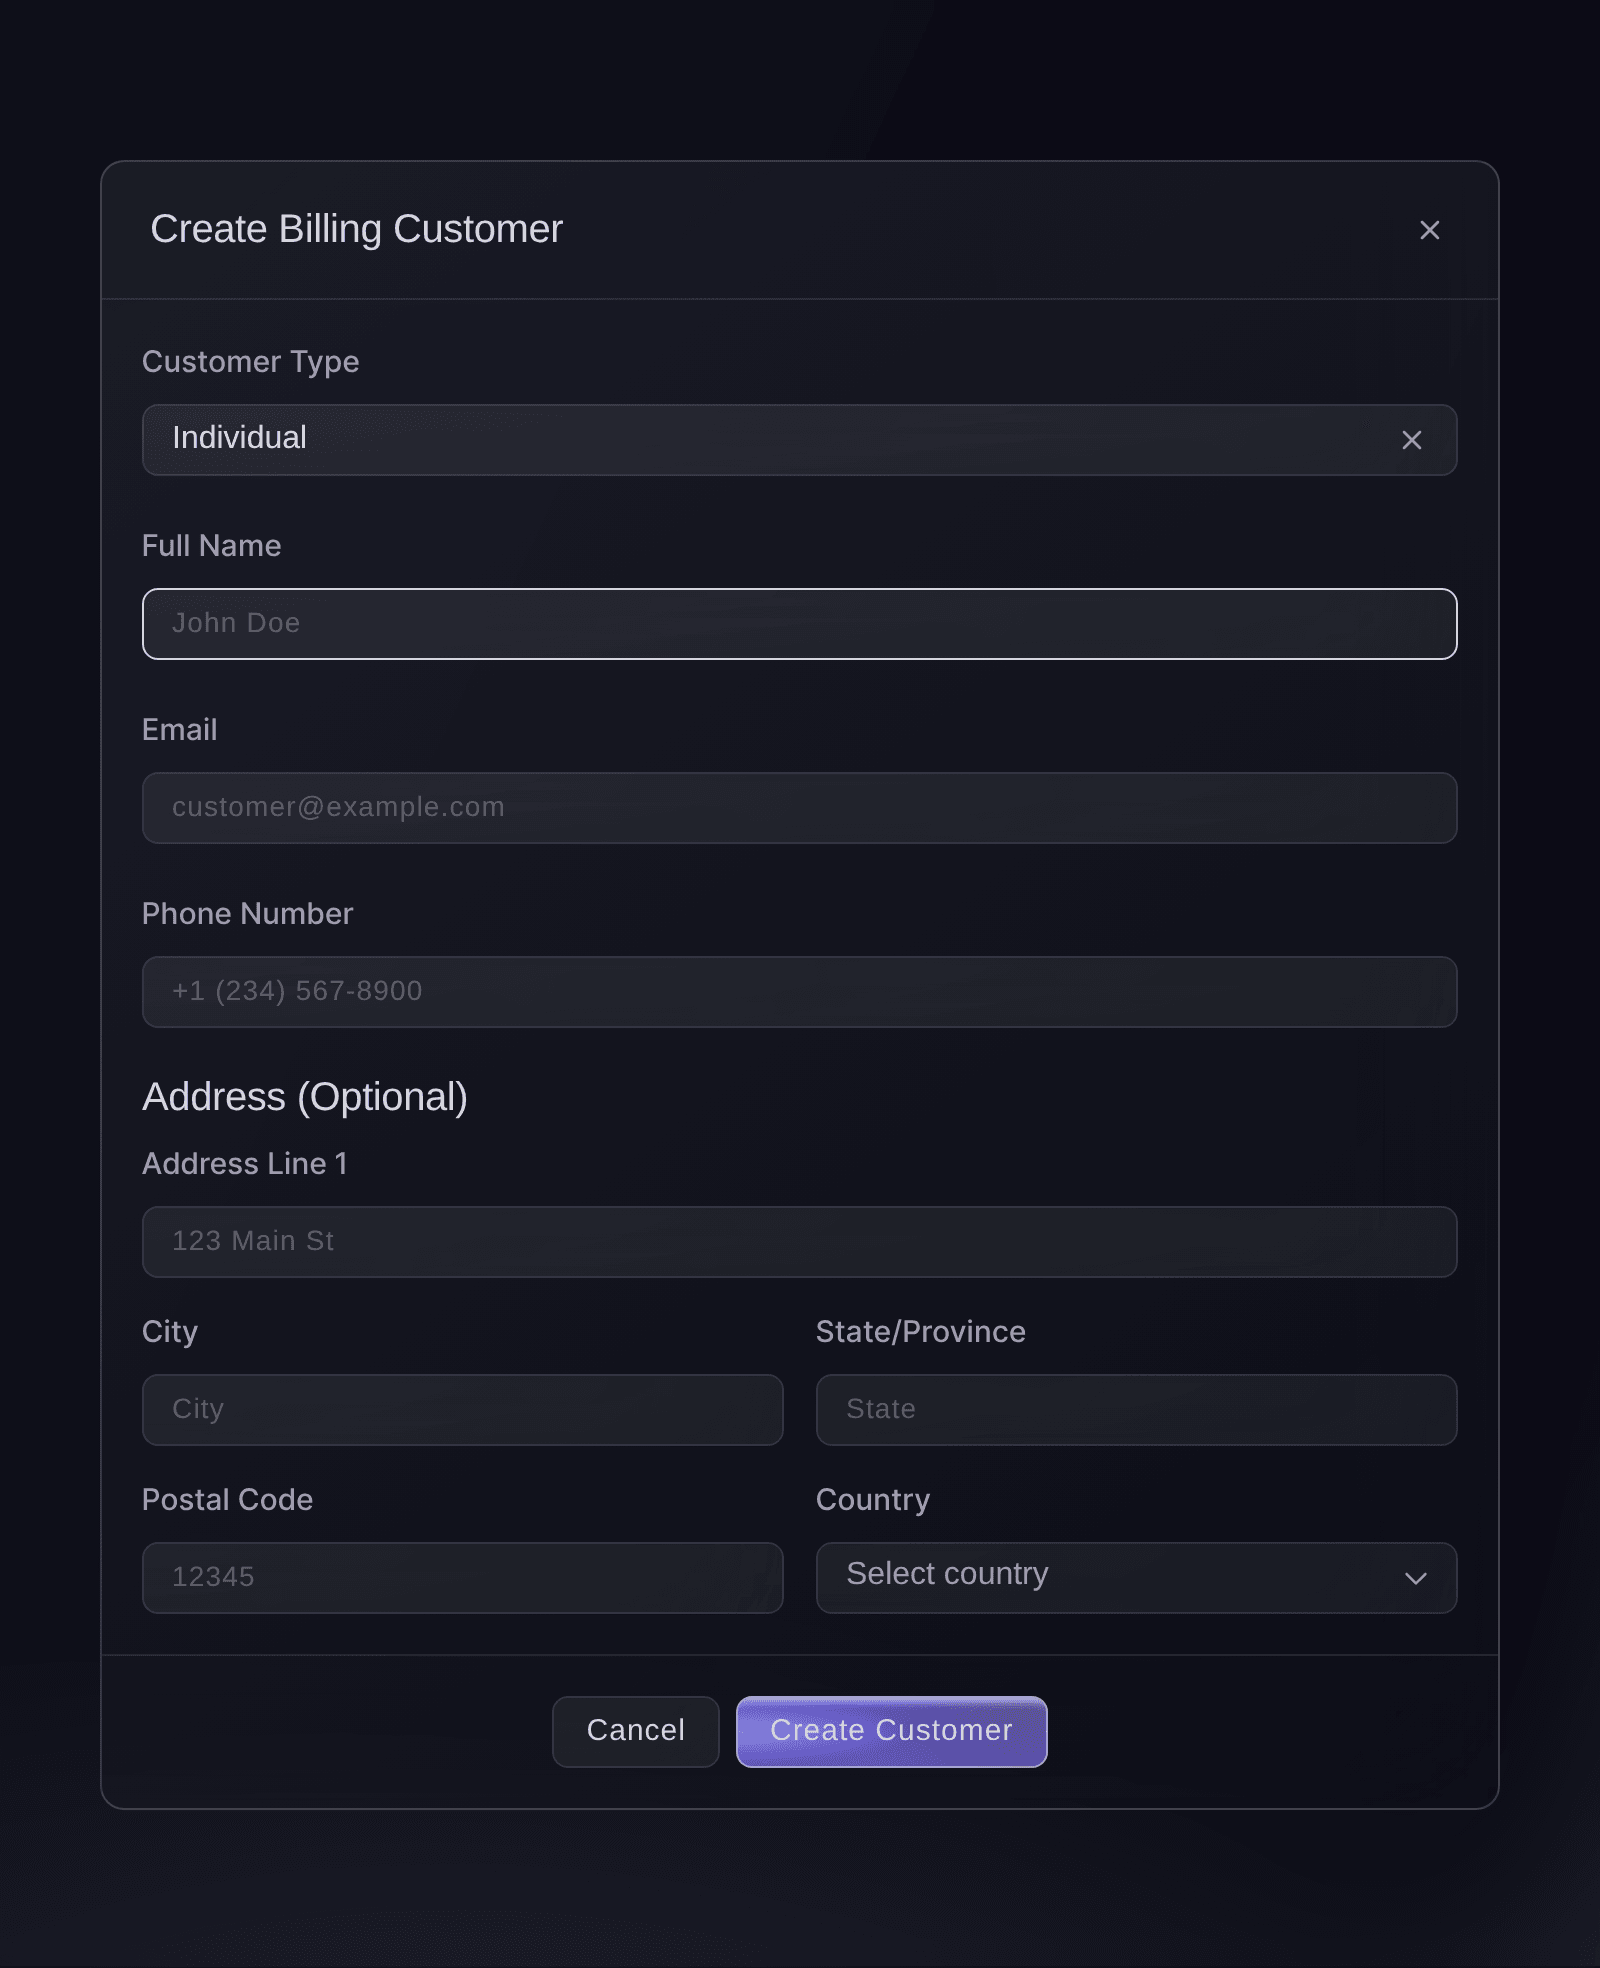
Invoices, Create Billing Customer. -
Choose a person or a company
In Customer Type, choose who you're billing.
-
Enter the customer's details
Enter the name, then the Email and Phone Number your customer uses for invoices.
Hinweis: Only the name is required. Address (Optional) takes their billing address.
-
Save the customer
Select Create Customer. The customer joins the list on the Customers tab.
-
Select New Invoice
On the Invoices tab, select New Invoice. The Create Invoice dialog opens.
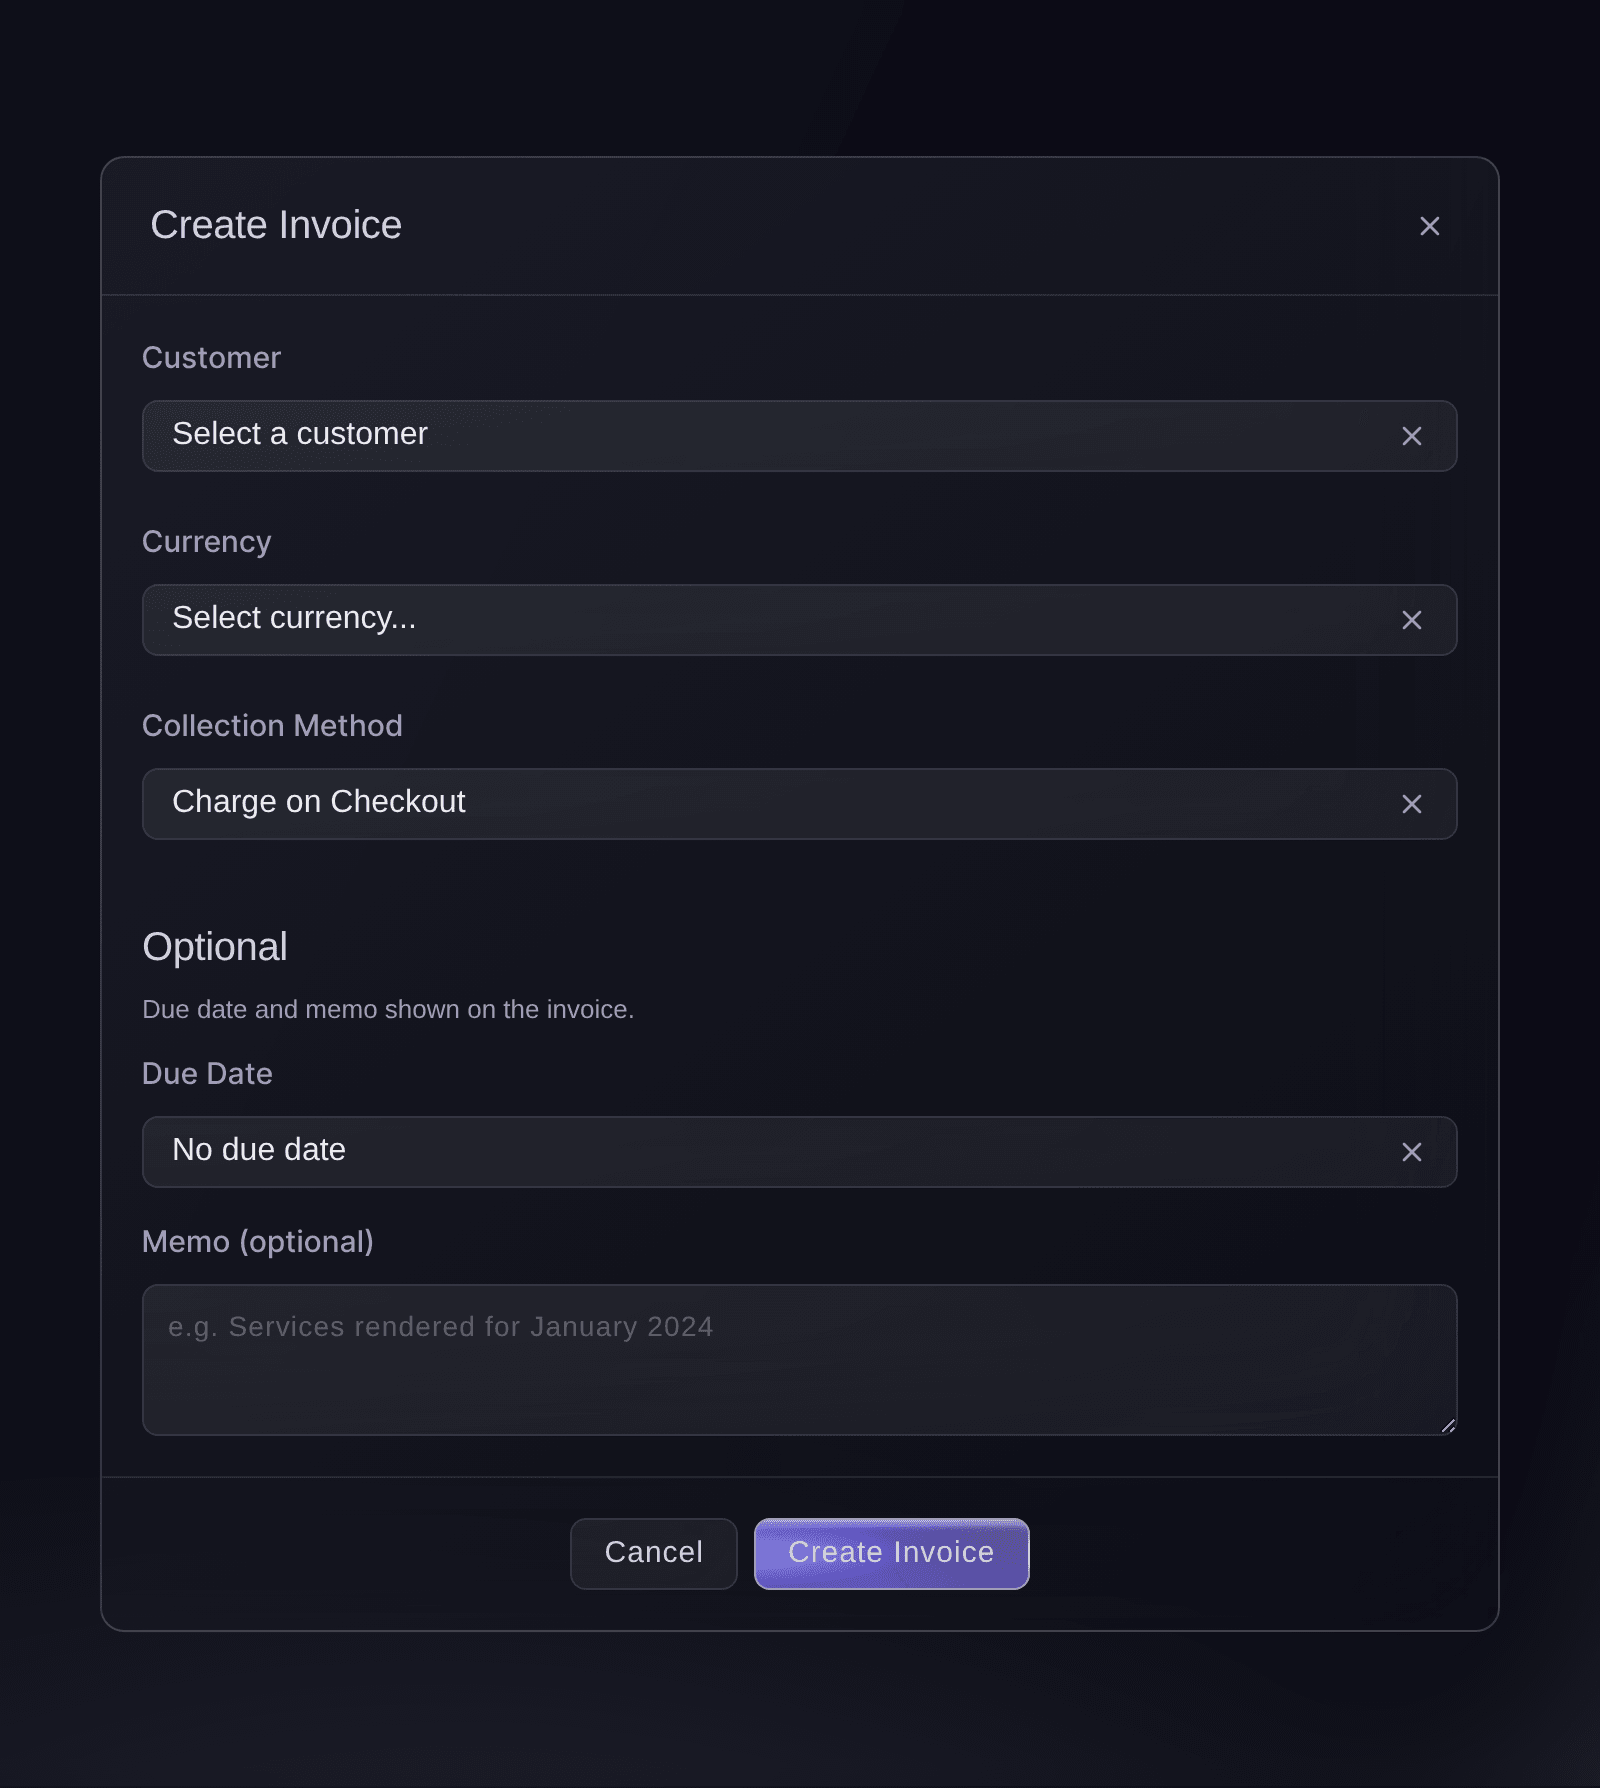
Invoices, Create Invoice. -
Choose the customer
In Customer, choose who you're billing.
Hinweis: The list starts with 20 customers. Select Load more customers under it to see the rest.
-
Choose the currency
In Currency, choose the currency you're billing in.
Hinweis: Every price on the invoice has to be in this currency, and the currency can't be changed after you create the invoice.
-
Choose how your customer pays
In Collection Method, choose how the payment reaches you.
-
Choose a due date
Optional: To give the invoice a due date, choose how in Due Date.
Hinweis: The dialog opens on No due date.
-
Enter a memo
Optional: Enter a note in Memo (optional), such as the event and what the invoice covers.
Hinweis: Your customer sees the memo and the due date on the invoice.
-
Create the draft
Select Create Invoice. The invoice joins the list as a Draft.
-
Open the draft's details
Select the invoice number in the draft's row. The invoice opens with its details and its line items.
Hinweis: A new draft shows
No line items
until you add what you're charging for.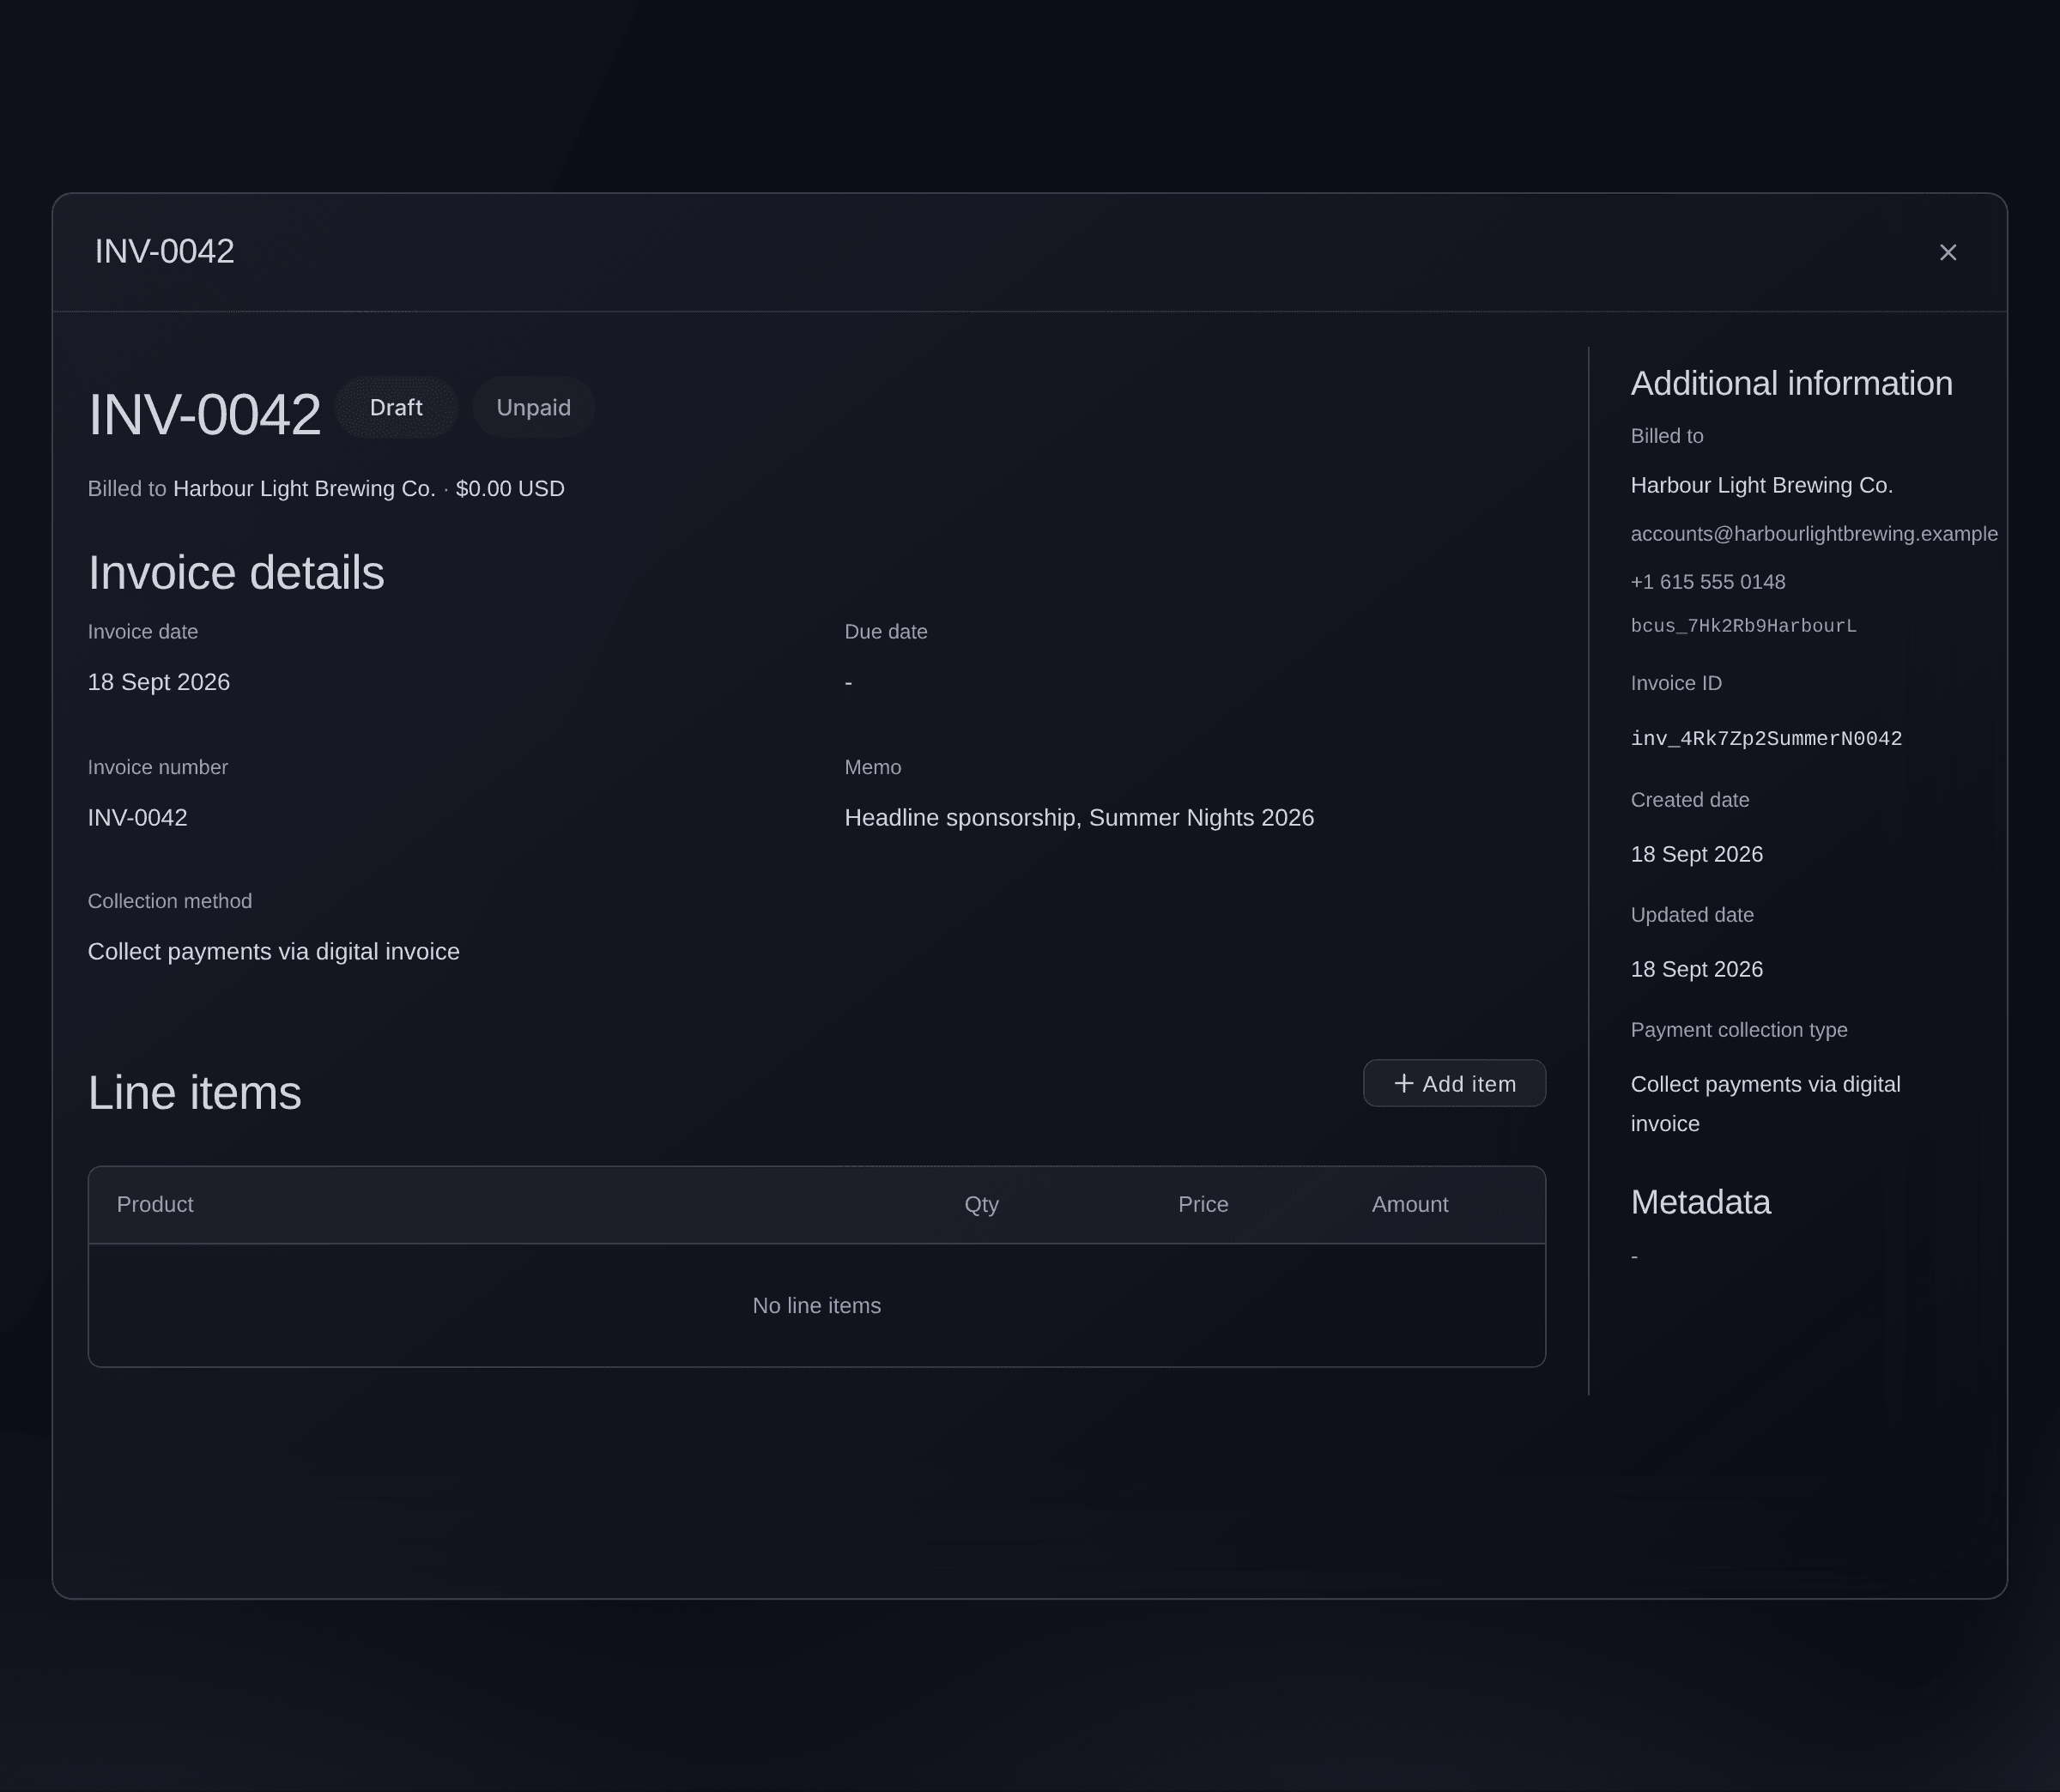
Invoices, a draft invoice. -
Select Add item
Select Add item beside Line items. The Add line item dialog opens.
Hinweis: Add item appears only while the invoice is a draft.
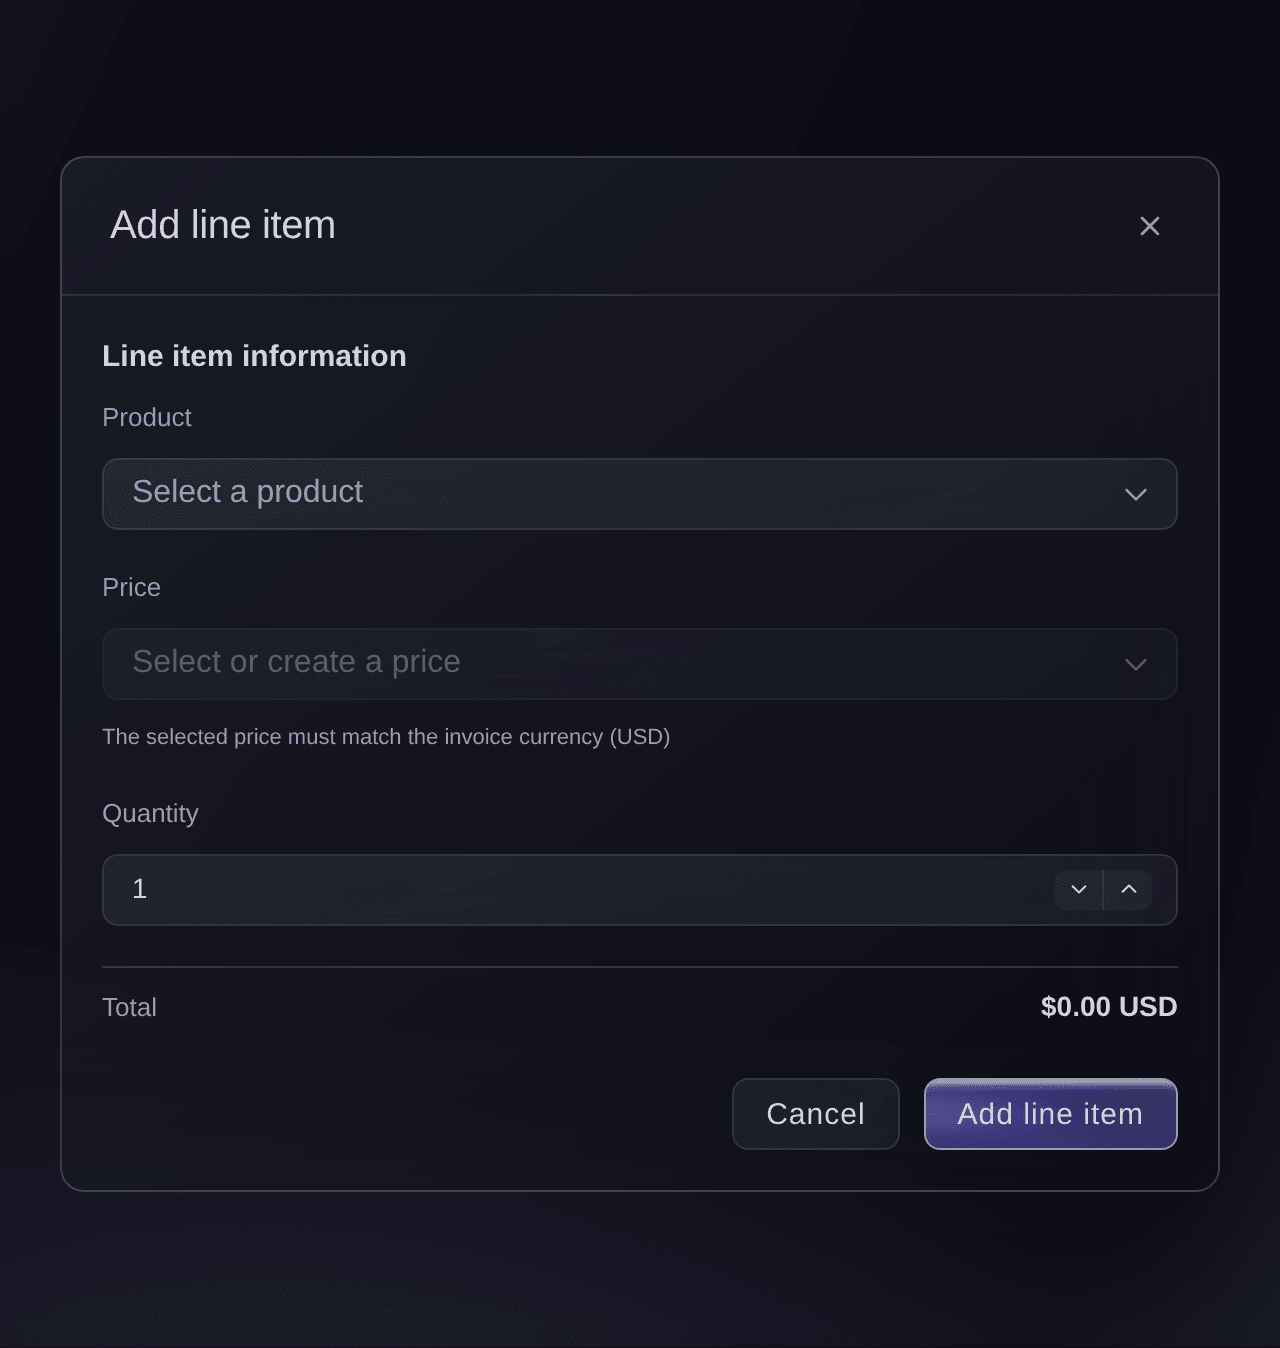
Invoice details, Add line item. -
Choose the product
In Product, choose what you're charging for, such as a sponsorship package or a stall pitch.
Hinweis: Something you haven't invoiced before isn't listed yet. Choose + Create new product and follow Add a product or price you haven't invoiced before.
-
Choose the price
In Price, choose the price to charge.
Hinweis: The list shows only the product's prices in the invoice's currency. Choose + Create new price to add one.
-
Enter the quantity
Enter how many in Quantity. The total under it changes as you enter the number.
-
Add the line item
Select Add line item. The item joins the invoice, and its subtotal, tax and total update.
Tipp: Select Add item again for each thing you're charging for. The bin at the end of a row takes that line item off the draft.
-
Select Finalize
Back on the Invoices tab, open the menu at the end of the draft's row and select Finalize.
Hinweis: Finalize appears only on a draft.
-
Confirm the invoice
Check the invoice number in the confirmation, then select Finalize.
Warnung: A finalised invoice can't go back to draft, and its customer, due date, memo and line items can't be changed.
-
Send your customer the invoice's link
Open the finalised invoice's details and select Copy invoice link under Digital invoice link, then paste the link into your message to the customer.
Hinweis: A finalised invoice shows its link and its PDF, and no longer offers Add item.
Tipp: Download PDF gives you the invoice as a PDF to attach instead.
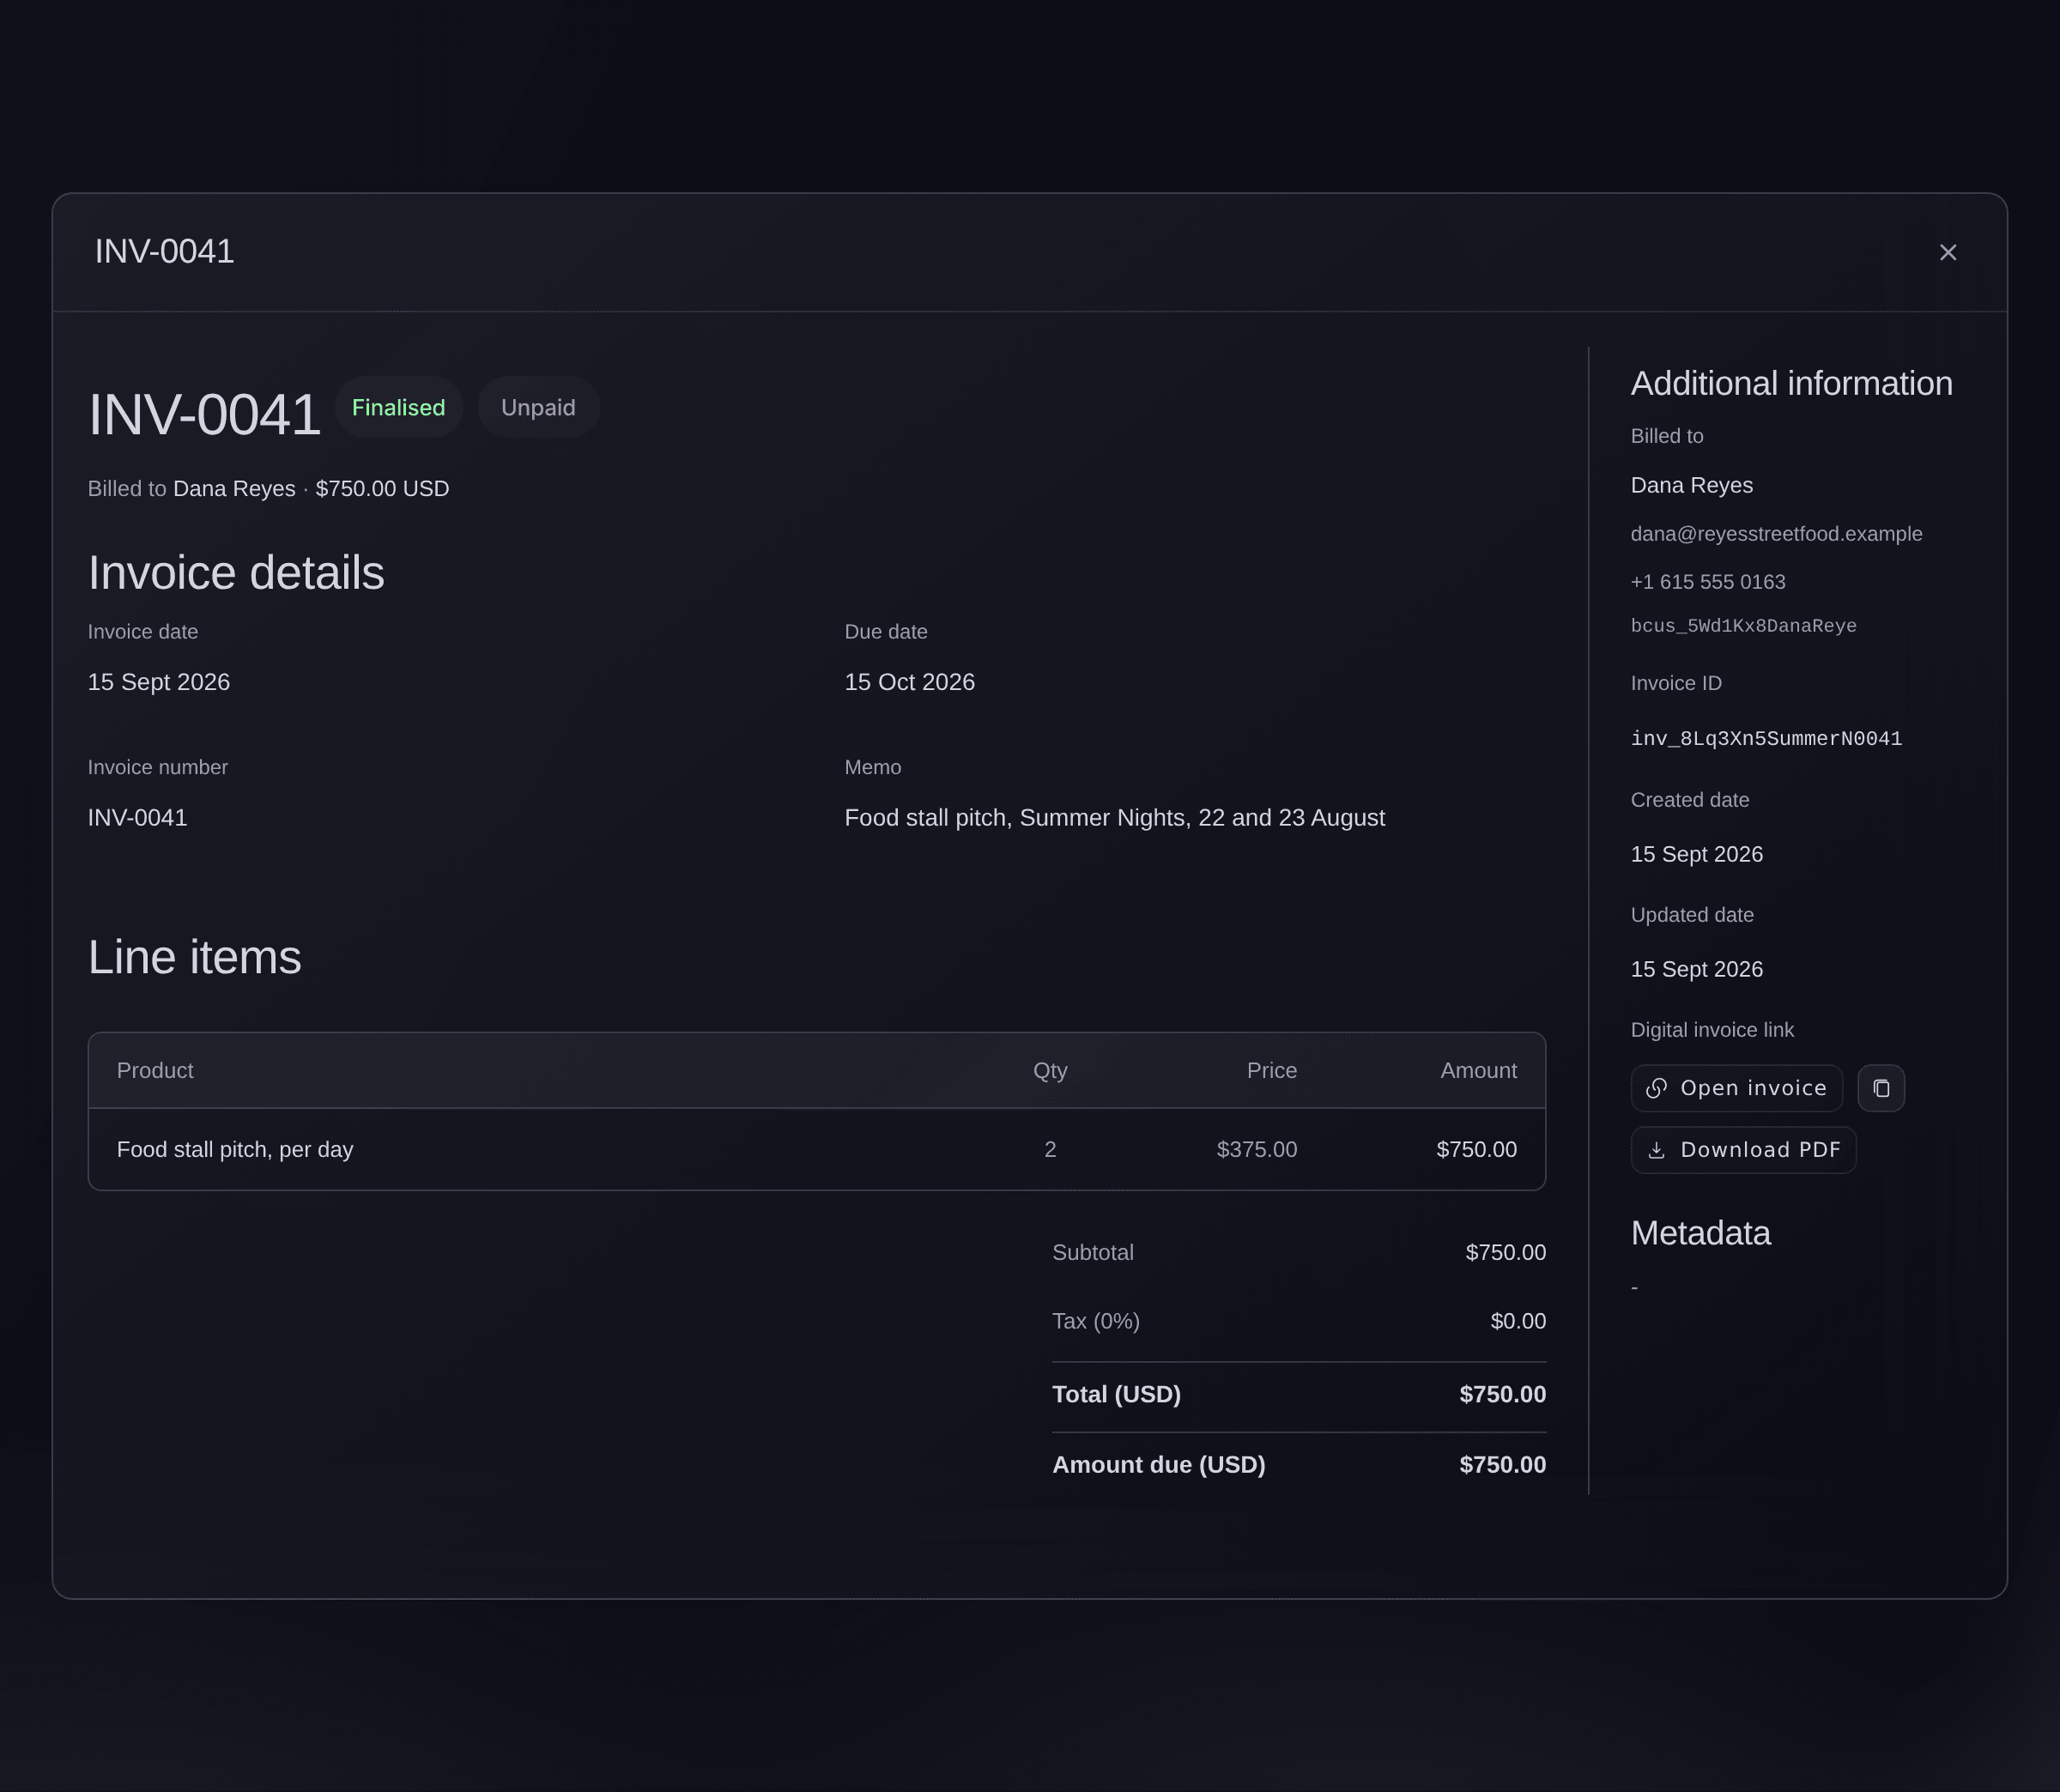
Invoices, a finalised invoice. -
Check the invoice in the list
Back on the Invoices tab, find the invoice. It reads Finalized and Unpaid until its payment is recorded.


Probiere diese Schritte bei deinem eigenen Event aus
Erstelle ein kostenloses Konto, lege dein Event an und folge den Schritten oben in deinem eigenen Dashboard. Das dauert ein paar Minuten, und du musst kein Verkaufsgespräch buchen.
Keine Einrichtungsgebühren. Keine verpflichtende monatliche Ticketing-Gebühr. Keine Kreditkarte nötig.
Oder lassen Sie es erledigen
Fai, the assistant inside your dashboard, can open the Invoices page in Vault for you. You add customers and line items, finalise, mark as paid and void invoices in the dashboard.
In Ihrem Dashboard, mit Fai
Open the Vault invoices for <BRAND NAME>
Über das Terminal
Installieren Sie die CLI über unserer CLI-Seite, melden Sie sich mit ticketfairy auth login an und wählen Sie mit ticketfairy brand use <BRAND_ID> die Marke, an der Sie arbeiten. ticketfairy brand list und ticketfairy event list zeigen die IDs, die die anderen Befehle verwenden.
The CLI's raw API command lists the brand's Vault invoices with each one's status and payment. You create and change invoices in the dashboard.
Show the brands you can act for, with their ids
ticketfairy brand list
List the brand's Vault invoices, with each invoice's number, status, payment status and total
ticketfairy api /api/brand/<BRAND_ID>/banking/invoices --output json
Lass Fai das für dich erledigen
Fai arbeitet in deinem Ticket Fairy Dashboard. Erstelle dein Konto, öffne Fai und füge die Anweisung von oben ein.
Keine Einrichtungsgebühren. Keine verpflichtende monatliche Ticketing-Gebühr. Keine Kreditkarte nötig.
Mark an invoice as paid
-
Select Mark as Paid
In the invoice's row, open the menu at the end and select Mark as Paid.
Hinweis: Mark as Paid appears only on a finalised invoice that's still unpaid. Use it when your customer paid you another way, such as a bank transfer.
-
Confirm the payment
Check the invoice number, then select Mark as Paid. The invoice's payment changes to Paid.
Warnung: Marking an invoice as paid can't be undone, so check the money has arrived first.
Marking an invoice as paid is done in the dashboard. Fai can open the Invoices page in Vault for you.
In Ihrem Dashboard, mit Fai
Open the Vault invoices for <BRAND NAME> so I can mark one as paid
Void an invoice you no longer want paid
-
Select Void
In the invoice's row, open the menu at the end and select Void.
Hinweis: Void appears only on a finalised invoice that's still unpaid. A draft doesn't need voiding; change it with Edit instead.
-
Confirm the void
Check the invoice number, then select Void. The invoice's status changes to Voided.
Warnung: Voiding can't be undone. To bill the customer again, create a new invoice.
Voiding an invoice is done in the dashboard. Fai can open the Invoices page in Vault for you.
In Ihrem Dashboard, mit Fai
Open the Vault invoices for <BRAND NAME> so I can void one
Change a draft before you finalise it
-
Select Edit
In the draft's row, open the menu at the end and select Edit. The Edit Invoice dialog opens.
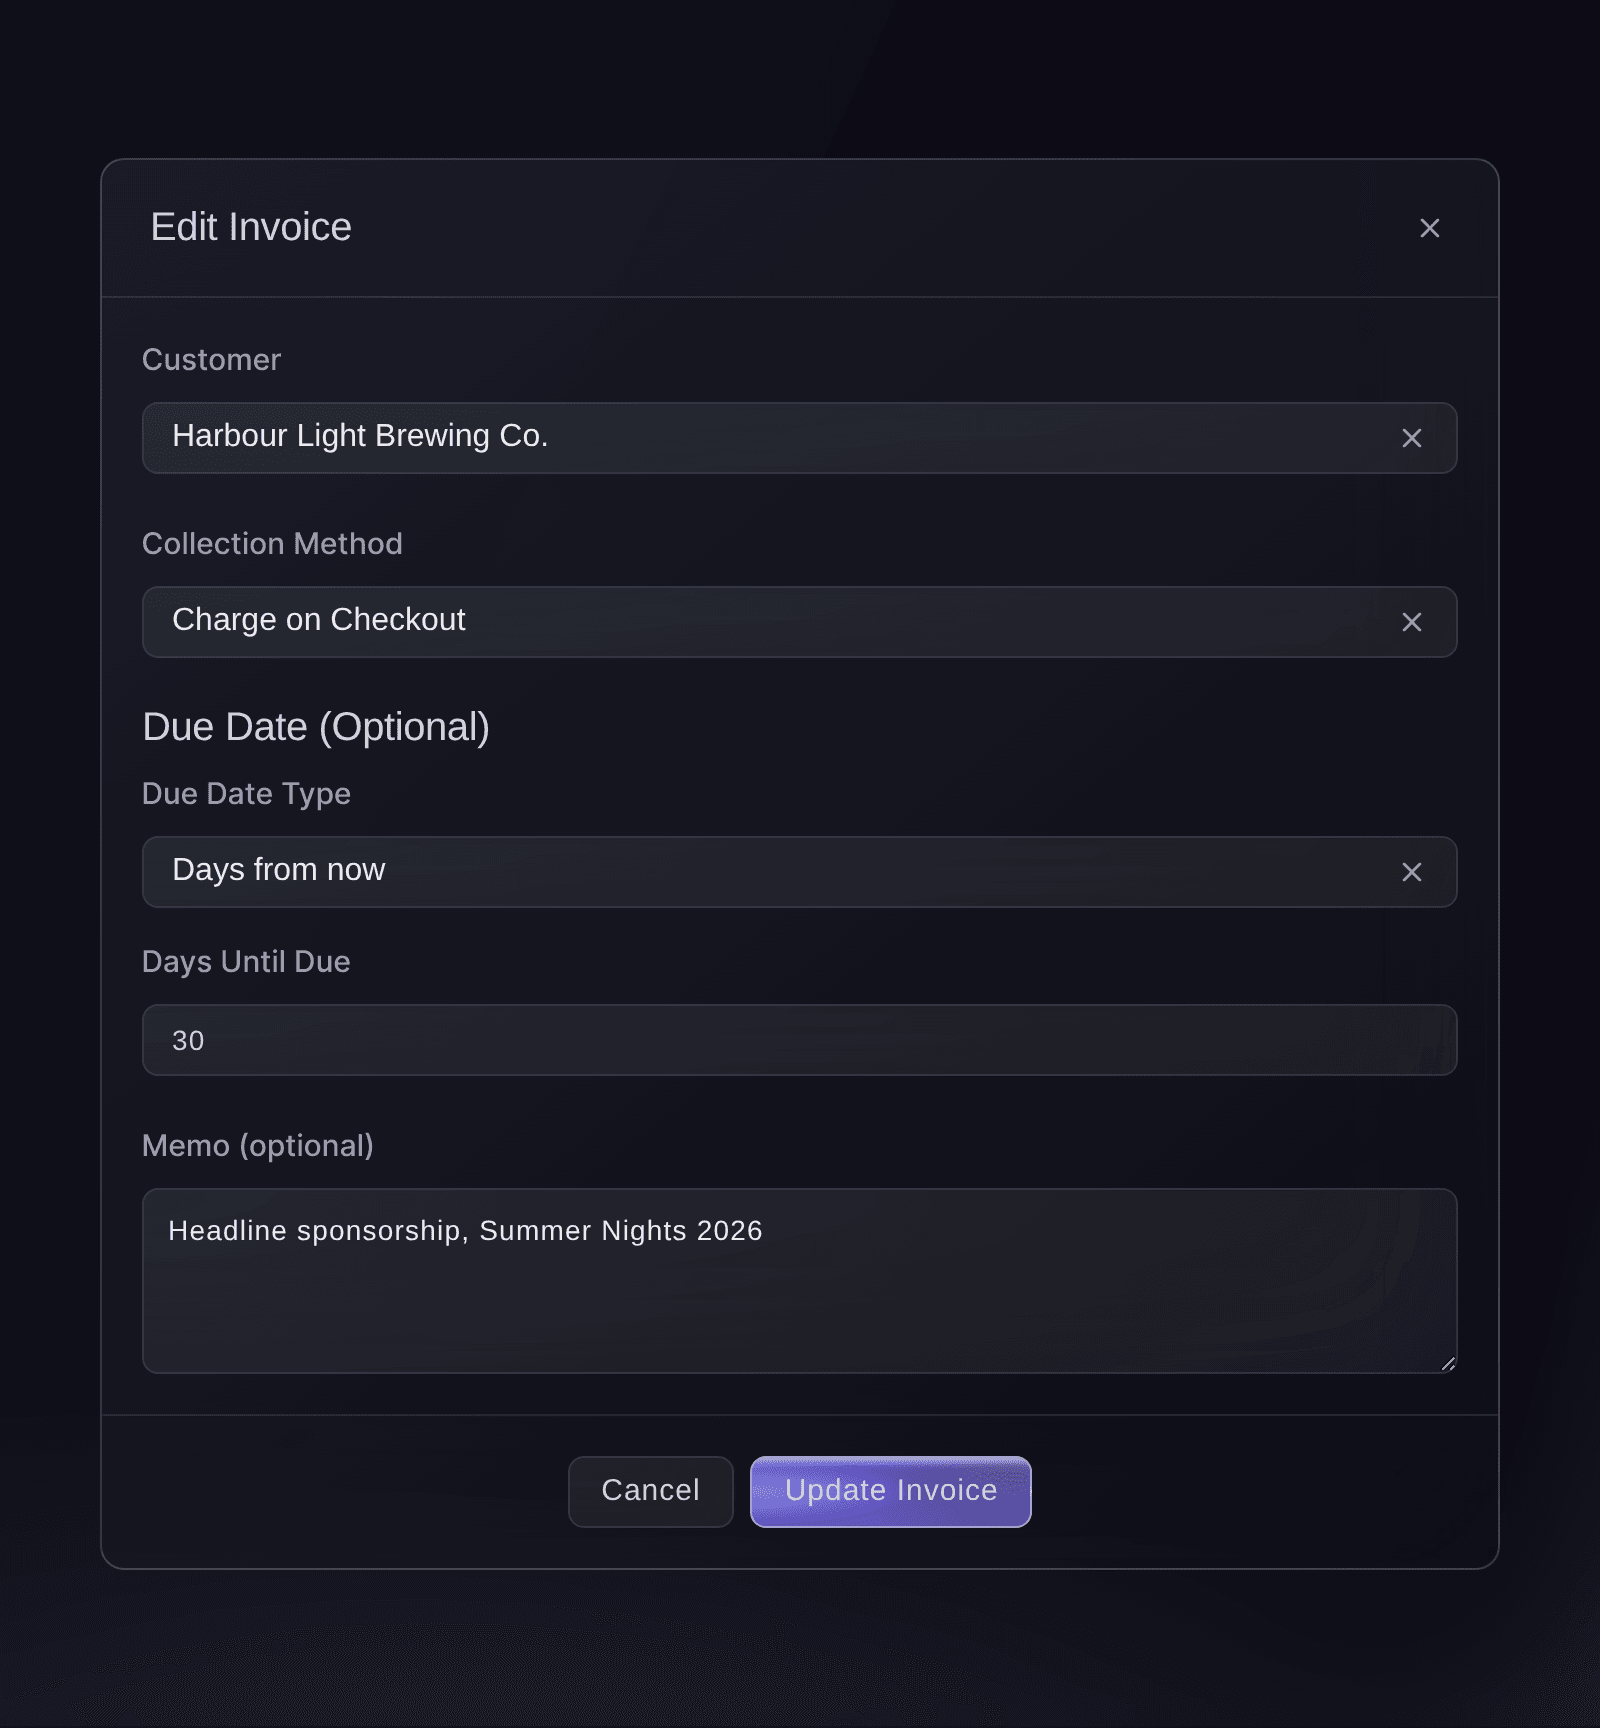
Invoices, Edit Invoice. -
Change the details
Change the Customer, the Collection Method, the due date or the Memo (optional).
Hinweis: The currency stays as you created it. Line items are changed in the invoice's details, with Add item and the bin at the end of each row.
-
Save the changes
Select Update Invoice.
Changing a draft invoice is done in the dashboard. Fai can open the Invoices page in Vault for you.
In Ihrem Dashboard, mit Fai
Open the Vault invoices for <BRAND NAME> so I can change a draft
Add a product or price you haven't invoiced before
-
Choose Create new product
In Add line item, open Product and choose + Create new product. The New product dialog opens.
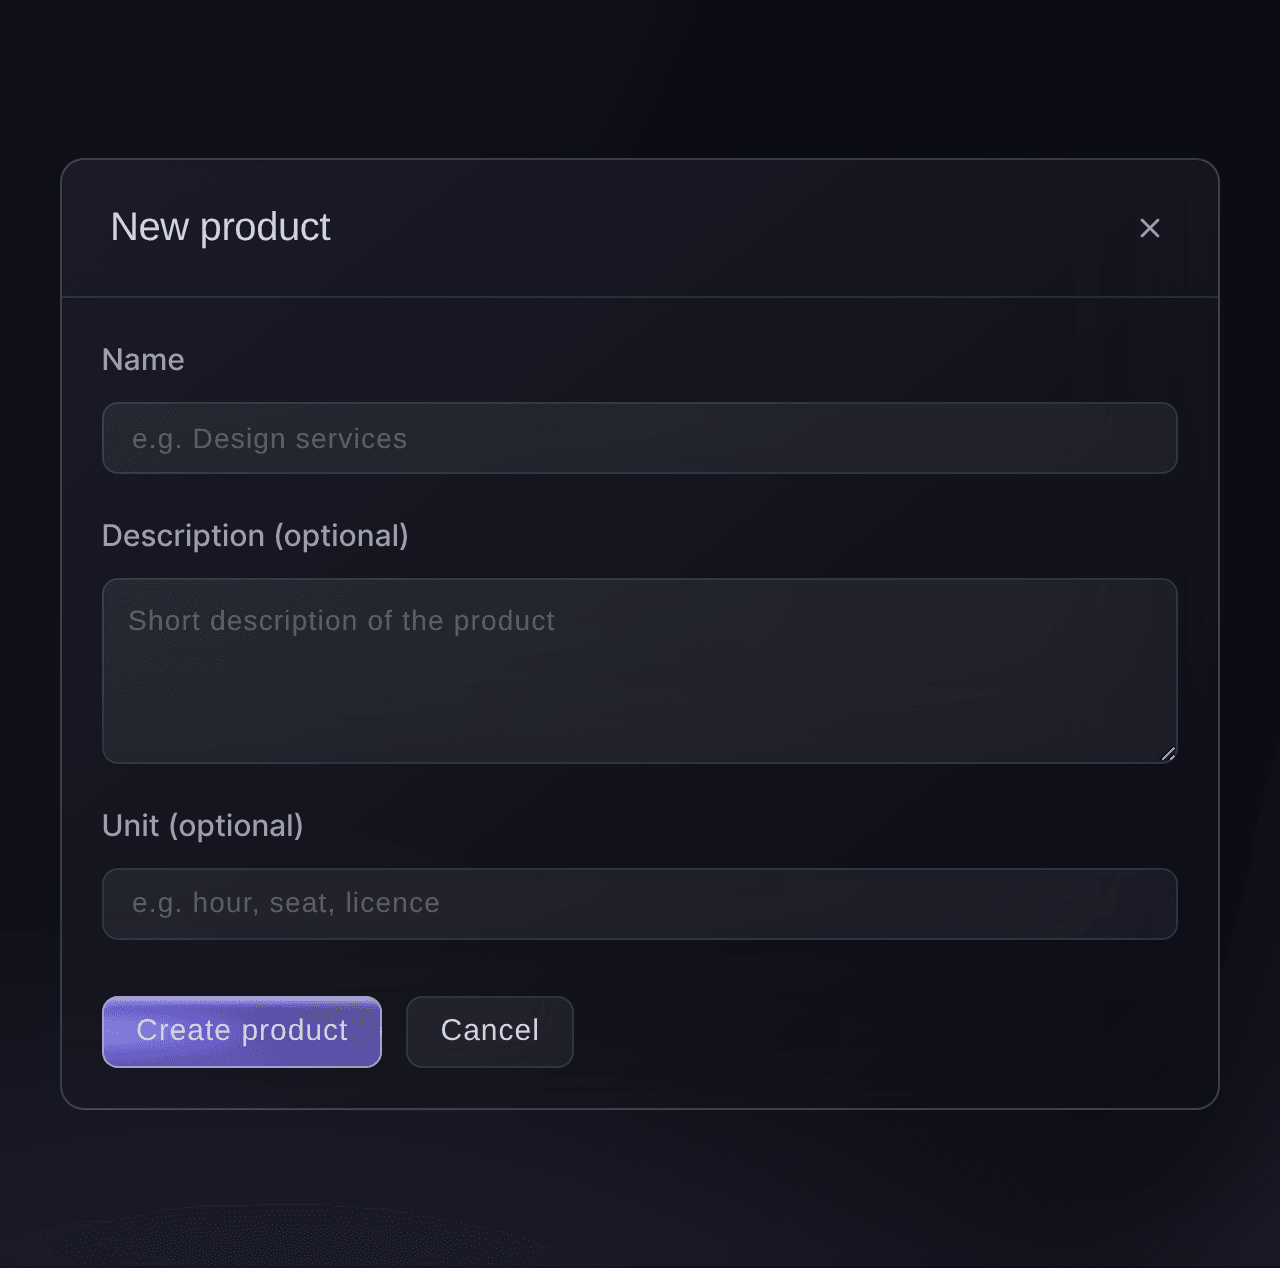
Add line item, New product. -
Enter the product's name
Enter what you're charging for in Name, such as Headline stage sponsorship.
Tipp: Unit (optional) names what a quantity counts, such as a day or a pass.
-
Create the product
Select Create product. The dialog closes, and the new product is chosen in Product.
-
Choose Create new price
Open Price and choose + Create new price. The New price dialog opens in the invoice's currency.
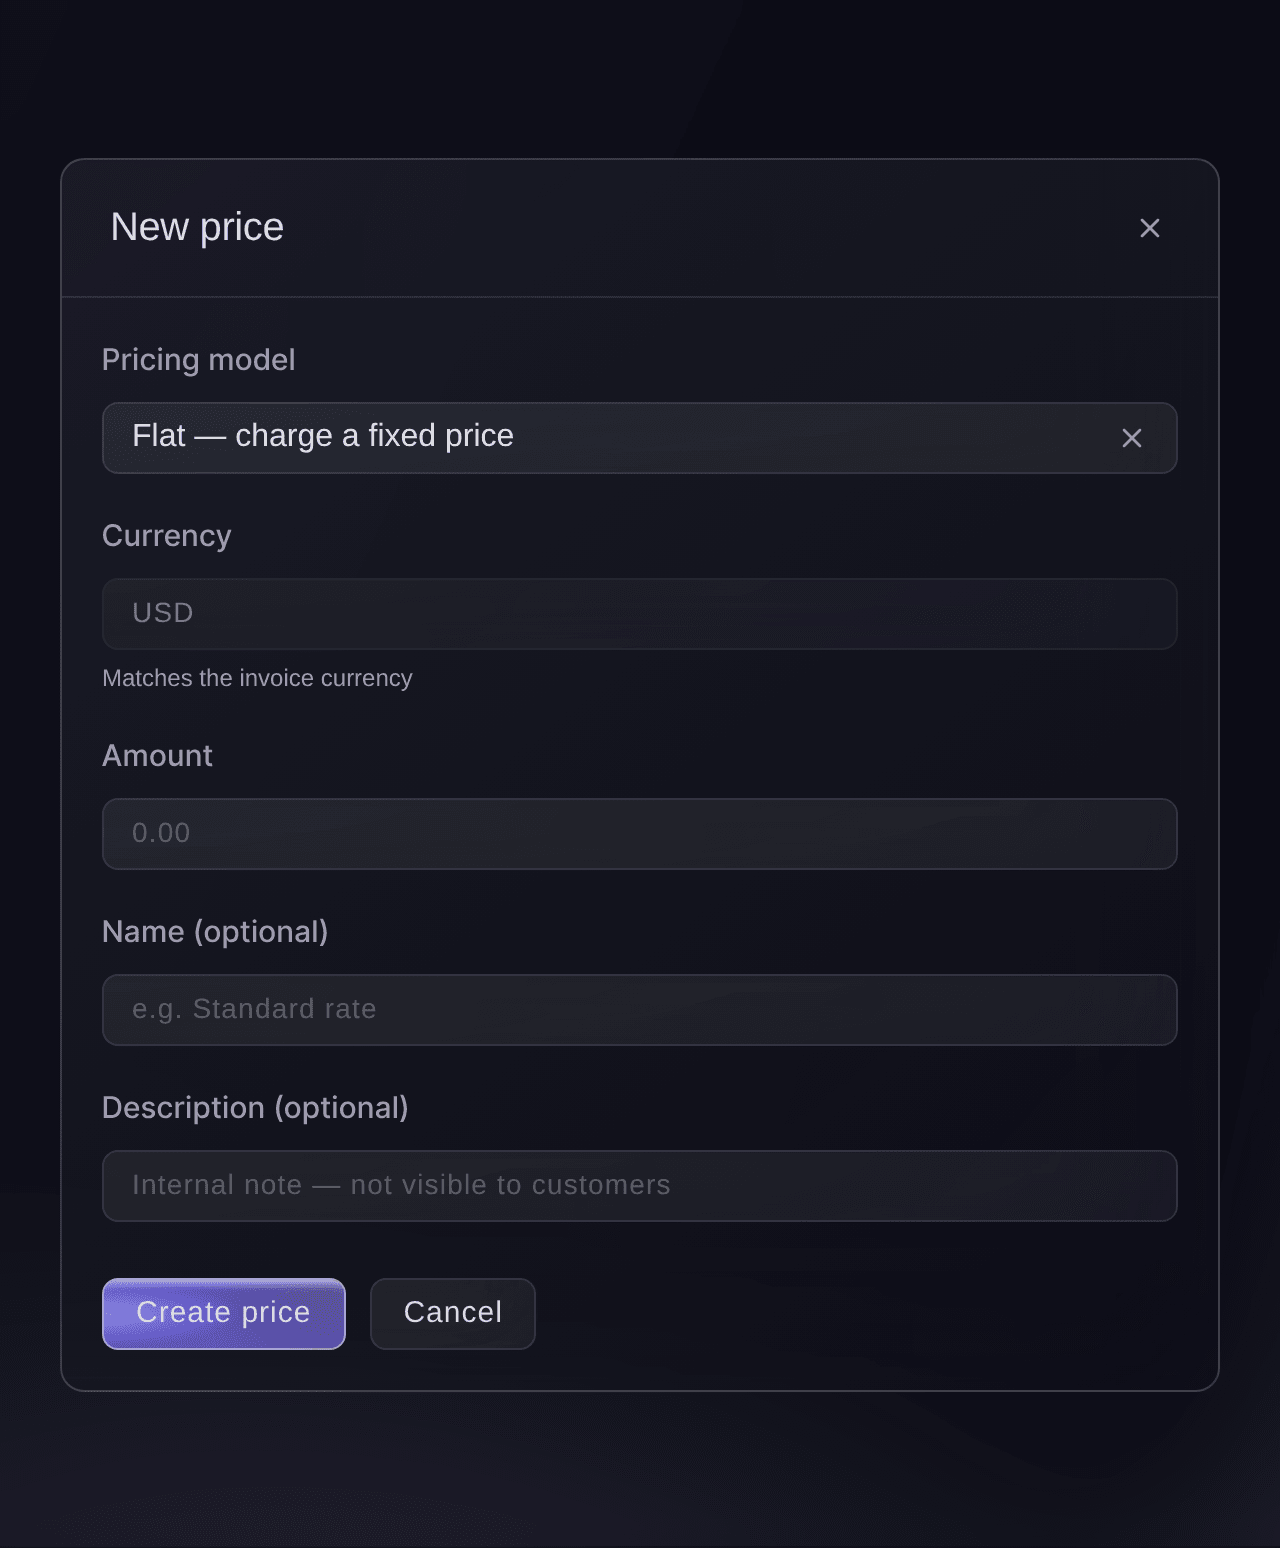
Add line item, New price. -
Choose the pricing model
In Pricing model, choose Flat for one fixed price, or Per unit for a fixed price for each unit.
-
Enter the amount
Enter the price in Amount, or in Unit amount for a price per unit.
Tipp: Name (optional) tells two prices of one product apart in the list, such as Early rate and Standard rate.
-
Create the price
Select Create price. The dialog closes, and the new price is chosen in Price.
Products and prices are added in the dashboard, from the invoice you're working on. Fai can open the Invoices page in Vault for you.
In Ihrem Dashboard, mit Fai
Open the Vault invoices for <BRAND NAME> so I can add a line item
Fragen, die Sie haben könnten
- Who on my team can create and change invoices?
- You can create, finalise, mark as paid and void invoices with an owner or admin login on the brand. Event-level logins, such as promoter, door staff and stats, don't see Vault.
- Why can't I select New Invoice?
- The brand has no billing customer yet, and the button says
Create at least one billing customer first
when you point at it. Add one on the Customers tab, then go back to Invoices. - Why isn't Invoices in the Vault menu?
- Invoices appears once your Vault account is active, and only to owners and admins of the brand. Opened before the account is active, the page says
Account not active
, so finish onboarding first. - Can I change an invoice after I finalise it?
- No. Only a draft can be edited or have line items added or taken off. If a finalised invoice is wrong and still unpaid, void it and create a new one with the right details.
- Can I undo marking an invoice as paid, or voiding it?
- No. The Invoices page has no way to mark a paid invoice unpaid again or to bring a voided invoice back. Mark an invoice as paid once the money has arrived, and create a new invoice if you voided one by mistake.
- Can I delete an invoice?
- The Invoices page doesn't delete invoices. A draft stays in the list until you finalise it, and an unpaid invoice you no longer want paid can be voided, which keeps it in the list for your records.
- When does a Days from now due date start counting?
- From the day you finalise the invoice, not the day you create the draft. Choose Specific date instead if the payment is due on a fixed day.
- Why isn't my price in the Price list?
- The list shows only the chosen product's prices in the invoice's currency. Add a price in this invoice's currency with + Create new price.
- What does Failed to finalize invoice mean?
Failed to finalize invoice
means Vault didn't finalise it. Select Refresh: if someone on your team has already finalised or changed the invoice, the list now shows its current status. If it still reads Draft, try again, and contact Ticket Fairy support if it keeps failing.- How is this different from invoicing a group booking?
- A group booking's invoice is raised from the booking itself, on the event, for the tickets in it. Vault invoices are for anything else you bill from the brand, such as a sponsorship, a stall pitch or a venue's share of the bar.
Hast du noch eine Frage?
Buche eine Demo, und wir beantworten sie in einem Gespräch, passend zu deiner Art von Event. Oder erstelle dein Konto und sieh es dir selbst an.
Keine Einrichtungsgebühren. Keine verpflichtende monatliche Ticketing-Gebühr. Keine Kreditkarte nötig.
Verwandte Anleitungen
Machen Sie das bei Ihrer eigenen Veranstaltung
Erstellen Sie Ihr Konto, legen Sie Ihr Event an und folgen Sie den Schritten in Ihrem eigenen Dashboard. Sie müssen kein Verkaufsgespräch buchen.