
Invitationer og gæstelister
Take act and trader applications for your event
When you book acts, market traders or crew for a festival, a form on your event collects every application with the same questions answered. You read them in one list, email each applicant your decision, and send the people you accept a ticket or an invitation to buy.
Build a form for your event from a ready-made form, a description Fai turns into questions, or an empty one, ask only what each applicant needs to answer, read every application in one list, accept or decline each one, and send the people you accept a ticket.
- Til
- Choosing acts, traders or guests from the people who apply
- Tager
- 14 minutter
- Start a form
- Choose how to start
- Name the form and set when it takes answers
- Check the form's address
- Enter the message applicants see after they apply
- Let applicants change their answers
- Add a background image and a social image
- Choose the emails applicants get when you decide
- Add a question
- Enter the question
- Enter the answers for a choice question
- Show the question only for some answers
- Let people add a section more than once
- Fill in answers from the applicant's account
- Save the question
- Choose where the answers go
- Create the form
- Open the form the way applicants see it
- Read the applications
- See the form's statistics
- Open one application
- Accept or decline each application
Før du går i gang
- You need an owner or admin login for the event. If Forms isn't in your event's menu, ask the event's owner to make you an admin.
-
Start a form
Open your event, select Forms under Interact, then select Create Form. On an event with no forms yet, the button is Add New Form.
Bemærk: One event can run several forms at once, so acts and traders can each get their own questions.
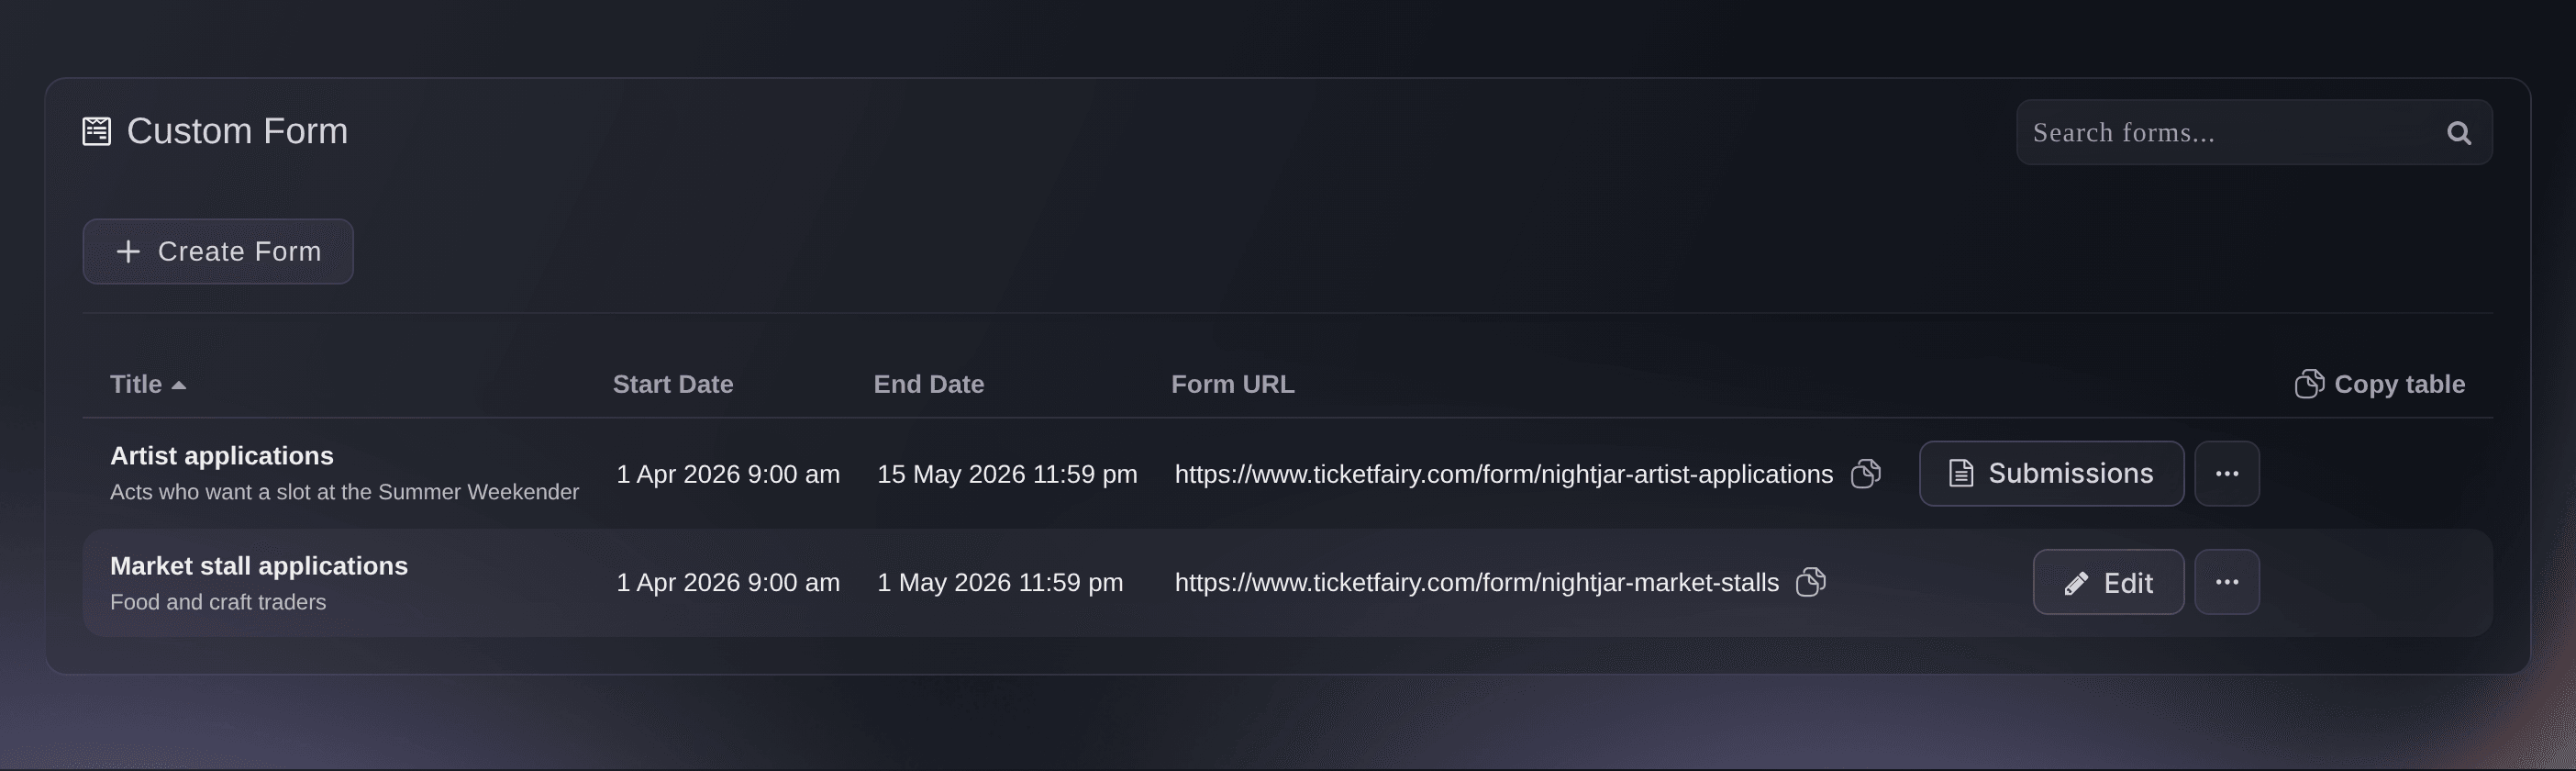
Forms. -
Choose how to start
In Create a form, choose where the questions come from.
Bemærk: Answers to Apply to play and Submit a talk go to your event's Applications section, where your team reviews and scores them.
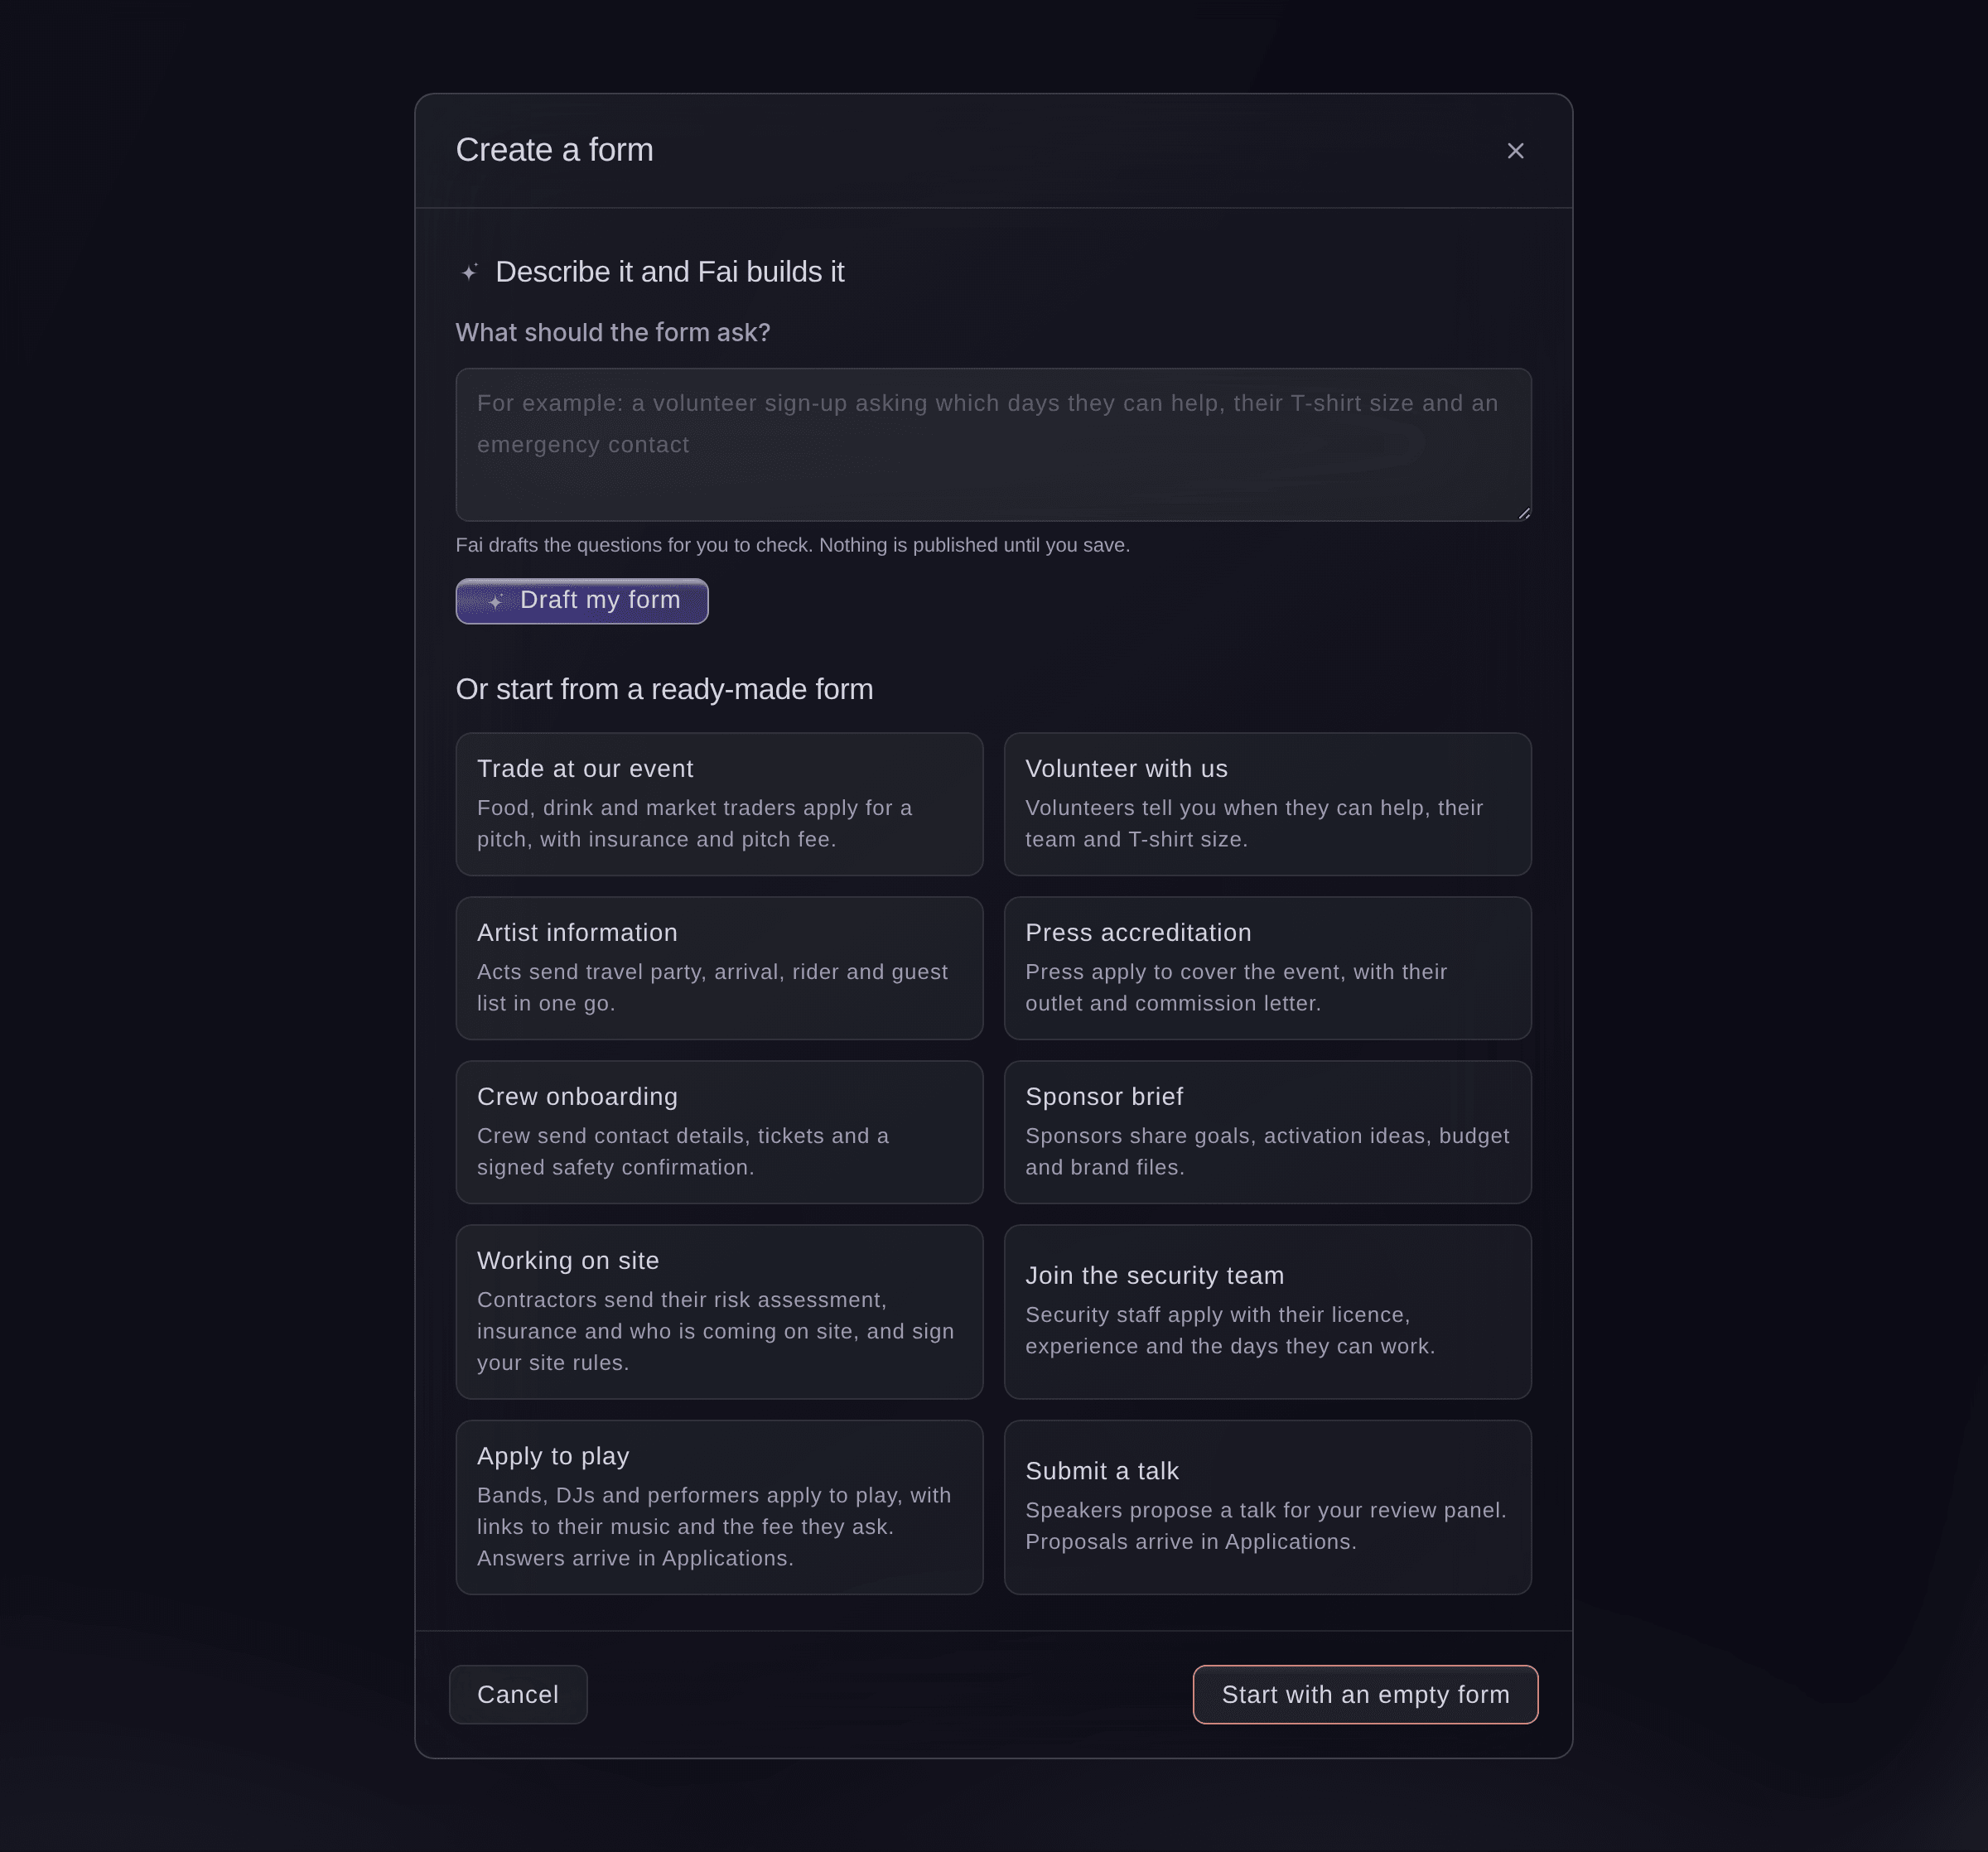
Create a form. -
Name the form and set when it takes answers
On the Details step, check the Title, then choose the Start Date and End Date the form takes answers between. With both dates empty, the form takes answers from the moment you create it.
Bemærk: Applicants see the title as the form's heading, with Subtitle (optional) and Description under it.
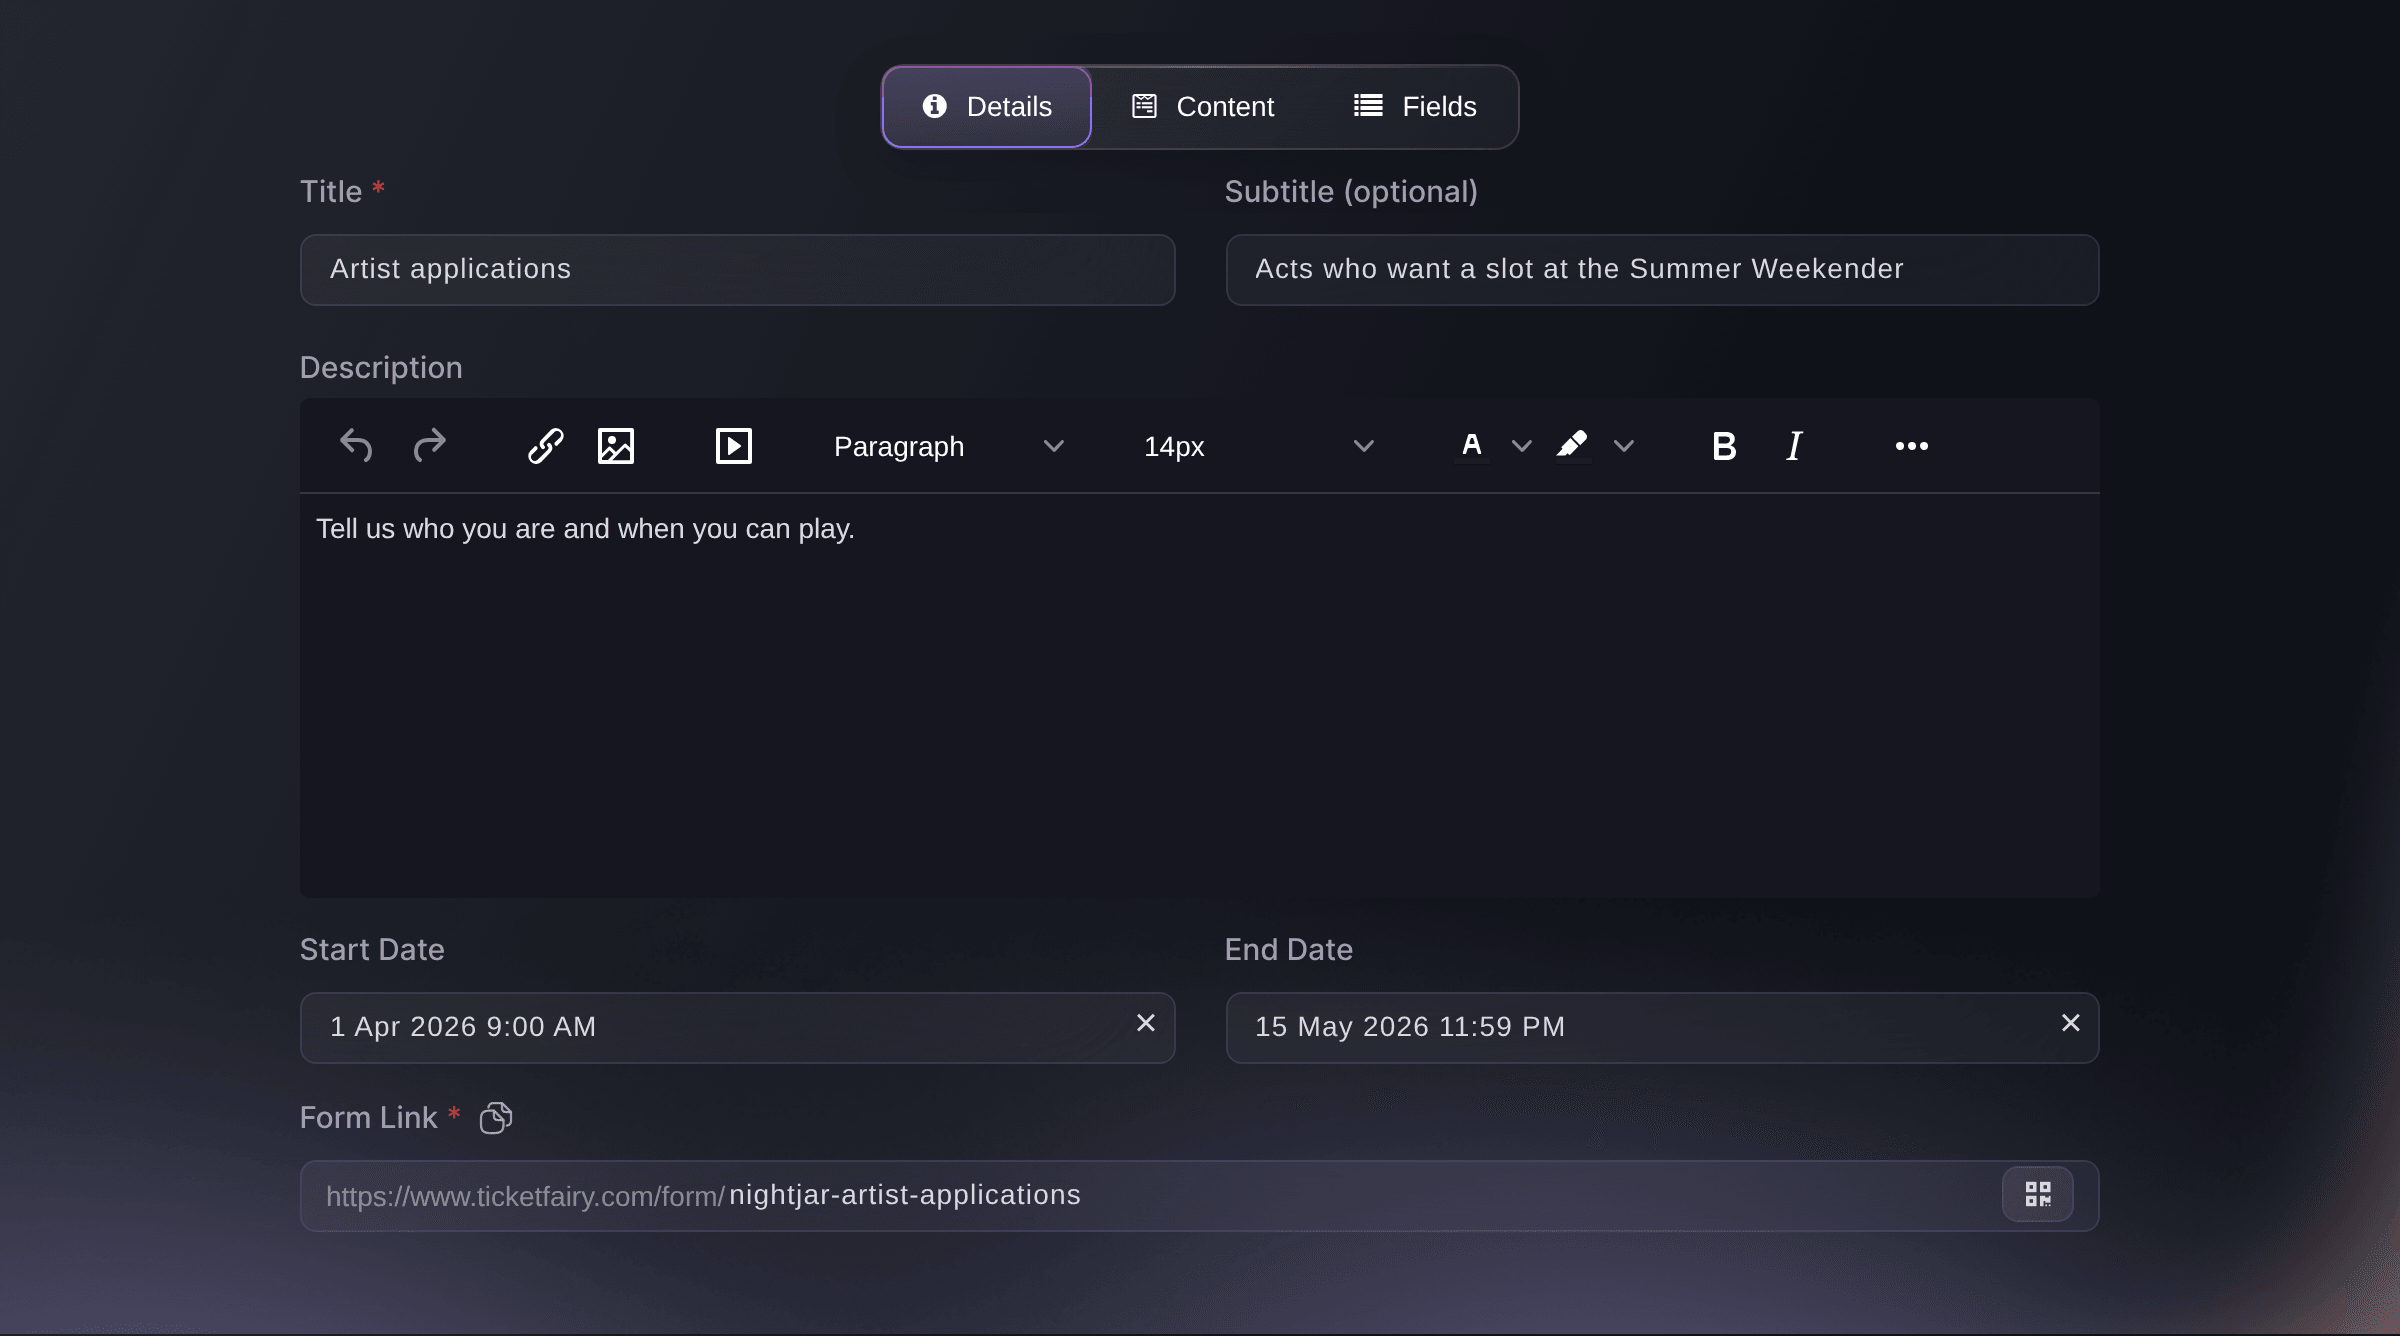
Create Form, Details. -
Check the form's address
Check the address in Form Link, which fills itself in from the title and the start date until you change it.
Bemærk: It can hold lowercase letters, numbers and hyphens, and no other form on Ticket Fairy can have the same one. Settle it before you share it, because an address you change stops working.
-
Enter the message applicants see after they apply
Select Next, then enter the Success Message applicants see when they send the form.
Tip: Say when you'll answer, so applicants know when to look out for your decision.
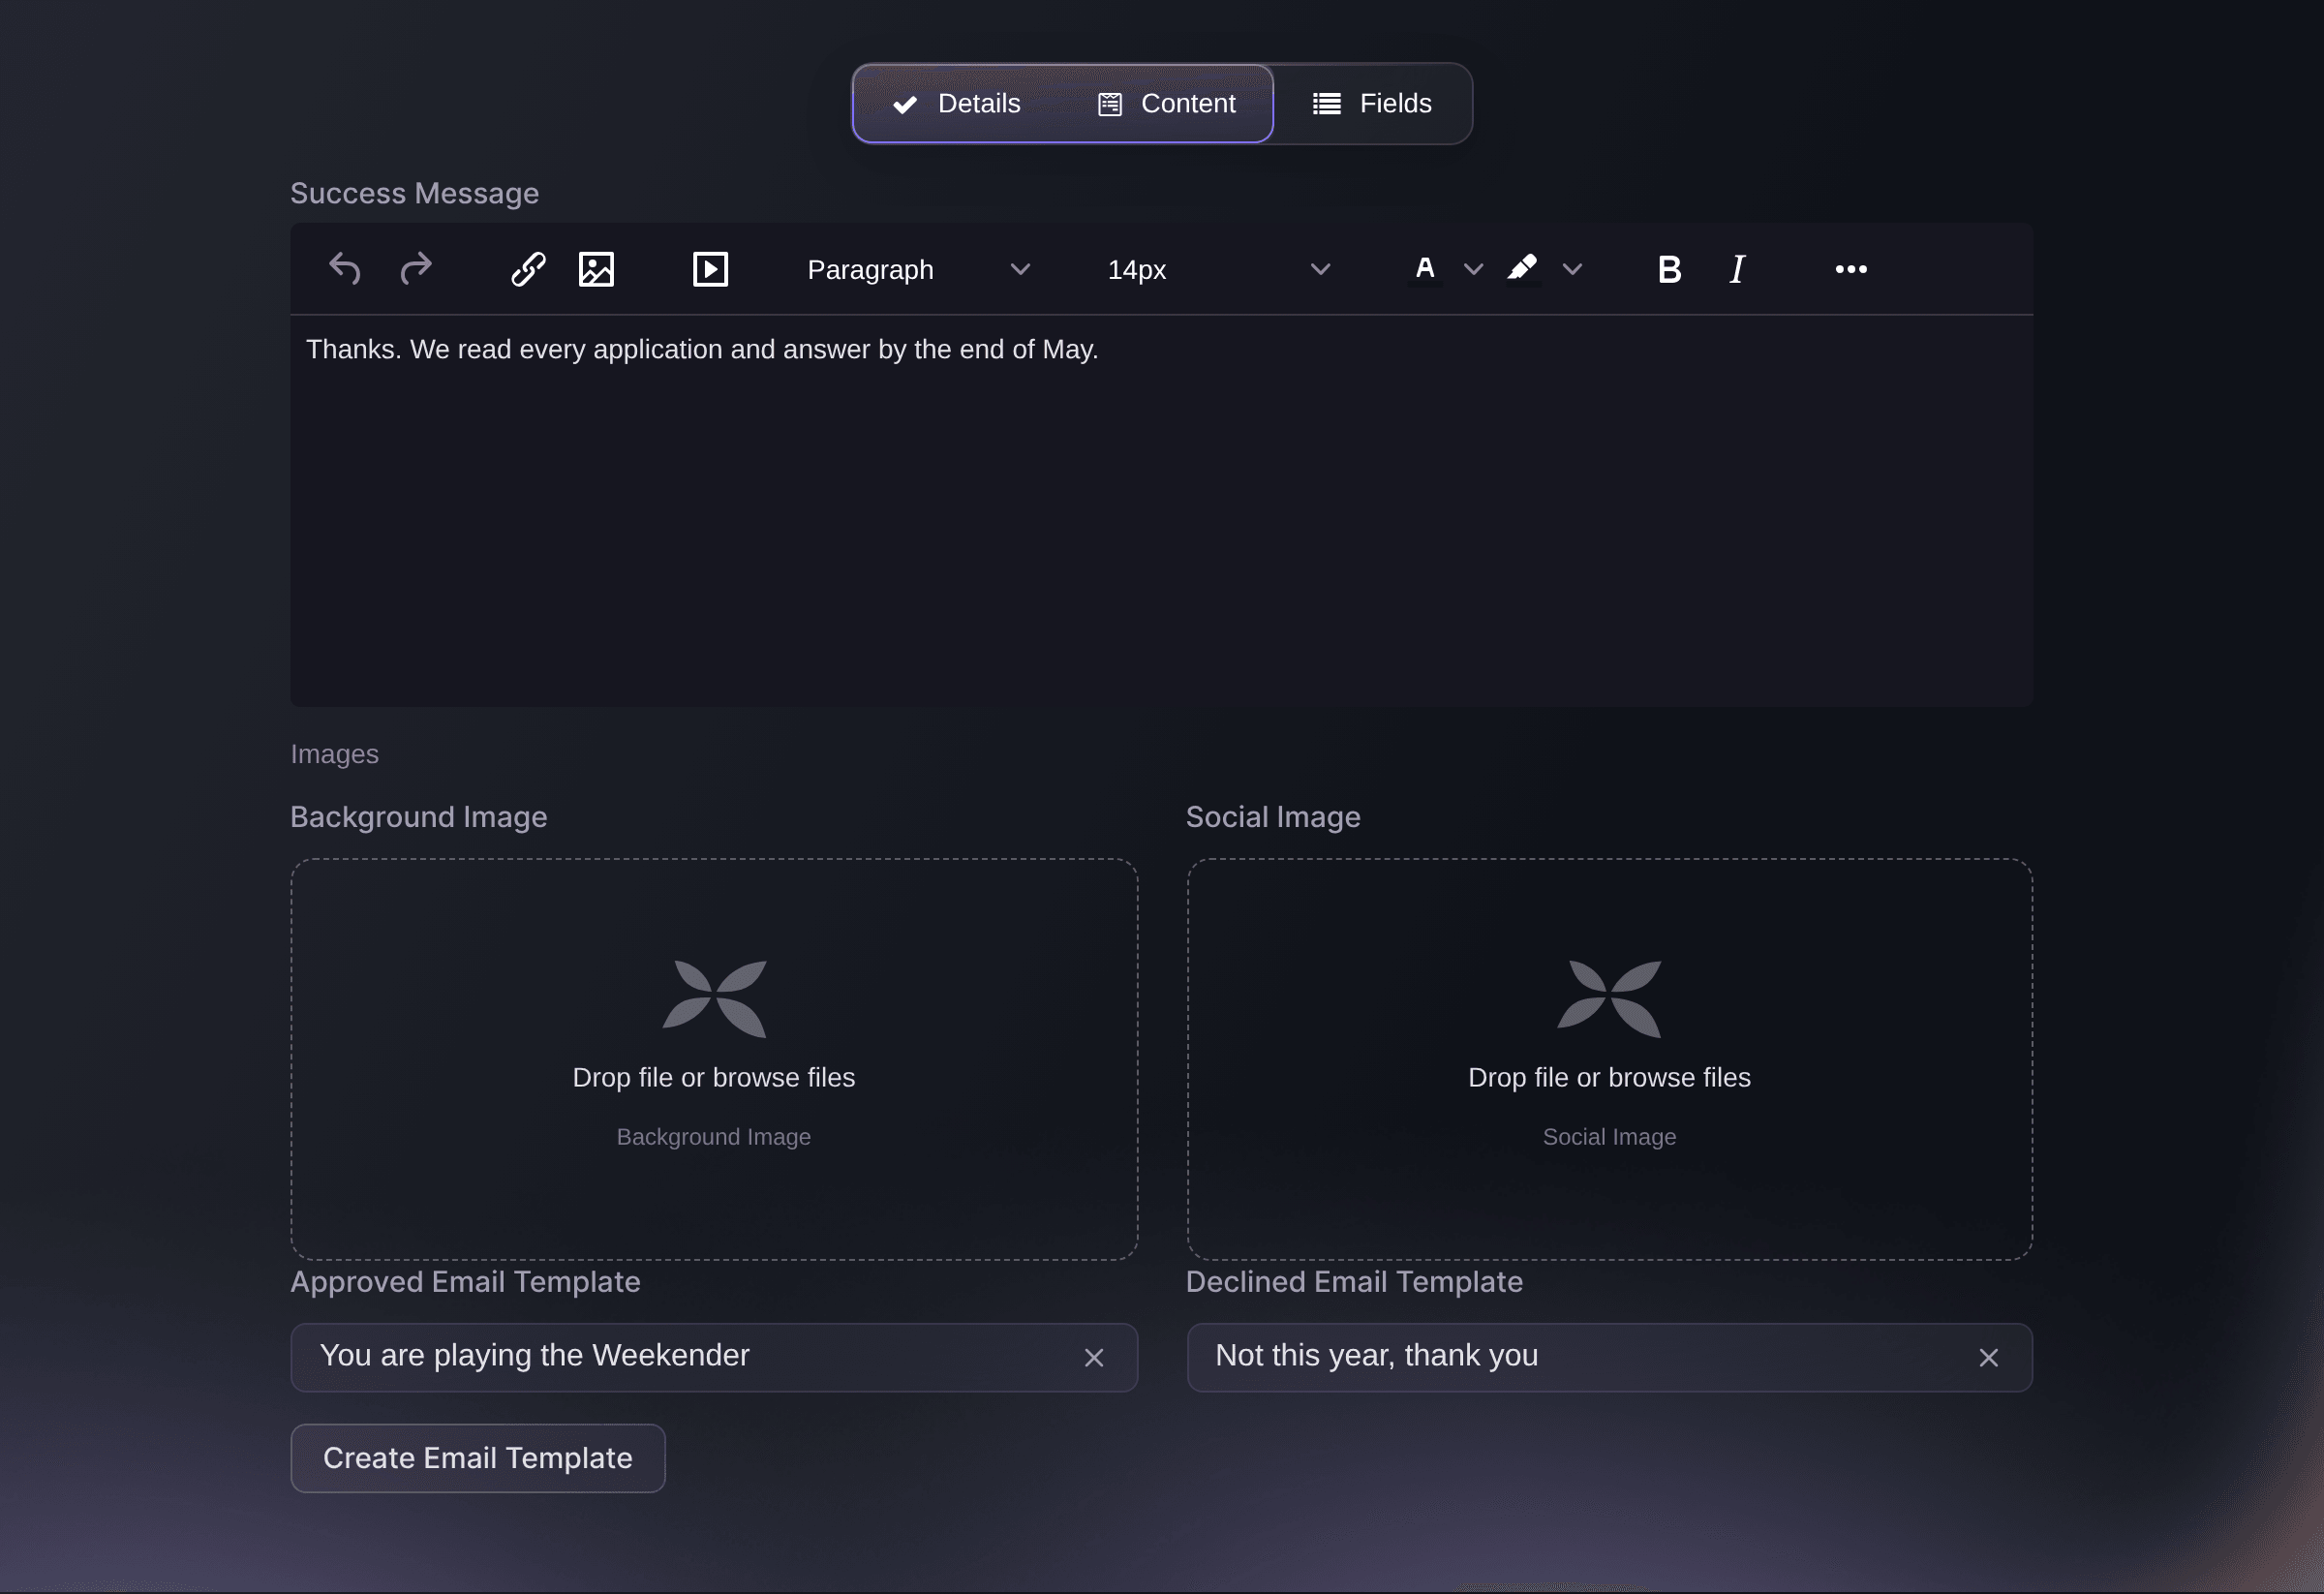
Create Form, Content. -
Let applicants change their answers
Optional: Turn on Let people change their answers under the success message.
Bemærk: Each applicant then gets an email with a private link to change their answers. The link stops working when you accept or decline them, or when the form closes.
-
Add a background image and a social image
Optional: Add a Background Image to show behind the form and a Social Image to show when someone shares the form's address.
-
Choose the emails applicants get when you decide
Choose an Approved Email Template and a Declined Email Template from your event's email templates.
Bemærk: Create Email Template opens your event's Email Templates page in a new tab. Leave a list empty and that decision changes the status without sending an email.
-
Add a question
Select Next, choose the type of question in the list under the questions, then select Add question.
Bemærk: Every form starts with an email question marked Always asked, because your decision emails go to the address applicants enter there.
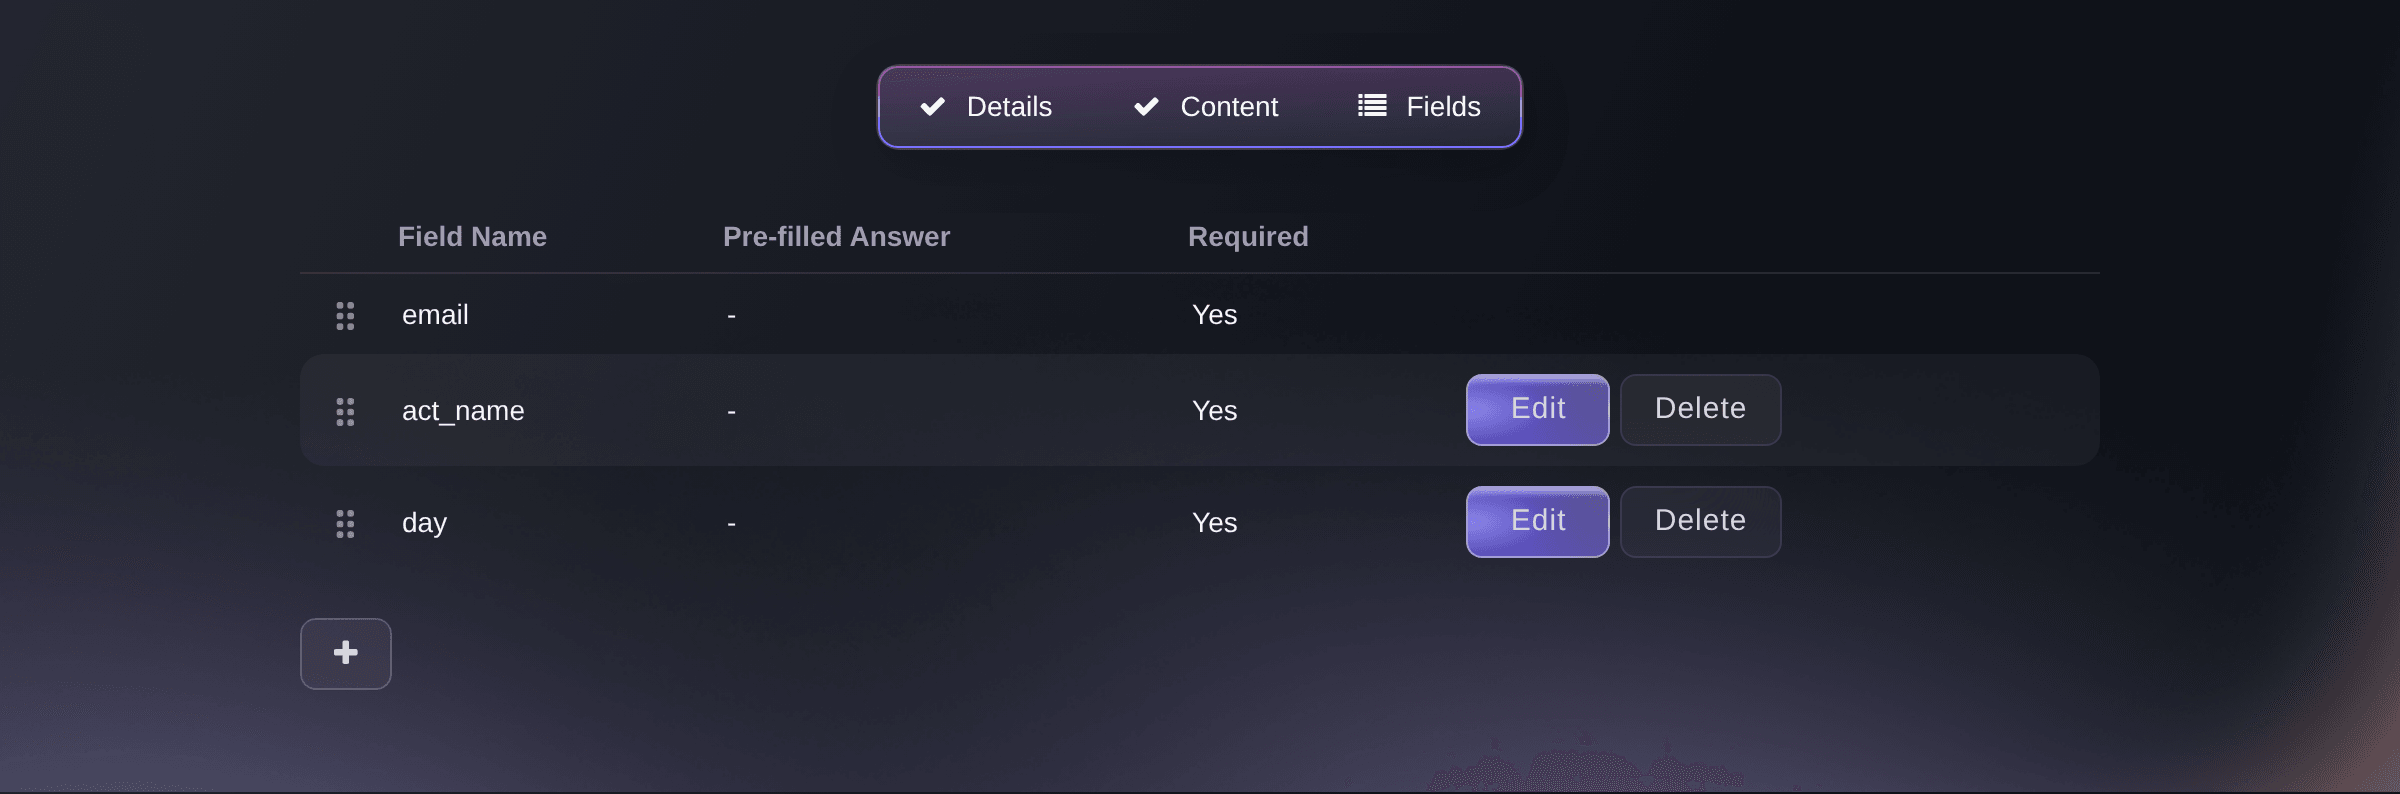
Create Form, Fields. -
Enter the question
In Add a question, check the Type of question, then enter the Question applicants see.
Bemærk: Email address, Phone number, Date, Time and Country are checked as the applicant enters them.
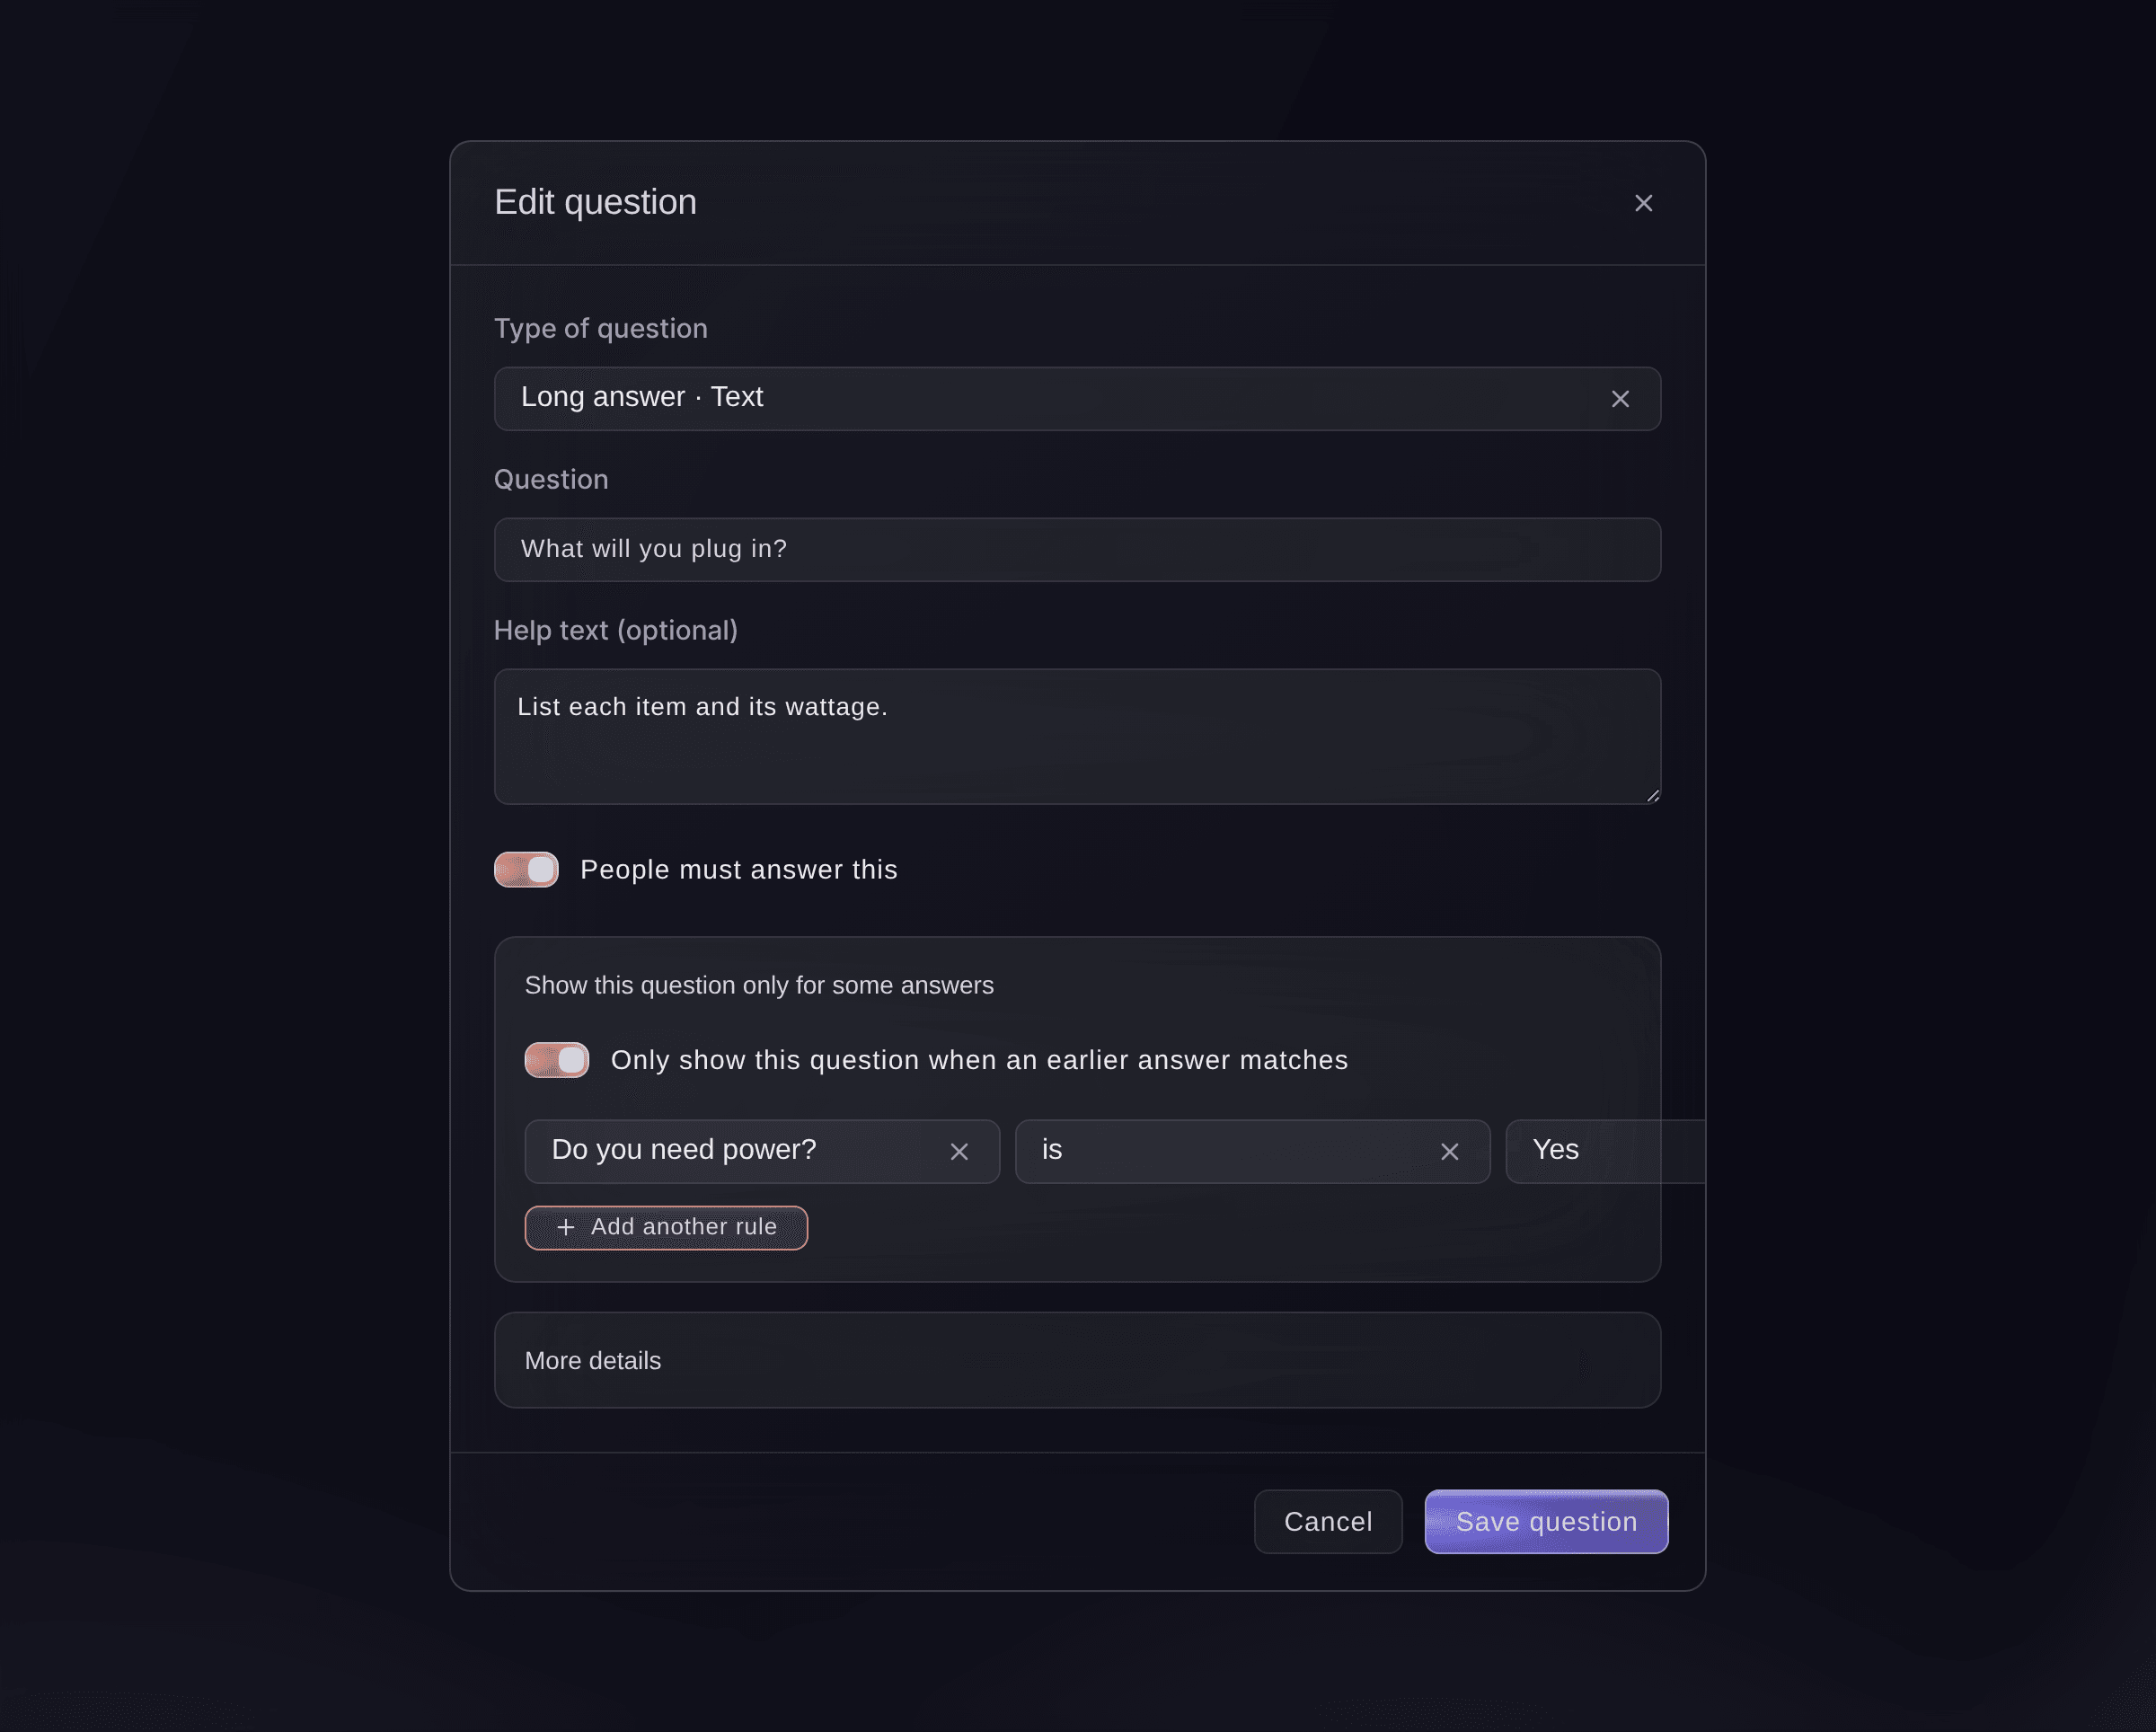
Edit question. -
Enter the answers for a choice question
If you chose Choose one, Dropdown list or Tick any, enter each answer under Answers people can choose, and select Add an answer for another.
-
Show the question only for some answers
Optional: Open Show this question only for some answers, turn on Only show this question when an earlier answer matches, then choose the Earlier question, the comparison and the Answer.
Bemærk: Answers to a question that is hidden are not saved. A rule on a Section heading hides every question in that section.
-
Let people add a section more than once
Optional: On a Section heading, turn on People can add this section more than once, then set Most copies.
Bemærk: The questions under the heading repeat, up to the next heading, so a band enters each member or a contractor enters each person coming on site. People can add from 2 to 20 copies, and a file upload, signature or fee cannot be in the section.
Tip: Enter Words on the add button (optional), such as Add another person, so applicants know what each copy is for.
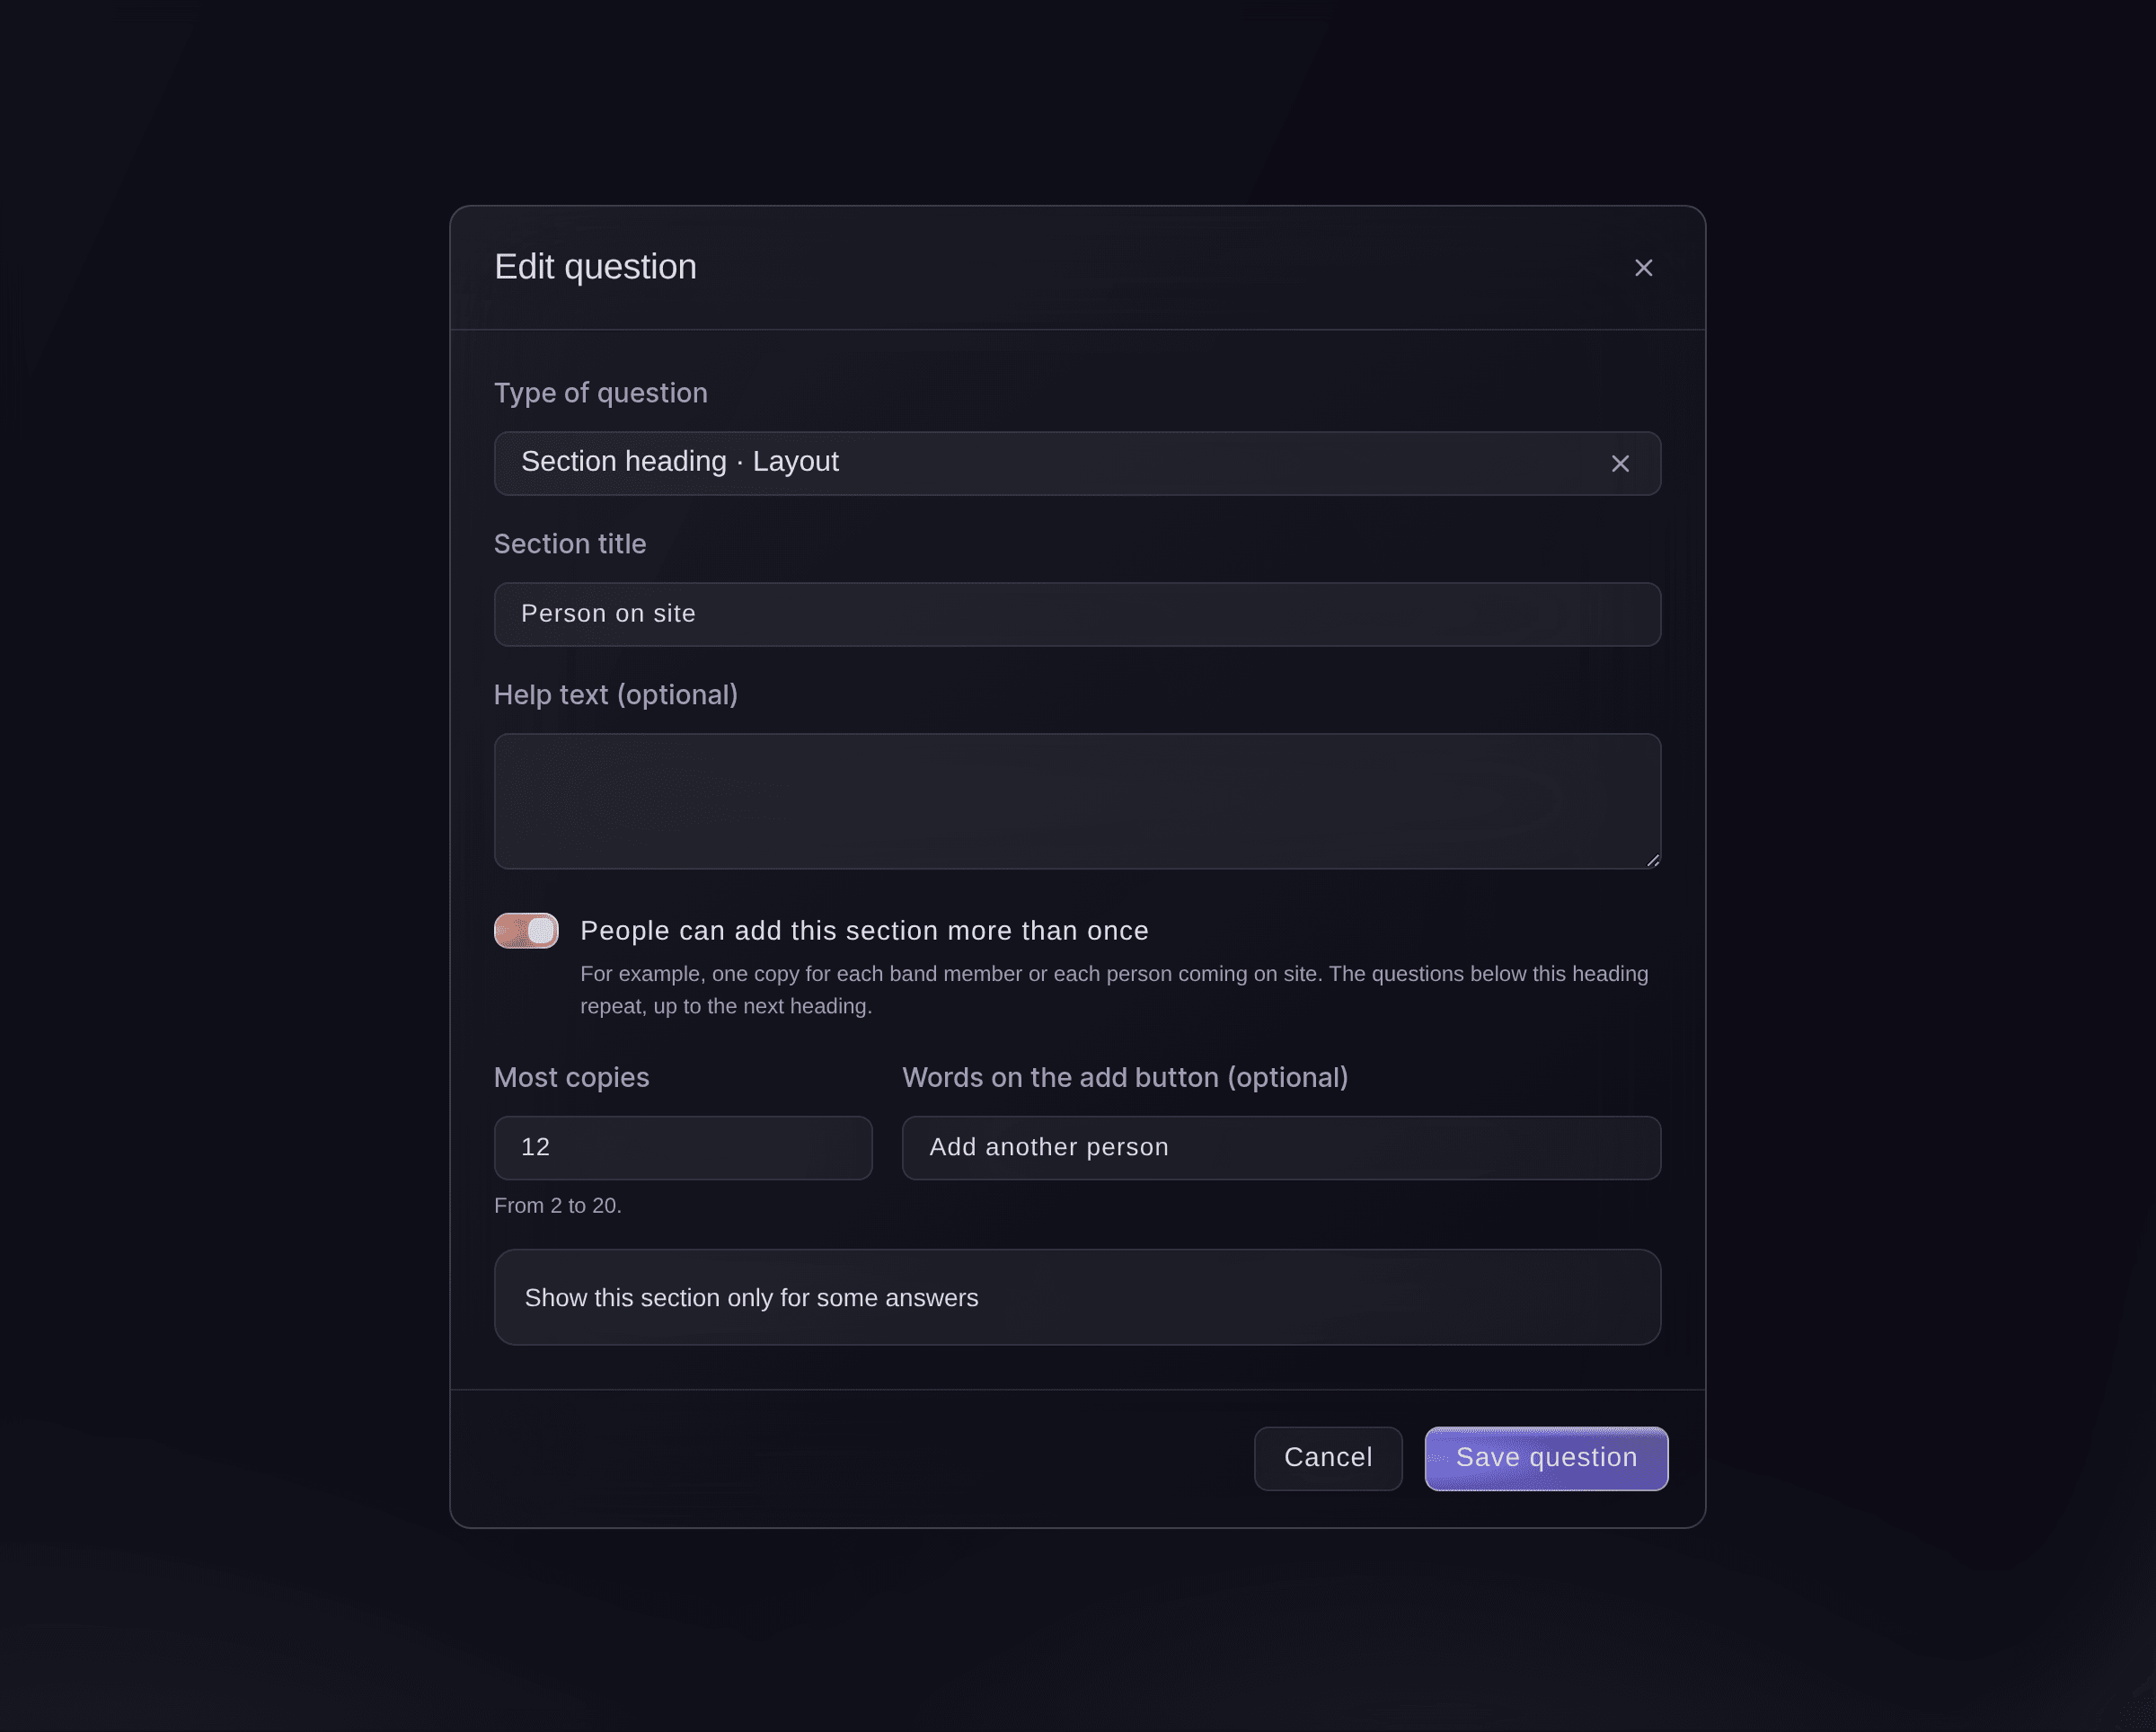
A section people add more than once. -
Fill in answers from the applicant's account
Optional: On a short answer, email or phone question, choose a detail such as Full name under Fill in from their account.
Bemærk: Applicants who are signed in see the answer filled in and can change it. For anyone who is not signed in, the question starts empty.
-
Save the question
Turn on People must answer this if every applicant has to answer, then select Add question.
Bemærk: The list shows each question with its type, and a tag when it shows only for some answers. Use the up and down arrows beside a question to change the order.
-
Choose where the answers go
Optional: Under When someone sends this form, choose a list in Also add each person to, such as your volunteers or traders.
Bemærk: The answers stay on the form either way. Matching each detail to a question is in its own guide.
Tilføj alle, der sender din eventformular, til dine frivillige, handlende eller crew
-
Create the form
Select Create Form at the foot of the dialog. You see
Form created successfully!
and the form joins the list on the Forms page.Bemærk: If a teammate saved the same form while you were editing it, choose Save my version or Load their version.
-
Open the form the way applicants see it
Select Copy Form Link in the form's row menu, then open the address in a new browser tab. You see the title, the description and your questions in order, or
This form is not taking answers right now.
outside its dates. -
Read the applications
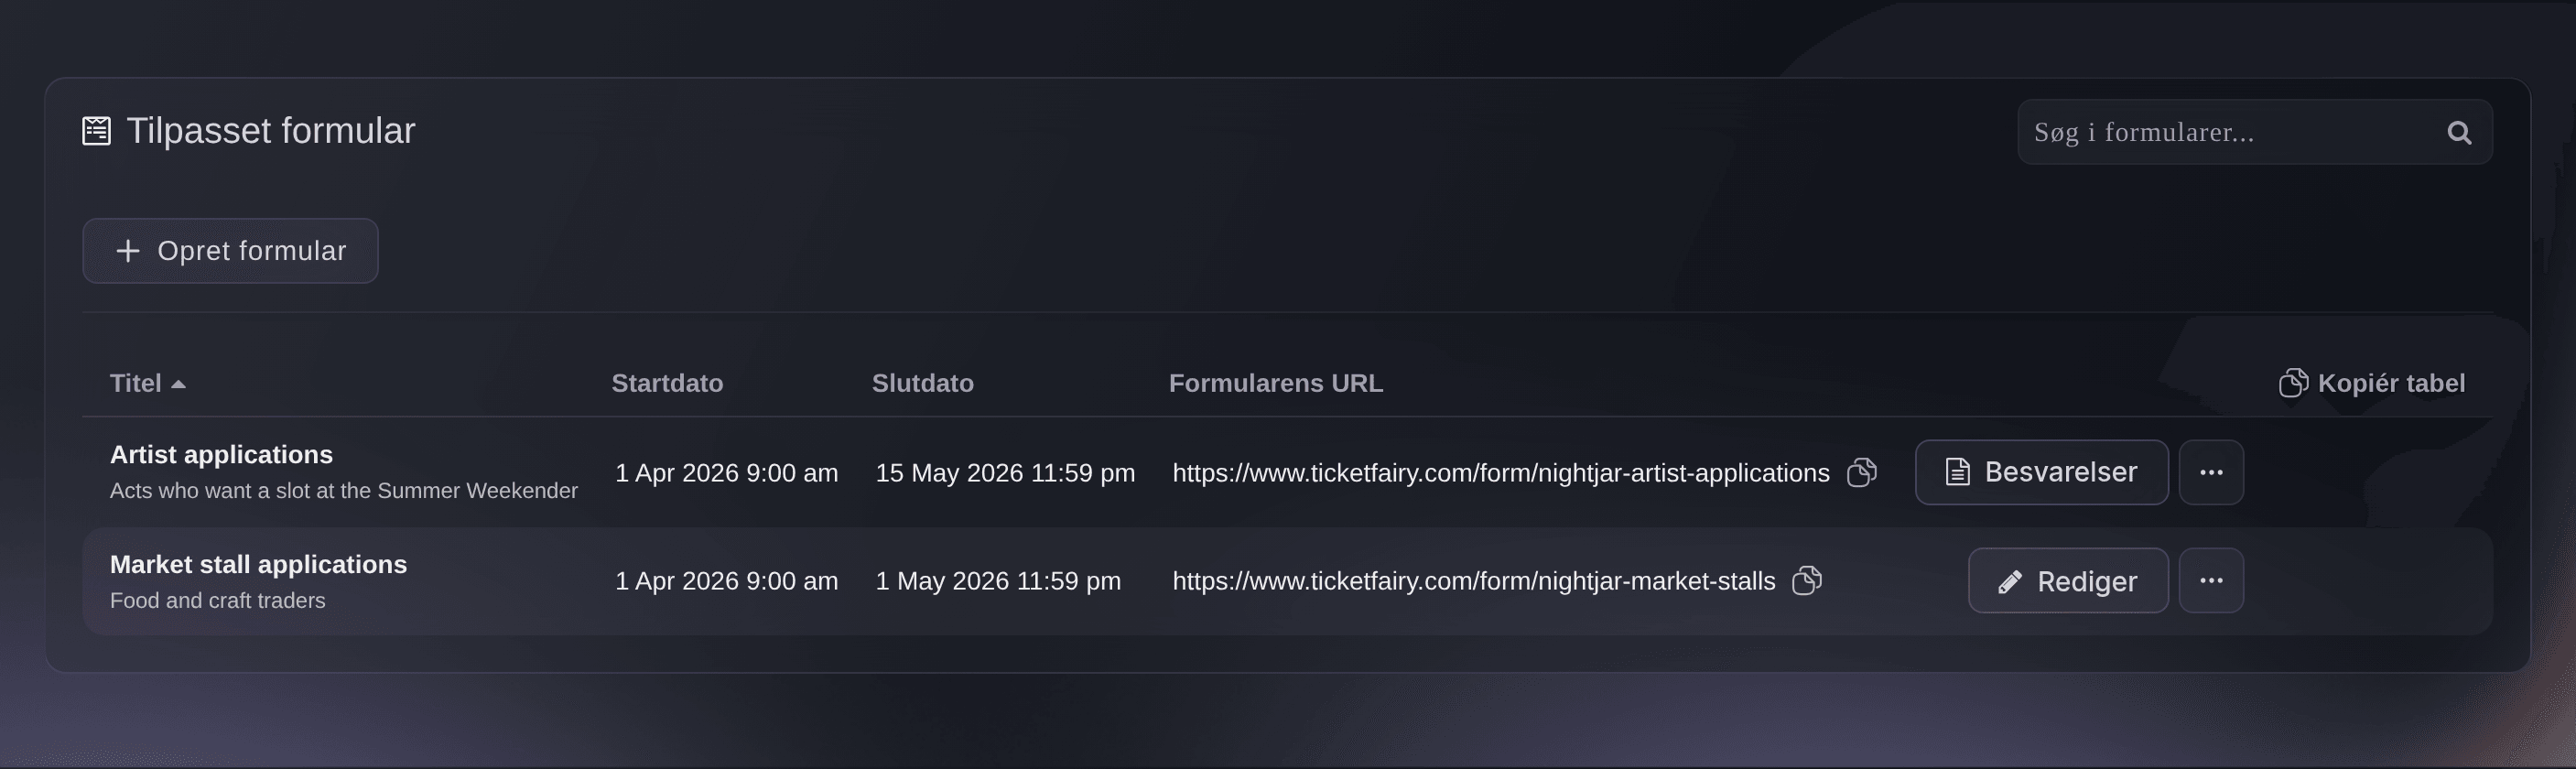
On the form's row, select Submissions. Each application shows the person, their answers and your decision.
Bemærk: Search the answers, or filter by decision or by the answer to one question. A form that adds people to your Event Operating System lists also shows whether each person was added.
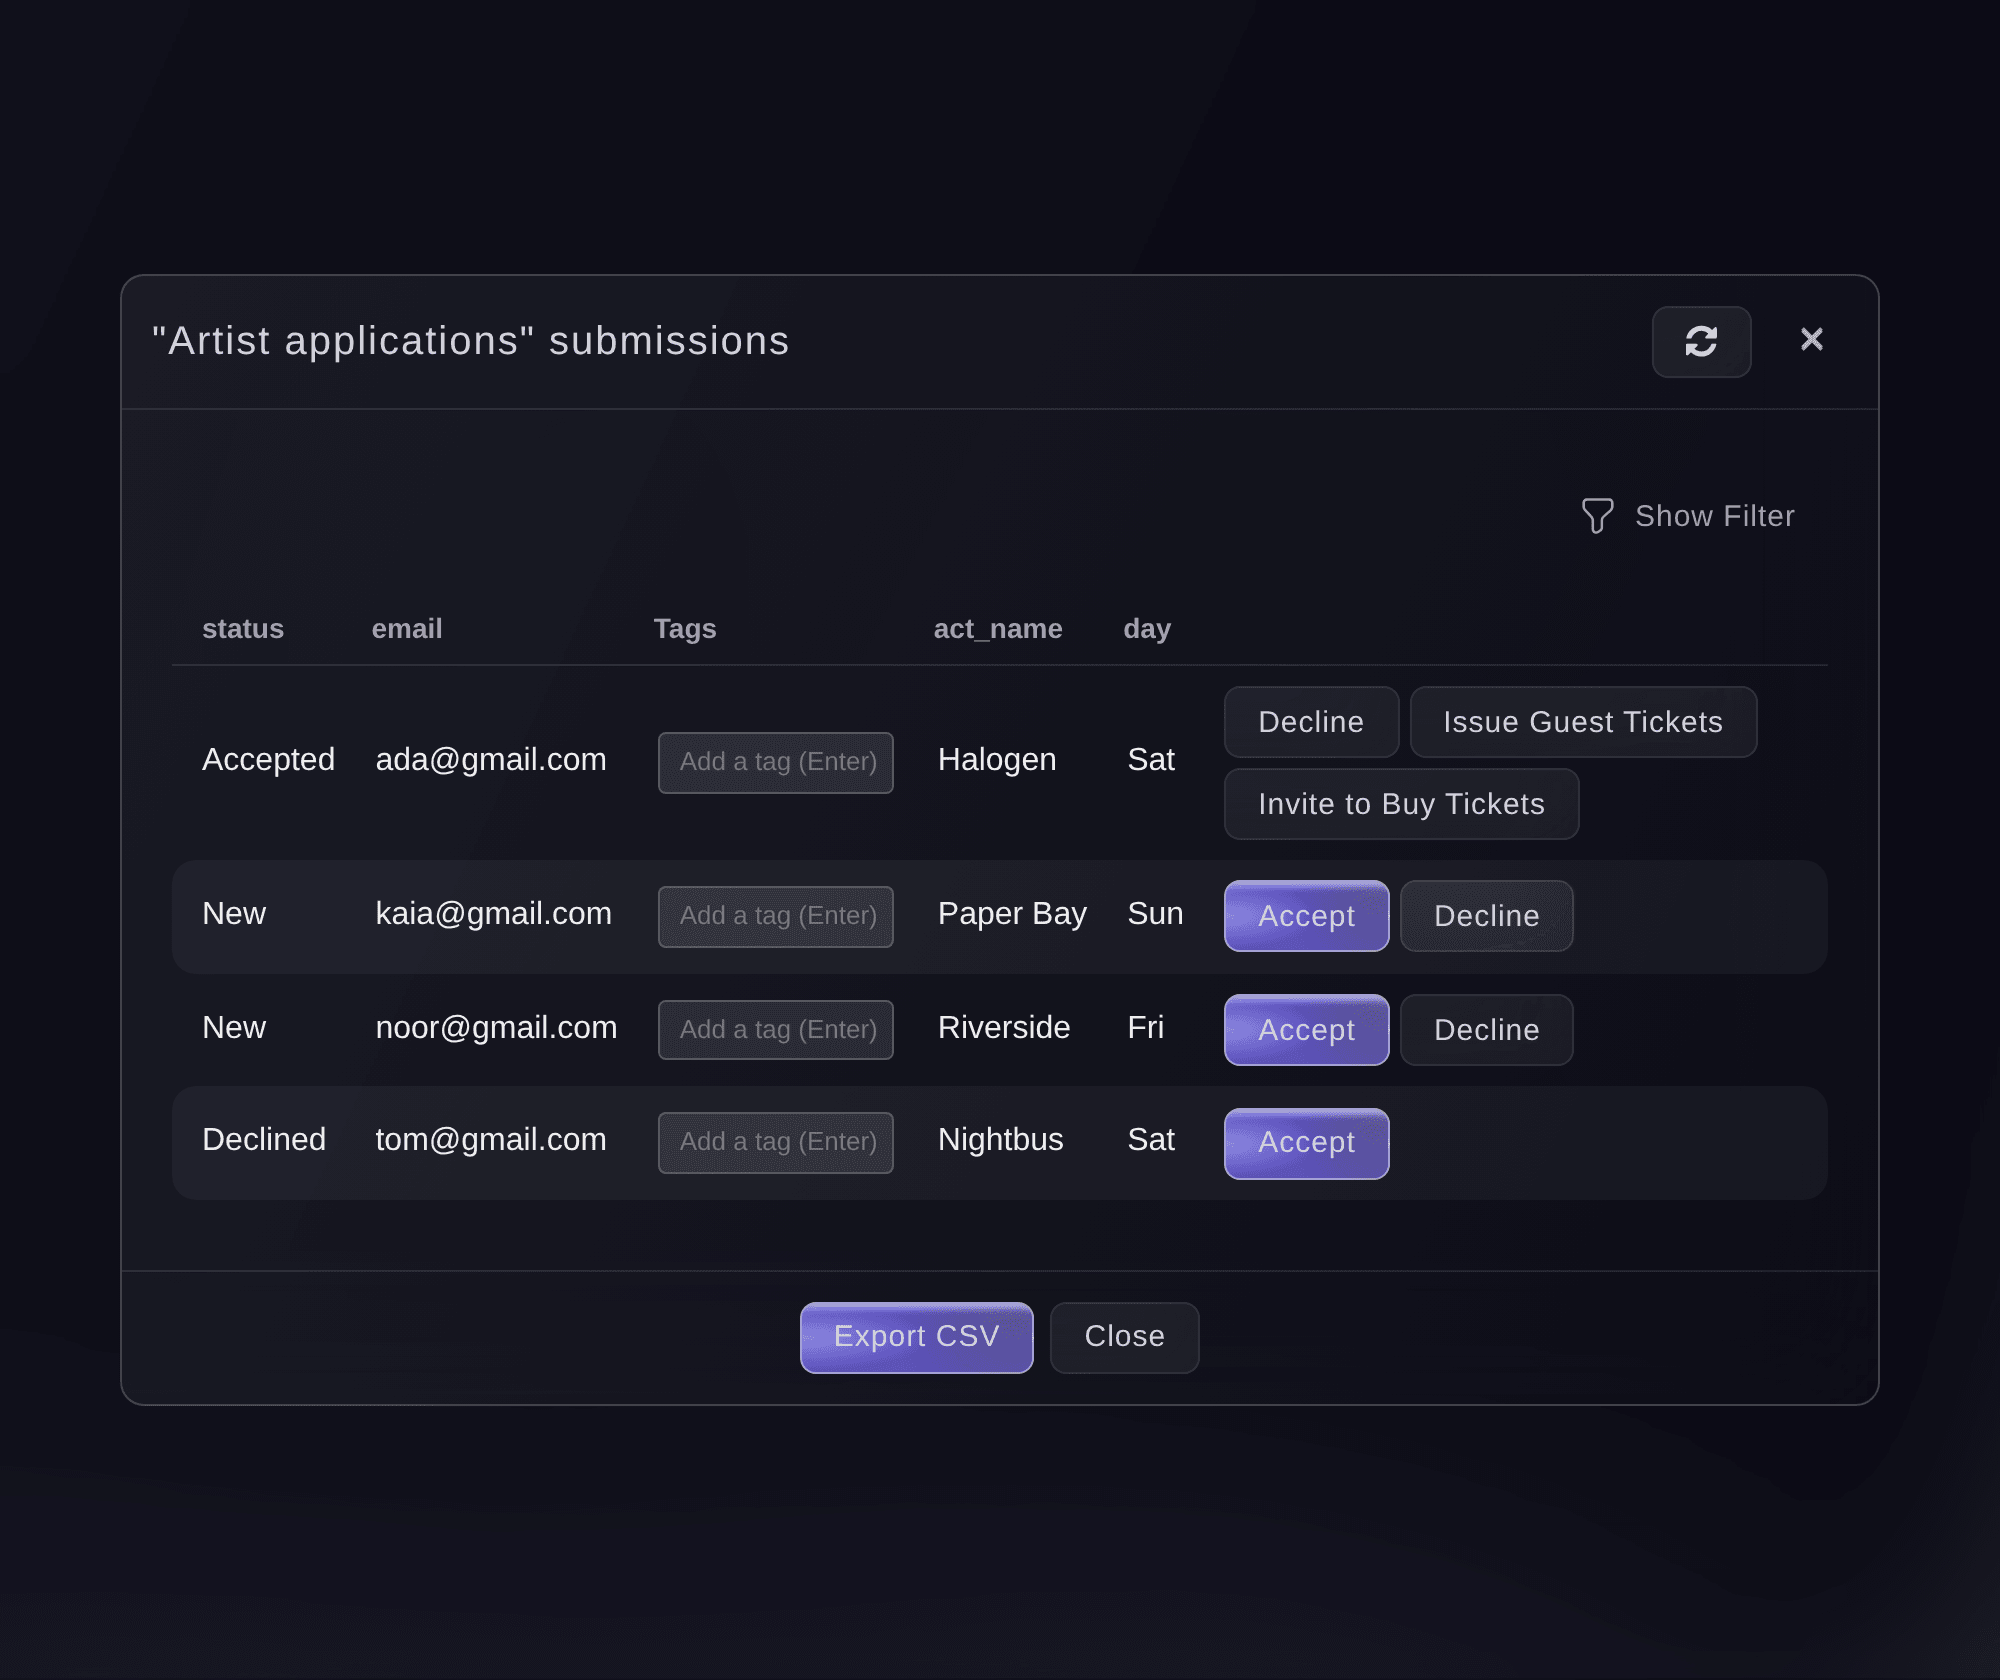
Forms, Submissions. -
See the form's statistics
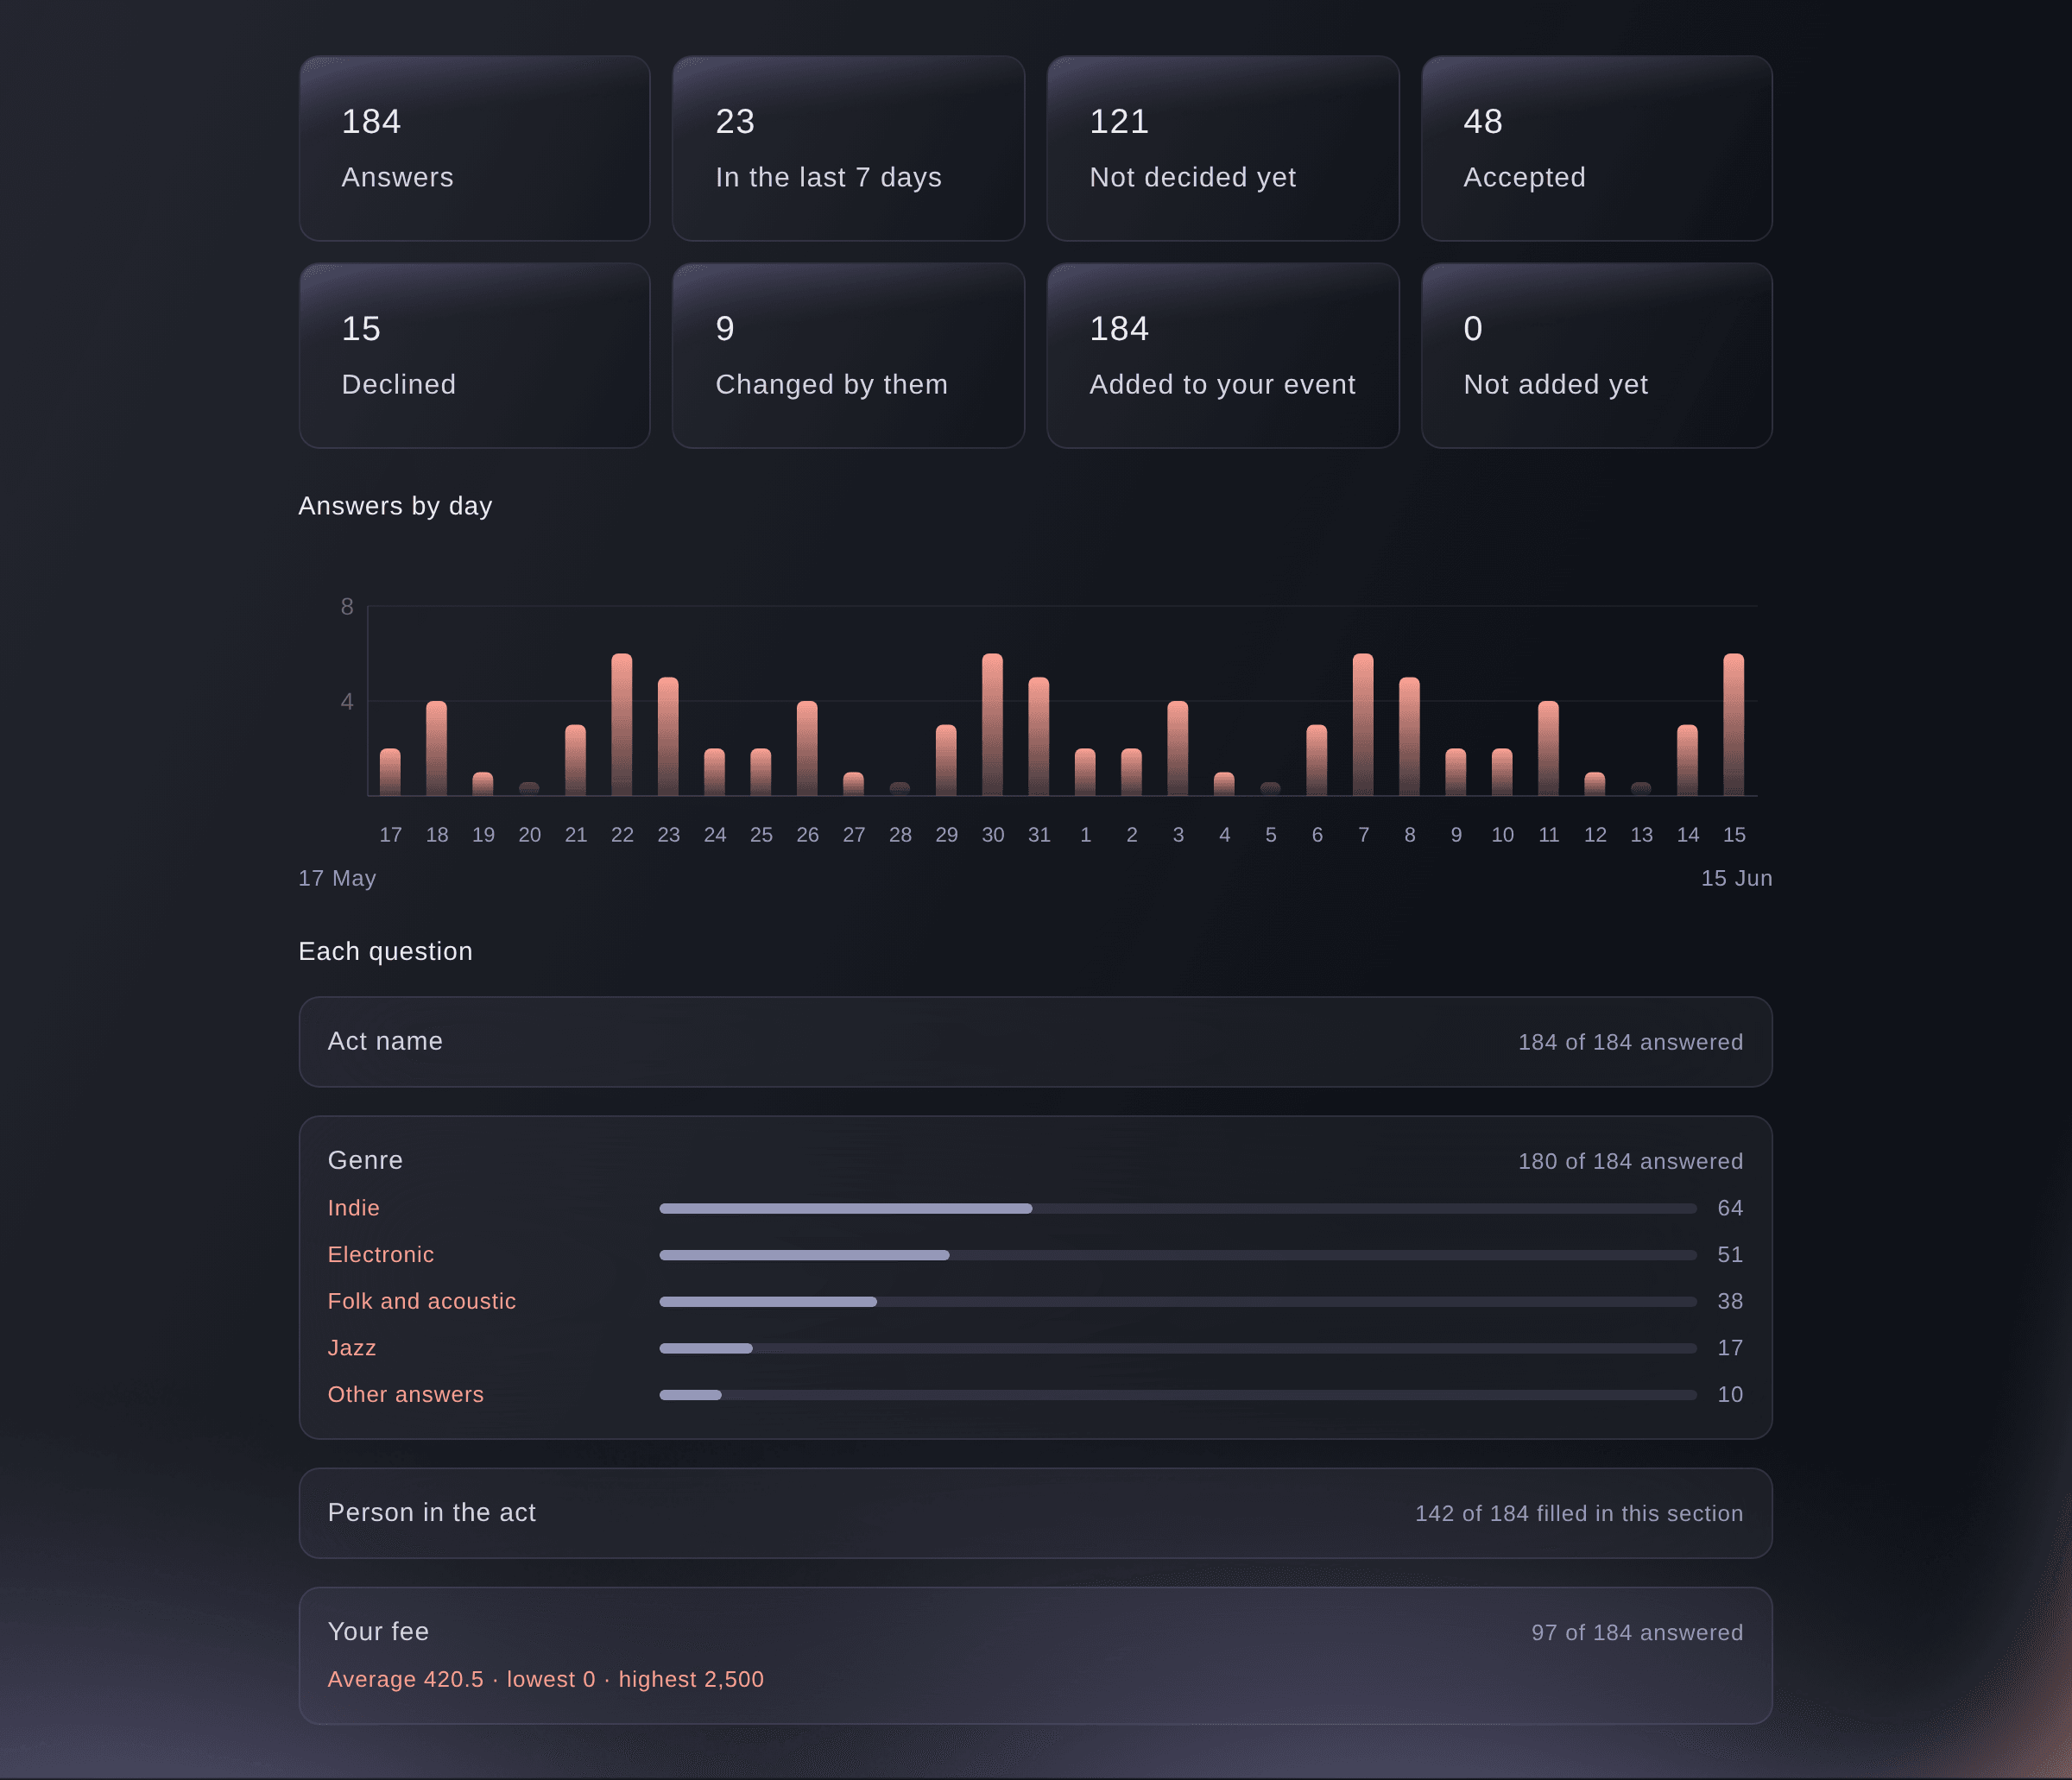
Optional: Select Statistics above the applications to see how many people answered, what you decided and how each question was answered.
Bemærk: Answers by day covers the last 30 days. Select Answers to go back to the list.
Forms, Statistics. -
Open one application
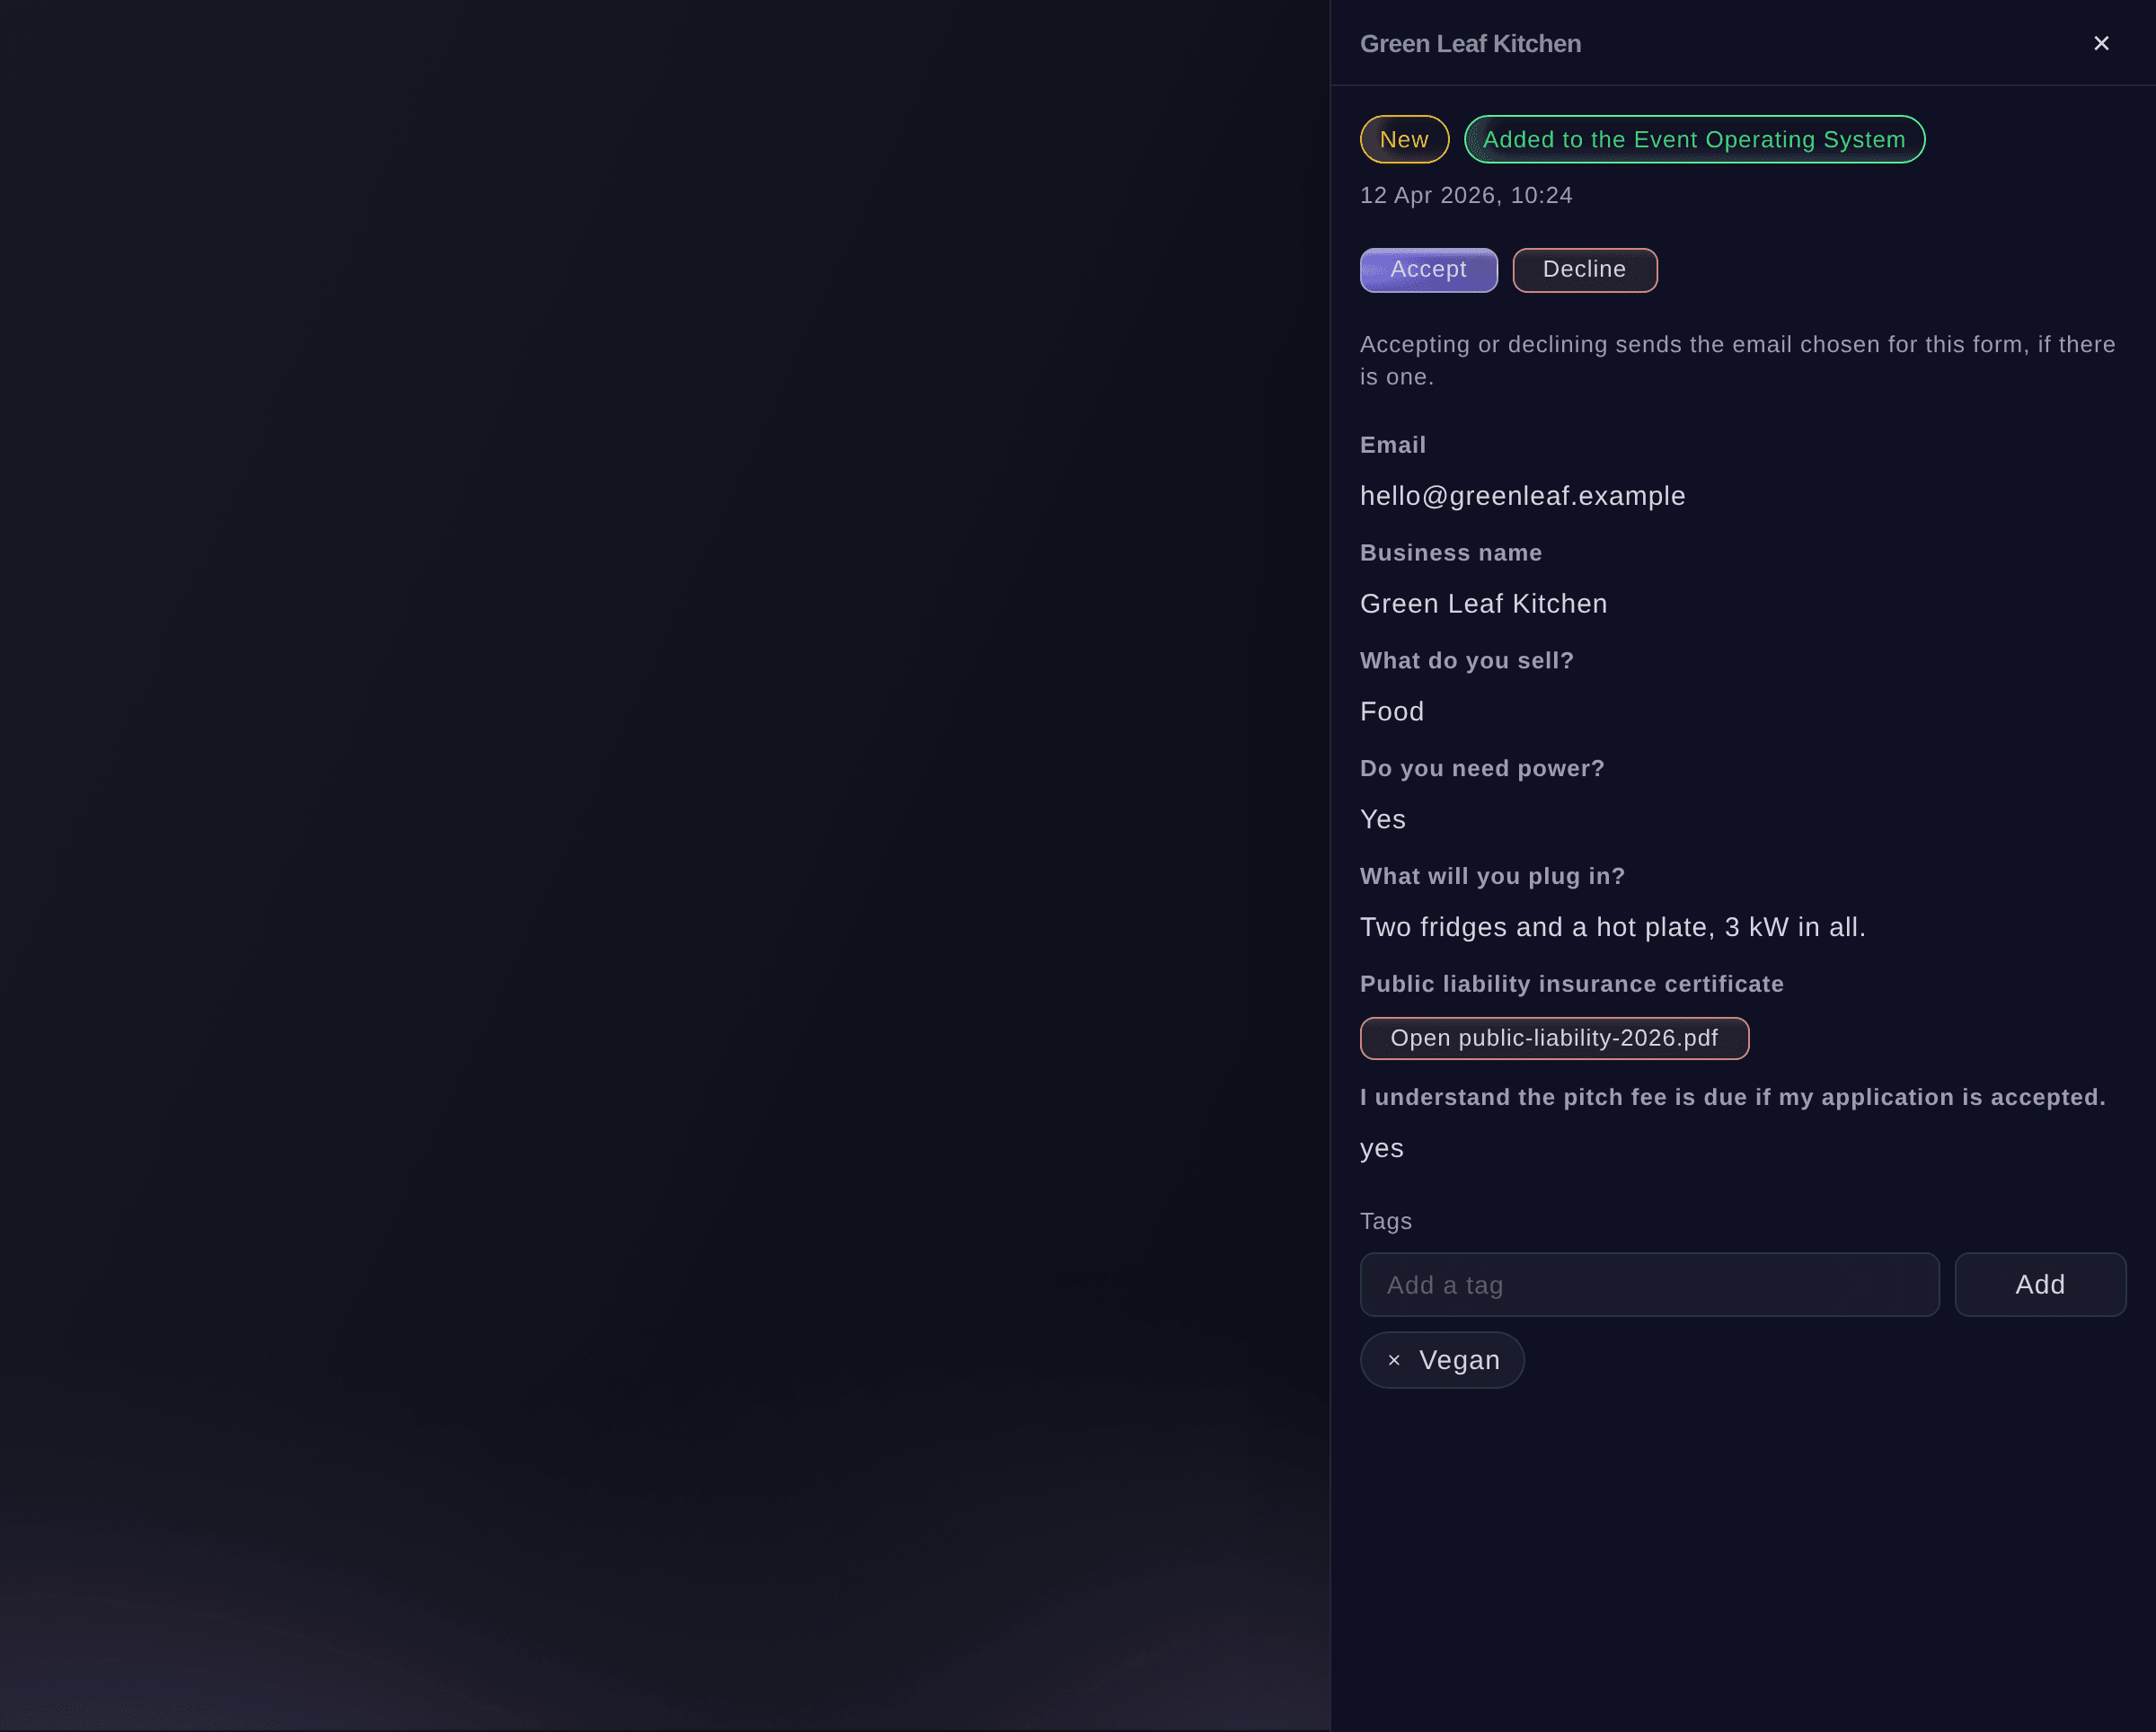
Select an application's row to read every answer, open the files and signatures they sent and add your tags.
Bemærk: Files and signatures are private: only the event's owners and admins open them, through a short-lived link, and every opening is recorded.
One application. -
Accept or decline each application
Select Accept or Decline. The decision changes and the email you chose for it goes to the address the applicant entered.


Prøv disse trin på dit eget event
Opret en gratis konto, byg dit event og følg trinnene ovenfor i dit eget dashboard. Det tager få minutter, og du behøver ikke at booke et salgsopkald.
Ingen oprettelsesgebyrer. Intet obligatorisk månedligt gebyr. Intet kreditkort påkrævet.
Eller få det gjort for dig
Fai, the assistant inside your dashboard, can draft a form from your description or from a ready-made form, save it once you say yes, read every application, open the files applicants sent, and accept, decline or add an applicant to your event lists, asking you first each time.
I dit dashboard, med Fai
Draft a trader application form for <EVENT NAME> with a pitch fee of 150 and an insurance certificate upload, and add each applicant to our trader applications
Lad Fai gøre det for dig
Fai arbejder inde i dit Ticket Fairy-dashboard. Opret din konto, åbn Fai og indsæt instruktionen ovenfor.
Ingen oprettelsesgebyrer. Intet obligatorisk månedligt gebyr. Intet kreditkort påkrævet.
Send an accepted applicant a free ticket
-
Open the guest ticket form
Open an accepted application and select Send guest tickets. The form opens with the applicant's email address filled in.
Bemærk: If the form shows
No issuable inventory
, the event has no ticket type or table to issue yet, so add one to the event first. -
Choose the ticket and issue it
Choose the Ticket Type, enter the name on each ticket, then select Issue Tickets.
Bemærk: Each ticket comes out of that ticket type's stock like a sold one, and shows in the issued list on the Guest Tickets page.
Fai can send guest tickets to the applicants you accepted. She reads their names and email addresses from the form, and shows you the recipients, the ticket type and the count to approve before anything is sent.
I dit dashboard, med Fai
Send one Artist ticket each to the applicants I accepted on the artist applications form for <EVENT NAME>, and show me who gets what before you send
Invite an accepted applicant to buy tickets
-
Open the invitation
Open an accepted application and select Invite to buy. The Send Invitation dialog opens with the applicant's email address and name filled in.
-
Enter the invitation email
Choose a template under Select from Email Templates to fill in the Subject and Invitation Content, or enter both yourself.
-
Set the limits and send the invitation
Choose the Maximum number of tickets and Maximum number of transactions, then select Send. You see
Successfully sent!
when the invitation is on its way.Bemærk: The applicant gets their own ticket link by email and can buy up to that many tickets in up to that many orders. Both limits start at 1.
Send this invitation from the application in the dashboard, which fills in the applicant's email address and name for you.
Work through a long list of applications
-
Tag the applications you want to come back to
Open an application, enter a tag such as Headline shortlist under Tags, then select Add.
Bemærk: Tags are for you and your team, and applicants never see them.
-
Export the applications
Select Export CSV above the list. The file holds the applications the filters are showing, with a column for each question.
Bemærk: Each export is recorded with your name. Clear the filters first to export every application.
Fai can read the applications on your form and list the ones that match what you describe, such as every act who picked Saturday. Tag and export the applications in the dashboard.
I dit dashboard, med Fai
Go through the artist applications form for <EVENT NAME> and list the acts who picked Saturday, with their email addresses
Get the form in front of applicants
-
Open the form again
Select Edit Form in the form's row menu.
-
Download a QR code for the form
Select Download QR Code, the square button at the end of Form Link.
Bemærk: You get a PNG image of the form's address to add to a poster, a flyer or a social post.
Tip: Select Cancel afterwards to close the form without changing it.
Fai can draft social captions that ask acts or traders to apply, in your brand's voice, and shows you every version to choose from. Nothing is posted, so add the form's address to the caption you pick, and download the QR code from the form in the dashboard.
I dit dashboard, med Fai
Draft three social captions for <EVENT NAME> asking acts to apply for a slot, and leave space for the application link
Spørgsmål du måske har
- Do applicants need a Ticket Fairy account to apply?
- No. Anyone with the address can send the form while it's open, from their phone or computer, and you can accept or decline every application.
- What happens when I accept an applicant?
- The decision changes to Accepted, and the email you chose under Approved Email Template goes to the address the applicant entered. Accepting doesn't send a ticket: send guest tickets or an invitation to buy from the application.
- Can I change my mind after accepting or declining?
- Yes. An accepted application offers Decline and a declined one offers Accept. Each change sends the email you chose for the new decision, so the applicant gets a second email.
- Can I take a payment on the form?
- No. A Fee to agree to question records that the applicant agreed to a fee. Invoice them afterwards, for example from your event's traders.
- Can I change a form after applications have come in?
- Yes. Select Edit Form in the form's row menu, make your changes, then select Update Form. New applicants get the questions as they are now, and the answers already given stay in the list and the export, even for a question you delete.
- Why won't my form save?
- The dialog takes you back to the step with the problem and marks the field, and on the Fields step it lists each question that needs attention, such as a choice question with no answers or a rule that depends on a question below it. If you see
The slug is already used
, another form on Ticket Fairy already has that address, so change the end of Form Link and select Create Form again. - Can I stop the form without deleting it?
- Yes. Select Edit Form, set End Date to a time that has passed, then select Update Form. Anyone who opens the address then sees that the form is not taking answers, and every application stays in your list. Delete Form in the row's menu removes the form, its applications and the files applicants sent, and you can't bring them back.
- Who else can read the applications?
- Anyone with an owner or admin login for the event. Other roles on your team, such as promoter, curator or stats, don't see Forms, and Ticket Fairy's support team can open it when they help you with the event.
Har du stadig et spørgsmål?
Book en demo, så besvarer vi det i en samtale ud fra din type event. Eller opret din konto og se det selv.
Ingen oprettelsesgebyrer. Intet obligatorisk månedligt gebyr. Intet kreditkort påkrævet.
Relaterede guides
Gør det på dit eget arrangement
Opret din konto, byg dit arrangement, og følg trinnene i dit eget dashboard. Du behøver ikke booke et salgsmøde.