
Vault and Capital
Let your event team spend with Vault cards
Production managers, tour managers and venue teams spend on the brand's behalf in the weeks before an event. A Vault card in their name spends from the same balance your events pay into, within the limits you set, so nobody waits to be paid back.
Issue a virtual or physical Vault card in a team member's name, with the spending limits you choose, so the people running your events pay suppliers straight from the ticket money in Vault.
- For
- Giving the people who spend for your events a card of their own
- Takes
- 8 minutes
- Open Cards
- Select Create Card
- Add the cardholder if they are new
- Enter their contact details
- Enter their name and date of birth
- Enter their home address
- Save the cardholder
- Choose the cardholder
- Name the card
- When to choose a physical card
- Choose the card type
- Choose how often the card can be used
- Set a spending limit
- Leave the program settings as they are
- Select Create Card
- Check the card
Before you start
- You're an owner or an admin on the brand. Those are the two roles that reach Vault, and only they can add a cardholder.
- Your brand has an active Vault account. Ask Ticket Fairy support to switch Vault on for your brand if it isn't, then open the account.
- You have the team member's email, mobile number, date of birth and home address, and their agreement to hold a card in their name.
- You have your second factor to hand. Vault may ask you to confirm it's you before it issues the card.
-
Open Cards
Pick the brand, open Vault, then select Cards. Issued Cards lists every card on the brand with its status.
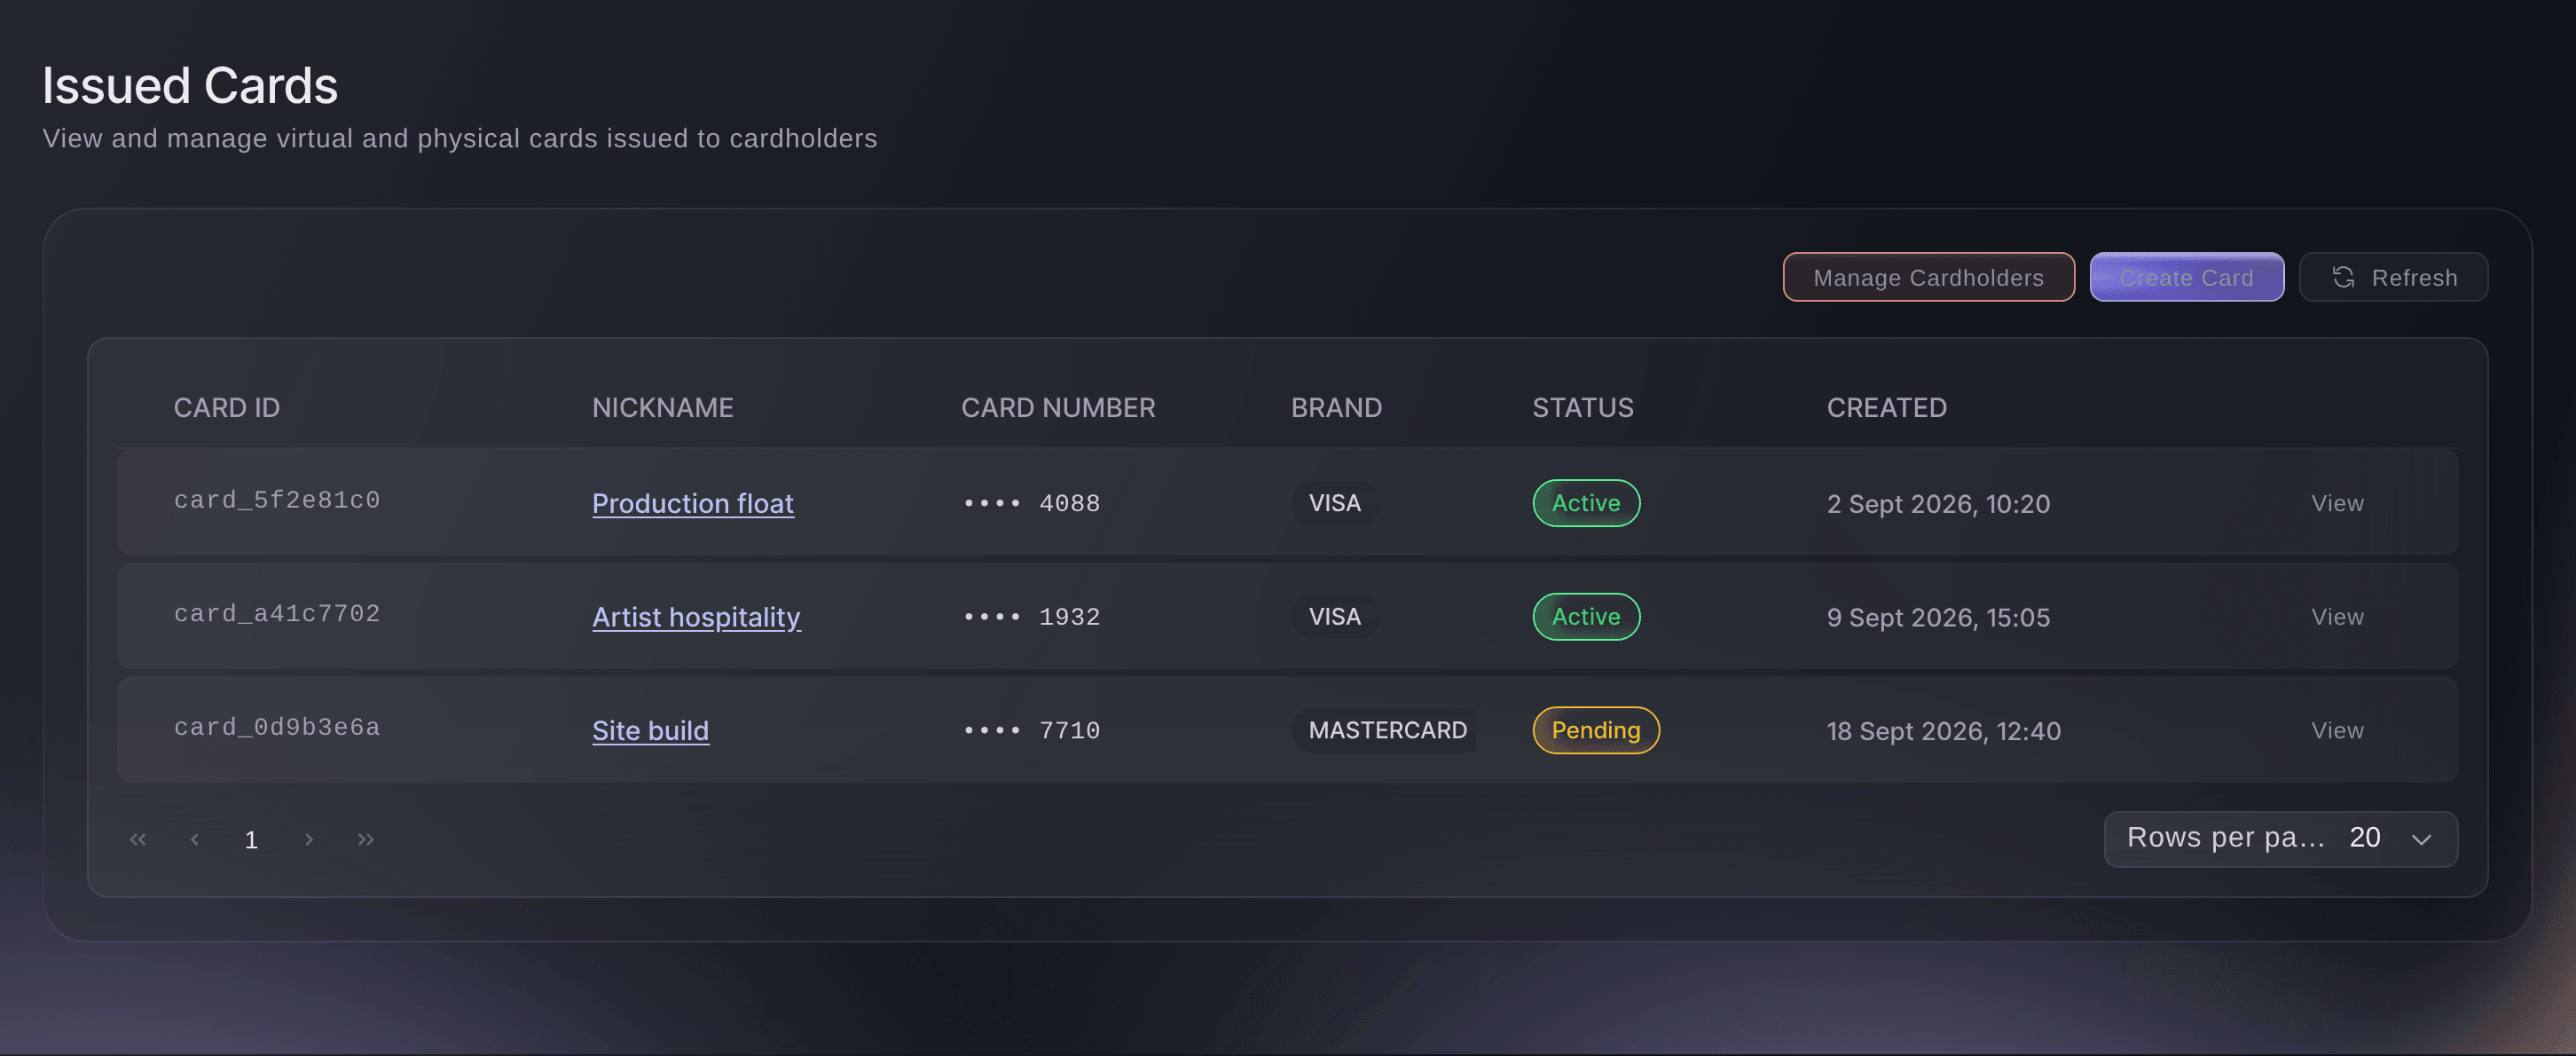
Brand, Vault, Cards. -
Select Create Card
Select Create Card. The Create Card window opens with its defaults already chosen.
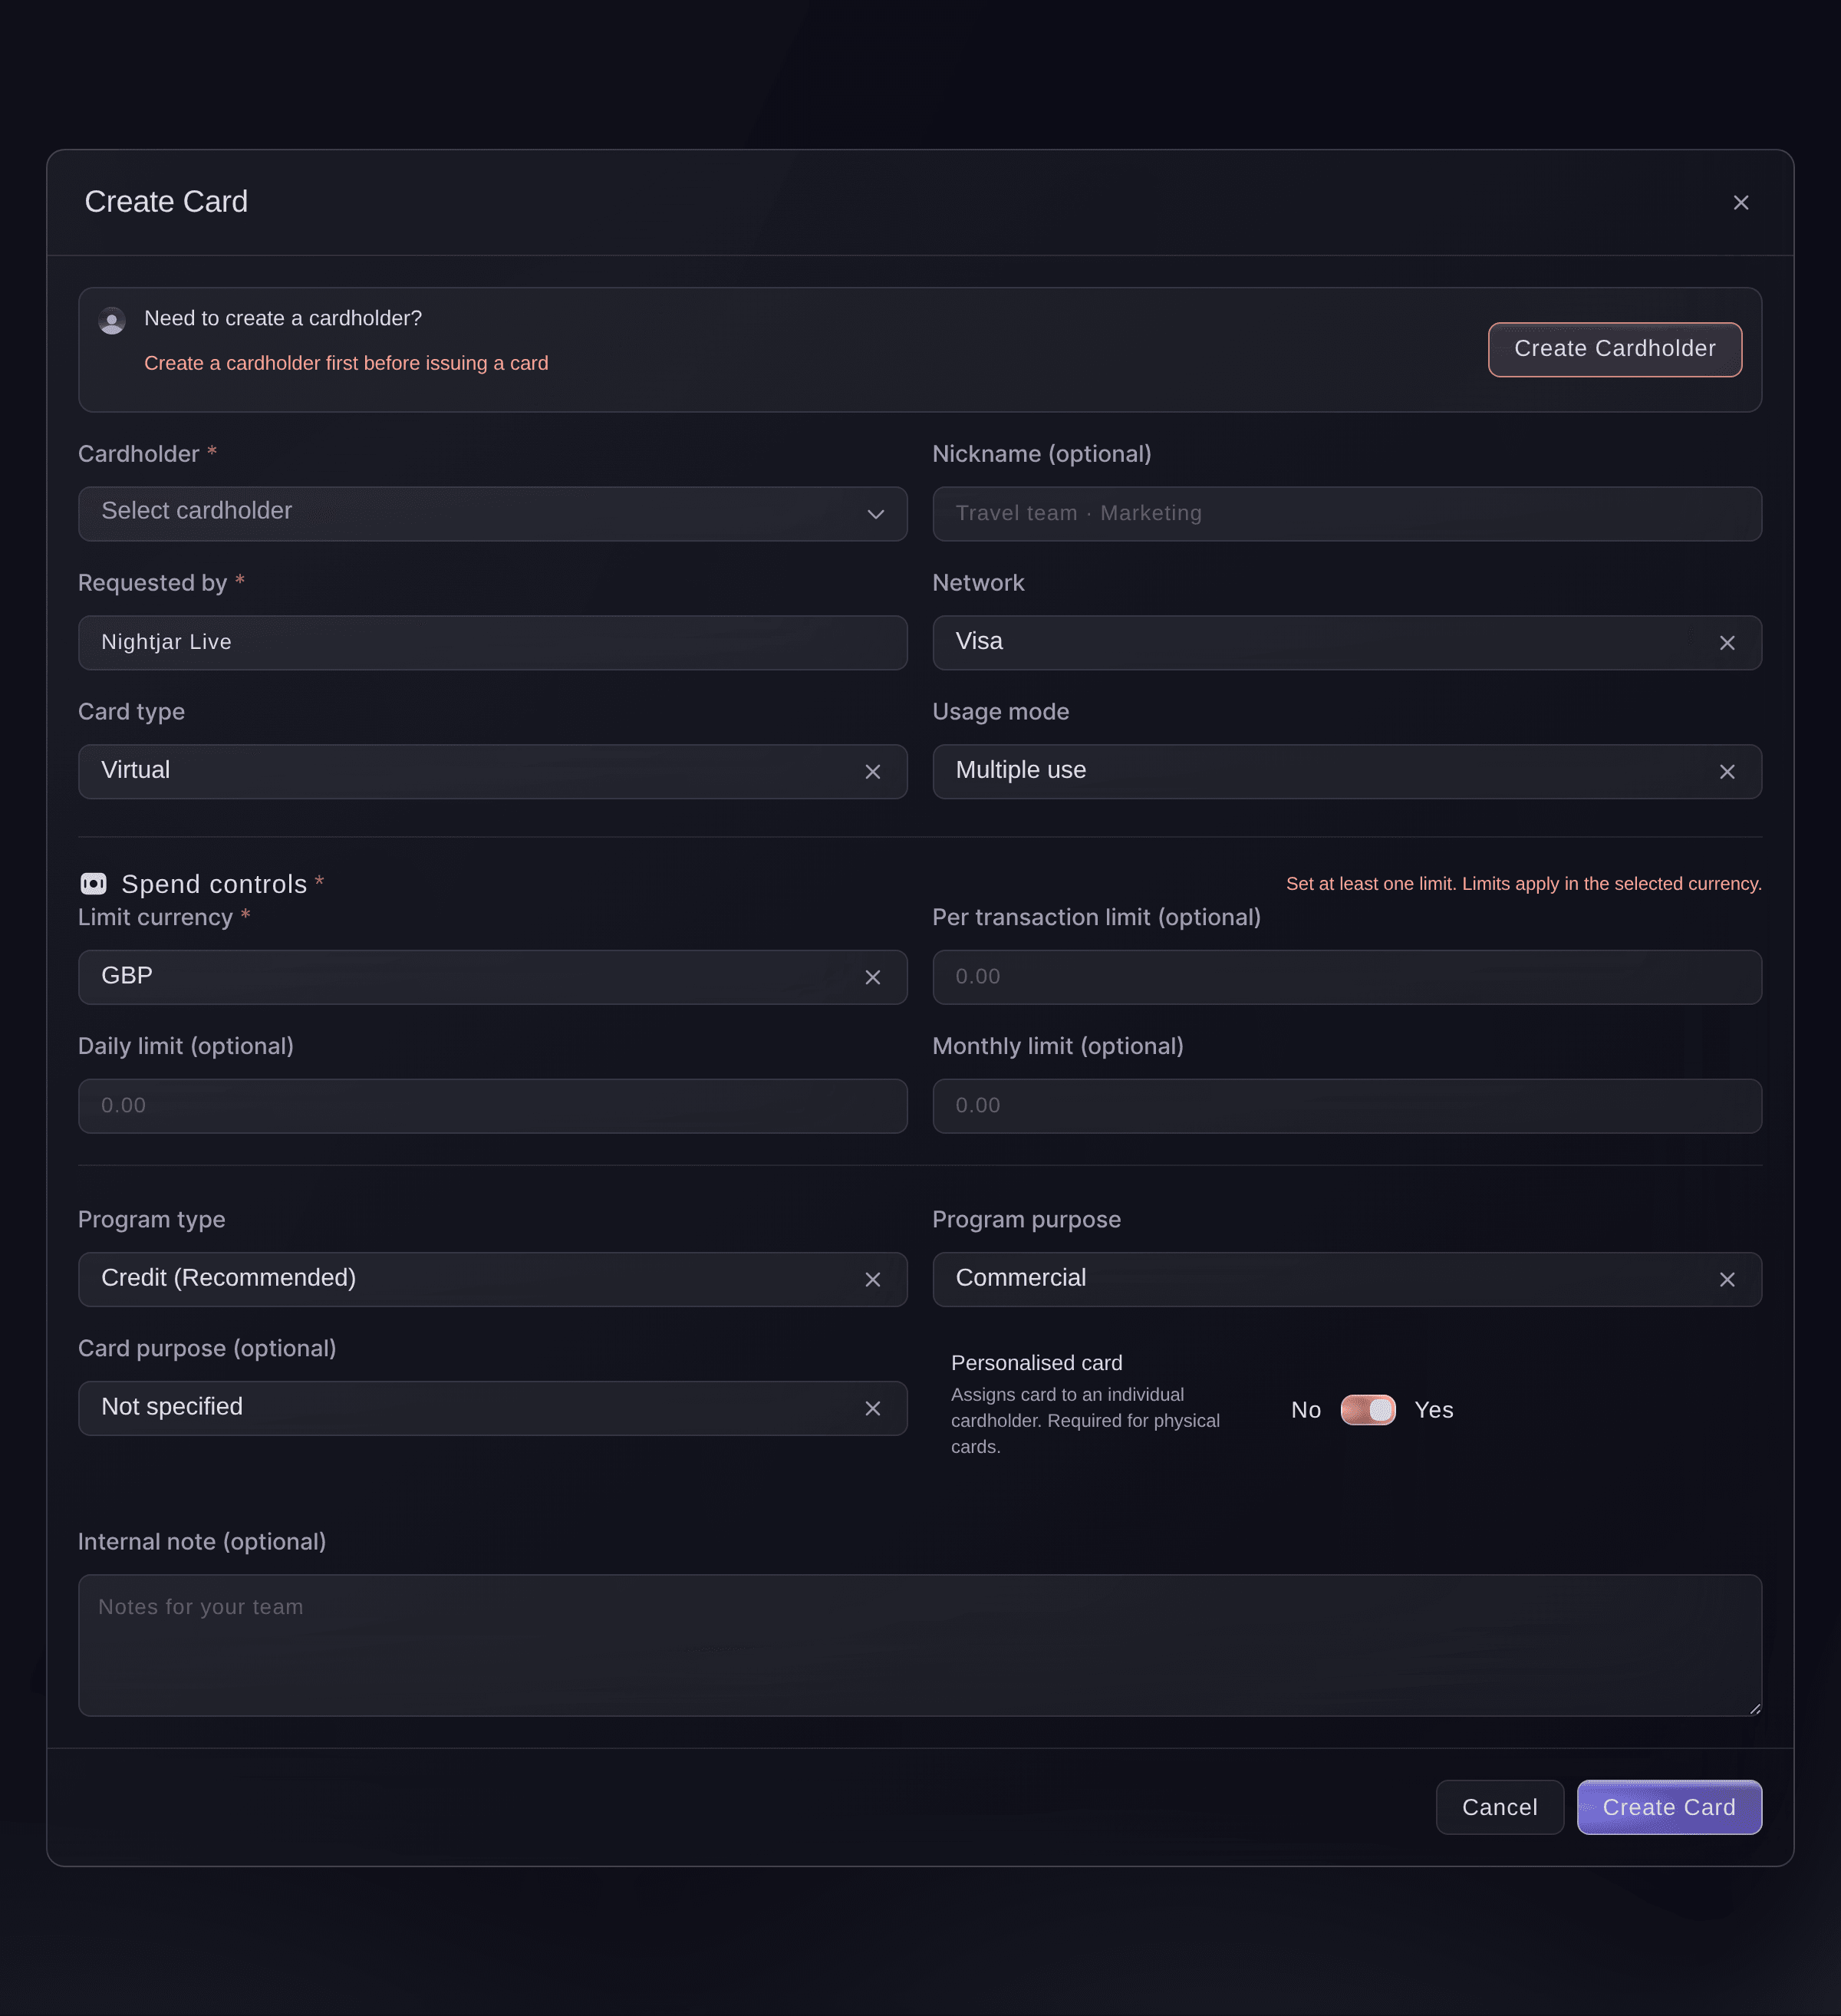
Brand, Vault, Cards, Create Card. -
Add the cardholder if they are new
Optional: If the person isn't in Cardholder yet, select Create Cardholder beside
Need to create a cardholder?
at the top. The Create New Cardholder window opens over the card.Note: A cardholder is the person a card is made out to. Add each person once and you can issue them as many cards as you need.
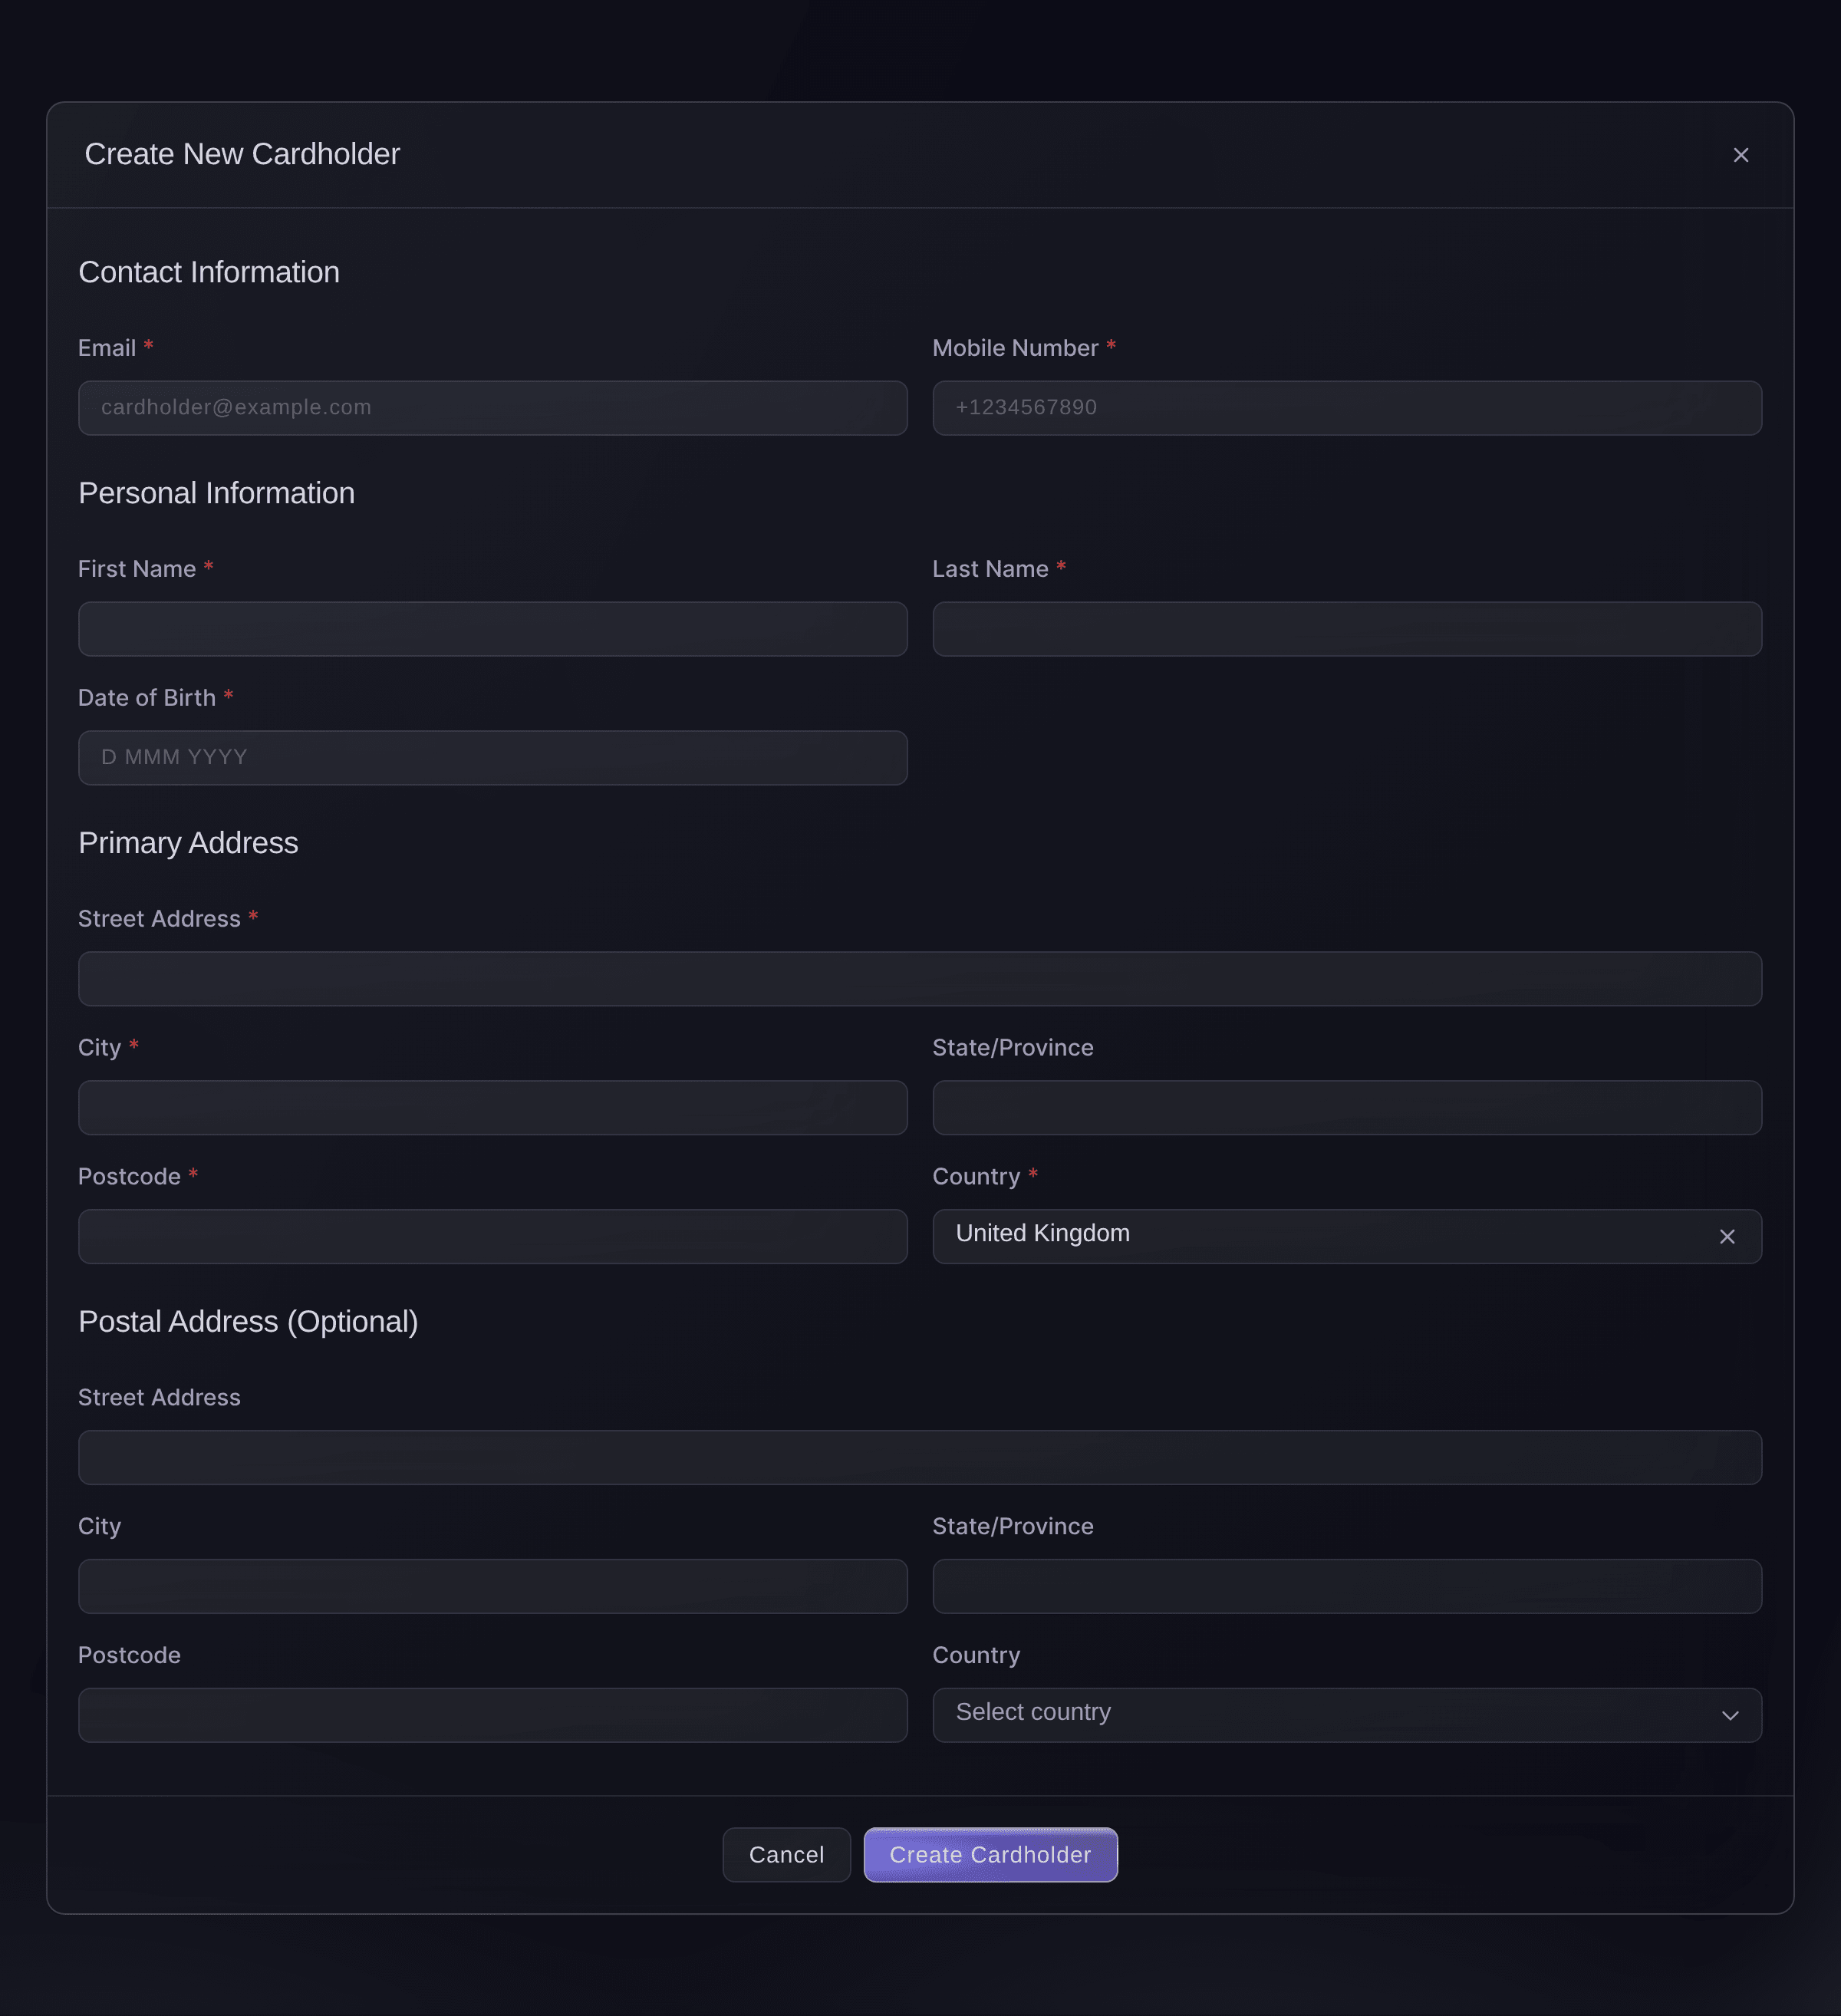
Brand, Vault, Cards, Create Cardholder. -
Enter their contact details
Enter the person's Email and Mobile Number, with the country code in front of the number.
Note: The email can't be changed once the cardholder exists, so use the address they will keep.
-
Enter their name and date of birth
Enter their First Name, Last Name and Date of Birth.
Note: A cardholder must be at least 18, so the date picker stops at the date 18 years ago.
-
Enter their home address
Under Primary Address, enter their Street Address, City and Postcode, then choose Country.
Note: Postal Address (Optional) takes a second address. Once you start it, its street, city, postcode and country are all needed.
-
Save the cardholder
Select Create Cardholder. The window closes and the person is ready to choose in the Create Card window.
-
Choose the cardholder
Choose the person from Cardholder. Requested by fills in with their name; change it to yours if you're asking for the card on their behalf.
-
Name the card
Optional: Enter a name in Nickname (optional), such as Production float or Artist hospitality, so the card is easy to find in lists and in card activity.


When to choose a physical card
Choose a virtual card when the person pays online, over the phone or in an app: its number is ready as soon as the card is issued. Choose a physical card when they pay in person at a till, such as buying supplies on site. A physical card is always made out in the cardholder's name.
-
Choose the card type
Choose the kind of card from Card type.
Note: Network starts on Visa. Choose Mastercard there if you prefer it.
-
Choose how often the card can be used
Choose from Usage mode.
-
Set a spending limit
Under Spend controls, enter at least one of Per transaction limit (optional), Daily limit (optional) and Monthly limit (optional). Each limit is in Limit currency, which starts on your brand's own currency.
Note: The card can't be saved with every limit empty.
-
Leave the program settings as they are
Leave Program type on Credit (Recommended) and Program purpose on Commercial, which marks the card for business spending.
Tip: Choose what the card is for in Card purpose (optional), and add anything your team should know in Internal note (optional).
-
Select Create Card
Select Create Card at the foot of the window.
Card created successfully
confirms it, and the new card joins Issued Cards.Note: If Authenticate to continue opens first, confirm with your second factor and Vault carries on issuing the card.
-
Check the card
In Issued Cards, select the card's nickname. Card Information shows its status, the last four digits and the cardholder's name.
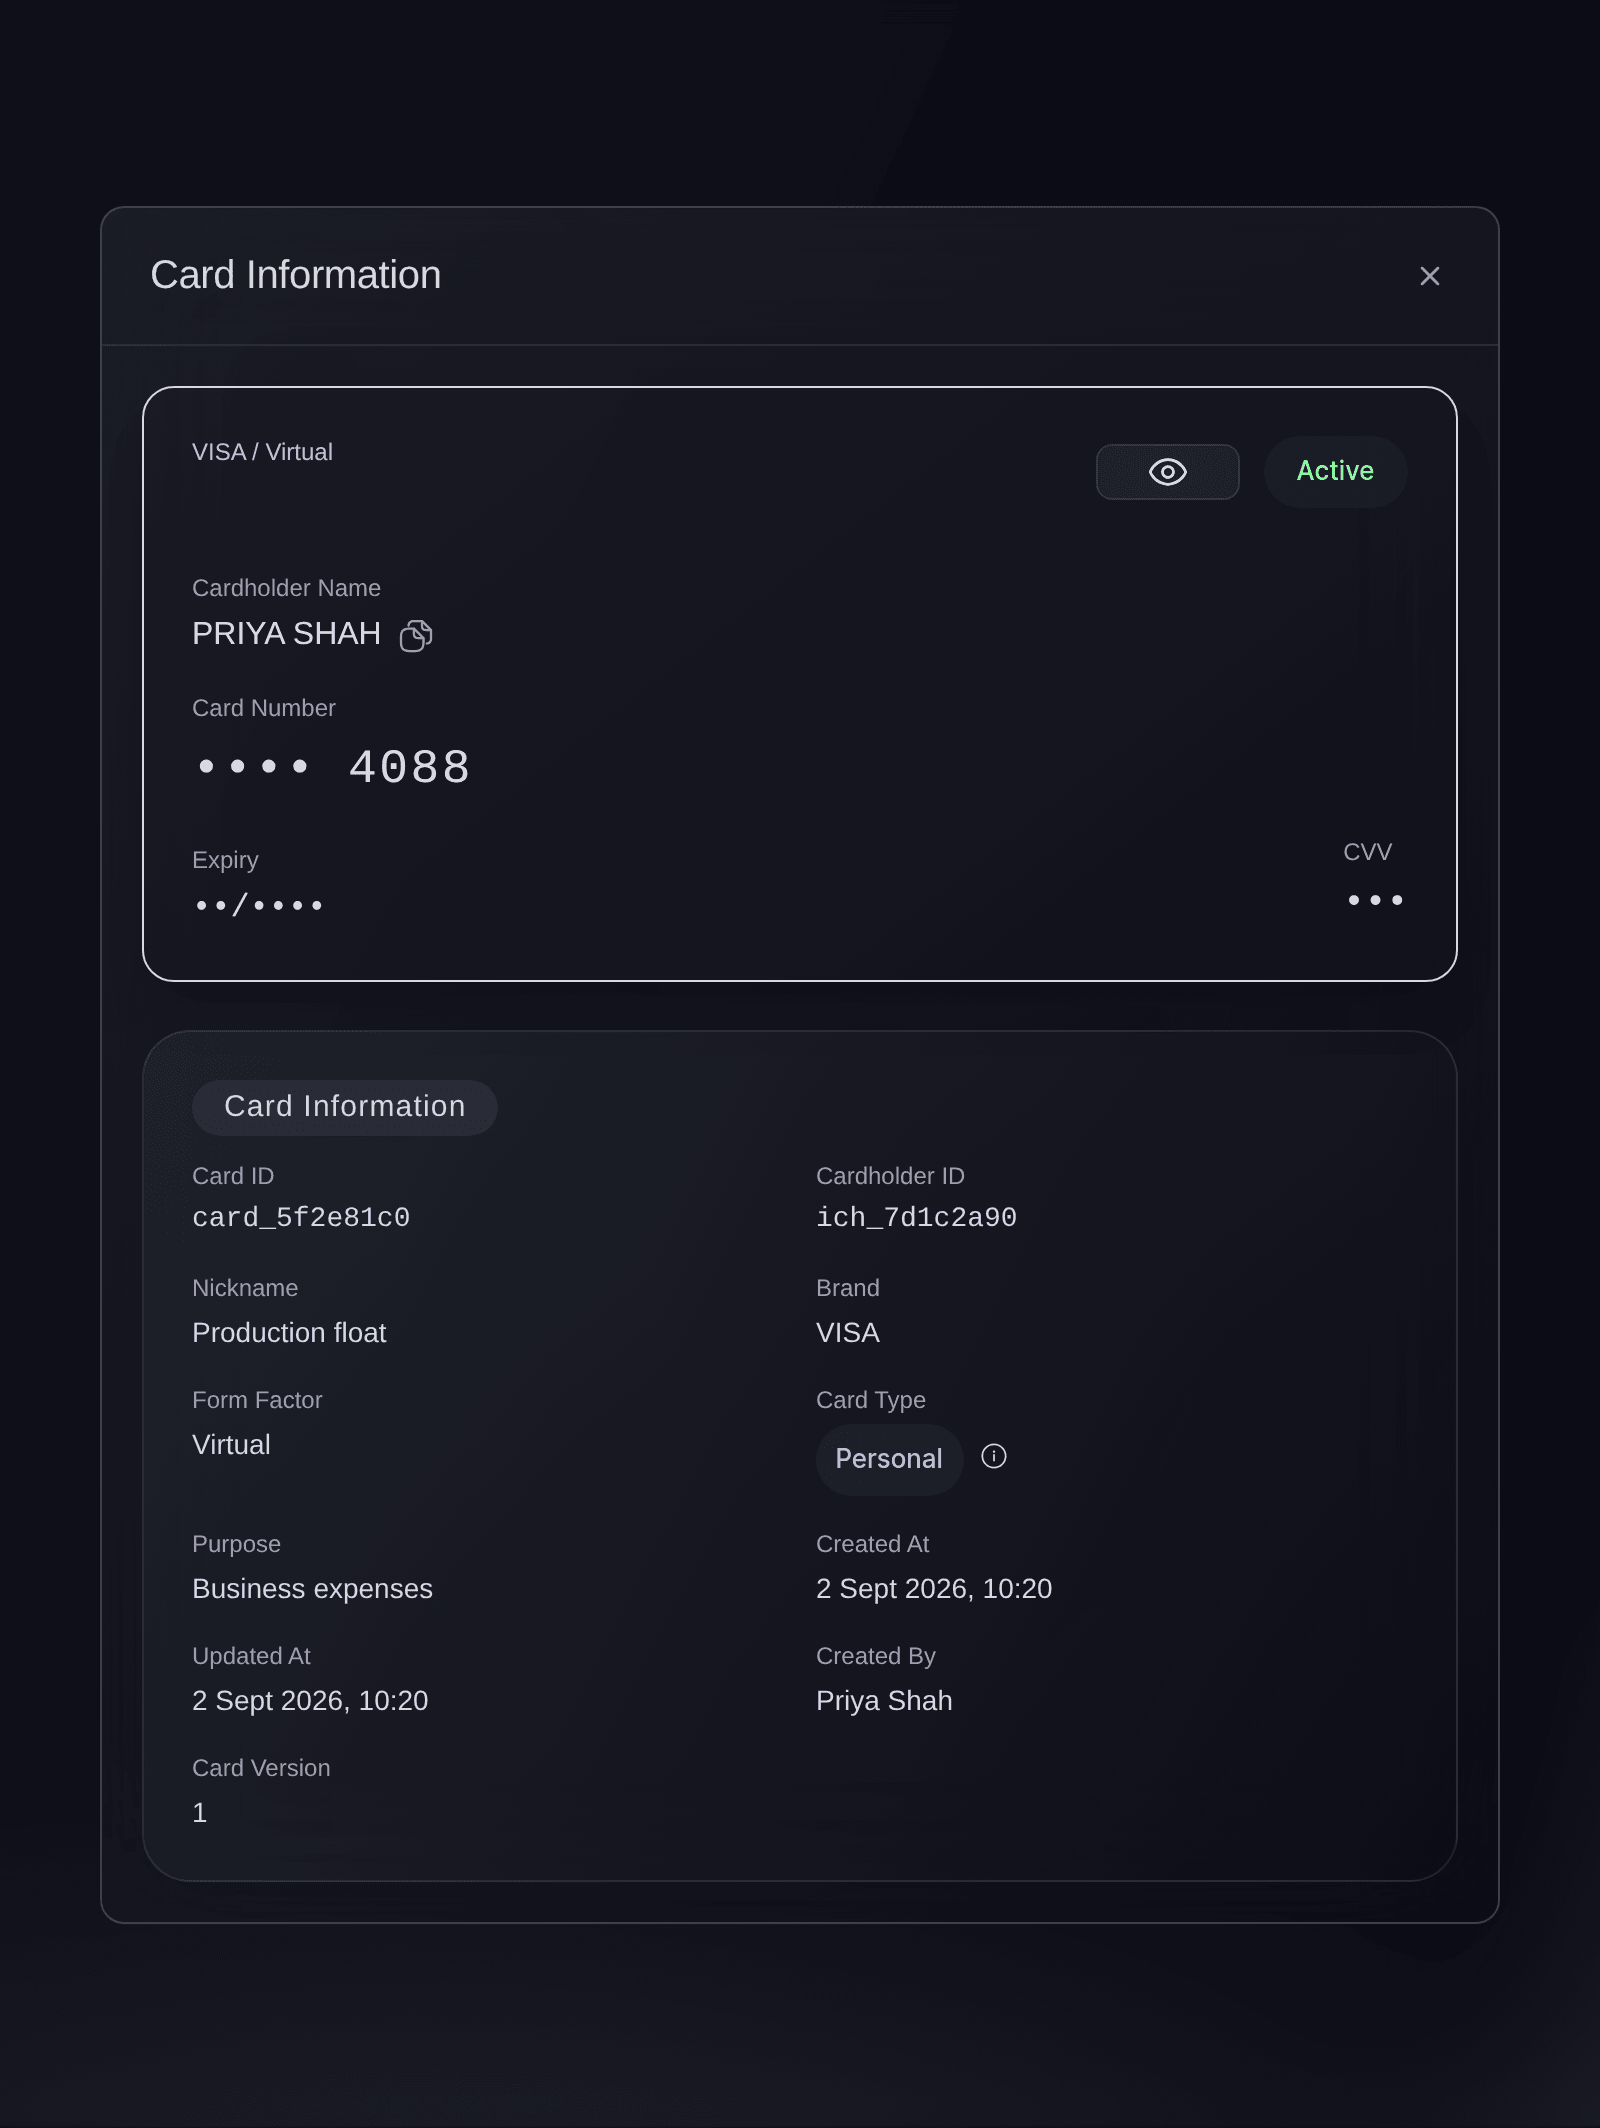
Brand, Vault, Cards, a card opened from the list.

Try these steps on your own event
Create a free account, build your event and follow the steps above in your own dashboard. It takes a few minutes and you do not need to book a sales call.
No setup fees. No required monthly ticketing fee. No credit card required.
Or have it done for you
Fai, the assistant inside your dashboard, opens the Cards page for you. Adding a cardholder and issuing a card are yours to do there, because Fai has no tool for either. The command line lists the cards you have issued, and MCP has no card tools.
In your dashboard, with Fai
Open the Vault cards page for <BRAND NAME>
From your terminal
Install the CLI from our CLI page, sign in with ticketfairy auth login, and choose the brand you are working on with ticketfairy brand use <BRAND_ID>. ticketfairy brand list and ticketfairy event list show the IDs the other commands use.
The command line reads the brand's cards: their name, brand, status and last four digits, and each card's limits. You need an owner or admin login for the brand. It cannot add a cardholder or issue a card, and it does not show a card's full number. If it says Vault needs you to confirm it is you, the command stops. Open the card in Vault in the dashboard, confirm it is you there, and read it there.
List the cards issued on the brand's Vault account, with the id of each
ticketfairy vault cards list --brand <BRAND_ID>
Show one card's spending limits, using an id from the list
ticketfairy vault cards get <CARD_ID> --brand <BRAND_ID> --limits
Let Fai do it for you
Fai works inside your Ticket Fairy dashboard. Create your account, open Fai and paste the prompt above.
No setup fees. No required monthly ticketing fee. No credit card required.
Show a card's full number
-
Open the card
In Issued Cards, select the card's nickname to open Card Information.
-
Select Show Sensitive Data
Select the eye beside the status, labelled Show Sensitive Data, and confirm it's you if Vault asks. The number, expiry and security code appear on the card in a secure view.
Note: Only owners and admins on the brand can show a card's details, and each time is recorded.
Only you can show a card's full details, on the page. Fai, MCP and the command line never show a card number.
Change a cardholder's details
-
Open Manage Cardholders
On Issued Cards, select Manage Cardholders. Cardholders lists each person with their status.
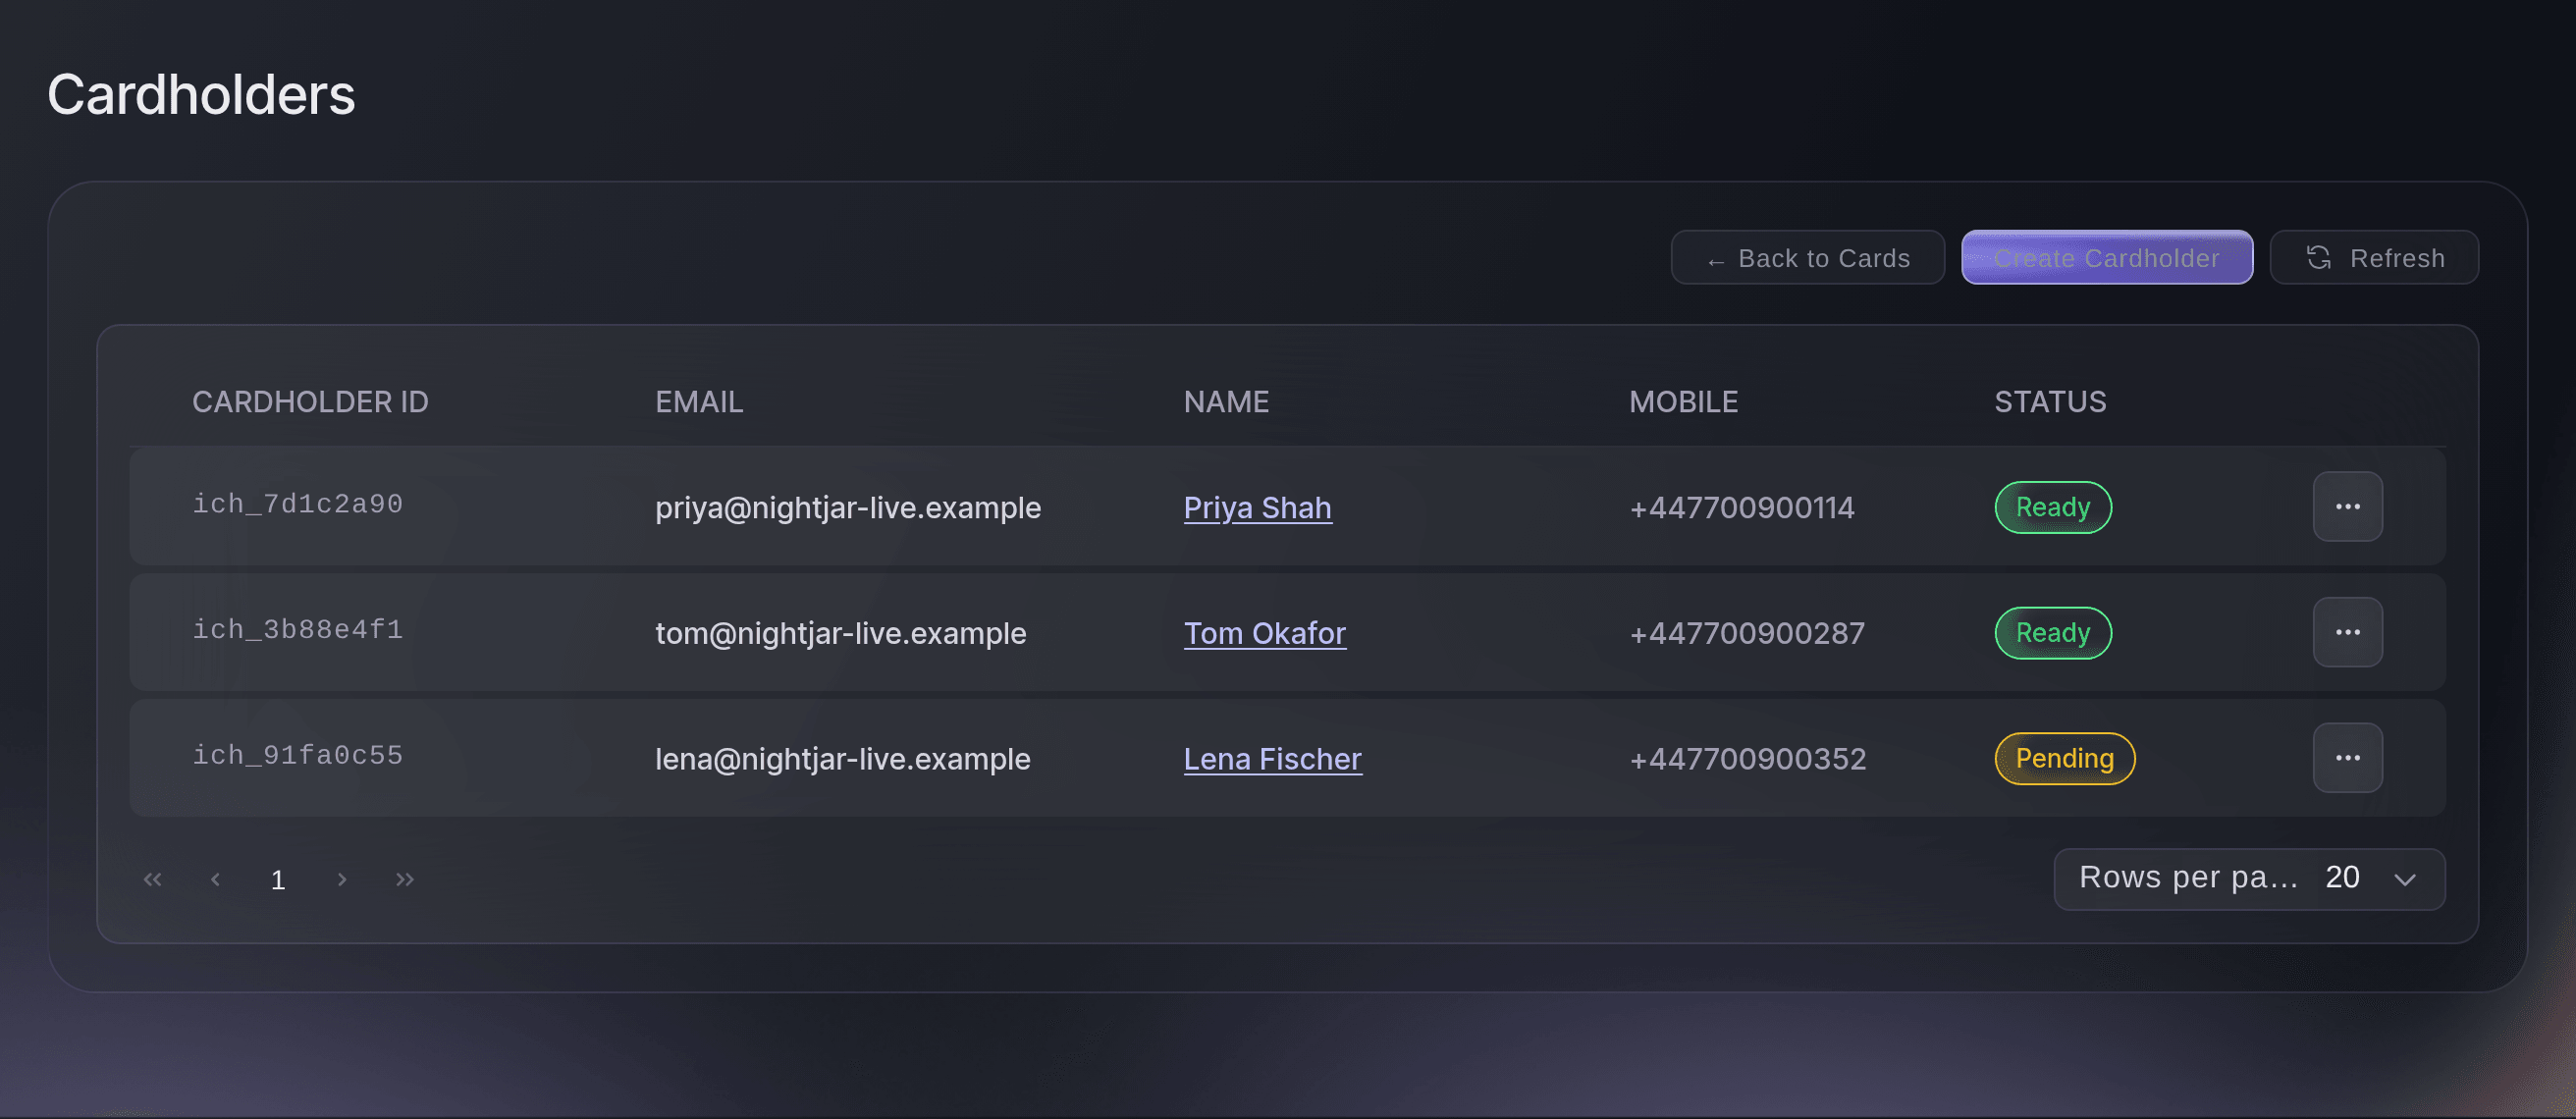
Brand, Vault, Cards, Manage Cardholders. -
Update and save
Open the menu on the person's row, select Update, change their details, then select Save Changes.
Cardholder updated successfully
confirms it.Note: The email stays as it is; the window shows it as
(cannot be changed)
.

Fai opens the Cardholders page for you. Changing a person's details is yours to do there.
In your dashboard, with Fai
Open the Vault cardholders page for <BRAND NAME>
Stop a team member's cards
-
Delete the cardholder
On Cardholders, open the menu on the person's row and select Delete, then Delete in
Delete cardholder?
.Warning: This closes every card the person holds, and a closed card can't be opened again. Issue a new card if they need one later.
Fai opens the Cardholders page for you. Deleting a cardholder is yours to do there, behind the confirmation.
In your dashboard, with Fai
Open the Vault cardholders page for <BRAND NAME>
Questions you might have
- Can I freeze a card or change its limits after I issue it?
- Cards has no control for either. To stop someone spending, delete them as a cardholder, which closes every card they hold. To give them different limits, issue a new card with the limits you want.
- Why does a cardholder say Pending?
- Vault is still checking the person's details. They show Ready once the check passes, and a cardholder who is not ready also appears as
Cardholder review needed
in the Action centre. - Which money does a Vault card spend?
- Cards spend from the brand's Vault account, and Card activity lists every payment each card makes. A payment the account can't cover is declined, and its details in Card activity say so.
- Can a promoter or door team member issue cards?
- No. Vault is open to the brand's owners and admins only, so ask one of them to issue the card.
- Why was a card payment declined?
- Open the payment in Card activity. Its details give the reason at the top, such as a card limit being reached, with what to do next.
Still have a question?
Book a demo and we will answer it on a call, on your kind of event. Or create your account and see it for yourself.
No setup fees. No required monthly ticketing fee. No credit card required.
Related guides
Do this on your own event
Create your account, build your event and follow the steps in your own dashboard. You do not need to book a sales call.